Introduction
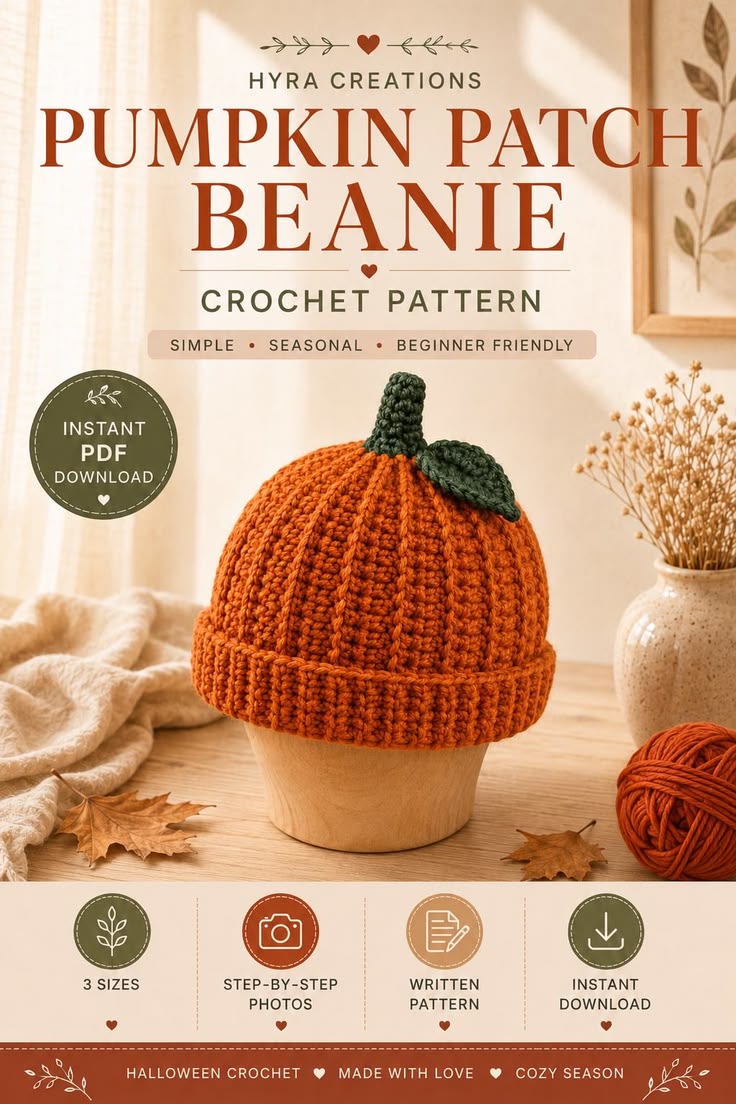
A pumpkin hat only works when its vertical ribs converge beneath the stem instead of ending as ordinary beanie stripes. This pumpkin crochet beanie pattern uses worsted-weight orange yarn, a 5.5 mm hook, green yarn, and back-loop ribbing to make an adult hat approximately 53–55 cm around. The easy-to-intermediate construction includes a folded brim, upright stem, and leaf for a practical fall hat.
The Design: What Makes This Pumpkin Beanie Different
The photographed hat is built around strong vertical ribs that imitate the channels between pumpkin lobes. Back-loop half double crochet is a practical way to create those channels because each row leaves a raised ridge running from brim to crown. The body is worked sideways as a rectangle, which also makes circumference adjustments easier than altering a top-down increase sequence. A deep folded brim adds structure at the lower edge and keeps the pumpkin body visually round rather than elongated.
The second structural feature is the crown. It is gathered tightly before the green stem is attached, forcing the orange ribs toward one central point. The leaf then sits beside the stem instead of covering it. Published crochet pumpkin hat patterns commonly use worsted yarn and 5–5.5 mm hooks. A frequent mistake is making the rectangle too wide before seaming; ribbed fabric stretches significantly around the head.
Project Info at a Glance
| Skill Level | Time | Finished Size | Hook | Best For |
|---|---|---|---|---|
| Easy–Intermediate | Approx. 3–5 hours | Adult: approx. 53–55 cm circumference | 5.5 mm body / 5 mm details | Fall wear, pumpkin-patch trips, Halloween |
Published pumpkin-beanie specifications support this scale. The Turtle Trunk uses medium #4 yarn, a 5.5 mm hook, and a gauge of 15 stitches × 8 rows per 10 cm in HDC BLO. Its pattern includes six sizes and uses approximately 69–137 m. Underground Crafter’s 2024 Pumpkin Beanie uses Aran yarn with 5 and 5.5 mm hooks; its Adult Medium size measures approximately 53.5 cm around × 20.5 cm high.
Materials and Tools
Yarn
- Pumpkin orange — worsted/Aran #4 — approximately 130–155 m (142–170 yd)
- Dark forest or olive green — worsted/Aran #4 — approximately 15–20 m
- Optional stem stuffing — several short green yarn scraps
For comparison, Oombawka Design’s published Pumpkin Beanie lists approximately 133–155 m total with medium worsted yarn and a 5.5 mm hook. Jo to the World lists approximately 160 yd of orange for an adult pumpkin hat plus about 7 yd for the stem and 7 yd for leaves.
Tools
- 5.5 mm crochet hook for the orange hat
- 5 mm crochet hook for the green stem and leaf
- Locking stitch markers
- Tapestry needle
- Scissors
- Tape measure
Abbreviations
- MR — magic ring
- ch — chain
- sc — single crochet
- hdc — half double crochet
- dc — double crochet
- inc — increase
- sl st — slip stitch
- BLO — back loop only
- st/sts — stitch/stitches
An invisible decrease is not needed in the orange body because crown shaping comes from gathering the top edge rather than decreasing individual rounds.
Gauge
Target approximately 15 HDC BLO stitches × 8 rows = 10 × 10 cm with the 5.5 mm hook.
This gauge matches a published worsted-weight Pumpkin Beanie benchmark.
Measure the swatch without stretching it.
Then pull it gently sideways to understand how much circumference the ribbed fabric can gain during wear.
If 15 stitches measure less than 10 cm, increase the hook size. If they measure more than 10 cm, reduce the hook size.
Finished Adult Measurements
Target approximately:
- Hat circumference: 53–55 cm unstretched
- Hat height with brim unfolded: 25–27 cm
- Visible height with folded brim: 20–22 cm
- Folded brim: 5–6 cm deep
- Stem: approximately 6–7 cm high
- Leaf: approximately 8–9 cm long
Pattern — Step by Step
Use US terminology. The orange hat is worked sideways in rows. Every row runs from the lower brim edge to the crown edge.
Orange Ribbed Hat Body
Yarn: pumpkin orange.
Ch 41.
The foundation should measure approximately 26–27 cm without stretching.
Row 1: Hdc in second ch from hook and in every chain across. (40)
Row 2: Ch 1, turn, hdc BLO across. (40)
Row 3: Ch 1, turn, hdc BLO across. (40)
Row 4: Ch 1, turn, hdc BLO across. (40)
Continue repeating Row 2 until the rectangle measures approximately 48–50 cm wide without stretching.
At the verified row gauge of eight rows per 10 cm, this requires approximately 39–40 rows.
Do not fasten off.
Why the Rectangle Is Smaller Than the Head
Ribbed crochet stretches across the rows.
An adult head circumference around 56–57 cm does not require a rectangle of the same width.
Targeting approximately 48–50 cm before seaming creates negative ease of roughly 10–15 percent.
This keeps the hat fitted instead of allowing the folded brim to slide downward.
Published adult pumpkin hats commonly finish around 51–56 cm in circumference depending on size and construction.
Test the Circumference Before Seaming
Wrap the rectangle around the intended wearer’s head with the ribs vertical.
The first and last rows should meet with gentle tension.
Do not stretch the fabric to its maximum capacity.
If the edges overlap by more than approximately 2 cm, remove rows.
If a gap remains while the fabric is comfortably stretched, add rows.
Seaming the Hat
Fold the rectangle so Row 1 meets the final row.
Keep right sides together.
Ch 1.
Sl st through one loop of Row 1 and the corresponding loop of the final row.
Continue across all 40 stitches.
Do not pull the slip stitches tightly.
The seam should stretch at approximately the same rate as the surrounding ribbing.
Fasten off, leaving a 90–100 cm orange tail for gathering the crown.
Closing the Crown
Thread the long orange tail onto a tapestry needle.
Identify the crown edge before gathering. The opposite edge will become the folded brim.
Run the needle in and out around the crown, catching approximately one stitch at the end of every rib.
Pull the yarn gradually.
Distribute the gathers evenly.
When the opening reaches approximately 1–1.5 cm, pull firmly to close it.
Pass the needle across the opening several times.
Knot securely on the inside.
Do not cut the tail until the crown has been inspected from the outside.
Shaping the Pumpkin Crown
Massage the orange ribs outward from the gathered center.
Each raised BLO ridge should travel toward the crown rather than twisting around it.
If one section is heavily bunched, loosen the gathering strand slightly and redistribute the fabric.
The finished crown should form a low rounded dome beneath the stem.
Folded Pumpkin Brim
Turn the lower edge upward approximately 5–6 cm.
Follow one complete horizontal line around the hat so the fold remains level.
The folded section should display the same vertical rib direction as the body.
Steam or lightly block the fold only if permitted by the yarn label.
Do not permanently stitch the complete brim in place unless a fixed cuff is preferred.
Green Stem
Yarn: dark forest or olive green.
Use the 5 mm hook.
R1: 6 sc in MR. (6)
R2: inc ×6. (12)
R3: BLO sc around. (12)
R4: sc around. (12)
R5: sc around. (12)
R6: sc around. (12)
R7: sc around. (12)
R8: sc around. (12)
R9: sc around. (12)
R10: sc around. (12)
Sl st in the next stitch.
Fasten off, leaving approximately 45 cm for attachment.
The finished stem should stand approximately 6–7 cm tall.
Firming the Stem
Insert several short green yarn scraps into the tube.
Do not pack it with a hard cylinder of stuffing.
The photographed stem is upright but retains a soft crochet structure.
Leave the lowest 1 cm unstuffed so the base can spread against the crown.
Green Pumpkin Leaf
Yarn: dark forest or olive green.
Ch 12.
Starting in the second chain from the hook:
sl st, sc, hdc, dc, dc, tr, dc, dc, hdc, sc, sc.
Work 3 sc in the final chain.
Continue along the opposite side of the foundation chain:
sc, sc, hdc, dc, dc, tr, dc, dc, hdc, sc, sl st.
Do not fasten off.
Leaf Edging
Ch 1.
Sc around the leaf.
At the point work:
sc, ch 2, sl st in first ch, sc.
Continue around the opposite side.
Sl st at the base.
Fasten off, leaving a 35–40 cm tail.
The leaf should measure approximately 8–9 cm.
Leaf Vein
Join green yarn at the base of the leaf.
Surface sl st along the central foundation chain toward the point.
Fasten off.
The raised vein stiffens the center slightly and gives the leaf more definition against the orange crown.
Optional Green Curly Vine
The reference emphasizes the stem and leaf, but a small vine can be added for a more detailed pumpkin topper.
Ch 22.
Starting in the second chain from the hook, work 2 sc in each chain.
For a tighter final curl, work 3 sc into each of the last five chains.
Fasten off, leaving a 25 cm tail.
Attaching the Stem
Center the stem directly over the gathered crown.
Pin it temporarily.
Thread the green tail onto the tapestry needle.
Pass through one stem-base stitch and then through a small section of orange crown fabric.
Continue around all 12 base stitches.
Keep the attachment circle approximately 2.5–3 cm wide.
Do not pull so tightly that the stem base disappears into the hat.
Attaching the Leaf
Place the leaf beside the stem with its point angled down the orange body.
The base should partly overlap the stem attachment.
Secure only the lowest 2–3 cm of the leaf.
Leave the outer half free.
This allows the leaf to curve naturally instead of lying completely flat against the crown.
Assembly
- Crochet the 40-stitch orange rectangle in HDC BLO until it measures approximately 48–50 cm across without stretching.
- Wrap the rectangle around the intended head and add or remove complete rows until the first and last rows meet with gentle negative ease.
- Slip-stitch the first and final rows together without tightening the seam more than the surrounding ribbed fabric.
- Use the long orange tail to gather the crown, distributing the rib ends evenly before closing the central opening.
- Turn the lower edge upward approximately 5–6 cm to create the thick pumpkin-colored folded brim.
- Crochet the 12-stitch green stem tube and fill it lightly with short yarn scraps while leaving its base flexible.
- Make the green leaf, add its raised center vein, and block it to approximately 8–9 cm if necessary.
- Center the stem over the gathered orange crown and stitch through all 12 base stitches into stable sections of the hat.
- Anchor only the lower 2–3 cm of the leaf beside the stem and add the optional spiral vine behind it.
- Weave every tail through matching stitches, reshape the orange ribs toward the crown, and confirm that the brim remains level around the complete hat.
The completed beanie should show continuous orange vertical ribs, a deep folded cuff, one upright green stem, and one dimensional green leaf.
7 Technical Tips
- The finished hat becomes too loose: stop the rectangle at approximately 48–50 cm for a 56–57 cm adult head and test its stretch before seaming. Ribbed HDC BLO fabric needs negative ease rather than a one-to-one head measurement.
- The crown develops one large pleat: gather one stitch from approximately every rib end and distribute the fabric before tightening the final 1–1.5 cm opening. Pulling the crown closed in a single motion concentrates excess fabric at one point.
- The vertical pumpkin channels disappear: insert every HDC through the back loop only after Row 1. Working through both loops for even one long section interrupts the raised rib running from brim to crown.
- The folded brim flares outward: check that the seam is not tighter at its lower 5–6 cm than through the body. A rigid seam prevents the cuff from stretching at the same rate as the ribbed rows.
- The stem falls sideways: fill the upper portion with short yarn scraps and attach all 12 base stitches over a 2.5–3 cm crown area. Securing only two or three stitches creates a hinge instead of a stable stem.
- The leaf covers the pumpkin ribs: attach only its lower 2–3 cm and angle the point diagonally. Sewing the entire 8–9 cm leaf flat hides several orange channels and removes the raised topper profile.
- The row gauge changes halfway through: measure the rectangle every 10 rows and compare it with the target eight rows per 10 cm. A difference of one row per 10 cm can change adult circumference by several centimeters over the complete panel.
Why Back-Loop Half Double Crochet Works
Half double crochet produces more height than single crochet but remains denser than double crochet.
Working into only the back loop leaves the unused front loop visible as a horizontal ridge along each row.
Once the rectangle is turned sideways and seamed into a hat, those ridges become vertical.
The result resembles the channels running from the top to the bottom of a pumpkin.
A published Pumpkin Beanie by The Turtle Trunk uses HDC BLO with a gauge of 15 stitches × 8 rows per 4 inches, supporting this stitch choice for a strongly ribbed worsted-weight hat.
Verified Yarn and Hook Benchmarks
Published pumpkin hats show a consistent material range. The Turtle Trunk uses medium #4 yarn and a 5.5 mm hook, with approximately 69–137 m depending on size. Its adult version is part of a six-size pattern.
Oombawka Design’s Pumpkin Beanie uses medium worsted #4 yarn, a 5.5 mm hook, and approximately 133–155 m total.
Underground Crafter’s 2024 Pumpkin Beanie uses Aran yarn with 5 and 5.5 mm hooks. It offers ten sizes from newborn through adult large.
Donna Browne’s 2024 Pumpkin Beanie uses DK yarn and a smaller 4 mm hook, demonstrating how yarn weight changes both gauge and required stitch counts.
Adult Sizing
Underground Crafter lists its Adult Medium pumpkin beanie at approximately 53.5 cm circumference × 20.5 cm high for a mannequin with a 57 cm head circumference.
Jo to the World lists an adult pumpkin hat at approximately 11 inches wide × 9.5 inches high when folded flat.
Those dimensions support a fitted adult circumference around 53–55 cm for a stretchy ribbed hat.
Measure the intended wearer whenever possible rather than relying only on age labels.
Adult Large Adjustment
Keep the 40-stitch row length.
Add rows until the rectangle measures approximately 52–54 cm unstretched.
Test it around the head.
The fabric should stretch comfortably without opening large gaps between the ribs.
Do not add chains unless additional hat height is also required.
Adult Small Adjustment
Keep the same 40-stitch height.
Stop the rectangle at approximately 45–47 cm unstretched.
Test the circumference before seaming.
If the wearer prefers a shallower hat, begin with ch 38 and work 37 HDC instead of 40.
Child Size
Begin with approximately ch 35.
Work 34 HDC BLO per row.
Continue until the rectangle measures approximately 43–45 cm around before seaming, adjusting for actual stretch.
Make the folded brim approximately 4.5–5 cm deep.
Reduce the stem to approximately 5 cm and the leaf to 6–7 cm.
Toddler Size
Begin with approximately ch 31.
Work 30 HDC BLO.
Continue until the rectangle measures approximately 39–41 cm wide before seaming.
Test the fit if possible.
A published pumpkin-hat benchmark lists toddler dimensions around 43 cm circumference and 16 cm height, so negative ease remains necessary.
Baby Size
For baby sizing, use measured head circumference rather than simply reducing the adult pattern by a fixed number of rows.
Underground Crafter lists finished circumferences ranging from approximately 30.5 cm for newborn to 40.5 cm for 6–12 months.
Reduce both row length and total number of rows.
Make a proportionally smaller stem so the topper does not add excessive weight to the crown.
Choosing the Orange Yarn
The photographed hat uses a warm burnt pumpkin orange rather than a bright traffic orange.
Useful shade descriptions include pumpkin, burnt orange, rust, spice, persimmon, and harvest orange.
A smooth yarn gives the BLO ridges clear edges.
Strongly fuzzy yarn softens the vertical channels and reduces the pumpkin effect.
Choosing the Green
The topper uses a dark muted green.
Useful shades include forest, dark olive, pine, moss, and evergreen.
The stem and leaf can use the same shade.
Using one green keeps attention on the orange ribbing rather than dividing the small crown area into several colors.
Acrylic Versus Wool
Worsted acrylic is practical for this design because it provides stretch, consistent gauge, and easy care.
Several published pumpkin-beanie patterns specify acrylic yarn.
Wool produces stronger thermal insulation and can create a springier rib.
A wool-acrylic blend combines elasticity with easier washing.
Whatever fiber is chosen, make the gauge swatch in the actual yarn before calculating circumference.
Making the Pumpkin Ribs Deeper
Use a smaller hook without changing the yarn if the fabric remains flexible.
Another option is to substitute back-loop single crochet for HDC BLO.
Single crochet creates narrower, more compressed ribs but requires more rows and more working time.
Do not add surface crochet over every ridge. That increases bulk and can reduce the horizontal stretch needed for a fitted beanie.
Making Wider Pumpkin Sections
Instead of treating every BLO ridge as a pumpkin channel, visually group several ribs together.
At the crown, distribute the gathers into approximately 8–10 broad sections.
Massage two or three neighboring crochet ribs into each visible pumpkin segment.
This produces a larger-lobed appearance similar to a real pumpkin without changing the underlying hat construction.
Making a Taller Stem
Continue the 12-stitch tube beyond R10.
Add two or three rounds for approximately every additional centimeter required.
For a stem taller than 8 cm, insert a flexible yarn core or additional yarn scraps.
Do not use a hard internal support in a wearable hat.
The topper should remain soft if the wearer leans against a chair or car headrest.
Making a Curved Stem
Work the stem normally through R6.
For the next three rounds, replace one sc on the same side with a slip stitch.
The shorter stitches pull that side inward.
Rotate the stem slightly while stuffing it with yarn scraps.
A gentle curve is enough; a sharply bent stem can pull unevenly on the crown attachment.
Making a Larger Leaf
Increase the foundation from ch 12 to ch 15.
Extend the center with additional dc and tr stitches.
Target approximately 10–11 cm finished length.
Attach only the base.
A large leaf sewn flat can hide too much of the pumpkin ribbing.
Adding a Second Leaf
Make a second leaf approximately 20 percent smaller.
Position it on the opposite side of the stem.
Angle one leaf toward the front and the other toward the back.
Do not stack both leaves directly over the gathered crown because the combined layers can make the stem attachment bulky.
Adding a Curly Vine
Use the same green yarn as the stem.
Chain between 20 and 30.
Work two single crochets into every chain.
The extra stitch width forces the chain into a spiral.
Attach only the upper end beside the stem.
Keep the finished vine short enough that it does not hang near the wearer’s eyes.
Fixing a Visible Side Seam
Use slip stitches through corresponding loops rather than a bulky whipstitch seam.
Match every row exactly.
If one side contains more rows than the other, the seam will spiral.
After joining, turn the hat right side out and massage the seam between two raised ribs.
The vertical texture should make the connection difficult to identify.
Fixing a Crown Hole
If a small opening remains after gathering, do not keep pulling the same strand until it breaks.
Pass the tapestry needle across the opening from several directions.
Catch opposing rib ends.
Pull each pass gradually.
The stem base will cover a remaining opening of approximately 5–8 mm.
Fixing a Brim That Will Not Stay Folded
Fold the cuff to the required 5–6 cm depth.
Place four stitch markers evenly around the hat.
Wear or block the hat with the fold held in place.
If additional control is required, add four small hidden tacking stitches at the marker positions rather than sewing around the complete circumference.
This preserves most of the ribbed stretch.
Making the Hat Without a Folded Brim
Reduce the starting chain so the rectangle is approximately 20–21 cm high.
Work the same HDC BLO rows and circumference.
Finish the lower edge with one round of sc after seaming.
The resulting hat has a lighter silhouette and uses less orange yarn, but it will not reproduce the substantial cuff visible in the reference.
Yarn Tail Management
Leave the side-seam tail long enough to gather the crown.
This avoids introducing a second orange knot near the top.
For the stem and leaf, weave tails through stitches of the same color whenever possible.
Run each tail through approximately 5–7 cm of fabric and change direction once before trimming.
Care and Storage
Follow the yarn manufacturer’s washing instructions.
Reshape the stem and leaf while damp.
Dry the beanie with the crown supported rather than flattening the green topper beneath other garments.
Restore the 5–6 cm brim fold after drying.
For seasonal storage, place the hat loosely in a container instead of compressing the stem for several months.
Conclusion
The defining measurement in this pumpkin hat is the ribbed rectangle width, not the nominal adult head circumference. Build the orange panel to roughly 48–50 cm, test its horizontal stretch, and seam only after the fit has been checked. A carefully distributed crown gather then directs the ribs toward the green stem while the deep folded cuff maintains the rounded pumpkin proportions. Start with a gauge swatch using worsted yarn and the 5.5 mm hook before committing to the full panel. Save this pumpkin crochet beanie pattern to Pinterest or share the finished hat on Instagram with #PumpkinPatchBeanie. Would you keep one dark-green leaf beside the stem or add a second smaller leaf and curling vine?









