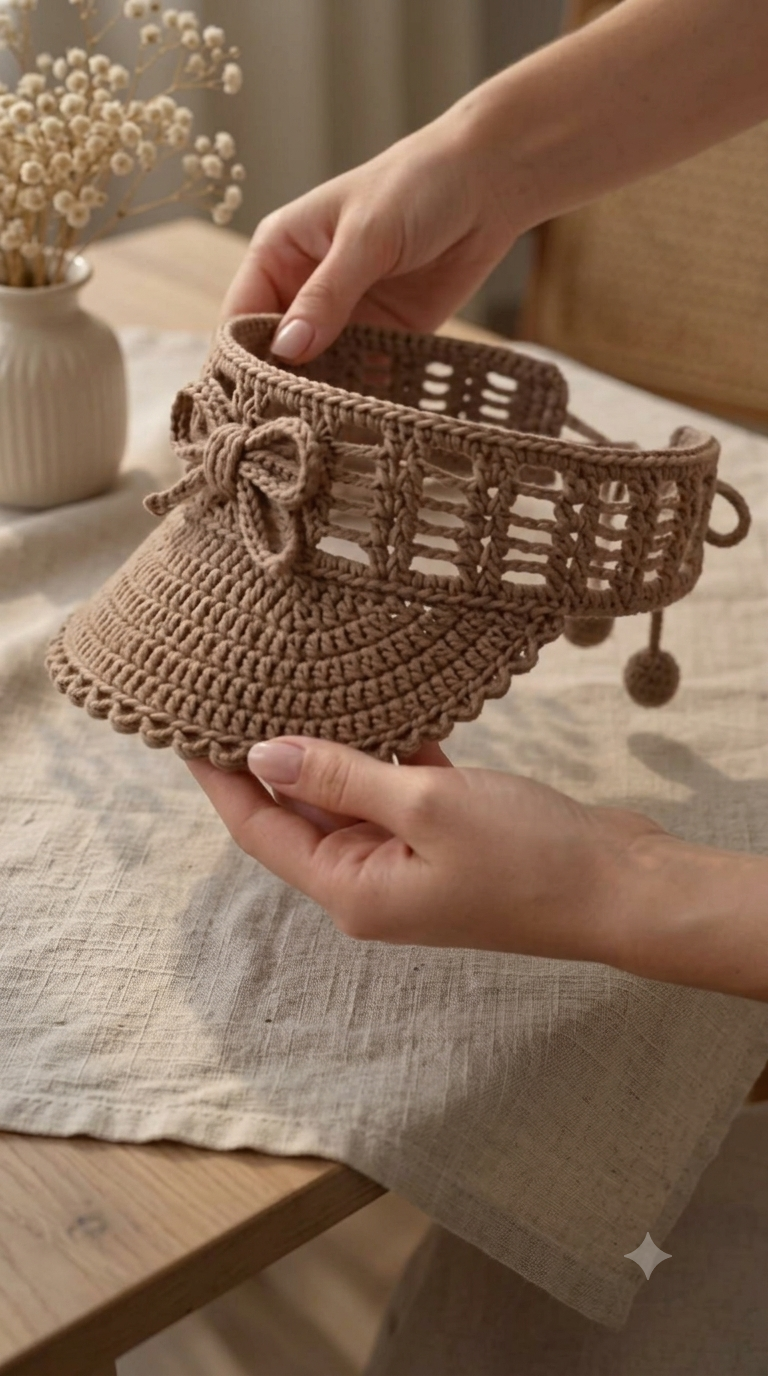
A visor with rectangular ladder openings cannot rely on its crown for stability, because there is no crown. This crochet sun visor pattern solves that problem with dense upper and lower rails around an openwork band. Use #4 cotton yarn, a 3.75 mm hook and an adult 50.5 cm reference circumference. The intermediate-level construction produces a practical open-top visor that accommodates a ponytail without compressing it.
The Design: What Makes This Crochet Visor Different
Three structural decisions define this version. First, the forehead and brim use dense stitches because the front must resist folding when the visor is worn. Second, the open top crochet hat band replaces solid fabric with vertical posts and horizontal chains, reducing bulk while preserving a stable upper rail.
The brim also widens toward its center rather than maintaining one rectangular depth. That shaping matters: a flat strip projects poorly and tends to distort at the temples.
The bow is decorative, but its attachment point is structural. Sewing it across the side transition helps conceal the point where the dense front panel meets the open lattice. A common error in a crochet visor with bow is making the brim too loose. Once that happens, edging alone will not restore a clean curve.
Project Info at a Glance
| Skill Level | Time | Finished Size | Hook | Best For |
|---|---|---|---|---|
| Intermediate | 4–6 hours estimated | 50.5 cm reference circumference | 3.75 mm | Adult open-top summer visor |
The circumference reference and hook are based on a published cotton crochet visor specification. Working time is an editorial estimate for this original construction.
Materials and Tools
Yarn
- Taupe / mocha — Aran or #4 cotton — approximately 70–100 g — matte mercerized or firm cotton suggested
The yarn quantity is a practical prototype allowance. Exact consumption changes with gauge, brim depth, yarn composition and the amount used for the bow and ties.
Choose cotton with enough twist to keep the lattice posts defined. Avoid extremely soft, draping yarn for the first sample because the brim and upper rail require structure.
Tools
- 3.75 mm crochet hook
- Tapestry needle
- Locking stitch markers
- Scissors
- Flexible tape measure
- Pins
- Two small handmade yarn pom-poms
- Optional flexible brim insert
Abbreviations
- ch — chain
- sc — single crochet
- hdc — half double crochet
- dc — double crochet
- sl st — slip stitch
- sp — space
- st/sts — stitch/stitches
- RS — right side
- WS — wrong side
- BLO — back loop only
- inc — two stitches in one stitch
- dec — decrease
An invisible decrease is worked through the front loops of the next two stitches before completing one single crochet. It is mainly relevant when shaping dense three-dimensional crochet and is not required through the lattice.
Pattern — Step by Step
Construction note: This visor is worked primarily in rows rather than amigurumi-style continuous rounds. The band remains open at the back so the ties can provide adjustment.
Lower Forehead Band
Yarn: taupe. Original photo-derived construction.
Ch 87.
Row 1: Starting in second ch from hook, sc 86. (86)
Row 2: Ch 1, turn, sc across. (86)
Row 3: Ch 1, turn, sc across. (86)
Measure the strip without stretching it. At a reference gauge of approximately 17 sc per 10 cm, 86 stitches produce roughly 50.6 cm before adjustments for individual tension.
Do not join the rear edges. The design uses an open-back construction.
Openwork Lattice Band
Yarn: taupe. The rectangular openings reproduce the main structural feature visible in the reference design.
Row 4: Ch 4, turn. Dc in first st, *ch 4, skip 4 sts, dc in next 2 sts* across. Adjust the final repeat where necessary so both ends remain solid.
Row 5: Ch 1, turn. Sc in each dc and work 4 sc around every ch-4 space.
Row 6: Ch 4, turn. Establish another openwork row directly above the first, placing the vertical dc posts above the previous posts and ch-4 across each opening.
Row 7: Ch 1, turn. Sc across, working 4 sc into each ch-4 space.
Row 8: Repeat Row 6.
Row 9: Repeat Row 7.
The finished lattice section should measure approximately 5–6 cm high. Stop adding openwork rows once the required depth is reached.
Upper Stabilizing Rail
Yarn: taupe.
Row 10: Ch 1, turn, sc evenly across. Maintain 86 sts if gauge permits. (86)
Row 11: Ch 1, turn, BLO sc across. (86)
Row 12: Ch 1, turn, sc across. (86)
Fasten off. Leave approximately 20 cm of yarn for finishing.
The three-row upper rail limits lateral stretching and helps the rectangular openings retain their shape while the visor is worn.
Curved Brim
Yarn: taupe.
Mark the center 52 stitches of the lower band. Work the brim into this front section only.
Row 1: Join yarn at first marker. Sc across marked section. (52)
Row 2: Ch 1, turn. Skip first st, sc 50, leave final st unworked. (50)
Row 3: Ch 1, turn. Skip first st, sc 48, leave final st unworked. (48)
Row 4: Ch 1, turn. Sc across. (48)
Row 5: Ch 1, turn. Sc across. (48)
Row 6: Ch 1, turn. Skip first st, sc 46, leave final st unworked. (46)
Row 7: Ch 1, turn. Sc across. (46)
Row 8: Ch 1, turn. Skip first st, sc 44, leave final st unworked. (44)
Row 9: Ch 1, turn. Sc across. (44)
Do not cut the yarn.
The progressively shortened rows reduce bulk at the outer corners and produce the tapered profile needed for a curved visor.
Brim Reinforcement
Yarn: taupe.
Ch 1. Work sc evenly down the first side edge, across the outer brim and up the opposite side.
For a firmer front edge, work one additional row of sc along the outer curve only.
An optional flexible brim insert can be enclosed within a second crocheted layer when substantially greater stiffness is required.
Fasten off. Leave approximately 15 cm of yarn for weaving.
Scalloped Brim Edge
Yarn: taupe.
Join yarn at one side of the brim.
Edging: *Sl st in next st, ch 3, hdc in same st, skip 1 st*; repeat across the exposed outer curve.
Keep each scallop compact. Large shell stitches add unnecessary weight and change the proportions of the brim.
Fasten off.
Side Bow
Yarn: taupe.
Ch 25.
Row 1: Sc in second ch from hook and across. (24)
Rows 2–8: Ch 1, turn, sc across. (24)
Fasten off, leaving approximately 25 cm of yarn.
Fold the rectangle so its short ends meet at the center back. Sew the ends together, then pinch the middle vertically.
For the center wrap, ch 9.
Row 1: Sc in second ch from hook and across. (8)
Rows 2–3: Ch 1, turn, sc across. (8)
Wrap this strip firmly around the pinched center of the bow and stitch the ends together at the back.
For each narrow bow tail, ch 18 and work sl st back along the chain. Make two. Sew both beneath the center of the bow.
The completed bow should remain relatively flat so its weight does not distort the side of the visor.
Back Ties — Make 2
Yarn: taupe.
Join yarn at one rear corner.
Ch 35.
Starting in second chain from hook, sl st back along the chain. (34)
Sl st into the band attachment point and fasten off securely.
Repeat at the opposite rear corner.
For longer ties intended to form a larger rear bow, increase each starting chain to approximately 45–50 stitches.
Pom-Poms — Make 2
Yarn: taupe.
Wrap the yarn approximately 35–45 times around two fingers or use a 3 cm pom-pom maker.
Tie the center firmly. Cut the loops and trim each pom-pom to approximately 2.5–3 cm in diameter.
Stitch one pom-pom securely to the end of each back tie.
Keep the pom-poms smaller than the depth of the openwork band so they remain proportional to the visor.
Optional Back Loops — Make 2
Yarn: taupe.
Join yarn at one lower rear corner.
Row 1: Ch 12, sl st into the upper rear corner.
Row 2: Ch 1, work 14–16 sc evenly around the chain loop, then sl st into the starting point.
Fasten off.
Repeat on the opposite side.
Assembly
- Lay the completed visor flat and mark the exact midpoint of the forehead band.
- Center the brim under that midpoint before attaching decorative components.
- Pin the brim across the lower rail and confirm that equal lengths of band remain exposed on both sides.
- Stitch the brim attachment firmly with matching yarn if the brim was constructed separately.
- Position the side bow approximately 2–3 cm behind the beginning of the brim rather than directly over the temple.
- Sew through the bow’s center wrap, leaving the outer loops free enough to maintain their shape.
- Attach both back ties at matching heights and compare their finished lengths before weaving in the tails.
- Stitch one 2.5–3 cm pom-pom securely to each tie end.
- Weave yarn tails horizontally through at least 4 cm of dense crochet rather than through the open chain spaces.
- Block the lattice band to the required circumference while maintaining the brim’s curved profile over a rounded form.
The completed visor should have a dense shaped brim supported by an openwork band, side bow and adjustable rear closure.
7 Technical Tips for a Better Crochet Sun Visor
- Mark the center stitch before shaping the brim. An error of even three stitches can make one side project farther than the other, which becomes visible once the visor is worn.
- Measure the lower band without stretching it. If a 50.5 cm target band measures several centimeters longer at rest, the openwork section can add enough movement for the visor to slide downward.
- Keep every lattice chain consistent. A ch-4 opening that repeatedly becomes ch-5 creates vertical columns that lean rather than forming a regular rectangular grid.
- Control cotton tension across the brim. If the finished brim collapses when held horizontally, reduce the hook by approximately 0.25–0.5 mm for the dense brim section.
- Pin the bow before sewing. Position its center approximately 2–3 cm behind the brim junction; attaching the full bow directly to the brim adds weight where maximum stiffness is required.
- Make both ties from counted chains. A difference greater than two chains can become obvious once the two pom-poms hang freely at the back.
- Weave tails through the dense rails. Run each tail through at least 4 cm of solid single crochet and reverse direction once rather than hiding ends inside the open lattice.
Adjusting the Visor Size
The 86-stitch lower band is based on an adult reference circumference close to 50.5 cm at approximately 17 single crochet stitches per 10 cm. Your own gauge controls the final measurement, so make a gauge sample before changing the starting chain.
For a different head size, multiply the required finished circumference in centimeters by your number of stitches per centimeter. For example, a gauge of 1.7 stitches per centimeter multiplied by a 54 cm target gives approximately 92 stitches.
Do not enlarge the brim automatically by the same percentage. The band must fit the head, while brim width controls shade and visual proportion. Center the brim independently after establishing the new band stitch count.
Choosing Yarn for a Structured Visor
Cotton is particularly suitable for this construction because the pattern depends on stitch definition through the rectangular lattice and firmness across the brim. A smooth #4 cotton also makes it easier to identify the vertical posts when working subsequent openwork rows.
Very elastic yarn changes the behavior of the band. If substituted, test the completed lower rail around the intended head circumference before adding the lattice section.
For the brim, a smaller hook can be used without changing the hook for the rest of the visor. Moving from 3.75 mm to 3.5 mm, for example, can produce a denser fabric while allowing the openwork band to retain its intended dimensions.
Finishing the Openwork Band
Blocking should concentrate on the band rather than flattening the entire project. Pin the upper and lower rails parallel to each other, then align the vertical lattice posts so the openings remain rectangular.
Do not stretch the band beyond the target circumference during this process. Excessive blocking can permanently increase a cotton visor’s circumference and reduce the effectiveness of the adjustable back closure.
The brim should retain a shallow downward curve. Shape it over a rounded object rather than pressing it completely flat. Allow the visor to dry in that position before removing the pins or form.
Conclusion
Before making a second visor, measure the first sample across the unstretched lower band and record the actual gauge beside the hook size. That figure is more useful than copying a nominal adult stitch count because cotton, raffia and synthetic yarns produce different band behavior. For the next version, adjust the starting count to the wearer’s measured circumference while preserving the centered brim and symmetrical lattice columns. Save this crochet sun visor pattern to Pinterest with a clear side-profile photo, or share the finished version on Instagram using #OpenworkBowVisor. Would you keep the rectangular lattice shown here, or make the side band with smaller openings?









