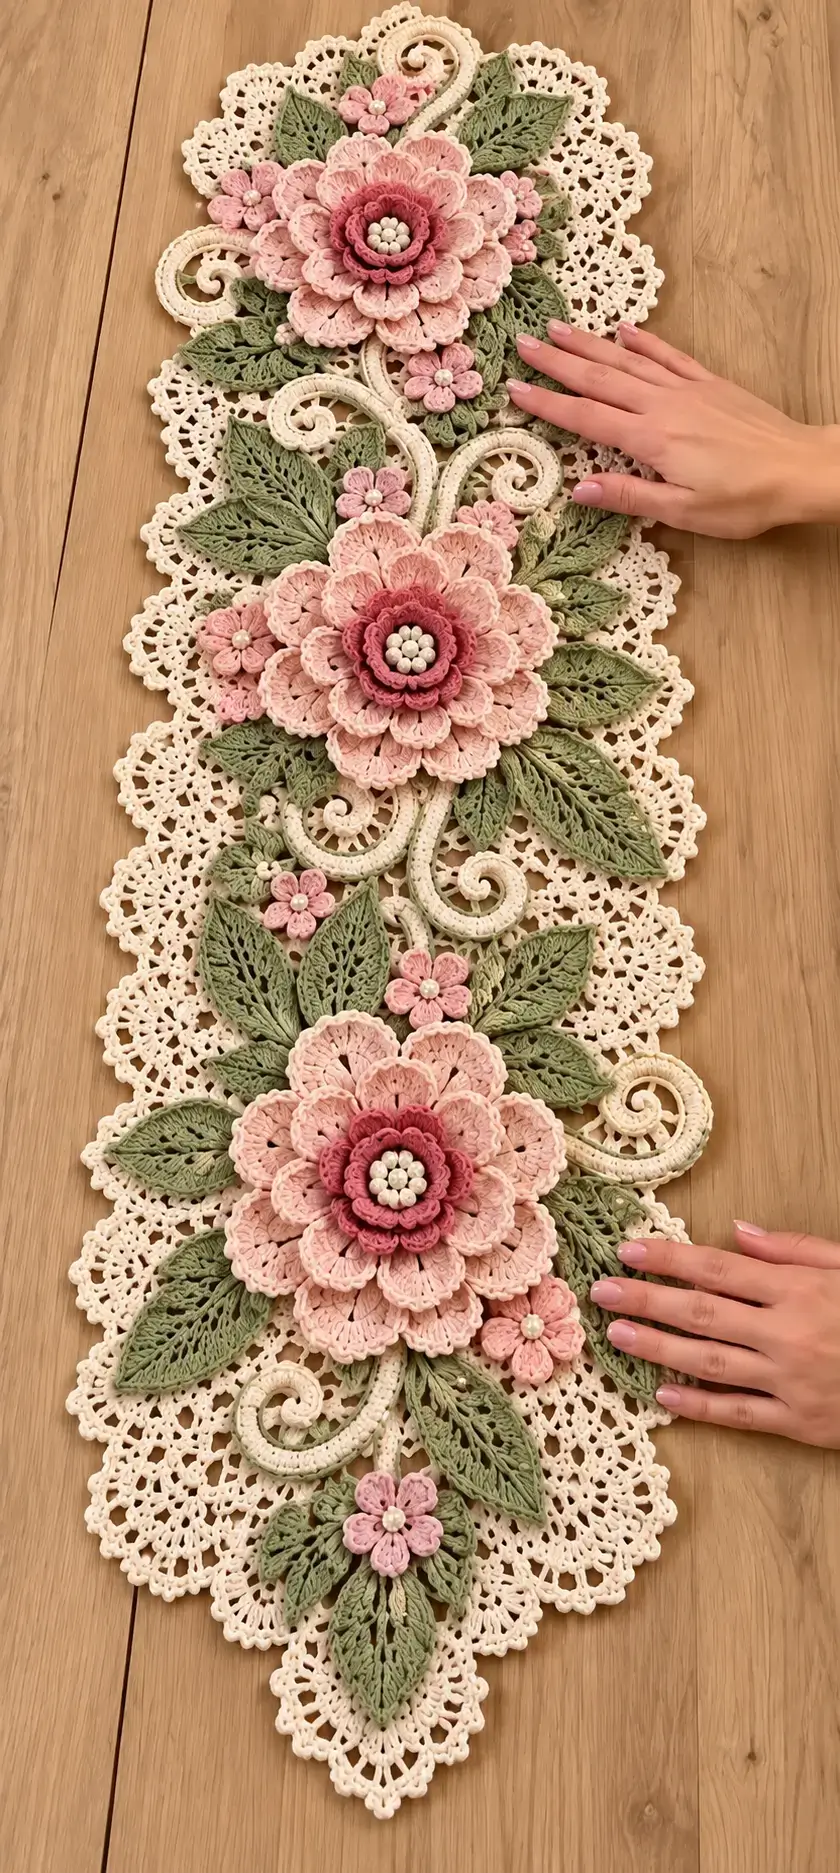
Three oversized pink flowers have to carry this runner without flattening the lace underneath them. This crochet flower table runner pattern uses DK cotton, layered floral motifs, pointed leaves, scrollwork stems, and a cream openwork foundation. Plan for an intermediate project approximately 46 × 114 cm when using the published comparable size. Modular construction also lets you repair or replace one motif without remaking the runner.
The Design: What Makes This Floral Runner Different
The design depends on three structural levels. First, a flat cream lace foundation carries the weight and prevents the finished piece from behaving like a loose garland. Second, sage crochet leaf motifs bridge the gaps between the three dominant flowers, giving the composition width without adding another heavy focal point. Third, padded cream scrolls sit above the foundation and create movement between otherwise static circular motifs.
The large blossoms use several petal tiers rather than one oversized round. That decision keeps the 3D crochet flower table runner dimensional while allowing each tier to be shaped independently.
A frequent error with layered flowers is stitching every tier tightly to the foundation. The petals then lose their relief. Attach the flower through its center and selected rear points instead; the outer petals should remain free enough to overlap neighboring leaves.
Project Info at a Glance
| Skill Level | Time | Finished Size | Hook | Best For |
|---|---|---|---|---|
| Intermediate | 18–25 hours estimated | 46 × 114 cm comparable published size | 3.5–4.0 mm | Dining or console table centerpiece |
The 46 × 114 cm measurement comes from a published flower-runner example rather than the photographed object itself. Current commercial floral-runner guidance also supports DK or light-worsted cotton with hooks around 3.5–4.5 mm.
Materials and Tools
Yarn
For the closest visual interpretation, use smooth cotton or cotton-blend yarn with clear stitch definition. DK or light-worsted cotton works well because the finished flowers and leaves can be blocked into defined shapes.
- Cream or ivory — DK/light-worsted cotton — approximately 180–250 g estimated
- Blush pink — DK/light-worsted cotton — approximately 100–140 g estimated
- Dusty rose — DK/light-worsted cotton — approximately 40–60 g estimated
- Sage or olive green — DK/light-worsted cotton — approximately 140–180 g estimated
- White or cream — DK cotton — approximately 10–20 g estimated for flower centers
These quantities are working estimates for the photo-inspired construction rather than measurements taken from the photographed runner.
Tools
- 3.5 mm crochet hook
- Tapestry needle
- Sharp scissors
- Stitch markers
- Rustproof blocking pins
- Blocking mat
- Sewing thread for bead attachment if required
- 8–10 mm pearl-style beads or crochet bobbles for decorative centers
Abbreviations
- MR = magic ring
- sc = single crochet
- hdc = half double crochet
- dc = double crochet
- tr = treble crochet
- inc = increase
- dec = decrease
- sl st = slip stitch
- ch = chain
- BLO = back loop only
- sp = space
- st/sts = stitch/stitches
Invisible decrease is mainly an amigurumi technique and is not required for the flat floral motifs in this project.
Pattern — Step by Step
Construction note: This pattern is an original photo-inspired interpretation rather than a transcription of a commercial pattern. A photograph cannot reveal hidden stitches, exact gauge, yarn composition, or attachment points, so make a test motif before beginning the complete runner.
Large Layered Flower — Lower Petal Tier (Make 3)
Yarn: blush pink
R1: MR, ch 3, work 11 dc into ring, sl st to top of ch-3 (12).
R2: Ch 1, 2 sc in each st around, sl st (24).
R3: *Ch 5, skip 2 sts, sl st in next st* ×8 (8 loops).
R4: Into each ch-5 loop work *(sc, hdc, 4 dc, hdc, sc)* (8 petals).
R5: Working behind the petals, sl st around the R3 anchoring stitch, *ch 7, sl st around next anchor* ×8 (8 loops).
R6: Into each ch-7 loop work *(sc, hdc, 2 dc, 3 tr, 2 dc, hdc, sc)* (8 large petals).
Fasten off. Leave a 25 cm tail for assembly.
Large Flower — Middle Petal Tier (Make 3)
Yarn: blush pink
R1: MR, 10 sc, sl st (10).
R2: Ch 4, sl st in next st around (10 loops).
R3: In each loop work *(sc, hdc, 3 dc, hdc, sc)* (10 petals).
R4: Work behind the first tier: *ch 5, sl st around next R2 anchor* ×10.
R5: In each loop work *(sc, hdc, 4 dc, hdc, sc)* (10 petals).
Fasten off with a 20 cm tail. Place centrally over the lower tier without stitching down the outer petal edges.
Raised Rose Center (Make 3)
Yarn: dusty rose
Ch 42.
Row 1: Starting in second ch from hook, sc across (41).
Row 2: Ch 3, skip 1 st, sl st in next st across to create approximately 20 arches.
Row 3: Into each arch work *(sc, 3 dc, sc)*.
Fasten off, leaving a 30 cm tail. Coil the strip into a shallow spiral, with the first petals forming the center. Stitch through the base of the coil every 1–1.5 cm.
Cream Bobble Centers (Make 27)
Yarn: cream
Make approximately nine small bobbles for each large flower.
R1: 6 sc in MR (6).
R2: BLO sc around (6).
R3: Dec ×3 (3).
Fasten off. Pull the tail through the remaining stitches and close the small bobble. Sew nine pieces into each dusty-rose center in a compact cluster.
Small Five-Petal Flowers (Make 10–12)
Yarn: blush pink
R1: MR, 10 sc, sl st (10).
R2: *Sl st in next st, (hdc, 3 dc, hdc) in next st* ×5.
Fasten off and leave approximately 15 cm for attachment.
Add one cream bobble or pearl-style center to each small blossom. The photographed runner contains small flowers in slightly different positions, so the number can be adjusted to suit the final length.
Pointed Lace Leaves (Make 20–24)
Yarn: sage green
Ch 18.
Row 1: Sc in second ch, hdc, dc in next 3, tr in next 6, dc in next 3, hdc, 3 sc in final ch. Rotate the work and crochet down the opposite side of the starting chain. Mirror the sequence with hdc, dc in next 3, tr in next 6, dc in next 3, hdc, sc.
Row 2: Ch 1. Work sc around the leaf edge, placing *(sc, ch 2, sc)* in the tip.
Row 3: Sl st along the center chain to strengthen the central vein.
Fasten off with a 20 cm sewing tail.
For a more open lace appearance, replace selected groups of tall stitches with dc, ch 1, skip 1 spaces. With DK yarn, each blocked leaf should measure approximately 9–12 cm long.
Cream Scroll Vines (Make 8–10)
Yarn: cream
Ch 45 for a medium scroll or ch 60 for a longer scroll.
Row 1: Starting in second ch from hook, sc across.
Row 2: Ch 1, turn, sc BLO across.
Row 3: Ch 1, turn, sc across.
Fasten off with a long sewing tail. Curl one end inward into a spiral and pin the entire shape before sewing. Secure the innermost section first and then stitch along the outer curve at approximately 2 cm intervals.
The photographed stems have a raised, corded appearance. A narrow three-row strip creates a similar profile without adding a wire core.
Openwork Foundation Strip
Yarn: cream
Ch 61.
Row 1: Dc in fourth ch from hook and across (59 dc including turning chain).
Row 2: Ch 5, turn, skip 2 sts, sc in next, *ch 5, skip 2, sc in next* across.
Row 3: Ch 5, sc in first ch-5 sp, *ch 5, sc in next ch-5 sp* across.
Repeat Row 3 until the foundation measures approximately 105 cm before the border is added.
The central foundation should remain narrower than the finished table runner because the leaves, flowers, scrolls, and scalloped edging add substantial width.
Scalloped Lace Border
Yarn: cream
Round 1: Work sc evenly around the entire foundation, placing 3 sc at each corner.
Round 2: *Ch 5, skip approximately 2 cm of edge, sc in next point* around.
Round 3: Into each ch-5 loop work *(sc, hdc, 5 dc, hdc, sc)*.
Round 4: Sl st to center dc of first shell, *ch 5, sc in center dc of next shell* around.
Round 5: Into each ch-5 space work *(3 sc, picot, 3 sc)*.
Fasten off and weave in the end.
Block the complete foundation before attaching any flowers. The photographed border contains finer openwork than this simplified construction, but the shell-and-picot border produces the same broad scalloped outline.
Assembly
- Block the cream foundation to the selected dimensions and allow it to dry completely before placing the dimensional motifs.
- Position the three large lower flower tiers along the centerline, leaving approximately 22–30 cm between flower centers depending on the finished length.
- Sew each middle flower tier to its lower tier through the central 3–4 cm only. Leave the outer petals free.
- Add the dusty-rose spiral centers and attach the cream bobble clusters through the center of each flower.
- Arrange the pointed leaves in asymmetrical pairs around each large bloom, directing most leaf tips toward the outside border.
- Position the small five-petal flowers in gaps between the three major blossoms, particularly beside groups of leaves.
- Curve the cream vines through the remaining open spaces and pin each entire spiral before sewing any section permanently.
- Stitch the vines to the foundation at approximately 2 cm intervals, hiding attachment stitches under nearby leaves when possible.
- Add any remaining small blossoms and pearl-style details after all structural motifs have been attached.
- Block the outer lace again without compressing the raised petals, then weave each remaining yarn tail through 4–5 cm of matching stitches.
The finished runner should lie flat around its outer lace border while the flower centers, petals, leaves, and scrollwork remain raised.
7 Technical Tips
- A wandering centerline makes the three flowers look misaligned. Run a contrasting waste-yarn marker down the longitudinal center of the foundation before pinning the first flower, then remove it after assembly.
- An oversized flower center forces the petals upward into a cup. Keep the rose coil approximately 1.5–2 cm deep before attaching the cream center pieces.
- Loose leaf tips curl after blocking. Pin each leaf at its base, midpoint, and tip while keeping the center vein straight until the yarn is completely dry.
- Incorrect center placement makes the bobble cluster appear uneven. Mark a circle approximately 2.5–3 cm across on the finished dusty-rose coil before sewing the cream pieces in place.
- Changing tension produces visibly different leaf sizes. Measure the first blocked leaf and keep later motifs within approximately 5 mm of that finished length.
- Unpinned scrolls become irregular during attachment. Shape each complete cream vine on the runner and add pins approximately every 2 cm before making the first permanent stitch.
- Short woven tails can work free after washing. Weave structural tails through at least 4–5 cm of matching stitches and change direction once before trimming.
Conclusion
Block one large flower and two leaves before committing yarn to the complete runner. That test establishes the actual motif diameter, leaf length, hook suitability, and spacing required for your table. Calculate the foundation around three evenly distributed flower centers rather than correcting proportions during final assembly. This crochet flower table runner pattern is modular, so its length can also be changed by adjusting the spaces between focal flowers and adding or removing leaf clusters. Save the finished layout to Pinterest and share the completed runner on Instagram with #PinkFloralTableRunner. Before attaching the motifs permanently, check one detail: do the cream scrolls remain visible between all three large pink flowers?
Pattern Notes and Sources
This is an original photo-inspired crochet interpretation. The supplied photograph does not reveal hidden stitches, gauge, exact yarn quantities, or original pattern instructions. Published references were used only for comparable dimensions, yarn weights, hook ranges, and general project research.









