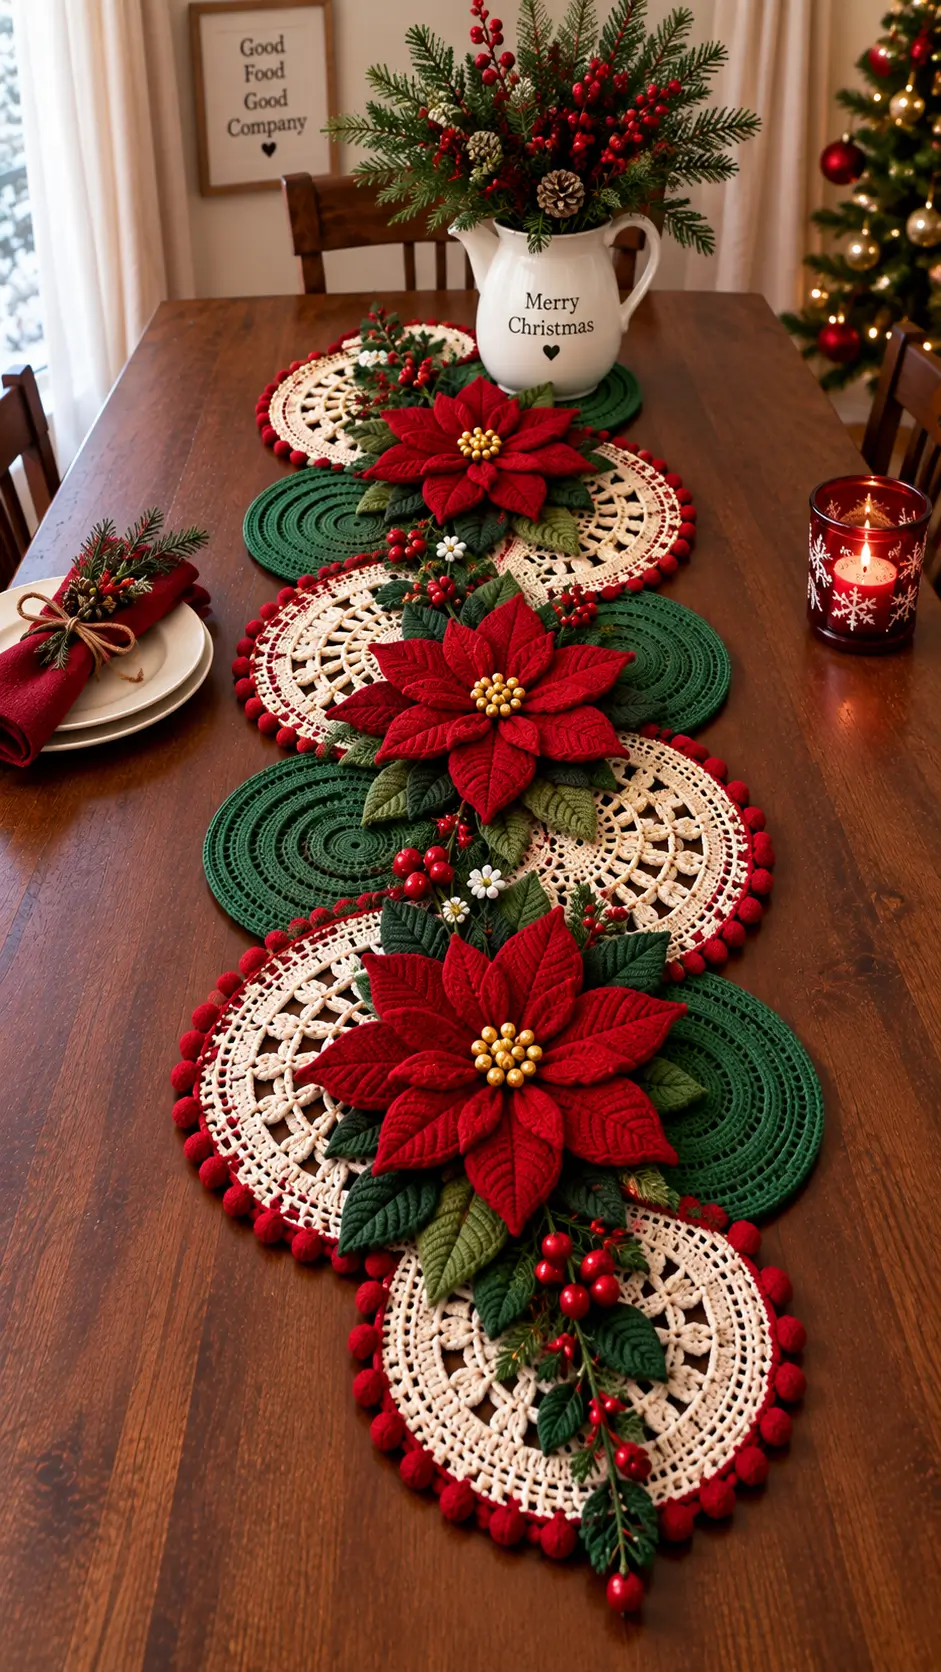
A poinsettia’s red display is formed by bracts around tiny central flowers, so one flat crochet layer misses its defining structure. This crochet poinsettia table runner uses stacked red bracts, green foliage, circular bases and raised berries. Use cotton or a smooth cotton-blend yarn with a hook matched to its weight; aim for roughly 100–110 cm overall. Intermediate crochet skills suit the dimensional assembly, and modular construction makes the length adjustable.
The Design: What Makes This Poinsettia Runner Different
The photograph relies on three structural decisions. First, large red poinsettias sit above the base rather than being worked directly into it. The extra layer produces the strong three-dimensional profile associated with a 3D crochet poinsettia.
Second, cream openwork circles alternate with dense forest-green circles. The contrast separates the botanical elements from the table surface while giving the runner a repeating framework.
Third, foliage bridges the spaces between flowers. Dark and olive leaves prevent the red sections from becoming one continuous mass, while berry clusters fill smaller gaps without requiring another large motif.
A common mistake in a Christmas crochet table runner of this type is attaching flowers before the circular modules have been blocked and joined. That locks distortion into the finished runner. Block the foundation first; embellishments come later.
Project Info at a Glance
| Skill Level | Time | Finished Size | Hook | Best For |
|---|---|---|---|---|
| Intermediate | Multi-session project | Adjustable; target approx. 100–110 × 35–40 cm | 3–4 mm for DK/light worsted yarn | Dining table or sideboard |
The target dimensions describe a photo-inspired interpretation rather than a direct measurement of the photographed runner. Adjust the number and overlap of the circular motifs to fit your table.
Materials and Tools
Yarn
- Deep red — DK/light worsted cotton or cotton blend — approximately 150 g — for poinsettia bracts.
- Forest green — DK/light worsted — approximately 150 g — for solid circles and dark leaves.
- Olive green — DK/light worsted — approximately 50 g — for secondary leaves.
- Cream/ecru — DK/light worsted — approximately 150–200 g — for openwork circles.
- Berry red — DK/light worsted — approximately 40 g — for berries and edging details.
- Gold/yellow — DK or sport — approximately 15 g — for poinsettia centers.
- White — DK or sport — approximately 10 g — for small accent flowers.
The quantities are working estimates for this photo-inspired version. Yarn consumption changes with fiber, gauge, motif diameter and the final length of the runner.
Tools
- 3.5 mm crochet hook as a starting point for DK cotton
- Tapestry needle
- Scissors
- Locking stitch markers
- Rust-resistant blocking pins
- Blocking mats
- Polyester stuffing for the berries
A smaller hook can be used for firmer decorative pieces. No safety eyes are required for this project.
Abbreviations
- MR — magic ring
- ch — chain
- sc — single crochet
- hdc — half double crochet
- dc — double crochet
- tr — treble crochet
- inc — increase
- dec — decrease
- sl st — slip stitch
- st/sts — stitch/stitches
- BLO — back loop only
- FO — fasten off
An invisible decrease is useful where a shaped three-dimensional component requires one. Insert the hook through the front loops of the next two stitches before completing the decrease.
Crochet Poinsettia Table Runner Pattern
This is a photo-inspired construction. Adjust the number of circular base motifs to suit the length of your table.
Solid Green Circular Motif — Make 5
Yarn: forest green.
R1: 12 dc in MR. Join. (12)
R2: 2 dc in each st around. (24)
R3: [dc, 2 dc in next st] ×12. (36)
R4: [2 dc, 2 dc in next st] ×12. (48)
R5: [3 dc, 2 dc in next st] ×12. (60)
R6: [4 dc, 2 dc in next st] ×12. (72)
R7: [5 dc, 2 dc in next st] ×12. (84)
R8: [6 dc, 2 dc in next st] ×12. (96)
Fasten off and weave in the tail. Block every green circle to the same diameter.
Cream Openwork Circle — Make 5
Yarn: cream/ecru.
R1: 12 dc in MR. Join. (12 dc)
R2: Ch 3, dc in same st, 2 dc in every remaining st. Join. (24 dc)
R3: Ch 4, skip 1 st, dc in next; repeat around. Join. (12 spaces)
R4: Sl st into first space, ch 3, 2 dc in same space, ch 2; work 3 dc, ch 2 in each remaining space. Join. (12 groups)
R5: Sl st to center dc, ch 5, sc in next ch-2 space; repeat around. (12 loops)
R6: Work 7 dc into each ch-5 loop, sc into each intervening sc. (12 shells)
R7: Ch 5, sc between the third and fourth dc of each shell; repeat around. (12 loops)
R8: Work [3 dc, ch 3, 3 dc] in each loop, sc between motifs. Repeat around.
Fasten off. Block firmly enough to open the lace without flattening the stitches.
Large Red Poinsettia — Make 3
The poinsettias use overlapping bracts in three sizes. Assemble all individual pieces before attaching the flowers to the runner.
Large Bracts — Make 7 per Flower
Yarn: deep red.
Ch 15.
Row 1: Sc in second ch from hook, hdc, dc in next 2, tr in next 6, dc in next 2, hdc, sc. Work 3 sc into final chain.
Continue along the opposite side of the foundation chain: sc, hdc, dc in next 2, tr in next 6, dc in next 2, hdc, sc. Join with sl st.
Row 2: Ch 1. Work sc evenly around, placing 3 sc at the tip.
Fasten off. Leave approximately 20 cm for sewing.
Medium Bracts — Make 6 per Flower
Yarn: deep red.
Ch 12.
Row 1: Sc in second chain, hdc, dc in next 2, tr in next 4, dc, hdc, sc; work 3 sc at the tip. Mirror the stitch sequence down the opposite side.
Row 2: Sc around, placing 3 sc at the tip.
Fasten off, leaving approximately 20 cm for sewing.
Small Bracts — Make 5 per Flower
Yarn: deep red.
Ch 9.
Row 1: Sc in second chain, hdc, dc in next 4, hdc, sc; work 3 sc at the tip. Work the corresponding stitches down the opposite side.
Row 2: Sc around, placing 3 sc at the tip.
Fasten off and leave a sewing tail.
Poinsettia Center — Make 3
Yarn: gold/yellow.
R1: 6 sc in MR. (6)
R2: Inc ×6. (12)
Fasten off. Make several small gold knots or crocheted bobbles and sew them closely over the foundation circle. Keep the center compact enough that the small red bracts remain visible.
Dark Green Leaves — Make 12–15
Yarn: forest green.
Ch 16.
Row 1: Sc in second ch, hdc, dc in next 3, tr in next 7, dc, hdc, sc; work 3 sc in the final chain. Continue along the opposite side with the sequence reversed.
Row 2: Sc around, placing 3 sc at the pointed tip.
Fasten off with approximately 20 cm remaining for sewing.
Olive Green Leaves — Make 8–10
Yarn: olive green.
Use the dark green leaf construction but begin with ch 13 instead of ch 16. Shorten the central treble section proportionally so the finished leaf remains visibly smaller.
Using two leaf sizes prevents the foliage from forming a rigid ring around each poinsettia. Place the shorter olive leaves behind and between the longer dark green leaves.
Red Berries — Make 20–30
Yarn: berry red.
R1: 6 sc in MR. (6)
R2: Inc ×6. (12)
R3: Sc around. (12)
R4: Dec ×6. (6)
Insert a very small amount of polyester stuffing before closing. Fasten off with approximately 15 cm for sewing.
Arrange the finished berries in clusters of three or five. Concentrated clusters reproduce the botanical structure more effectively than evenly spaced individual berries.
Small White Flowers — Make 4–6
Yarn: white with gold/yellow centers.
R1: 5 sc in MR. Join. (5)
R2: [Sl st, ch 3, 2 dc, ch 3, sl st] in each stitch to form five petals.
Fasten off. Add one small gold knot to the center of each flower.
Red Bobble Edge
Yarn: berry red.
Join the red yarn to the outside edge of a cream motif.
Work [sc in next 2 edge stitches or spaces, bobble in next position] repeatedly around the visible portion of the motif. Adjust the spacing slightly at the end of the round if required so the raised details remain evenly distributed.
For each bobble, partially complete five dc into the same position, leaving the final loop of each stitch on the hook. Yarn over and pull through the remaining loops together.
Test several repeats before completing the border. Excessive bobbles can pull the cream circle inward.
Joining the Circular Foundation
Lay the five cream circles and five forest-green circles on a flat surface. Alternate the colors while overlapping adjacent motifs.
Do not position every circle on one rigid center line. Shift successive motifs slightly left and right to produce the flowing arrangement shown in the reference design.
Pin the complete foundation before sewing anything permanently.
Where two motifs overlap, sew through the rear stitch bars or back loops. This keeps most of the joining yarn away from the visible surface.
Use several secure attachment points across each overlap rather than one small join. The runner should be capable of being lifted as one piece without the circles folding away from one another.
Assembly
- Block all cream and green foundation circles individually. Match their diameters before beginning the final arrangement.
- Arrange the circles in an alternating cream-and-green sequence. Shift successive motifs slightly from the center line and pin every overlap.
- Sew the overlapping circles together from the back. Place the foundation flat again and check both long edges for unwanted curling.
- Build each poinsettia by positioning seven large red bracts in the bottom tier. Overlap the bases and sew only through the central 2–3 cm.
- Position six medium bracts between the gaps of the first tier. Add five small bracts above them, followed by the compact gold center.
- Pin one completed poinsettia near each end of the runner and the third around the center. Compare all three positions before sewing them down.
- Insert the long forest-green leaves beneath the poinsettias. Fill remaining spaces with the shorter olive leaves while keeping their pointed ends visible.
- Position berry clusters in narrow spaces between the main flowers. Add the small white flowers as secondary accents rather than placing them around every poinsettia.
- Complete the raised red edging on the visible cream sections. Weave all tails into stitches of the same color on the back of the runner.
- Place the completed runner on blocking mats and correct the overall outline. Keep the dimensional flowers raised rather than pinning the bracts completely flat.
The finished foundation should lie flat while the poinsettias, berries and foliage remain visibly raised above the circular motifs.
7 Technical Tips for Better Results
- Mark the beginning of every circular round. Losing the first stitch shifts the increase positions and can turn a circular motif into an uneven polygon.
- Keep berry stuffing below approximately 80% firmness. Excessive stuffing stretches the single crochet stitches apart and produces visible gaps.
- Keep decreases confined to the stuffed berries. An incorrectly placed decrease on a flat bract creates an indentation instead of the required pointed outline.
- Check the flower center before sewing it permanently. If the inner red bracts overlap by more than roughly one-third of their width, the gold center becomes crowded and the layered structure loses definition.
- Maintain consistent tension across yarn colors. Switching to a significantly softer or thicker yarn can enlarge individual bracts enough to change the proportions of the flower.
- Pin each large poinsettia at four opposing points. Sewing one side completely before checking the opposite side can pull a 15–20 cm flower away from the intended center position.
- Weave each structural tail through at least 4–5 cm of matching stitches. Reverse direction once before trimming because flower and leaf attachment points receive repeated movement when the runner is handled.
Adjusting the Table Runner Size
The modular foundation makes length changes practical. For a shorter table, remove one cream-and-green motif pair. For a longer dining table, add another pair instead of increasing the amount of overlap between the existing circles.
Measure the available tabletop before joining the motifs. Leave enough clear space at both ends for place settings or other table decorations.
The width can also be changed through motif diameter. A smaller hook and thinner yarn produce more compact circles, while thicker yarn increases both the width and visual weight of the runner.
Do not change only the flower size without considering the foundation. The three large poinsettias should occupy substantial sections of the runner without completely hiding the alternating cream and green circles underneath them.
Flower and Foliage Placement
Place the three red poinsettias before attaching berries, white flowers or small leaves. These flowers establish the main visual intervals of the runner.
The central poinsettia can sit close to the middle of a cream-and-green overlap. Position the remaining two farther toward the ends while leaving enough uncovered foundation to show the circular construction.
Rotate the flowers slightly rather than aligning every pointed bract with the length of the table. Repeated identical orientation makes three separately crocheted flowers appear like one repeated appliqué.
Leaves should extend beyond the red bracts at different angles. Use the longer forest-green pieces to establish the main foliage silhouette, then place the shorter olive leaves in the remaining gaps.
Berry clusters work best between major floral sections. Keep several berries together instead of spreading single berries evenly along the entire runner.
Blocking and Finishing
Block the circular foundation before attaching dimensional decorations. This corrects small differences in motif diameter and makes the joins easier to assess.
After final assembly, perform only a controlled finishing block. Pin the outside edge and foundation motifs while allowing the poinsettia bracts and leaves to remain dimensional.
Check the back before trimming the final yarn tails. Structural sewing should remain confined to the central portions of flowers and the bases of leaves so unnecessary stitches do not show through the open cream lace.
Lay the runner on the intended table once it is completely dry. Check that the end motifs remain flat and that no large flower projects into the space required for plates, serving dishes or tableware.
Conclusion
Finish the foundation before committing to the floral placement because the large red bracts cover several joins and make later corrections difficult. Block the circles, assemble all three flowers separately, then test the complete botanical arrangement on the table before sewing anything permanently. For a longer dining table, add another cream-and-green motif pair rather than stretching the existing joins. Save the finished crochet poinsettia table runner to your Christmas crochet Pinterest board and share the completed layout on Instagram with #PoinsettiaTableRunner. As the final design check, compare the three flowers: do your poinsettia bracts point in one repeated direction, or rotate naturally along the runner?









