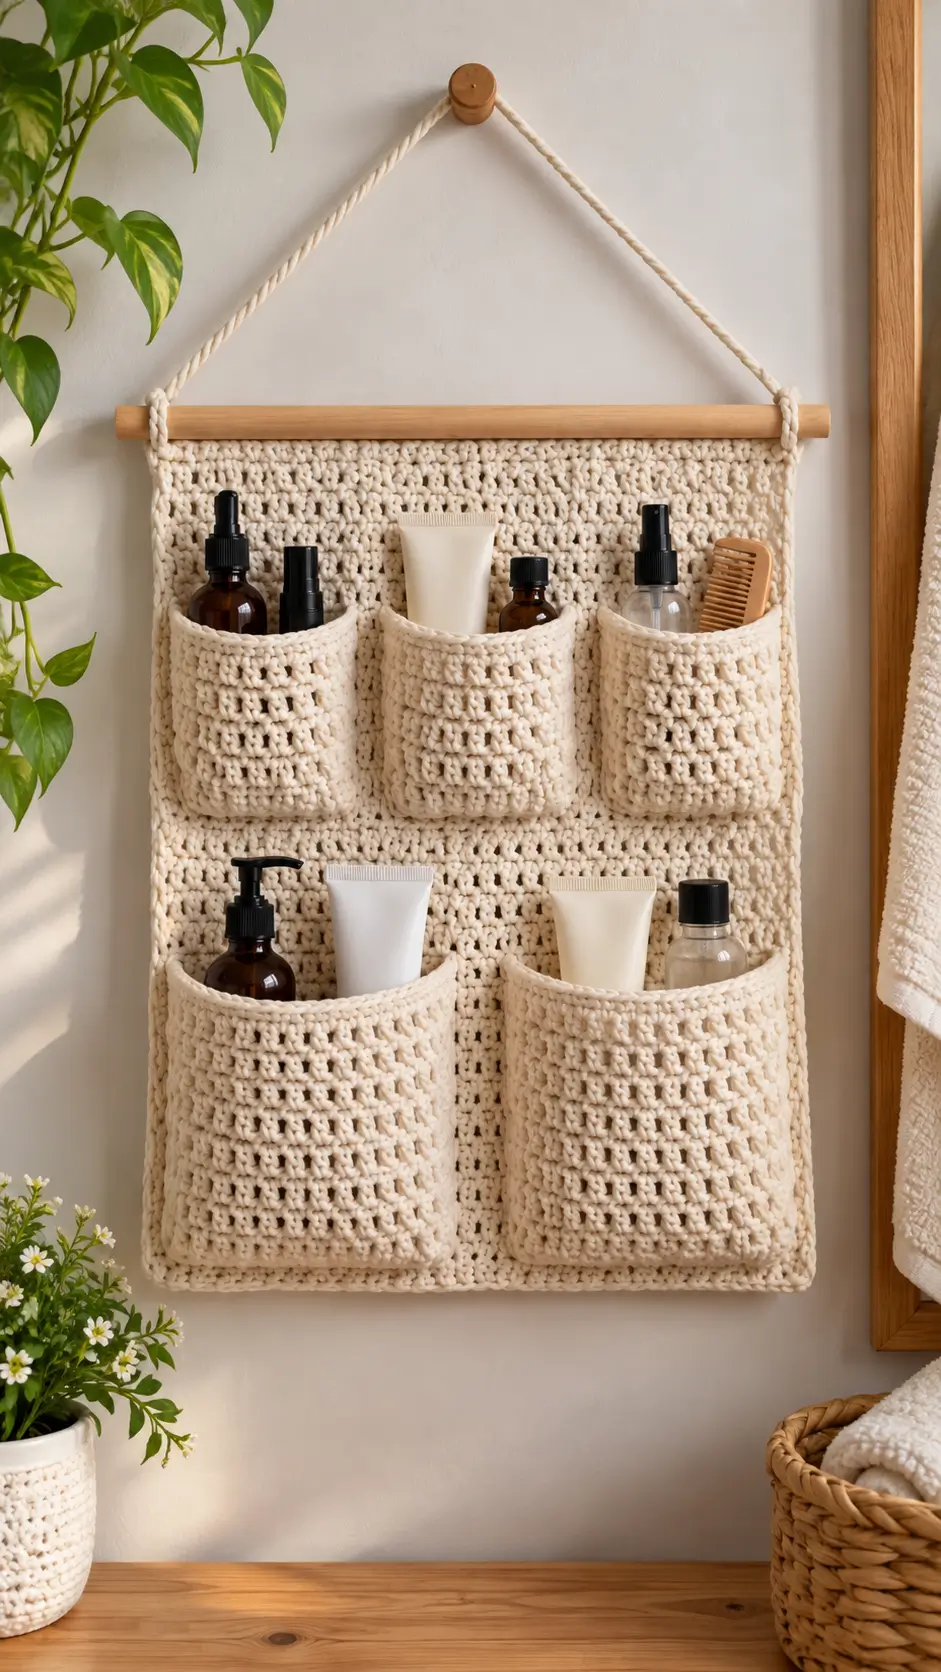
Three narrow pockets above two deep pockets are what give this organizer its unusually efficient storage layout. This crochet wall organizer pattern uses firm Aran or worsted cotton, a 4 mm hook, and a wooden dowel to create a body around 30 cm wide. It suits an intermediate crocheter because accurate pocket placement matters. Use it for bathroom bottles, craft tools, nursery supplies, or desk accessories.
The Design: What Makes This Wall Organizer Different
The organizer divides the available width rather than repeating five identical pockets. Three smaller upper compartments hold narrow objects upright, while two deeper lower pockets accept wider bottles and containers. That arrangement makes a five pocket crochet organizer more useful without increasing the backing width.
A firm rectangular panel carries the load. Separate pocket panels are then attached along their sides and lower edges. This construction gives each pocket enough projection to hold bottles, brushes, tubes, craft tools, or similar objects.
The second structural decision is the wooden dowel. It distributes the load across the upper edge rather than concentrating it at one crochet loop.
A frequent mistake with a crochet wall pocket organizer is making every pocket exactly as wide as its attachment area. The pocket then lies flat. Extra fabric is required across the pocket front to produce usable depth.
Project Info at a Glance
| Skill Level | Time | Finished Size | Hook | Best For |
|---|---|---|---|---|
| Intermediate | Multi-session project | Approx. 30 × 30–33 cm body | 4 mm | Bathroom, craft-room and small-item storage |
Materials and Tools
Yarn
- Natural cream/ecru — Aran/worsted cotton — quantity depends on gauge and pocket depth — firm 100% cotton or cotton-rich yarn
- Hanging cord — cream cotton rope or tightly twisted cotton cord
Aran or worsted cotton is a practical choice for a hanging organizer because the fabric needs enough structure to support stored objects without excessive stretching.
A precise yarn quantity can vary considerably with the cotton yarn, gauge, pocket depth, and finished dimensions. Buy enough yarn from the same dye lot to complete the backing and all five pockets.
Tools
- 4 mm crochet hook
- Wooden dowel, approximately 35–38 cm long
- Tapestry needle
- Stitch markers
- Scissors
- Measuring tape
- Blocking mat and pins, optional
Abbreviations
- ch — chain
- sc — single crochet
- dc — double crochet
- sl st — slip stitch
- st/sts — stitch/stitches
- sp — space
- RS — right side
- WS — wrong side
The invisible-decrease technique used in stuffed amigurumi is not required because this project is constructed as flat panels rather than shaped spiral pieces.
Gauge and Finished Measurements
Aim for approximately 12 stitches per 10 cm in the main fabric after light blocking. Exact gauge can be adjusted because this is a storage project rather than a fitted garment, but all five pockets should be made using the same yarn, hook, and tension.
Target backing width: approximately 30 cm.
Target backing height: approximately 30–33 cm.
For a larger organizer, increase the backing and pocket dimensions proportionally instead of enlarging only the pockets.
Pattern — Step by Step
Construction note: This organizer is worked flat in rows rather than in continuous spirals.
Main Back Panel — Make 1
Yarn: natural cream/ecru.
Ch 39.
Row 1: Sc in second ch from hook and each ch across. (38)
Row 2: Ch 1, turn, sc across. (38)
Row 3: Ch 1, turn, sc in first st, *ch 1, skip next st, sc in next st* across, adjusting the final repeat as required to maintain a neat edge. (38 positions)
Row 4: Ch 1, turn, sc across, working into each sc and ch-1 space. (38)
Repeat Rows 3–4 until the panel measures approximately 30–33 cm high.
Work 2 final rows of sc.
Do not fasten off.
Work one round of sc evenly around the complete rectangle, placing 3 sc at each corner.
Sl st to the first edging stitch.
Fasten off and weave in the tail.
The alternating solid and lightly open rows create visual texture while leaving firm sections for attaching the storage pockets.
Small Upper Pocket — Make 3
Yarn: natural cream/ecru.
Ch 16.
Row 1: Sc in second ch from hook and across. (15)
Row 2: Ch 1, turn, sc across. (15)
Row 3: Ch 1, turn, sc in first st, *ch 1, skip 1, sc in next st* across. (15 positions)
Row 4: Ch 1, turn, sc across, working into stitches and spaces. (15)
Repeat Rows 3–4 until the pocket measures approximately 9–10 cm high.
Work 2 rows of sc across the upper edge.
Fasten off, leaving approximately a 50 cm sewing tail.
The finished pocket panel should be slightly wider than one-third of its allocated backing area. That extra fabric becomes pocket depth instead of being stretched flat against the backing.
Large Lower Pocket — Make 2
Yarn: natural cream/ecru.
Ch 24.
Row 1: Sc in second ch from hook and across. (23)
Row 2: Ch 1, turn, sc across. (23)
Row 3: Ch 1, turn, sc in first st, *ch 1, skip 1, sc in next st* across. (23 positions)
Row 4: Ch 1, turn, sc across. (23)
Repeat Rows 3–4 until the piece measures approximately 13–14 cm high.
Work 2 rows of sc.
Fasten off, leaving approximately a 60 cm sewing tail.
The two lower pockets require greater projection than the three upper pockets. Do not stretch their lower edges flat during assembly.
Upper Pocket Top Edging — Make on Each Pocket
Join yarn at one upper corner.
Row 1: Sc evenly across the pocket opening.
Row 2: Ch 1, turn, sc across.
Fasten off and weave in the yarn tail.
A solid two-row rim helps limit stretching when bottles, tools, or containers press against the opening.
Lower Pocket Top Edging — Make on Each Pocket
Join yarn to one upper corner.
Row 1: Sc evenly across.
Row 2: Ch 1, turn, sc across.
Row 3: Sl st loosely across.
Fasten off.
The additional finishing row adds structure to the wider opening without requiring a separate fabric lining.
Dowel Attachment Edge
Place the wooden dowel against the top of the backing.
Working through the backing’s upper edge, join yarn at one corner.
Ch 1 and sc evenly across the top, keeping the stitches firm and consistent.
Fasten off.
The wooden dowel should extend beyond both sides of the crochet panel. This provides space for the hanging system and helps distribute the weight across the full upper edge.
Dowel Wraps — Make 2
Cut two lengths of matching cotton yarn or cord.
Wrap one securely around the left end of the dowel and the upper corner of the crochet panel.
Repeat at the right end.
Tie the knots on the rear side so they remain less visible from the front.
Do not attach the final hanging cord until both sides have been measured and the dowel is positioned evenly.
Hanging Cord — Make 1
Cut a length of cotton cord sufficient to create the triangular suspension shown in the finished organizer.
Attach one end near the left dowel wrap.
Run the cord upward toward the intended hanging point and then down toward the opposite side.
Attach the second end at the right dowel wrap.
Adjust both sides until the wooden dowel sits horizontally, then secure the knots.
Use a firm cotton rope rather than a highly elastic yarn. Stretch in the suspension cord can make the organizer hang lower after the pockets are loaded.
Pocket Placement
Lay the completed backing flat with the right side facing upward.
Position the three small pockets across the upper half. Leave approximately 1 cm between neighboring attachment lines and keep the two outside pockets clear of the backing border.
Start with the middle pocket. Mark the vertical center of the backing and align the center of this pocket with it.
Place the remaining two upper pockets at equal distances from the center pocket.
Pin each lower edge first.
Create a small fold or pleat at each lower corner before pinning the sides. This extra material changes the flat rectangle into a functional storage pocket.
Position the two large pockets across the lower section. Keep their upper openings far enough below the small pockets that bottles and other objects can be inserted without hitting the upper row.
Measure from the backing’s centerline outward rather than positioning all five pockets independently from the outer borders. The centerline method produces a more balanced arrangement.
Assembly
- Block the backing to approximately 30 cm wide and 30–33 cm high, keeping all four corners square.
- Position the middle upper pocket first and align its vertical center with the center of the backing.
- Place the remaining two small pockets at equal distances from the middle pocket, then pin their bottom and side edges.
- Sew the three small pockets along the bottom first and then upward along both sides, leaving every upper edge completely open.
- Position the two large lower pockets symmetrically around the backing’s centerline and pin small folds at their lower corners to create depth.
- Sew the lower edge and both sides of each large pocket with firm, closely spaced stitches.
- Insert or position the wooden dowel along the upper edge and secure the two outer attachment points without pulling the backing narrower.
- Attach the hanging cord at equal distances from the dowel ends and test the organizer against a vertical surface.
- Weave all structural yarn tails through at least 4–5 cm of dense crochet before reversing direction once and trimming.
- Test the organizer first with lightweight containers. Correct any twisting pocket or suspension point before adding normal contents.
The completed organizer has three small upper compartments, two deeper lower compartments, a rectangular crochet backing, and a dowel-supported hanging system.
7 Technical Tips for a Better Crochet Wall Organizer
- Crooked backing: Move a stitch marker to the first and last stitch on every row. Losing one edge stitch repeatedly can reduce the panel width enough to disturb the placement of all five pockets.
- Sagging pockets: Keep the pocket attachment seam within roughly 5 mm of the panel edge. A loose attachment seam creates a flexible hinge and allows a loaded pocket to pull downward.
- Flat pockets: Add approximately 1–2 cm of effective width through the lower corner folds rather than stretching each pocket tightly over its allotted space. A pocket with no projection performs poorly with bottles and containers.
- Uneven openings: Pin each pocket at the bottom center, two lower corners, and two upper corners before sewing. Those five reference points reduce movement while the pocket is attached.
- Dowel tilt: Measure both cord attachment points from their respective dowel ends. A difference of even 1 cm can become visible after objects are placed in the organizer.
- Overstretched backing: Use cotton or another low-stretch yarn and maintain relatively dense stitches. Loose fabric can lengthen vertically when the two large lower pockets carry bottles.
- Tail failure: Weave each structural sewing tail through at least 4–5 cm of dense crochet and reverse direction once. Short tails can work loose under repeated loading.
Why Cotton Works Better for This Organizer
Storage crochet has different structural requirements from blankets and garments. A hanging panel needs to resist vertical elongation, while its pockets need enough flexibility to accept objects without becoming permanently distorted.
Aran or worsted cotton provides a useful balance. The stitches can be worked tightly enough to produce a stable backing while the individual pocket panels retain enough flexibility to create storage depth.
The 4 mm crochet hook in this version is intended to produce a relatively compact fabric. Your individual tension still matters. If the swatch becomes extremely stiff or curls strongly at the edges, increase the hook size slightly and measure the new swatch before continuing.
Avoid changing hook size after the backing is finished. Pocket dimensions calculated with one gauge may no longer fit correctly when crocheted at another gauge.
How to Resize the Five-Pocket Crochet Organizer
Change the backing dimensions first.
For an organizer wider than 30 cm, crochet the backing to the required width and then calculate the available pocket space from that finished measurement.
Divide the usable upper width into three sections. Divide the usable lower width into two sections.
Do not make each pocket front exactly equal to its allocated backing width. The front panel requires additional width to create projection away from the backing.
For example, if a pocket attachment area measures 10 cm across, a pocket front measuring slightly more than 10 cm can form small folds at its lower corners. Those folds create storage volume.
Height can be modified independently. A taller backing creates additional separation between the two rows and gives long objects more clearance.
The wooden dowel should also be wider than the finished crochet backing. For a backing around 30 cm wide, a dowel around 35–38 cm provides practical clearance at both ends.
Load and Hanging Considerations
Crochet stitches do not behave like rigid shelving. This crochet hanging organizer is suitable for toiletries, crochet hooks, brushes, small bottles, craft materials, nursery supplies, and other relatively light objects.
Distribute heavier objects between the two lower pockets instead of placing the complete load on one side.
The wall fixing is separate from the crochet construction. Select hardware appropriate for the wall material and the expected total loaded weight.
Inspect the organizer after its first several uses. A pronounced increase in backing length indicates that the fabric is carrying more weight than intended.
Do not attempt to correct fabric elongation simply by shortening the hanging cord. That changes the position of the organizer but does not reduce the load acting on the crochet backing.
Care and Maintenance
Remove all stored objects before cleaning the organizer. Take out the wooden dowel and hanging cord if the construction allows them to be removed without cutting stitches.
Follow the washing instructions supplied with the yarn. Cotton can change dimensions after washing, so reshape the backing and pockets while damp and dry the organizer flat.
Measure the backing before it dries completely. Return it to approximately its original width and height, square the corners, and reshape each pocket opening.
Do not hang the organizer while it is wet. Water adds substantial weight to cotton and can stretch the backing before the fibers have dried.
Conclusion
Measure the finished backing before attaching a single pocket; that measurement controls every later placement decision. Keep the three upper compartments centered, give the two lower pockets additional depth, and test the dowel suspension before loading the organizer. Your next step is to crochet and block the 30 cm-wide backing, then mark its vertical centerline. Save this crochet wall organizer pattern to Pinterest so the pocket-placement measurements remain accessible, or share the completed organizer on Instagram with #FivePocketWallOrganizer. Which compartment would you change first: the narrow center upper pocket or one of the two deep lower pockets?









