Introduction
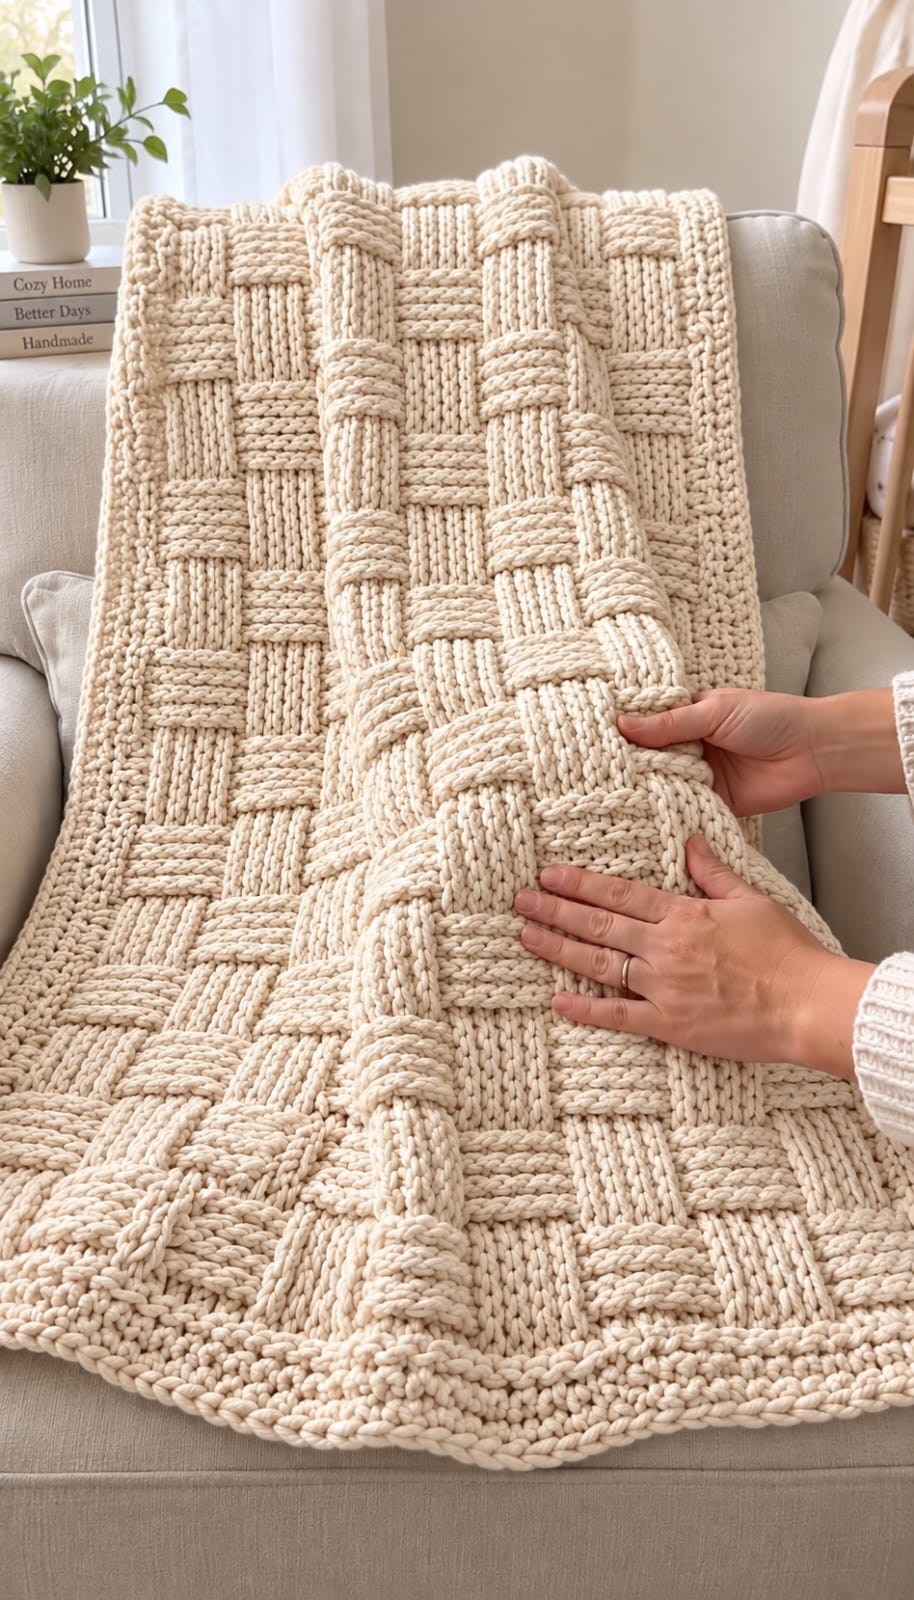
Alternating raised blocks make this cream blanket look as though wide yarn bands have been physically woven over and under one another. This basket weave crochet blanket pattern uses super-bulky yarn, front-post and back-post double crochet, and a substantial perimeter border. The target throw measures approximately 115 × 145 cm. An intermediate crocheter can use the construction for a sofa throw, bed layer, or textured lap blanket.
The Design: What Makes This Basket Weave Blanket Different
The photographed blanket depends on unusually large woven-looking blocks rather than a fine basketweave texture. Each block alternates between raised vertical post stitches and recessed sections, then reverses direction after a fixed number of rows. That reversal produces the apparent over-and-under structure without making individual strips.
Super-bulky yarn increases the depth of every post stitch. Published chunky basketweave blanket patterns commonly use category 6 yarn with hooks from about 8 to 11.5 mm, while finished throws range from roughly 114 × 140 cm to 127 × 145 cm. The border is deliberately simpler than the central field. Its job is to stabilize the heavy basket weave crochet fabric rather than compete with it. A common failure is a tight foundation chain, which pulls the lower edge inward before the textured blocks are established.
Project Info at a Glance
| Skill Level | Time | Finished Size | Hook | Best For |
|---|---|---|---|---|
| Intermediate | 12–18 hours | Approx. 115 × 145 cm | 9 mm | Sofa throws, lap blankets, bed layering |
A published Yarnspirations basket-weave blanket uses super-bulky Bernat Blanket Tweeds, a 9 mm hook, and a gauge of 8 stitches × 5 rows per 10 cm, finishing at approximately 127 × 144.5 cm. Another published chunky basketweave design uses an 8 mm hook and finishes at approximately 114 × 140 cm. These provide practical material and sizing benchmarks for the photograph-inspired version below.
Materials and Tools
Yarn
- Warm cream — category 6 super bulky — approximately 1,500–1,750 yards / 1,370–1,600 m
- Additional cream yarn for border — reserve approximately 150–200 yards / 137–183 m from the total quantity
Published basketweave throws demonstrate that this stitch consumes substantial yarn. A 127 × 144.5 cm Yarnspirations version specifies approximately 1,720 yards of super-bulky yarn, while another 45 × 55 inch chunky version lists approximately 1,460–1,540 yards.
Use one dye lot when possible. The photographed blanket is monochromatic, so even a modest color difference between cream skeins can become visible across the large uninterrupted surface.
Tools
- 9 mm crochet hook
- 10 mm hook — optional for a tight foundation chain
- Large tapestry needle
- Scissors
- Locking stitch markers
- Tape measure
Abbreviations
- ch — chain
- sc — single crochet
- hdc — half double crochet
- dc — double crochet
- FPdc — front post double crochet
- BPdc — back post double crochet
- sl st — slip stitch
- st/sts — stitch/stitches
- sp — space
Post stitches are worked around the vertical post of the previous-row stitch rather than through its top loops. FPdc pushes a column toward the front; BPdc moves the neighboring column toward the back.
Gauge and Swatch
Make a basketweave swatch before beginning the full blanket. Super-bulky yarn varies considerably in thickness even when two yarns carry the same category number.
A useful starting gauge is approximately 8 stitches × 5 rows = 10 cm in the established texture. That figure matches a published super-bulky basket-weave throw made with a 9 mm hook.
The photograph shows thick, compressed blocks rather than loose open crochet. If the swatch contains large gaps around the post stitches, move down one hook size.
If the swatch becomes rigid enough to stand vertically, move up one hook size. Basketweave naturally produces a thick fabric, so excessively tight tension adds unnecessary weight.
Pattern — Step by Step
This blanket is worked flat from the lower edge upward using US crochet terminology. The pattern uses six-stitch blocks to produce broad woven sections similar to those visible in the reference.
Foundation Chain
Yarn: warm cream.
The basketweave field uses a multiple of 12 stitches plus 2 edge stitches.
For the approximately 115 cm wide throw:
Ch 99.
If your foundation chain naturally becomes tight, make it with a 10 mm hook, then change to the 9 mm hook for Row 1.
Before continuing, place the chain on a flat surface without stretching it. A foundation that curves into a pronounced arc should be remade more loosely.
Foundation Row
Row 1: Dc in the fourth chain from the hook and dc in each chain across.
Count the completed stitches before beginning the textured section.
The foundation row provides the vertical posts required for the first FPdc and BPdc groups.
Basketweave Block A
Row 2: Ch 2 and turn. The turning chain does not count as a stitch. Dc in first stitch.
*FPdc around each of the next 6 posts, BPdc around each of the next 6 posts.*
Repeat from * to * across the row, maintaining the six-stitch grouping. Dc in the final edge stitch.
Row 3: Ch 2 and turn. Dc in first stitch.
Work FPdc around the six raised posts and BPdc around the six recessed posts as they present on this side.
Continue across. Dc in final stitch.
Row 4: Repeat Row 3.
Row 5: Repeat Row 3.
Row 6: Repeat Row 3.
Five textured rows now form the first set of rectangular blocks.
Basketweave Block B
The stitch orientation reverses for the next section. Raised blocks become recessed and recessed blocks become raised.
Row 7: Ch 2 and turn. Dc in first stitch.
*BPdc around each of the next 6 posts, FPdc around each of the next 6 posts.*
Repeat from * to * across. Dc in final stitch.
Row 8: Work the stitches as established across the row.
Row 9: Repeat Row 8.
Row 10: Repeat Row 8.
Row 11: Repeat Row 8.
The second set should now appear to cross the first visually. No strips have actually been woven together; the effect comes entirely from the direction of the post stitches.
Main Blanket Repeat
Continue alternating the two block sections.
Rows 12–16: Repeat Basketweave Block A.
Rows 17–21: Repeat Basketweave Block B.
Rows 22–26: Repeat Basketweave Block A.
Rows 27–31: Repeat Basketweave Block B.
Continue in this sequence until the central field measures approximately 137–140 cm long, ending after a complete five-row block.
Do not stop halfway through a block. A partial section at the upper edge creates an obvious visual imbalance once the border is added.
How the Basket Weave Structure Works
The blanket does not require separate crocheted strips. FPdc and BPdc change the apparent direction of a flat fabric.
A front-post double crochet wraps around the post from the front. This pushes the stitch toward the viewer and forms a raised ridge.
A back-post double crochet wraps around the same type of post from behind. It pushes that section away from the viewer.
Six raised stitches beside six recessed stitches create two neighboring rectangular blocks. Maintaining those positions for five rows makes one block appear vertical while its neighbor appears horizontal.
Reversing the post directions after the fifth row changes which block projects forward. Repeated across the blanket, the sections resemble wide cream bands passing over and under each other.
Keeping the Blocks Square
The photographed blanket uses blocks that are close to square rather than long narrow bars. Stitch gauge and row gauge therefore need to work together.
Measure one completed six-stitch block after the first five textured rows. Compare its width with its height.
If a block is significantly taller than it is wide, reduce the number of rows in each section from five to four.
If it is substantially wider than tall, use six rows per block instead.
Make this adjustment before completing a large portion of the blanket. Changing block height halfway through creates two visibly different basketweave scales.
Side Edge Control
Post-stitch blankets can develop uneven side edges because the hook repeatedly moves around posts rather than directly into the tops of stitches.
Keep one ordinary double crochet at each side edge. These stitches create a stable column for the border.
Place a marker in the first and final edge stitch every ten rows. This makes accidental losses easier to identify before several blocks have been completed.
Measure the width after every 20 rows. The difference between the upper working edge and the foundation edge should remain below approximately 2 cm.
If the blanket gradually narrows, inspect the edge stitches first. Missing edge stitches are more common than changes inside the six-stitch blocks.
Top Finishing Row
After completing the final basketweave block, work one plain row to prepare for the border.
Final Field Row: Ch 2 and turn. Hdc in every stitch across.
Fasten off only if you want to begin the border at a different corner. Otherwise, continue directly into the edging.
Chunky Crochet Border
The reference uses a thick cream frame around all four sides. Keep the border texturally simpler than the basketweave field.
Border Round 1
Ch 1.
Work sc evenly around the entire blanket.
Across the top and bottom, work one sc into each stitch.
Along each side, distribute stitches evenly without forcing one stitch into every visible row-end gap. Super-bulky double crochet is tall, and too many side stitches cause the border to ripple.
Work 3 sc in each corner.
Join with sl st to the first sc.
Border Round 2
Ch 1.
Hdc in each stitch around.
Work 3 hdc in the center corner stitch at each corner.
Join with sl st.
Border Round 3
Ch 1.
Sc in each stitch around.
Work 3 sc in each corner.
Join with sl st.
Fasten off, leaving a tail at least 20 cm long.
For an even heavier frame like the photographed edge, repeat Border Rounds 2 and 3 once more.
Optional Corded Final Edge
A final raised edge can make the border appear thicker without adding several more full rounds.
Join cream yarn in any corner.
Work reverse single crochet around the entire perimeter.
Keep the stitches loose enough to follow the border without drawing the corners inward.
Join carefully at the starting point and fasten off.
Reverse single crochet naturally forms a rounded cord-like line that complements the dimensional center while remaining visually separate from the basketweave blocks.
Assembly and Finishing
- Spread the completed blanket on a large flat surface and check the direction of every basketweave block.
- Correct any loose yarn tails before blocking because post stitches can hide ends that were missed during construction.
- Weave each tail through at least 8–10 cm of matching stitches, changing direction once before trimming.
- Measure the blanket at the top, center, and bottom to identify any width difference greater than approximately 2 cm.
- Shape the four corners into 90-degree angles without aggressively stretching the textured field.
- Arrange every border round so it lies in the same plane as the main blanket rather than curling toward the front.
- Steam or wet-block only according to the care instructions for the selected yarn fiber.
- Allow the blanket to dry completely while supported flat so the heavy wet fabric does not stretch vertically.
- Inspect the six-stitch blocks and gently separate any post groups that became compressed during blocking.
- Measure and record the final dimensions before folding or using the blanket.
The finished throw should have a rectangular cream field, broad alternating woven-looking blocks, stable straight sides, and a substantial matching border.
7 Technical Tips
- Foundation edge curves upward: Make the starting chain with a hook approximately 1 mm larger than the working hook. A tight chain can reduce the lower width by several centimeters before the first basketweave block is complete.
- Blocks become narrow vertical bars: Measure one six-stitch section after five textured rows. If its height exceeds its width by more than approximately 1 cm, reduce each block section to four rows.
- Blanket narrows toward the top: Mark both edge stitches every ten rows and recount the pattern groups. Losing one edge stitch repeatedly can remove several centimeters from the final width.
- Post stitches become difficult to insert: Work around the complete vertical post rather than splitting the yarn strands. Piercing a super-bulky post creates excess friction and damages the visible raised column.
- Border develops waves: Reduce the number of stitches placed along the row ends. Too many side-edge stitches add circumference and force the border away from the blanket.
- Border pulls the corners inward: Place three stitches in each corner and check the blanket after every border round. A corner that lifts more than approximately 2 cm indicates insufficient corner expansion or overly tight tension.
- Finished blanket becomes excessively heavy: Weigh the first skein before and after completing a measured section. Basketweave post stitches consume more yarn than a flat double-crochet fabric, so calculating from an ordinary blanket can underestimate total yarn significantly.
How Much Yarn Does a Chunky Basketweave Blanket Need?
Basketweave is a yarn-intensive texture because every front-post and back-post stitch travels around an existing stitch. That path is longer than a conventional stitch worked only through the top loops.
Published patterns provide useful benchmarks. A Yarnspirations super-bulky basket-weave throw measuring approximately 127 × 144.5 cm calls for about 1,720 yards / 1,567 m. A 45 × 55 inch chunky basketweave blanket lists approximately 1,460–1,540 yards of Bernat Blanket.
A smaller lapghan pattern using super-bulky Wool-Ease Thick & Quick lists approximately 600–700 yards for a 35 × 40 inch size. The difference demonstrates why dimensions must be considered together with yarn weight.
For an image-inspired throw near 115 × 145 cm, plan approximately 1,500–1,750 yards and purchase extra if adding a wide border.
Choosing Yarn for the Woven Appearance
The photograph has highly visible stitch structure. Choose a yarn that is thick enough to form raised blocks but still allows individual post stitches to remain identifiable.
Super-bulky category 6 yarn is a practical match. Published basketweave blankets use options such as Bernat Blanket, Bernat Blanket Tweeds, Hayfield Bonus Super Chunky, and Lion Brand Wool-Ease Thick & Quick.
Chenille produces a softer, rounder block. Plied acrylic or wool-blend super-bulky yarn produces sharper stitch definition and may more closely resemble the structured cream strands visible in the reference.
Very fuzzy yarn reduces the apparent separation between neighboring posts. The basketweave remains functional, but the over-and-under illusion becomes less precise.
For a monochrome blanket, stitch definition matters more than color contrast because texture has to create the complete pattern.
Adjusting the Blanket Width
The pattern can be resized without changing the basketweave construction.
Use a foundation that accommodates complete 12-stitch repeats plus the required edge stitches. Each repeat contains one six-stitch raised group and one six-stitch recessed group.
Make a swatch first, then calculate the number of complete repeats required for the target width.
For example, if one 12-stitch repeat measures approximately 15 cm, six repeats create roughly 90 cm before edge stitches and border. Seven repeats produce approximately 105 cm, while eight approach 120 cm.
Actual measurements depend on yarn and hook size, so calculate from the washed or blocked swatch rather than relying on those example figures.
Do not finish a row with half a basketweave repeat unless a deliberately asymmetric pattern is required.
Adjusting the Blanket Length
Length is simpler to modify because the blanket is constructed in repeated row blocks.
Continue alternating Block A and Block B until the central field approaches the required measurement.
Stop only after a complete block section.
Allow approximately 5–7 cm for a substantial top and bottom border when planning the final length.
For a lap blanket, a central field around 95–105 cm may be sufficient. A sofa throw can use approximately 135–145 cm, while a longer bed blanket can continue through additional complete basketweave sections.
Record the number of block repeats if making a second matching blanket. Counting individual rows later is harder because the heavy post texture obscures the row boundaries.
Why Basketweave Crochet Uses So Much Yarn
Ordinary double crochet travels upward through the top of a stitch. A post stitch must wrap around the entire vertical post before completing the stitch.
Multiply that additional yarn path by every stitch across a throw and the difference becomes substantial.
The fabric is also physically thicker. Raised and recessed sections overlap visually and create greater depth than flat double crochet.
For this reason, do not estimate yarn quantity from a plain super-bulky blanket of the same dimensions. Use a basketweave-specific reference or weigh a finished swatch and calculate from its area.
Buying all skeins before starting also reduces the chance of an obvious dye-lot transition in a solid cream blanket.
How to Keep a Large Basketweave Blanket Manageable
A super-bulky blanket gains weight quickly. As the fabric grows, that weight can pull on the active row and change tension.
Keep most of the completed blanket supported on your lap, a table, or the seat beside you rather than allowing it to hang toward the floor.
Rotate the entire project at the end of each row. Twisting only the working edge can place repeated torque on the side stitches.
After every two basketweave sections, lay the project flat and measure its width. Early correction requires less work than discovering a substantial taper after the final block.
Store the project folded rather than hanging from a hook or chair. The dense fabric can stretch under its own weight, particularly when made with polyester chenille.
Care and Blocking
Follow the yarn manufacturer’s washing instructions because super-bulky fibers vary widely. Polyester blanket yarn, acrylic, wool blends, and cotton blends do not respond identically to heat or moisture.
Acrylic and polyester should not be exposed to uncontrolled high heat. Excessive heat can permanently alter synthetic fibers.
When wet-blocking a large blanket, support the entire fabric during movement. Lifting a saturated super-bulky throw from one corner can stretch both the border and the basketweave field.
Shape the blanket to the target dimensions and allow it to dry flat when space permits.
Blocking should organize the edges and blocks. It should not be used to correct a foundation chain that is substantially shorter than the upper edge.
Conclusion
The six-stitch blocks are the measurement to check before committing to a full-size throw. Make one swatch, compare block width with block height, and adjust the number of rows per section before starting the foundation. During construction, keep both edge stitches marked and finish every complete block before reversing the post direction. Reserve enough matching yarn for the substantial perimeter frame shown in the reference. Save this basket weave crochet blanket pattern to Pinterest or share the finished cream throw on Instagram with #ChunkyBasketWeaveBlanket. For this specific blanket, would you keep the oversized six-stitch blocks or reduce them for a finer woven texture?









