Introduction
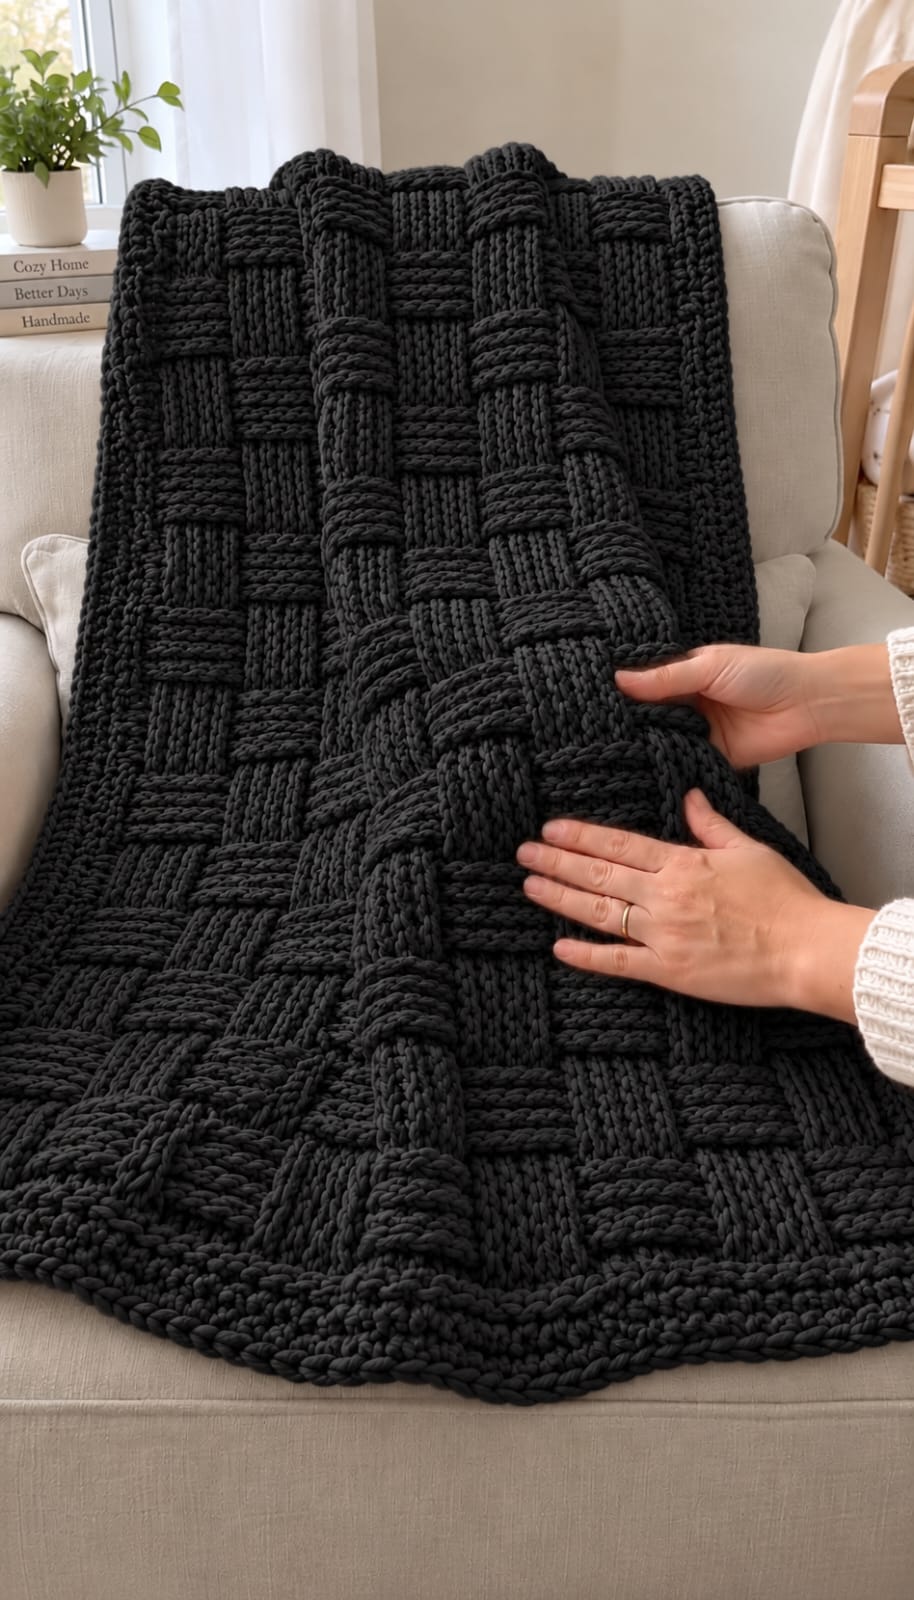
Black yarn removes color contrast, so every over-and-under block has to be built by texture alone. This basket weave crochet blanket pattern recreates the photographed throw with super-bulky black yarn, a 9 mm hook, broad six-stitch blocks, and a heavy matching border. The target finished size is approximately 115 × 145 cm. Its dense construction works particularly well for sofa throws and substantial lap blankets.
The Design: What Makes This Black Basket Weave Blanket Different
The reference uses oversized rectangular sections rather than a fine woven texture. Groups of six raised post stitches alternate with six recessed stitches, then reverse after five rows. That repeated change creates the appearance of thick yarn bands crossing above and below neighboring bands.
Color makes stitch construction more important here. A black crochet blanket cannot depend on contrasting shades to define the pattern, so deep front-post and back-post stitches supply the separation. Super-bulky yarn increases that relief and produces the substantial drape visible in the photograph.
A wide, comparatively simple border stabilizes the textured center. The main construction error is inconsistent post-stitch tension. Tight FPdc groups become shorter than neighboring BPdc groups, causing the supposedly square sections of the chunky basket weave blanket to become distorted rectangles.
Project Info at a Glance
| Skill Level | Estimated Time | Finished Size | Hook | Best For |
|---|---|---|---|---|
| Intermediate | 12–18 hours | Approx. 115 × 145 cm | 9 mm | Sofa throws, lap blankets, bed layering |
Published super-bulky basketweave blankets provide useful sizing benchmarks. Designs in this yarn category commonly use hooks around 8–11.5 mm, with throw dimensions near 114 × 140 cm through 127 × 145 cm. A 9 mm hook is a practical starting point for the dense structure shown here.
Materials and Tools
Yarn
- Black — category 6 super bulky — approximately 1,500–1,750 yards / 1,370–1,600 m
- Border allowance — reserve approximately 150–200 yards / 137–183 m from the total quantity
Basketweave consumes more yarn than a flat double-crochet fabric because post stitches travel around the vertical body of existing stitches. Published super-bulky basketweave throws of comparable dimensions can require approximately 1,460–1,720 yards.
Purchase the required black yarn from one dye lot when possible. Subtle dye-lot differences can become visible as horizontal bands across a monochromatic blanket.
Tools
- 9 mm crochet hook
- 10 mm crochet hook — optional for the foundation chain
- Large tapestry needle
- Scissors
- Locking stitch markers
- Tape measure
- Bright contrasting stitch markers — recommended for black yarn
Abbreviations
- ch — chain
- sc — single crochet
- hdc — half double crochet
- dc — double crochet
- FPdc — front post double crochet
- BPdc — back post double crochet
- sl st — slip stitch
- st/sts — stitch/stitches
FPdc and BPdc are worked around the complete vertical post of the stitch below rather than through its top loops. Keep the hook movement consistent so the raised blocks remain the same height as the recessed sections.
Gauge
Make a textured swatch before beginning the full blanket.
A practical target with super-bulky yarn and a 9 mm hook is approximately 8 stitches × 5 rows = 10 cm in the established basketweave pattern.
More important than matching an exact numerical gauge is making the blocks approximately square. Six stitches across should produce a width reasonably close to the height of one complete five-row block.
If the swatch is substantially taller than it is wide, use four rows per basketweave section. If it is wider than tall, test six rows per section.
Record the final swatch dimensions before beginning the blanket.
Pattern — Step by Step
This blanket is worked flat from the bottom upward using US crochet terminology. The center uses repeating groups of six FPdc and six BPdc to create the oversized woven appearance visible in the reference.
Foundation Chain
Yarn: black.
The basketweave repeat uses groups of 12 stitches plus edge stitches.
For a throw approximately 115 cm wide, begin with:
Ch 99.
Use the 10 mm hook for the chain if your foundation normally becomes tighter than the working rows. Change back to the 9 mm hook before beginning Row 1.
Lay the chain on a flat surface without stretching it. It should remain approximately straight rather than forming a semicircle.
Foundation Row
Row 1: Dc in the fourth chain from the hook. Dc in each remaining chain across.
Count the stitches before continuing. The next row depends on complete six-stitch groups, so an incorrect foundation count will shift every woven block.
Do not work post stitches into the foundation chain itself. Row 1 creates the vertical posts required for the textured construction.
Basket Weave Section A
Row 2: Ch 2 and turn. The turning chain does not count as a stitch. Dc in the first stitch.
*FPdc around each of the next 6 posts, BPdc around each of the next 6 posts.*
Repeat from * to * across the row while maintaining the six-stitch grouping. Dc in the final edge stitch.
Row 3: Ch 2 and turn. Dc in the first stitch.
Work the next six stitches so the same block remains raised on the public side. Continue the neighboring six stitches so that block remains recessed.
Repeat across. Dc in the final stitch.
Row 4: Repeat the established post-stitch arrangement.
Row 5: Repeat the established post-stitch arrangement.
Row 6: Repeat the established post-stitch arrangement.
Five textured rows now form the first set of broad blocks.
Basket Weave Section B
The next five rows reverse the raised and recessed groups.
Row 7: Ch 2 and turn. Dc in first stitch.
*BPdc around each of the next 6 posts, FPdc around each of the next 6 posts.*
Repeat from * to * across. Dc in the final edge stitch.
Row 8: Work the stitches as established so the new raised and recessed sections remain aligned.
Row 9: Repeat Row 8.
Row 10: Repeat Row 8.
Row 11: Repeat Row 8.
Viewed from the front, the second group should now appear to cross the first. This is the point where the woven illusion becomes obvious.
Main Blanket Repeat
Continue alternating the two five-row sections.
Rows 12–16: Repeat Section A.
Rows 17–21: Repeat Section B.
Rows 22–26: Repeat Section A.
Rows 27–31: Repeat Section B.
Rows 32–36: Repeat Section A.
Rows 37–41: Repeat Section B.
Continue alternating complete five-row sections until the central field measures approximately 137–140 cm long.
Finish after a complete block section rather than stopping partway through the five-row repeat.
Reading Front and Back Post Stitches in Black Yarn
Black yarn makes stitch shadows less obvious, particularly under warm indoor lighting. Do not rely only on color or shadow when identifying the next post.
Run a finger horizontally across the previous row. A raised FPdc group will feel like six distinct columns sitting toward the front of the fabric.
Place a bright locking marker between every 12-stitch repeat during the first few sections. Remove the markers only when the structure becomes easy to read.
When inserting the hook for FPdc, pass from front to back and then back to front around the complete post.
For BPdc, insert from the back toward the front and return to the back around the post.
Avoid inserting through the strands of the post itself. Splitting black super-bulky yarn makes the stitch harder to identify and weakens the clean raised line.
Creating Square Basketweave Blocks
The photographed blanket uses large blocks with nearly equal height and width. Gauge determines whether five rows are correct for your yarn.
After Row 6, measure one six-stitch block horizontally.
Then measure the five-row textured section vertically.
If the difference is below approximately 1 cm, keep the five-row repeat.
If the section is noticeably too tall, use four rows before reversing the post stitches.
If it is too short, use six rows.
Do not change block height after several repeats have been completed. The difference will remain visible across the finished black surface even when the blanket is folded.
Maintaining Straight Side Edges
Keep one ordinary edge stitch at each side of the blanket. These stitches create a stable foundation for the later border.
Use a bright stitch marker in the first and last stitch. Move both markers every row.
Count the 12-stitch pattern repeats after each five-row section rather than waiting until the blanket is nearly complete.
Lay the blanket flat every 20 rows and measure the width at the working edge.
The upper width should remain within approximately 2 cm of the lower width. A progressive difference usually indicates a missing edge stitch or accidental post-stitch group.
Top Finishing Row
Complete the final five-row basketweave section.
Then work one preparation row for the border.
Final Row: Ch 2 and turn. Hdc in each stitch across.
Fasten off if you want to begin the border from a corner. Otherwise, turn the work and continue directly into the edging.
Black Chunky Border
The reference has a substantial black frame surrounding the woven center. A three- to five-round border balances the heavy texture without introducing another complicated stitch pattern.
Border Round 1
Join black yarn at a corner.
Ch 1.
Work sc evenly around all four sides.
Across the top and bottom, work one sc into each available stitch.
Along the vertical sides, distribute the stitches evenly across the row ends.
Work 3 sc in each corner.
Join with sl st to the first sc.
Border Round 2
Ch 1.
Hdc in every stitch around.
At each corner, work 3 hdc in the center corner stitch.
Join with sl st.
Border Round 3
Ch 1.
Sc in every stitch around.
Work 3 sc in each corner.
Join with sl st.
For a wider border matching the visual weight of the photographed blanket, repeat Rounds 2 and 3 once more.
Corded Final Edge
Finish the outer perimeter with reverse single crochet.
Work one reverse sc into every stitch around, keeping the tension slightly looser than an ordinary sc round.
Join carefully at the starting point.
Fasten off and leave approximately 20 cm of yarn for weaving.
The reverse-sc round creates a thick rope-like perimeter that remains distinct from the square basketweave blocks.
Assembly and Finishing
- Lay the blanket flat under bright lighting and inspect every block for a misplaced front-post or back-post stitch.
- Check the first and final stitches of each row before weaving any tails because edge errors are less visible in black yarn.
- Weave every yarn tail through at least 8–10 cm of matching stitches and reverse direction once before trimming.
- Measure the top, middle, and bottom widths and compare the three measurements.
- Shape all four corners to approximately 90 degrees without stretching the center basketweave blocks.
- Check the border for ripples and remove excess side-edge stitches if a section rises more than approximately 2 cm from a flat surface.
- Support the complete blanket when moving it because super-bulky basketweave fabric becomes heavy before blocking.
- Wet-block or lightly steam only according to the care instructions supplied with the selected yarn.
- Allow the blanket to dry while fully supported rather than hanging it from one edge.
- Separate compressed post-stitch groups with your fingers and record the final blocked dimensions.
The finished blanket should have deep black basketweave blocks, straight side edges, square corners, and a substantial corded perimeter.
7 Technical Tips
- Black stitches become difficult to count: Place a bright marker after every 12-stitch repeat during the first 20 rows. A missed post stitch can shift every block that follows it.
- Foundation edge becomes narrower than the blanket: Use a hook approximately 1 mm larger for the starting chain. A tight foundation can reduce the bottom width by several centimeters.
- Blocks look rectangular instead of square: Measure six stitches against the height of five textured rows. Change to four or six rows per section when the difference exceeds approximately 1 cm.
- Raised blocks become shorter: Pull each FPdc up to the normal height of the surrounding stitches before completing it. Tight post stitches compress the fabric vertically and create uneven block boundaries.
- Blanket gradually narrows: Keep markers in both edge stitches and verify the repeat count after every five-row section. Repeatedly missing one side stitch produces a visible taper.
- Border develops waves: Reduce the number of stitches worked along the vertical row ends. Excess side-edge stitches create extra perimeter length and force the heavy border outward.
- Yarn joins remain visible: Change skeins at an edge whenever practical and weave each tail at least 8 cm through black stitches. A bulky knot inside the central field can distort a raised basketweave block.
How Much Yarn Does the Black Basket Weave Blanket Need?
Plan for approximately 1,500–1,750 yards of category 6 yarn for a throw close to 115 × 145 cm, including a substantial border.
That range is consistent with published super-bulky basketweave blankets of comparable dimensions. One approximately 127 × 144.5 cm basket-weave design specifies around 1,720 yards, while a 45 × 55 inch chunky basketweave blanket lists approximately 1,460–1,540 yards.
The post-stitch construction explains the high consumption. Every FPdc and BPdc travels around a vertical post, creating a longer yarn path than an ordinary stitch worked through the top loops.
Reserve the border yarn before finishing the central field. A wide super-bulky perimeter can consume several hundred additional yards depending on the number of rounds.
Choosing Black Yarn for Maximum Texture
A monochromatic black blanket needs strong stitch definition because color cannot separate neighboring blocks.
Choose a smooth or lightly textured super-bulky yarn with a consistent diameter. Highly fuzzy fibers soften the shadows between the post stitches and make the woven effect less distinct.
Plied super-bulky acrylic or wool-blend yarn creates sharper columns. Polyester blanket yarn produces a rounder, softer surface but can make individual posts less visible.
Work the swatch under the same lighting conditions in which you normally crochet. Matte black yarn can make stitch placement difficult in low light.
A pale towel or sheet placed beneath the working edge provides useful contrast while counting stitches. Bright stitch markers also remain much easier to locate than black or dark gray markers.
Making the Blanket Wider
Increase width by adding complete basketweave repeats to the foundation.
Each complete repeat contains 12 stitches: six stitches for one raised block and six for the neighboring recessed block.
Calculate the width of one 12-stitch repeat from the completed swatch.
If one repeat measures approximately 15 cm, adding one repeat increases the central field by roughly that amount before the border.
Add or remove only complete repeats when possible. A partial six-stitch block at one side changes the visual balance of the large woven pattern.
Remember that a larger width also increases yarn consumption across every subsequent row.
Making the Blanket Longer
Length is adjusted by repeating complete Section A and Section B blocks.
Continue until the central field is approximately 5–7 cm shorter than the required final measurement. The exact allowance depends on border width.
Finish with a complete five-row section.
Do not add isolated plain rows between basketweave blocks to reach a measurement. Those rows interrupt the over-and-under rhythm.
If making multiple blankets, record the number of completed sections rather than relying only on length. Super-bulky fabric can stretch slightly during use and blocking.
Why Super-Bulky Yarn Works for This Pattern
The photographed texture depends on scale. Thin yarn can create the same basketweave structure, but the individual blocks will appear finer and flatter.
Category 6 yarn creates thick posts and deep recesses with relatively few stitches. That produces the oversized woven appearance without requiring dozens of stitches inside each block.
A 9 mm hook is a useful starting point. Published basketweave designs with super-bulky yarn commonly use hooks around 8–11.5 mm depending on the specific yarn and desired density.
Move down a hook size if the post stitches have large openings. Move up if the blanket becomes rigid or the hook is difficult to pass around the posts.
Working with Black Yarn More Accurately
Use directional light rather than relying only on bright overhead illumination. Light coming from one side creates small shadows around the posts, making FPdc and BPdc positions easier to distinguish.
Count by touch when necessary. Six raised posts can be identified by running a fingertip across the surface even when the stitch tops are difficult to see.
Do not crochet several rows after noticing an uncertain stitch. Check the six-stitch group immediately.
One incorrectly placed FPdc inside a BPdc section creates a vertical ridge through what should be a recessed block. On solid black fabric, that textural error can become more noticeable than a small tension variation.
Preventing an Overly Heavy Blanket
Super-bulky basketweave fabric is inherently substantial. Finished weight depends on fiber and yardage, so check the skein weight before purchasing the complete quantity.
If the test swatch feels too dense, move up one hook size rather than reducing the basketweave block count. A slightly looser gauge reduces fabric density while preserving the pattern.
A smaller lap size is another option. Reduce both width and length while keeping the same six-stitch blocks.
Support the working blanket as it grows. Allowing a large portion to hang from the hook can alter working tension and place unnecessary strain on the active row.
Care and Blocking
Use the care instructions printed for the chosen yarn. Acrylic, polyester, wool blends, and other super-bulky fibers react differently to washing and heat.
Support the blanket fully when wet. A saturated super-bulky throw can stretch substantially if lifted from one corner.
Shape the border first, then align the basketweave blocks without flattening their raised texture.
Avoid aggressive pressing. The three-dimensional post stitches are the central design feature and should remain raised after finishing.
Allow the blanket to dry completely before folding it. Store it folded on a shelf or in a basket rather than hanging it for long periods, since its own weight can stretch the upper edge.
Conclusion
Black yarn makes consistency more important because the entire design is carried by shadow, depth, and stitch direction. Swatch one six-stitch block first, compare its width with the five-row height, and correct the proportions before committing to the full throw. Keep bright markers at both edges, reverse the post groups only after complete sections, and reserve enough yarn for the heavy outer frame. Once finished, measure the blanket flat and record the final dimensions for future versions. Save this basket weave crochet blanket pattern to Pinterest or share the black throw on Instagram with #BlackBasketWeaveBlanket. Would you keep these oversized blocks or make them smaller for a tighter woven effect?









