Introduction
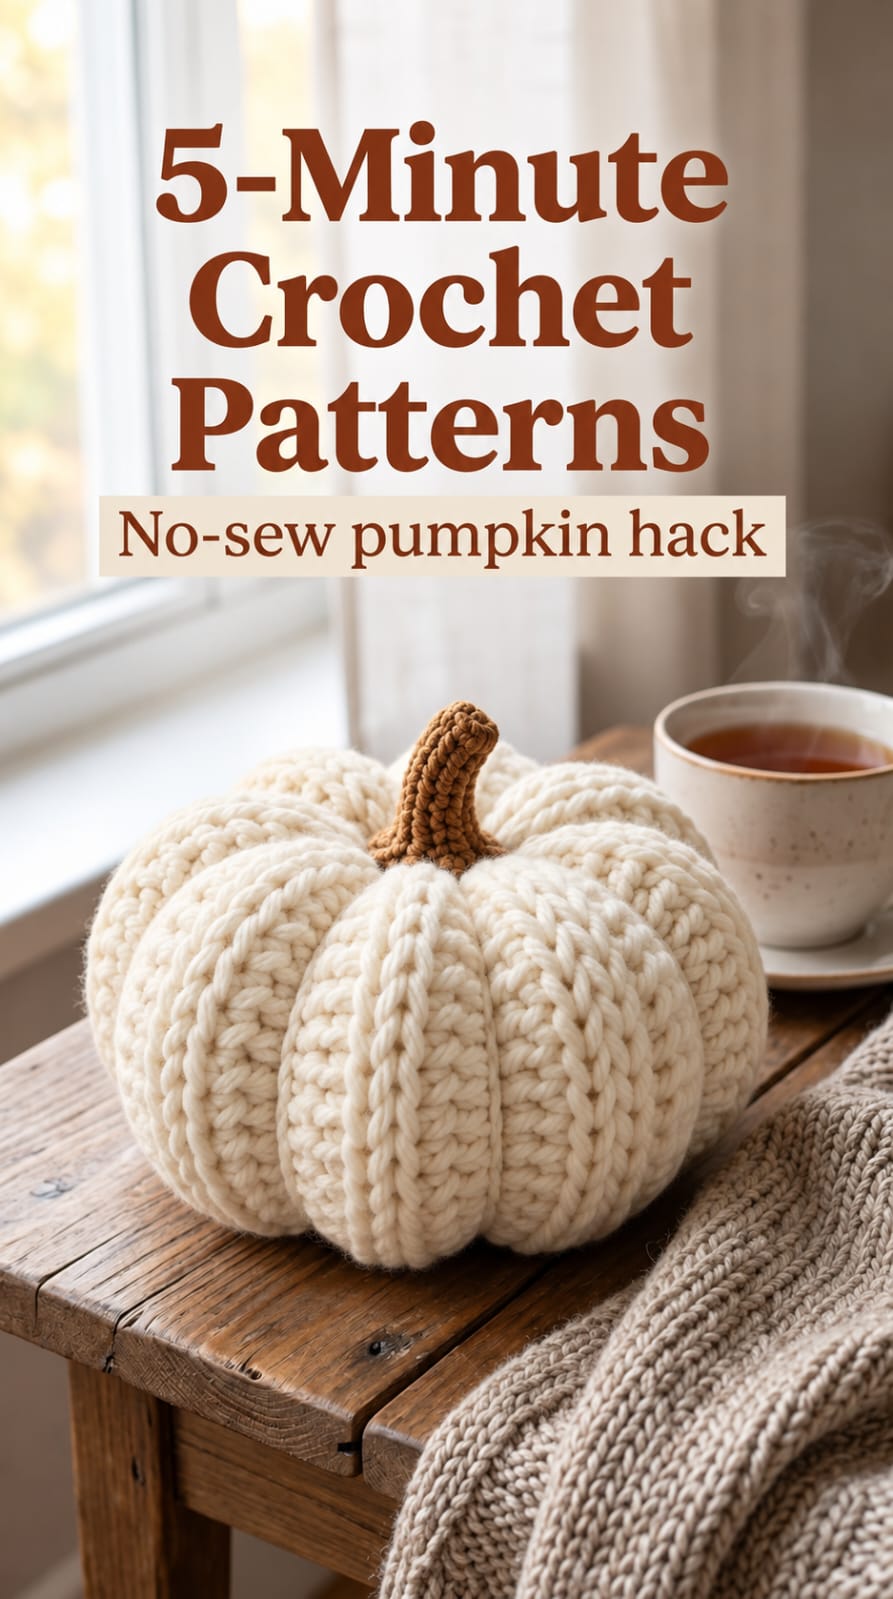
Eight thick cream ribs turn this squat stuffed form into a pumpkin before the brown stem is added. This no-sew crochet pumpkin pattern uses super-bulky yarn, a large hook, and surface shaping for a fast fall decoration. Published chunky pumpkins commonly use #6 yarn with 8–9 mm hooks, with small examples measuring roughly 9.5–13 cm wide. The compact construction works well for table displays, baskets, and seasonal sets.
The Design: What Makes This Chunky Pumpkin Different
The reference pumpkin is broad, low, and heavily segmented. Those proportions matter. A tall sphere with shallow grooves will read more like a ball, while a wide body with compressed vertical channels creates the recognizable pumpkin profile.
Super-bulky yarn supplies most of the visual volume. Published chunky pumpkin patterns commonly pair #6 yarn with hooks around 8–9 mm, and examples use roughly 17–60 yards depending on finished size and construction. This chunky crochet pumpkin follows the same material range while using a compact stuffed body.
The second structural decision is the ribbing. Eight exterior shaping strands divide the cream body after stuffing, creating deeper channels than ordinary crochet texture alone. Finally, the narrow brown stem is kept deliberately tall. Making it too wide can hide the central convergence of the ribs, one of the strongest features of this ribbed crochet pumpkin.
Project Info at a Glance
| Skill Level | Active Crochet Time | Target Size | Hook | Best For |
|---|---|---|---|---|
| Advanced beginner | About 5–15 minutes for a small version; finishing time varies | Approx. 10–13 cm wide | 8–9 mm | Fall tables, shelves, baskets, quick seasonal sets |
The exact five-minute claim depends heavily on crochet speed. Published super-bulky pumpkins provide a more useful size benchmark: one one-piece mini pumpkin measures approximately 9.5 cm wide by 7 cm high using an 8 mm hook, while another chunky design measures about 13 inches in circumference and uses a 9 mm hook.
Materials and Tools
Yarn
- Warm cream — #6 super bulky — approximately 30–50 g
- Caramel brown — #5 bulky or #6 super bulky — approximately 5–10 g
Published chunky pumpkin patterns commonly use Lion Brand Wool-Ease Thick & Quick or equivalent #6 yarn. Depending on the construction and size, published requirements range from approximately 17 yards for a 9.5 cm mini pumpkin to around 50–60 yards for larger chunky versions.
Tools
- 8 mm or 9 mm crochet hook
- Polyester fiberfill
- Locking stitch marker
- Scissors
- Long tapestry or upholstery needle — optional for deeper sculpting
If the selected #6 yarn creates visible holes with a 9 mm hook, move down to 8 mm. Dense fabric is more important than matching a specific hook number because white stuffing should not remain visible between stitches.
Abbreviations
- MR — magic ring
- ch — chain
- sc — single crochet
- inc — two single crochets in one stitch
- dec — invisible decrease
- sl st — slip stitch
- BLO — back loop only
- st/sts — stitch/stitches
For an invisible decrease, insert the hook through the front loops of the next two stitches, yarn over and pull through both front loops, then complete one single crochet.
Pattern — Step by Step
Use US crochet terminology. Work the pumpkin in a continuous spiral unless stated otherwise. Keep a stitch marker in the first stitch of each round.
Chunky Pumpkin Body
Yarn: warm cream.
R1: 6 sc in MR (6)
R2: inc ×6 (12)
R3: (1 sc, inc) ×6 (18)
R4: (2 sc, inc) ×6 (24)
R5: (3 sc, inc) ×6 (30)
The 30-stitch round forms the maximum circumference for this compact version.
R6: sc around (30)
R7: sc around (30)
R8: sc around (30)
R9: sc around (30)
The body should now be wider than it is tall. If it has become noticeably cylindrical, do not add more straight rounds.
R10: (3 sc, dec) ×6 (24)
R11: (2 sc, dec) ×6 (18)
Add polyester fiberfill. Push stuffing toward the outer circumference first and leave a small amount of compressibility in the center.
R12: (1 sc, dec) ×6 (12)
Add the final small pieces of stuffing.
R13: dec ×6 (6)
Fasten off, leaving approximately 100–120 cm of cream yarn if the same strand will be used to sculpt the pumpkin.
Thread the tail through the front loops of the final six stitches and pull the opening closed.
No-Sew Pumpkin Shaping
The body is already one continuous crochet piece, so there are no separate pumpkin sections to assemble. The strong ribs in the reference are created after stuffing.
Thread the long cream tail onto a tapestry needle. Pass the needle through the center of the pumpkin from top to bottom.
Bring the yarn around the outside and return through the top center.
Pull until the strand sinks into the body and creates a visible vertical channel.
Repeat the process at evenly spaced positions around the pumpkin.
Create eight ribs for the dense segmented appearance shown in the reference.
Do not fully tighten the first rib before making the remaining seven. Establish all eight channels with moderate tension, inspect the pumpkin from above, then tighten each section gradually.
The finished body should remain rounded between the channels. If the segments flatten into narrow wedges, loosen the sculpting yarn slightly.
True No-Sew Ribbing Alternative
If avoiding a yarn needle completely is the priority, the body can be crocheted with raised-looking vertical lines instead. This version will not produce channels as deep as external sculpting, but it removes the separate shaping step.
Work the body rounds as written, but periodically use elongated surface slip stitches along eight vertical lines after completing the body.
Insert the hook through the fabric from the outside, catch the cream yarn from inside the pumpkin, and pull up a loop.
Continue upward along the same column.
Keep every surface stitch tight enough to indent the body slightly but loose enough that the fabric does not buckle.
Repeat around all eight sections.
Brown Stem
Yarn: caramel brown.
The reference uses a tall, narrow stem with a slight bend rather than a short wooden-style stalk.
R1: 6 sc in MR (6)
R2: sc around in BLO (6)
R3: sc around (6)
R4: sc around (6)
R5: sc around (6)
R6: sc around (6)
For a slightly curved stem, work the following optional shaping round:
R7: 3 sl st, 3 sc (6)
The shorter slip stitches on one side pull the stem into a mild curve.
Fasten off, leaving a tail for attachment.
If a literal no-sew finish is required, crochet the stem directly into the six stitches surrounding the pumpkin’s top opening before completely closing the body. Otherwise, attaching the finished stem with the brown tail gives a cleaner and stronger result.
Direct-Attach No-Sew Stem Method
Complete the pumpkin through R12 but stop before the final decrease round.
Add the remaining stuffing.
Work R13: dec ×6 (6).
Do not fasten off the cream yarn yet.
Pull a loop of brown yarn through one of the six remaining top stitches and work six single crochets evenly around the opening.
Continue upward in brown:
Stem R1: sc around (6)
Stem R2: sc around (6)
Stem R3: sc around (6)
Stem R4: sc around (6)
Stem R5: 3 sl st, 3 sc (6)
Fasten off the brown yarn and draw the end down through the hollow center of the stem with the hook.
Close and secure the cream body opening beneath the stem. This method eliminates a separately sewn stem while keeping the top attachment concentrated around six stitches.
How to Make the Pumpkin Look More Ribbed
The photograph uses unusually strong segmentation. Yarn thickness alone will not produce that appearance.
First, keep the stuffing firm around the outer lobes but slightly softer through the center axis. The shaping strands need somewhere to sink.
Second, place every sculpting strand through approximately the same top and bottom center points. When those points drift outward, the channels become diagonal.
Third, divide the circumference before tightening. Eight ribs require eight reasonably equal sections. Looking directly down at the stem is the easiest way to judge spacing.
Finally, tighten opposite channels in pairs. Shape the first groove, then work the groove directly opposite it. Repeat at 90 degrees before filling the remaining spaces. This reduces distortion while the pumpkin is being compressed.
Assembly
- Finish stuffing the cream body before closing the final six stitches.
- Pull the top opening closed while keeping the center accessible for sculpting.
- Create the first vertical groove from the top center to the bottom center and back around the outside.
- Create a second groove directly opposite the first so the body remains balanced.
- Add two more grooves at approximately 90-degree angles, dividing the pumpkin into four initial sections.
- Add one shaping strand between each existing groove to produce eight total ribs.
- Adjust all eight channels until the lobes have comparable widths and the body remains broad rather than tall.
- Attach or directly crochet the brown stem into the center of the crown.
- Bend the upper stem slightly to one side and check that it remains stable rather than folding at its base.
- Set the pumpkin on a flat surface and redistribute the lower stuffing until the body sits without rolling.
The finished pumpkin should have eight rounded cream lobes, deep vertical channels, a recessed crown, and one narrow brown stem.
7 Technical Tips
- Stuffing shows through the fabric: Move from a 9 mm hook to an 8 mm hook if large openings appear between the single crochets. Super-bulky yarn should form a dense shell around white fiberfill.
- The pumpkin becomes too tall: Stop the straight section after R9. Adding even two extra 30-stitch rounds changes the compact pumpkin into a more cylindrical shape.
- The bottom will not sit flat: Keep slightly less stuffing in the central 3–4 cm of the base. A densely packed bottom center creates a rounded contact point and makes the pumpkin rock.
- Ribs disappear: Leave enough compression in the stuffing for each shaping strand to sink approximately 5–10 mm into a chunky body. Overstuffing prevents deep channels.
- One lobe becomes narrow: Establish all eight ribs before final tightening. Correct the spacing while the sculpting strands still move freely through the body.
- Stem collapses: Keep the six-stitch tube narrow and use a firm tension. A stem that expands beyond six stitches becomes disproportionately wide and bends at the attachment point.
- Top develops a large hole: Draw the final six body stitches together before applying strong sculpting tension. The shaping strands should pass through the closed center rather than enlarge the opening.
Can This Crochet Pumpkin Really Take Five Minutes?
The large text in the reference describes a “5-Minute Crochet” project, but completion time needs qualification. Crochet speed varies, and published chunky pumpkin patterns generally describe themselves as quick projects rather than guaranteeing a universal five-minute completion time.
Super-bulky yarn does make the project substantially faster because each stitch covers more area. A published no-sew mini pumpkin using #6 yarn needs only about 17 yards and measures approximately 9.5 cm wide by 7 cm high. Other chunky patterns use 30–60 yards for larger versions.
An experienced crocheter working a very small version may complete the basic body rapidly. Stuffing, sculpting eight ribs, finishing the stem, and weaving ends add additional time.
For WordPress readers, describing the design as a quick chunky crochet pumpkin is more accurate than promising every maker an exact five-minute finish.
Choosing the Right Yarn
Super-bulky #6 yarn is the main reason this pumpkin develops such substantial ribs with relatively few stitches. Published chunky crochet pumpkins frequently specify Wool-Ease Thick & Quick or comparable #6 yarn with 8–9 mm hooks.
One published 9 mm chunky pumpkin uses approximately 50 g of super-bulky yarn. Another wide-ribbed example uses about 30 yards, while a small no-sew design uses approximately 17 yards. The variation comes from body dimensions, stitch pattern, and construction method.
For the cream pumpkin shown here, choose a warm ivory rather than pure optic white if matching the reference palette. Smooth or lightly fuzzy yarn both work, but heavy chenille changes the stitch definition and may make the sculpting strands harder to hide.
The brown stem can use a thinner yarn if necessary. Hold two strands together when the difference in thickness makes the stem look undersized.
Making a Smaller No-Sew Pumpkin
For a miniature version, stop increasing at 24 stitches.
R1: 6 sc in MR (6)
R2: inc ×6 (12)
R3: (1 sc, inc) ×6 (18)
R4: (2 sc, inc) ×6 (24)
R5–R7: sc around (24)
R8: (2 sc, dec) ×6 (18)
R9: (1 sc, dec) ×6 (12)
R10: dec ×6 (6)
Stuff before the final decrease and use six rather than eight sculpting channels if the finished diameter is below approximately 10 cm. Too many grooves on a very small pumpkin produce narrow lobes and excessive compression.
Making a Larger Chunky Pumpkin
For a larger centerpiece, continue increasing after the 30-stitch round.
Next Increase Round: (4 sc, inc) ×6 (36)
For a still larger body:
Next Increase Round: (5 sc, inc) ×6 (42)
Work enough plain rounds to produce a body that remains slightly wider than tall. Then reverse the shaping in six-stitch increments.
From 42 stitches, decrease to 36, then 30, 24, 18, 12, and finally 6 stitches.
Published large super-bulky pumpkins can use more than 100 yards, so check the remaining skein before increasing substantially beyond the photographed size.
Why the Pumpkin Needs Firm but Flexible Stuffing
There are two competing requirements. The lobes need enough fiberfill to stay rounded, but the center must compress under the sculpting strands.
Add stuffing in small pieces rather than inserting one large ball. Push the first pieces against the outside wall, especially around the widest rounds.
Keep the central vertical axis slightly softer. When the needle passes through this area, the shaping yarn can draw the top and bottom toward one another and create the squat silhouette.
After sculpting, add no additional stuffing. Trying to force fiberfill into a finished channel can disturb the spacing of neighboring ribs.
Using the Pumpkin for Fall Decor
The neutral cream body makes this version easier to combine with brown, sage, rust, and natural wood than a bright orange pumpkin. The large rib texture supplies the seasonal shape without depending on color.
For a grouped display, make three sizes using the same yarn. Change stitch counts rather than switching yarn weights so all three pumpkins retain matching stitch texture.
Place the largest pumpkin at the back and use 24- or 18-stitch versions toward the front. Vary the stem height slightly while keeping the same brown yarn.
This stuffed design is intended as decorative crochet rather than a functional container. Keep it away from open flames, hot surfaces, and other heat sources.
Conclusion
The speed of this project comes from super-bulky yarn, but the eight sculpted channels are what produce the oversized ribbed appearance shown in the reference. Crochet the body only until it is wider than tall, stuff the outer lobes firmly, and leave enough central compression for the shaping strands to sink into the surface. Make one small version first and record the finished diameter before scaling the stitch count. Save this no-sew crochet pumpkin pattern to Pinterest or share the finished version on Instagram with #ChunkyNoSewPumpkin. For this cream pumpkin specifically, would you keep all eight deep ribs or reduce the shaping to six broader sections?









