Introduction
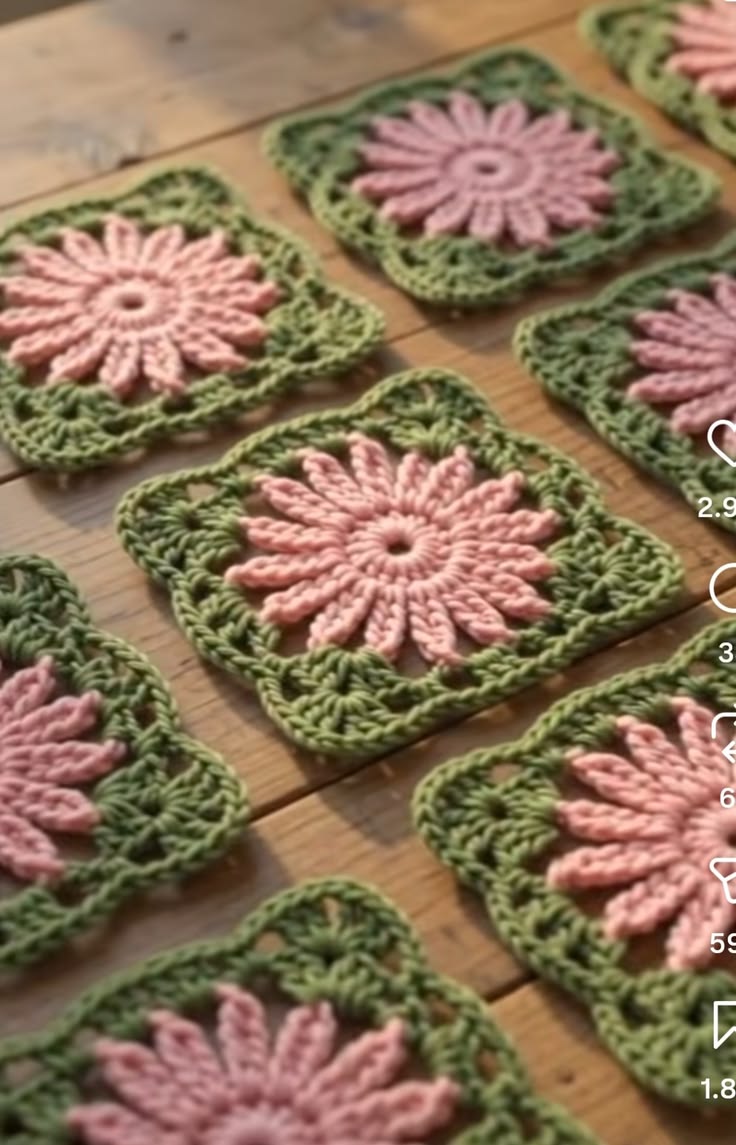
Sixteen narrow petals change the geometry of this flower before the green square even begins. This daisy granny square crochet pattern builds a dimensional pink flower over an olive-green background, creating the raised floral structure visible in the reference. Use DK yarn with a 4 mm hook for a square approximately 9–10 cm wide. The finished motifs can be joined into bags, cushion panels, table runners, or blankets.
The Design: What Makes This Daisy Granny Square Different
The defining feature is the petal count. Many traditional daisy granny squares use eight or twelve petals, but the photographed motif has a much denser ring of long pink petals. This version therefore uses 16 raised petals arranged around a compact center.
The petals are worked before the olive-green background. Each petal extends outward from the center and remains physically above the later rounds instead of being trapped inside the square. The green section then converts the circular flower into four sides using progressively taller stitches near the corners.
That separation is important. A 3D flower granny square loses much of its definition when the background stitches pull directly on the petal tips. The most common failure is overcrowding the center, which causes adjacent petals to twist instead of lying radially around the flower.
Project Info at a Glance
| Skill Level | Time | Finished Size | Hook | Best For |
|---|---|---|---|---|
| Intermediate beginner | 35–50 minutes per square | Approx. 9–10 cm | 4 mm | Blankets, bags, cushions, table runners |
Published daisy-square patterns using a 4 mm hook commonly finish near 9–10 cm, although yarn choice and tension will change the final measurement.
Materials and Tools
Yarn
- Dusty pink — DK/light worsted — approximately 4–6 g per square
- Olive or sage green — DK/light worsted — approximately 7–10 g per square
A smooth cotton, cotton-acrylic blend, or tightly spun acrylic works well because the elongated petals need visible stitch definition. Avoid a heavily fuzzy yarn when matching the photographed motif; fibers around the stitch surface can obscure the narrow petal shape.
Tools
- 4 mm crochet hook
- Tapestry needle
- Scissors
- Stitch marker
- Blocking pins
- Blocking mat
Abbreviations
- MR — magic ring
- ch — chain
- sl st — slip stitch
- sc — single crochet
- hdc — half double crochet
- dc — double crochet
- tr — treble crochet
- FLO — front loop only
- BLO — back loop only
- st/sts — stitch/stitches
- sp — space
Keep the final pull-through of each petal slightly loose; tightening it excessively compresses the top of the petal and causes the raised section to curl sideways.
Pattern — Step by Step
This motif is worked in rounds using US crochet terminology. The pink flower is completed first. Green yarn is then joined behind the petals to build the background and square the circular motif.
Pink Flower Center
Yarn: dusty pink.
R1: Make an MR. Ch 1, work 16 sc into MR. Join with sl st to first sc. (16)
Pull the magic ring closed, but do not tighten it until the central opening disappears completely. The photographed flower retains a small visible opening at its center, so leaving a controlled opening of approximately 3–4 mm gives a closer visual result.
R2: Ch 1. Work 1 sc in each stitch around. Join with sl st. (16)
Do not fasten off.
Long Raised Petals — Make 16
Continue with dusty pink.
Each stitch from R2 supports one petal. Work all petals from the front of the flower so they remain raised above the green background.
Petal 1: Ch 6.
Starting in the second chain from the hook, work:
1 sl st, 1 sc, 1 hdc, 1 dc, 1 hdc.
Slip stitch into the same R2 stitch where the chain began.
Slip stitch into the next stitch.
Repeat the petal sequence once in each remaining stitch around until there are 16 petals.
After the final petal, slip stitch at its base and fasten off.
Leave a 10–12 cm tail for weaving.
The petals should form a dense radial ring. Each one should point away from the center rather than crossing its neighbor.
Alternative Fuller Petal
If the selected DK yarn produces petals that look too narrow, use the following variation instead:
Ch 7. Starting in the second chain from the hook, work 1 sl st, 1 sc, 1 hdc, 2 dc, 1 hdc. Slip stitch back into the same center stitch.
This adds approximately one stitch of visible length and increases the widest section without changing the 16-petal arrangement.
Use one petal version consistently throughout a square. Mixing the two lengths in the same motif makes the flower appear irregular after blocking.
Preparing the Green Background
Yarn: olive or sage green.
Turn the flower over and identify the stitch structure immediately behind the pink petals.
Join green yarn behind any petal base.
R3: Ch 1, work 1 sc behind each petal around. Join with sl st to first sc. (16)
Check the front before continuing. All 16 petals should remain free and should sit above the green round rather than being caught inside it.
Green Expansion Round
Continue with olive green.
R4: Ch 3, dc in same stitch, 2 dc in each remaining stitch around. Join with sl st to top of beginning ch-3. (32 dc)
This round creates enough circumference to move the green fabric beyond the tips and bases of the pink flower.
Spread the motif flat before beginning the square conversion. If the green round cups upward, remake R4 with slightly looser tension.
Turning the Flower into a Square
Continue with olive green.
The next round establishes four corners. Place a stitch marker every eight stitches around R4 before beginning if identifying the four sections visually is difficult.
R5: Ch 1.
Work the following sequence across the first side:
1 sc in next st,
1 hdc in next st,
1 dc in next st,
1 tr in next st.
In the next stitch work:
(2 tr, ch 2, 2 tr) — first corner.
Continue:
1 tr in next st,
1 dc in next st,
1 hdc in next st,
1 sc in next st.
Repeat the side-and-corner shaping around the motif, positioning four (2 tr, ch 2, 2 tr) corner groups as evenly as possible.
Join with sl st.
The motif should now have four identifiable sides. Minor waviness at this stage is acceptable because the final border and blocking establish the finished geometry.
Final Green Granny Border
Continue with olive green.
Slip stitch to the nearest corner ch-2 space.
R6: Ch 3, work 2 dc, ch 2, 3 dc in the same corner space.
Work 3 dc groups evenly across the first side, placing each group into the available spaces between stitch groups.
In the next corner work:
(3 dc, ch 2, 3 dc).
Repeat across all four sides.
At each corner work:
(3 dc, ch 2, 3 dc).
Join with sl st to the top of the beginning ch-3.
Fasten off. Leave approximately 12 cm of yarn and weave the tail into the back of the green border.
Checking the Flower Shape
Place the finished square on a flat surface before blocking. The pink center should remain approximately circular, while the 16 petals should radiate outward with similar spacing.
The green background must remain behind the petals. Pull any trapped petal gently toward the front before blocking.
Measure diagonally from corner to corner as well as horizontally across the square. A large difference between the two measurements usually indicates excessive tension in one corner.
Assembly and Blocking
- Weave the pink center tail through several stitches on the back of the flower without pulling the central ring completely closed.
- Arrange all 16 petals so each points away from the flower center.
- Turn the square over and weave the remaining pink tail through at least 3 cm of matching stitches.
- Check that no green stitch accidentally passes through the front of a pink petal.
- Measure all four sides before blocking and identify any side that is more than approximately 5 mm shorter than the others.
- Place the square face up on a blocking mat.
- Pin the four corners first, bringing the motif to approximately 9–10 cm across.
- Add pins along the sides without stretching the pink flower itself.
- Arrange the petal tips individually while the square is pinned so the 16-petal ring remains symmetrical.
- Allow the motif to dry completely before removing the pins or joining it to another square.
The completed motif should have a dimensional pink flower sitting above a flat olive-green square with four clearly defined corners.
7 Technical Tips
- Petals twisting sideways: Check the chain tension before changing the stitch sequence. If the six-chain foundation is significantly tighter than the return stitches, the petal will curve instead of pointing outward.
- Uneven flower center: Count all 16 stitches in R1 before beginning R2. One missing stitch creates a visible gap in the petal ring because every center stitch corresponds to one petal.
- Petals disappearing behind the square: Check the front after completing the first green round. A petal accidentally caught by a green stitch will lose most of its raised 3D effect.
- Green background cupping: Lay R4 flat before continuing. If the edges rise more than approximately 5 mm from the work surface, loosen the double-crochet tension rather than forcing the motif flat with the next round.
- Rounded corners: Keep the ch-2 corner spaces loose enough to accept the next corner group. Tight corner chains pull the adjacent sides inward and prevent the motif from blocking into a clean square.
- Different finished sizes: Measure every completed motif before joining. Even a 5 mm difference becomes significant when ten or more granny squares are arranged across a blanket panel.
- Petal tails becoming visible: Weave pink ends only through pink stitches whenever possible. Carrying a pink tail through the olive background can expose contrasting fibers when the square stretches during joining.
How to Keep 16 Petals Even
The photographed square depends on repetition. A dense ring of elongated petals makes small variations more obvious than they would be in an eight-petal flower.
Count the center stitches before starting the first petal. There must be 16 usable positions. Once the first four petals are complete, place the flower flat and check their length before continuing.
If all four lean in the same direction, the foundation chains are probably too tight. If their lengths vary, check that every petal begins with the same number of chains and that the first slip stitch is consistently placed in the second chain from the hook.
Do not rely on blocking to correct major petal differences. Blocking can organize the direction of a petal, but it cannot add missing stitches or compensate for a petal that is substantially shorter than its neighbors.
Choosing Yarn for Raised Flower Granny Squares
DK and light worsted yarns are practical choices for this motif because the center contains 16 individual petals. Thick yarn increases the diameter rapidly and can crowd the flower before the green background begins.
Published daisy granny-square designs show considerable variation in yarn and hook combinations. Examples include DK yarn with a 4 mm hook and Aran yarn with larger hooks. Finished dimensions can range from approximately 9 cm to 15 cm depending on construction, yarn, and hook size.
For a result close to the supplied photograph, prioritize stitch definition over bulk. Smooth cotton and cotton-acrylic yarns make the individual chains, raised petals, and green border stitches easier to distinguish.
The pink and olive combination also affects definition. A medium dusty pink against a muted green creates enough contrast to separate the flower visually without adding another center color.
Making a Larger Daisy Granny Square
Do not enlarge the flower itself unless a substantially larger bloom is required. The easier method is to add more green granny rounds after R6.
For each additional round, slip stitch to a corner space and work:
(3 dc, ch 2, 3 dc) in every corner.
Across each side, work 3 dc into every available granny space, separating groups as required by the established stitch structure.
Each extra round increases the square while keeping the raised flower centered.
When making multiple motifs for one project, add exactly the same number of border rounds to every square. Record the final side measurement after blocking rather than relying only on round count.
Using the Squares in a Blanket or Bag
Make every motif separately and block all squares to the same dimensions before joining. This matters particularly with a 3D daisy granny square because the flower adds bulk to the center while the green corners remain comparatively flat.
For a small bag panel, arrange four squares in a 2 × 2 grid. A larger tote can use six or eight motifs depending on the required dimensions and strap construction.
For blankets, calculate the finished width from the blocked measurement. Ten 10 cm squares create approximately 100 cm of motif width before allowing for the joining method and outer border.
A mattress stitch or slip-stitch join keeps the green edges controlled. If the raised flowers are the main feature, join from the back so the seam does not compete visually with the petals.
Color Variations
The reference uses dusty pink for the flower and olive green for the square, and that two-color arrangement keeps attention on the petal texture.
For a botanical variation, use cream petals with sage green. Dark burgundy petals against moss green create stronger contrast, while pale peach with muted eucalyptus produces a lighter version without changing the stitch construction.
Keep the entire flower one color when the elongated petal shape is the main design feature. Introducing a contrasting center changes the visual structure and makes the motif read more like a conventional daisy.
Conclusion
Count the center before judging the finished flower: all 16 petal positions determine the symmetry of this motif. Once the pink section is correct, keep every petal free while the olive background is built behind it, then block the four corners to the same measurement. Make one test square and record its blocked dimensions before calculating a blanket or bag layout. Save this daisy granny square crochet pattern to Pinterest or share the finished motif on Instagram with #RaisedDaisyGrannySquare. For the next square, would you keep the dusty pink and olive combination shown here, or change the flower while retaining the green border?









