Introduction
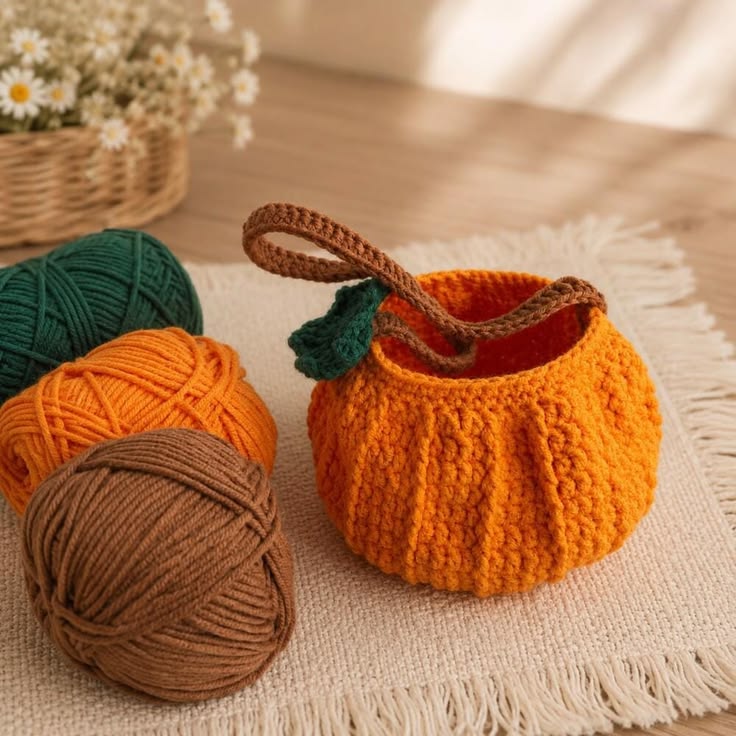
A pumpkin needs deep vertical furrows or the orange sphere reads as an ordinary bowl. This pumpkin bag crochet pattern builds those ribs into a compact open basket using Aran yarn, a 4 mm hook, and standard amigurumi shaping. The target size is approximately 12 cm across and 13 cm high. Intermediate beginners can use the finished basket for wrapped treats or small seasonal items.
The Design: What Makes This Pumpkin Bag Different
Three structural choices define this version. First, the base expands to 36 stitches before the sides rise, producing a squat pumpkin rather than a narrow pouch. Second, raised surface columns divide the orange shell visually into pumpkin segments; without strong vertical definition, a crochet pumpkin basket tends to resemble a plain orange container. Third, the upper rounds decrease before the rim is stabilized, pulling the opening inward while preserving useful internal volume.
The handle attaches near opposite sides of the opening rather than beneath the widest point. That keeps the brown loop visually connected to the stem area. The green leaf is deliberately small so it reads as an accent rather than a lid.
A common mistake in ribbed pumpkin crochet is tightening the sculpting or surface stitches so aggressively that the opening puckers. Moderate, equal tension gives clearer segmentation.
Project Info at a Glance
| Skill Level | Time | Finished Size | Hook | Best For |
|---|---|---|---|---|
| Intermediate beginner | 3–5 hours | Approx. 12 cm diameter × 13 cm high | 4 mm | Wrapped treats, small accessories, autumn display |
Materials and Tools
Yarn
- Pumpkin orange — Aran/10 ply — 50 g — DROPS Paris or comparable firm cotton
- Dark brown — Aran/10 ply — approximately 15–20 g for the handle
- Forest green — Aran/10 ply — approximately 5–10 g for one leaf
Choose yarn with enough structure to maintain the pumpkin ridges. Firm cotton or a cotton-rich Aran yarn gives the basket walls more definition than very soft or heavily brushed fibers.
Tools
- 4 mm crochet hook
- Tapestry needle
- Locking stitch markers
- Scissors
- Rust-resistant pins
- Polyester stuffing — optional for lightly shaping the base
Safety eyes are not required because this pumpkin basket has no face. A smaller 3.5 mm hook can be used for the handle if your normal tension produces a loose or stretchy cord.
Abbreviations
- MR — magic ring
- sc — single crochet
- inc — two single crochets in one stitch
- dec — single crochet decrease
- sl st — slip stitch
- ch — chain
- BLO — back loop only
- FLO — front loop only
- st/sts — stitch/stitches
For an invisible decrease, insert the hook through the front loops of the next two stitches, yarn over, draw through both front loops, then complete one single crochet.
Pattern — Step by Step
Work the main pumpkin in a continuous spiral unless a round specifically states otherwise. Place a stitch marker in the first stitch and move it upward after every completed round.
Pumpkin Body / Basket
Yarn: pumpkin orange.
R1: 6 sc in MR (6)
R2: inc ×6 (12)
R3: (1 sc, inc) ×6 (18)
R4: (2 sc, inc) ×6 (24)
R5: (3 sc, inc) ×6 (30)
R6: (4 sc, inc) ×6 (36)
The base now contains the 36-stitch medium-size plateau.
R7: sc around in BLO (36)
R8: sc around (36)
R9: sc around (36)
R10: sc around (36)
R11: sc around (36)
R12: sc around (36)
R13: sc around (36)
R14: sc around (36)
R15: sc around (36)
R16: sc around (36)
R17: sc around (36)
R18: sc around (36)
Do not stuff the basket walls. Keep the main cavity open.
R19: (4 sc, dec) ×6 (30)
R20: sc around (30)
R21: (3 sc, dec) ×6 (24)
R22: sc around (24)
R23: FLO sc around (24)
R24: sc around (24)
Slip stitch into the next stitch. Fasten off and weave in the end.
The shaping intentionally stops at 24 stitches. Continuing the standard decrease sequence would close the top, while this design requires an open basket cavity.
Raised Pumpkin Ribs — Make 6
Yarn: pumpkin orange.
Identify six evenly spaced vertical columns around the pumpkin body. At the widest section, each rib should sit approximately six stitches from the next.
Insert the hook near R7 and pull up an orange loop.
Row 1: Surface slip stitch upward through the selected vertical line until reaching R22.
Fasten off.
Repeat for all six ribs. Keep the tension consistent so each surface line draws the fabric inward slightly without collapsing the wall.
If one rib shortens the basket wall by more than approximately 5 mm, remove that line and crochet it again with looser tension.
For more pronounced pumpkin channels, work a second surface-slip-stitch line immediately beside each first line.
Upper Rim
Yarn: pumpkin orange.
Join orange yarn at the back of R24.
R1: ch 1, sc in each stitch around, sl st to first sc (24)
R2: ch 1, reverse sc in each stitch around (24)
Fasten off. Leave a 10 cm tail and weave it through several stitches on the inside of the basket.
The reinforced edge supports the two handle attachment points and reduces stretching around the opening.
Brown Handle
Yarn: dark brown.
The handle is designed as a short carrying loop rather than a long shoulder or crossbody strap.
Foundation: Ch 46.
Row 1: Starting in the second chain from the hook, 45 sc (45)
Row 2: ch 1, turn, 45 sc (45)
Fasten off, leaving approximately 25 cm of yarn at each end for attachment.
For a rounder handle, fold the strip lengthwise and whipstitch the long edges together. The finished loop should measure approximately 24–28 cm after normal crochet contraction.
A longer handle can be made by increasing the starting chain, but a short loop keeps the proportions close to the photographed pumpkin basket.
Green Leaf
Yarn: forest green.
Foundation: Ch 8.
Row 1: Starting in the second chain from the hook, sl st, sc, hdc, dc, dc, hdc, 3 sc in the final chain.
Continue along the opposite side of the foundation chain: hdc, dc, dc, hdc, sc, sl st.
Ch 4. Slip stitch into the second chain from the hook and into each of the remaining two chains to create a short central stem.
Fasten off and leave approximately 20 cm of yarn for sewing.
If the outer edges curl noticeably, block the leaf flat before attaching it to the pumpkin.
Optional Internal Base Disc
Yarn: pumpkin orange.
The internal disc is optional. Add it when the basket needs a firmer bottom for holding small objects.
R1: 6 sc in MR (6)
R2: inc ×6 (12)
R3: (1 sc, inc) ×6 (18)
R4: (2 sc, inc) ×6 (24)
R5: (3 sc, inc) ×6 (30)
R6: (4 sc, inc) ×6 (36)
Fasten off and leave a 30 cm sewing tail.
Position the disc inside the pumpkin against the bottom. Sew its outer edge to the BLO ridge created at R7. This creates a double-layer base while keeping the main cavity empty.
Optional Stem Tab
Yarn: dark brown.
The brown handle already supplies the stem color visible at the top of the pumpkin. Add this small tab only when a separate stem is wanted.
R1: 6 sc in MR (6)
R2: sc around in BLO (6)
R3: sc around (6)
R4: sc around (6)
Fasten off and leave a 20 cm sewing tail.
Flatten the lower end slightly and position the stem beside the green leaf without blocking the basket opening.
Assembly
- Place the pumpkin body on a flat surface and check that all six orange ribs are distributed evenly around the circumference.
- Shape the base from inside the basket until the lower edge sits flat. Avoid heavily stuffing the base because the interior is intended to remain usable.
- Check the 24-stitch upper rim and correct any area stretched during the surface-crochet stage.
- Position one end of the brown handle just inside the rim, approximately three stitches from the back-center point.
- Position the opposite handle end across the opening. Pin both ends and confirm that the loop is not twisted.
- Sew each handle end through at least three rim stitches. Pass through the attachment area several times to distribute carrying pressure.
- Place the green leaf beside one handle attachment with the pointed end angled outward.
- Sew the leaf along its short stem and central base only. Leave the outer section unattached so the leaf maintains its shape.
- Add the optional internal base disc or stem tab. Weave each yarn tail through at least 3 cm of dense crochet before trimming.
- Set the pumpkin upright and adjust the six ribs so the segments have comparable widths.
The completed piece is an open ribbed pumpkin basket with a short brown carrying handle and one green leaf.
7 Technical Tips
- Prevent a drifting round start: Move a locking stitch marker after the final stitch of every round. A one-stitch error during R8–R18 shifts the decrease positions and can produce an asymmetric opening.
- Correct a soft base: Add the optional 36-stitch internal disc if the 12 cm base folds when the basket is lifted. Heavy stuffing reduces the usable internal space and can round the bottom excessively.
- Avoid visible decrease bars: Work R19 and R21 with invisible decreases through the front loops. Standard decreases can leave six horizontal marks around the upper pumpkin.
- Prevent rim distortion: Complete the entire orange body before attaching the handle. Installing the handle too early can pull two sections inward and turn the 24-stitch opening into an oval.
- Control rib tension: A surface-crochet rib should shorten the wall by no more than approximately 5 mm. Excessive tension creates one deep channel while leaving neighboring segments comparatively flat.
- Check handle alignment: Pin both ends and lift the empty basket approximately 10 cm from the work surface before sewing permanently. An attachment point positioned even two stitches away from its intended location can make the basket hang unevenly.
- Secure handle tails: Weave each tail through at least 3 cm of dense crochet and reverse direction once. A single straight pass can loosen because the handle repeatedly flexes at the attachment point.
Why Aran Yarn Works for This Pumpkin
The pumpkin needs enough stitch definition for the orange ridges and recessed channels to remain visible. Aran-weight cotton provides a useful combination of density and structure for this type of small basket.
A softer DK yarn can also work, but finished measurements will depend on the yarn fiber, hook size, and individual tension. Make the first six rounds before committing to the full project and measure the resulting base.
Very soft chenille creates a rounder, thicker pumpkin. The tradeoff is reduced definition in the smaller surface-crochet ribs. If matching the photographed structure is the priority, use a smooth yarn with clearly visible stitches.
Sizing and Gauge Adjustments
The target measurement is approximately 12 cm in diameter and 13 cm high. Treat those dimensions as a working target because yarn choice and crochet tension can change the final measurements.
If the 36-stitch base exceeds approximately 13 cm before the side rounds begin, change the yarn or hook size rather than attempting to compensate by tightening the surface ribs later.
For a larger basket, add one conventional increase round after R6:
R7: (5 sc, inc) ×6 (42)
Continue the side section at 42 stitches. When shaping the top, decrease by six stitches per decrease round to maintain the same mathematical progression.
For a smaller pumpkin, stop increasing when the base reaches 30 stitches. Shorten the brown handle proportionally so it does not dominate the smaller body.
Conclusion
The finished basket should measure close to 12 cm across when the selected yarn, hook, and tension match the target gauge. Check the six ribs first, then test the brown handle under the actual weight the basket will carry before weaving in the final attachment tails. Save this pumpkin bag crochet pattern to Pinterest with a clear side-view project photo, or post the finished version on Instagram with #RibbedPumpkinBag so the rib placement remains visible. If you modify the construction, record the change before making another basket. Which detail would you change on this pumpkin specifically: the number of ribs, the green leaf size, or the brown handle length?









