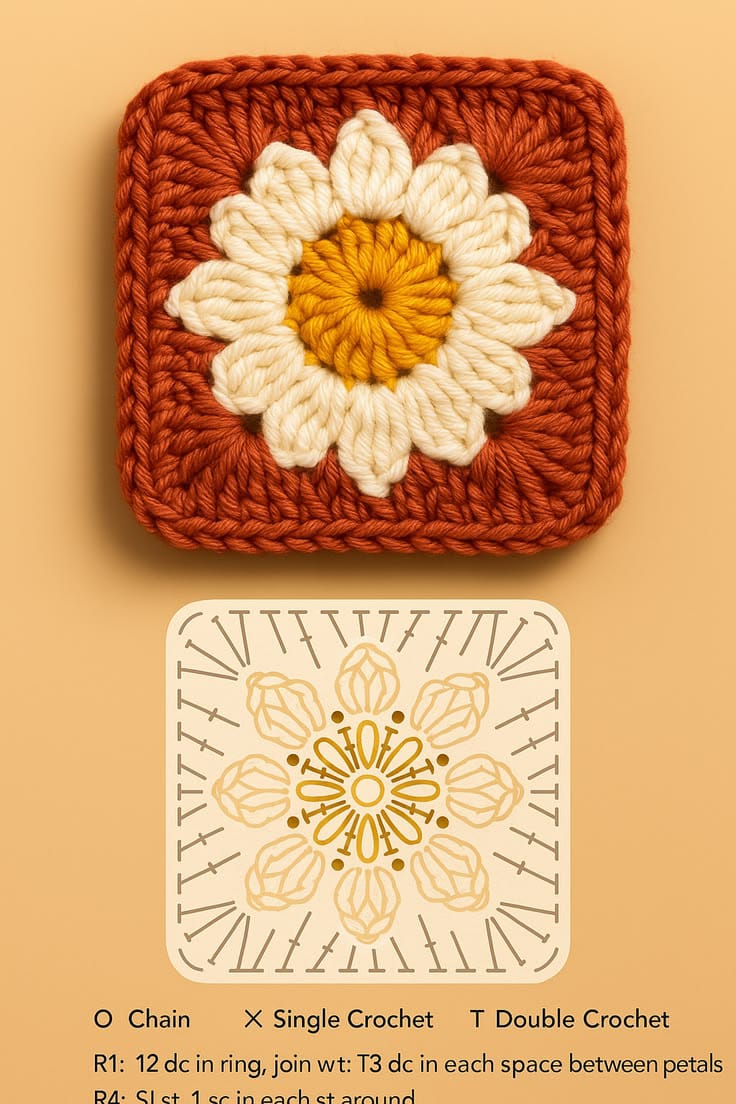
Twelve cream petals have to divide cleanly into four corners or a daisy square begins turning into a circle. This 12 petal daisy granny square crochet pattern uses a mustard center, raised ivory petals, and a substantial rust background to create an autumn flower motif. Worked with worsted or light-worsted cotton and a 4.0 mm hook, the finished square targets approximately 14–15 cm after blocking.
What Makes This Daisy Granny Square Different
The flower is built around a 12-position center. Each center position supports one dimensional petal, producing a symmetrical daisy before any square shaping begins. The rust background is added only after the flower is complete, which keeps the cream petals visually separate from the darker frame.
Corner placement is the second structural decision. Twelve petals divide naturally into four groups of three, so each corner can be positioned after every third petal. That relationship keeps the daisy granny square pattern balanced without forcing extra stitches into one side.
The outer rust round is intentionally denser than an airy traditional granny square. It stabilizes the raised flower and creates a stronger edge for joining motifs. A common mistake with a 3D daisy crochet square is making the petal chains too loose. Oversized petals overlap and hide the mustard center.
Project Information
| Skill Level | Construction | Finished Size | Hook | Yarn |
|---|---|---|---|---|
| Intermediate beginner | Center + 12 petals + square frame | Approx. 14–15 cm | 4.0 mm | Worsted / light-worsted cotton |
The final measurement depends on yarn thickness, hook size, cluster height, and blocking tension. Make one complete test square before calculating yarn requirements for a blanket or bag.
Materials and Tools
Yarn
- Mustard gold — worsted/light-worsted cotton — approximately 3–5 g per square for the center.
- Warm ivory or cream — worsted/light-worsted cotton — approximately 5–8 g per square for 12 petals.
- Burnt orange or rust — worsted/light-worsted cotton — approximately 10–15 g per square for the background and outer edge.
Use yarns with similar thickness and fiber content. A substantially thicker cream yarn enlarges the petals and can force the rust squaring round to ripple.
Tools
- 4.0 mm crochet hook
- Tapestry needle
- Scissors
- Locking stitch marker
- Blocking mats
- Rust-resistant pins
- Tape measure
Abbreviations
- MR — magic ring
- ch — chain
- sc — single crochet
- hdc — half double crochet
- dc — double crochet
- tr — treble crochet
- sl st — slip stitch
- st/sts — stitch/stitches
- sp — space
- ch-sp — chain space
- dc3tog — three double crochets closed together
- tr3tog — three treble crochets closed together
When closing a cluster, leave the final loop of each partial stitch on the hook, then yarn over and pull through all remaining loops at once.
12 Petal Daisy Granny Square Crochet Pattern
The flower is worked first. The rust background then converts the circular motif into a square by placing one corner after every group of three petals.
Mustard Flower Center
Use mustard-gold yarn and the 4.0 mm hook.
Round 1
Make an MR.
Ch 3. The beginning chain can count as the first dc.
Work 11 dc into the ring.
Sl st to the top of the beginning ch-3.
Stitch count: 12 dc.
Pull the center ring firmly closed.
Fasten off mustard yarn.
Ivory Daisy Petals
Change to warm ivory or cream yarn.
Join the cream yarn to any mustard stitch.
Each of the 12 center positions receives one raised petal.
Petal 1
Ch 3.
Work a tr3tog into the same mustard stitch.
Ch 3.
Sl st into the same stitch.
This creates one pointed dimensional petal.
Petals 2–12
Sl st into the next mustard stitch.
Ch 3.
Work tr3tog into the same stitch.
Ch 3.
Sl st into the same stitch.
Repeat once in every remaining center stitch.
Total: 12 petals.
Sl st at the base of the first petal and fasten off.
Alternative Fuller Petal
For a thicker petal closer to the substantial cream texture in the reference image, increase the cluster size.
Join cream yarn to one mustard stitch.
Ch 3.
Work 4 partial treble crochets into the same stitch, leaving the final loop of each treble on the hook.
Yarn over and pull through all loops.
Ch 3 and sl st into the same center stitch.
Repeat around all 12 mustard stitches.
Use the same petal construction throughout one project. Mixing three-treble and four-treble clusters changes the diameter of the flower.
Checking the Flower Before Squaring
Place the completed flower on a flat surface.
Count all 12 petals.
Divide them mentally into four groups of three.
Place a stitch marker after petals 3, 6, 9, and 12 if necessary. These four positions determine where the rust corners will be formed.
The flower should remain approximately circular at this stage. If it cups strongly upward, the petals are too tight. If the outer edge ripples, the petal chains or clusters are too loose.
Rust Squaring Round
Change to burnt-orange or rust yarn.
The first rust round is worked into spaces around the bases and sides of the petals. Distribute the stitches consistently rather than forcing the hook through the thickest part of each cluster.
Corner 1
Join rust yarn in the space after the third petal.
Ch 3.
Work 2 dc, ch 2, 3 dc into the same space.
This forms the first corner.
First Side
Work 3 dc into the next available space between petals.
Work another 3 dc into the following space.
Continue toward the next marked corner position.
Corner 2
At the space after the next group of three petals, work:
3 dc, ch 2, 3 dc.
Continue working side groups toward the third corner.
Corners 3 and 4
Repeat the same sequence around the flower.
Each corner receives:
(3 dc, ch 2, 3 dc)
Each side receives the same number of 3-dc groups.
Sl st to the top of the beginning ch-3.
Do not fasten off.
Second Rust Round
Sl st into the next available space and continue with rust.
At the first corner ch-2 space, work:
(3 dc, ch 2, 3 dc)
Work 3 dc into each available side space.
At the next corner work:
(3 dc, ch 2, 3 dc)
Repeat around all four sides.
Sl st to join.
At this stage, the motif should have four clearly defined sides and four rounded corners.
Dense Rust Finishing Round
The reference square has a substantial outer frame rather than a very open final round.
Ch 1.
Work one sc into each dc across the first side.
At the corner ch-2 space work:
(sc, ch 1, sc)
Continue with one sc in every stitch across the next side.
Repeat around.
Sl st to the first sc.
Fasten off, leaving approximately 15 cm for weaving.
Optional Double-Crochet Outer Edge
If the square is smaller than the 14–15 cm target after the first rust expansion rounds, add one more dc round before the sc edging.
Join rust yarn in a corner.
Work one dc in every stitch across each side.
At every corner work:
(2 dc, ch 2, 2 dc)
Continue around all four sides.
Join with a sl st.
Then work the dense sc finishing round.
Add this round to every square in the project rather than correcting individual motifs independently.
Making the Petals More Dimensional
The cream petals can be pushed slightly toward the front after the rust background has been completed.
Hold the square with the right side facing.
Insert a finger beneath each petal and lift the cluster away from the rust stitches.
Pin only the rust corners during initial blocking.
Do not flatten the center of every petal against the mat.
The flower should retain a raised layer while the background becomes flat and square.
Controlling Petal Direction
All petals should point away from the mustard center.
If one petal twists sideways, check its beginning and ending slip stitches. Both should enter the same center position or closely neighboring points according to the chosen construction.
Shape the petals before blocking rather than attempting to correct severe twisting with pins.
A petal that crosses over its neighbor usually contains a looser chain section than the surrounding petals.
Creating Rounded Petals
For a less pointed flower, substitute a mixed-stitch petal for the treble cluster.
Join cream yarn at one center position.
Work:
sc, hdc, 3 dc, hdc, sc
into the selected petal position or designated space.
Move to the next position and repeat.
This creates broader oval petals rather than narrow cluster petals.
The mixed-stitch version uses more yarn and produces a larger flower, so test one complete motif before committing to a blanket quantity.
Assembly for a Single Square
- Make the mustard center with exactly 12 dc and close the magic ring firmly.
- Attach cream yarn and create one dimensional petal at each of the 12 center positions.
- Count the completed petals and divide them into four equal groups of three.
- Mark the four corner positions before introducing the rust background.
- Work the first rust squaring round, placing identical corner groups after every third petal.
- Check that every side contains the same number of stitch groups before continuing.
- Add the second rust expansion round while keeping all four corners aligned.
- Add an optional expansion round only when the complete project requires a larger square.
- Finish with a dense rust sc round and weave each color tail into matching stitches.
- Block the square to approximately 14–15 cm while keeping the ivory petals raised.
The completed motif should show a mustard circular center, 12 evenly spaced cream petals, and a flat rust frame with four balanced sides.
7 Technical Tips for a Daisy Granny Square
- Wrong petal count: Confirm that Round 1 contains exactly 12 center stitches before changing color. Eleven or thirteen positions prevent the petals from dividing evenly into four groups of three.
- Center hole remaining visible: Pull the magic ring closed until the opening is only a few millimeters across before securing the mustard tail. Waiting until the rust rounds are finished makes the center harder to tighten.
- Petals overlapping heavily: Keep the petal chain sections close to the height required by the cluster. Chains that add more than approximately 5 mm of unnecessary length allow neighboring petals to cross.
- Flower cupping upward: Compare all 12 cluster tensions before beginning the rust background. Tight petals reduce the outer circumference and pull the mustard center into a bowl shape.
- Square corners shifting: Mark a corner after every three petals. Moving one corner by a single petal produces visibly different side lengths.
- Rust background ruffling: Add only the number of side groups required to keep the square flat. Extra dc groups between two corners introduce excess circumference and create waves.
- Finished squares differing in size: Block every motif to the same 14–15 cm target. A difference greater than approximately 5 mm becomes visible when multiple squares are joined.
Blocking the Daisy Granny Square
Blocking controls the rust frame while preserving the raised flower.
Place the finished square on a blocking mat.
Pin the four corners first and measure diagonally from corner to corner. The two diagonal measurements should be nearly identical.
Add pins along the rust sides until each edge is straight.
Target approximately 14–15 cm across the square.
Avoid driving pins through the cream petal clusters. Flattening the flower removes much of the dimensional effect visible in the finished motif.
Allow the square to dry completely before removing the pins.
Joining Multiple Daisy Squares
The dense rust outer edge provides several joining options.
For a nearly invisible seam, place two squares with right sides together and slip stitch through corresponding outer loops.
For a visible ridge, place the squares with wrong sides together and single crochet through matching edge stitches.
A flat mattress-style seam can also be sewn through the outer loops with rust yarn.
Whichever method is selected, match corner to corner first and then align the center points of the sides.
Do not compensate for different square sizes by stretching one motif during joining. Correct the dimensions during blocking instead.
Using the Square for a Blanket
A 14–15 cm motif can be repeated efficiently for throws, baby blankets, cushion covers, and smaller lap blankets.
At a 15 cm blocked measurement, six squares across create approximately 90 cm of width before joining and border additions. Eight squares across create approximately 120 cm.
Calculate the desired dimensions from the blocked test square rather than the unblocked crochet.
The rust background creates a strong continuous field when identical squares are joined with matching rust yarn. A cream joining color produces a more visible grid between flowers.
Using the Square for a Crochet Bag
The dense final round makes this crochet flower granny square suitable for bags as well as blankets.
Four squares can form a small front panel. Larger totes can use several rows or one oversized version of the motif.
For bags, use cotton or a cotton-rich blend and keep the final rust edging firm. Loose outer stitches stretch considerably when the bag is loaded.
Add a fabric lining when the bag will carry small objects. The raised petals should remain on the exterior rather than being compressed beneath lining fabric.
Changing the Autumn Color Palette
Mustard, cream, and rust create the autumn character visible in the reference square. The center is the smallest color field, so it can carry the strongest saturated shade without dominating the motif.
For another fall version, replace mustard with olive green while retaining cream petals and rust framing.
A softer palette can use camel at the center, oatmeal petals, and terracotta around the outside.
For a higher-contrast square, use dark brown as the background while keeping the mustard center and ivory petals.
Maintain a clear value difference between petals and background. If cream and rust are replaced by colors of similar brightness, the petal silhouette becomes less distinct.
Adjusting the Square Size
The easiest size adjustment occurs after the flower has been squared.
For a smaller motif, use DK yarn with a correspondingly smaller hook and stop after the first stable rust frame.
For a larger square, continue adding rust expansion rounds. Work one stitch or cluster into each established side position and increase only at the four corners.
Measure after every added round.
Do not enlarge the flower center simply to make the complete square larger. Changing the center count changes the 12-petal geometry and requires a different corner calculation.
Yarn Planning for Multiple Squares
Make one complete blocked square and weigh it before purchasing yarn for a large project.
Separate color estimates are more accurate when the three yarns are weighed before and after the test motif.
As an image-inspired starting allowance, one 14–15 cm square may require approximately 10–15 g rust, 5–8 g cream, and 3–5 g mustard, depending on yarn and cluster density.
Multiply the measured consumption by the total number of squares and add approximately 10–15 percent for joining, tails, gauge differences, and repairs.
Finishing the Daisy Granny Square
Inspect all 12 petals after blocking and correct any cluster that remains folded beneath its neighbor. Check the four rust corners next; each should align with a division between groups of three petals, and the finished frame should lie flat without cupping or ruffling. Record the blocked measurement and yarn consumption before beginning a larger project.
This 12 petal daisy granny square crochet pattern can be repeated for blankets, bags, cushions, or other modular projects while retaining the same 12-position flower geometry. Photograph the finished square from directly above so the petal spacing and corner alignment remain visible, then share it on Pinterest or Instagram with #AutumnDaisyGrannySquare. Would you keep the burnt-orange frame, or replace it with olive for your next daisy square?









