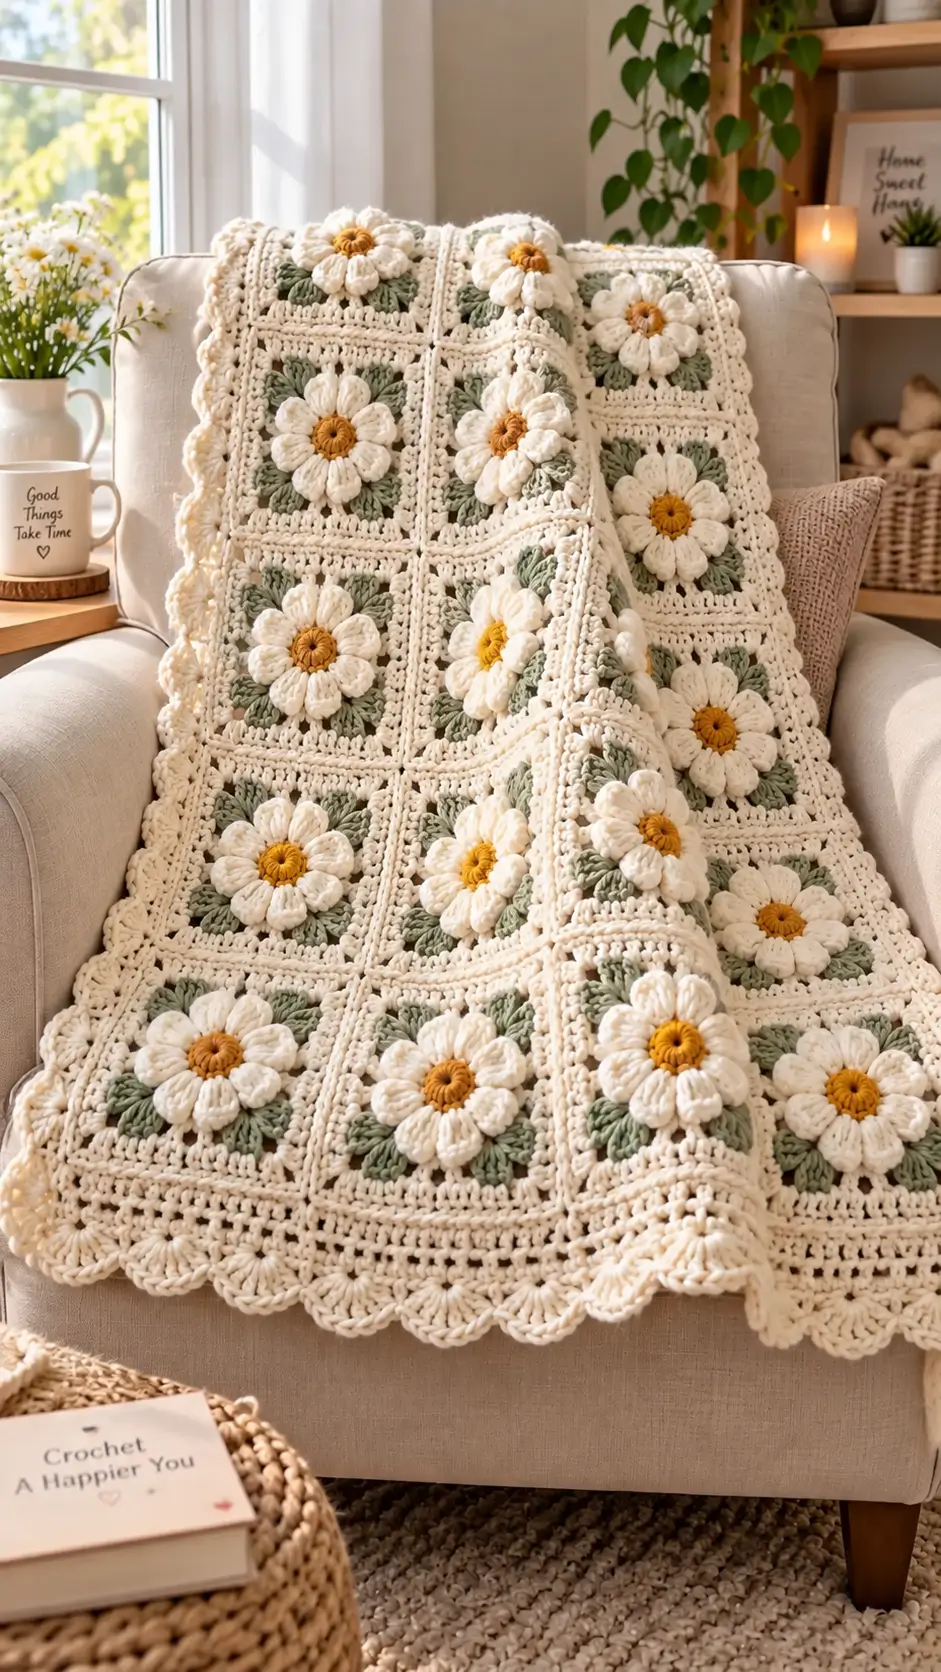
Daisy Granny Square Blanket Crochet Pattern: 3D Flower Throw
Introduction
Twelve raised white petals around a mustard center give this daisy blanket its defining geometry. This daisy granny square blanket crochet pattern uses worsted yarn, a 5 mm hook, dimensional flower motifs, and a scalable square layout. Comparable motifs block to about 16.5 cm, making the project suitable for an intermediate crocheter who wants a modular throw that can be resized before joining.
The Design: What Makes This Daisy Blanket Different
The photograph depends on three structural layers: a compact yellow center, raised white petals, and a muted sage field that turns the circular flower into a square. Keeping those layers separate prevents the petals from disappearing into the background.
The 3D flower granny square also needs controlled petal volume. Oversized clusters can buckle the square; undersized clusters lose the raised effect. Twelve petals provide the dense daisy appearance visible in the reference and are supported by several established daisy constructions.
Cream outer rounds perform another job. They visually separate adjacent sage motifs while providing stable edges for joining. A common error in a crochet daisy blanket is joining unblocked motifs. Small variations multiply across several columns, pulling an otherwise rectangular blanket diagonally.
Project Info at a Glance
| Skill Level | Time | Finished Size | Hook | Best For |
|---|---|---|---|---|
| Intermediate | Multi-session | Scalable; approx. 16.5 cm per square | 5.0 mm | Lap or throw blanket |
The exact photographed blanket cannot be measured reliably from the image. Make and block one test square before calculating the final blanket dimensions.
Materials and Tools
Yarn
For a close visual match, use a smooth worsted or light-Aran yarn with clear stitch definition.
- Warm cream — worsted/Aran — framing, joining, and border
- Sage green — worsted/Aran — square background
- Natural white — worsted/Aran — daisy petals
- Mustard or golden yellow — worsted/Aran — flower centers
Yarn consumption depends on the number of motifs, individual square gauge, joining method, and border depth. Buy enough yarn from the same dye lot for the cream and sage sections because those colors occupy the largest continuous areas.
Tools
- 5.0 mm crochet hook
- Tapestry needle
- Sharp scissors
- Locking stitch markers
- Blocking mats
- Rust-resistant blocking pins
- Measuring tape
Abbreviations
- MR — magic ring
- ch — chain
- sc — single crochet
- hdc — half double crochet
- dc — double crochet
- tr — treble crochet
- sl st — slip stitch
- st/sts — stitch/stitches
- sp — space
- dc3tog — three double crochets closed together as one cluster
- RS — right side
An invisible decrease is an amigurumi shaping technique and is not required for this square-based blanket construction.
Pattern — Step by Step
The blanket is constructed from repeated dimensional flower squares. Make enough motifs for your required width and length, block them to identical dimensions, join the squares, and then crochet the outer border.
A finished square around 16.5 cm provides a practical reference. Your own measurement takes priority because yarn composition, hook size, and individual tension can change the finished dimensions.
Daisy Center
Yarn: mustard or golden yellow.
Make an MR.
R1: Ch 2, work 12 dc into MR. Join with sl st to first dc. (12 dc)
Pull the magic ring firmly closed.
Fasten off and weave the tail toward the center rather than through the stitches that will hold the petals.
The 12-stitch center provides one anchoring position for each of the 12 petals. Count the stitches before changing color because a missing or additional center stitch changes the entire flower geometry.
Raised Daisy Petals
Yarn: natural white.
Join white yarn to any dc from R1.
R2: Ch 2, dc3tog in the same st, ch 2. *Dc3tog in next st, ch 2.* Repeat around. Join with sl st to the top of the first cluster. (12 clusters, 12 ch-2 spaces)
Fasten off.
Push each cluster gently toward the RS before beginning the background. The white clusters should remain raised instead of becoming trapped beneath the sage stitches.
For more pronounced petals, keep the working loops of each cluster slightly taller. Maintain the same tension across all 12 petals so one side of the flower does not appear heavier than the other.
Sage Square Foundation
Yarn: sage green.
Join sage yarn in any ch-2 space.
R3: Ch 3, 2 dc in the same space, ch 1. Work 3 dc, ch 1 in each of the next two ch-2 spaces. In the next selected corner space work (3 dc, ch 2, 3 dc).
Continue around the flower, distributing the groups evenly and placing (3 dc, ch 2, 3 dc) at four equally spaced corner positions.
Join with sl st.
This is the structural transition from a circular flower to a square motif. The four corners must occupy equivalent positions around every daisy.
Sage Stabilizing Round
Yarn: sage green.
R4: Sl st to the nearest corner space. Ch 3, 2 dc, ch 2, 3 dc in the corner. Work 3 dc into each available space across the side, adding ch 1 between groups where required to keep the fabric flat.
In each corner work (3 dc, ch 2, 3 dc).
Repeat around all four sides and join with sl st.
Fasten off.
Place the motif on a flat surface. All four sides should sit without severe cupping or rippling. Correct tension problems now rather than attempting to hide them during joining.
Cream Frame Round
Yarn: warm cream.
Join cream yarn in any corner.
R5: Ch 3, 2 dc, ch 2, 3 dc in the same corner. Work one 3-dc group into each available side space.
At each subsequent corner work (3 dc, ch 2, 3 dc).
Repeat around and join with sl st.
The cream framing round visually separates the sage sections when multiple motifs are placed together. Using one common framing color also makes small differences between individual green sections less noticeable.
Cream Edge Round
Yarn: warm cream.
R6: Ch 1. Sc evenly around the complete square, working 3 sc into each corner ch-2 space.
Keep the number and distribution of stitches identical on all four sides.
Join with sl st to the first sc.
Fasten off. Leave approximately 15 cm of yarn if the motifs will be sewn together. Weave the tail immediately when using a crochet joining method.
Blocking Each Daisy Granny Square
Block every completed motif before joining. Pin the squares to one consistent measurement rather than trying to make individual motifs visually similar without measuring them.
A target around 16.5 × 16.5 cm can be used with worsted yarn if your test motif naturally reaches that measurement. Do not aggressively stretch a smaller square simply to hit this number.
Measure horizontally, vertically, and diagonally. The two diagonal measurements should be close to equal. A square can have four equal sides while still being skewed.
Allow the motifs to dry completely before removing the pins.
Joining the Squares
Yarn: warm cream.
Place all blocked motifs RS up and arrange them in the planned blanket layout. Check that every flower faces the same direction before beginning the permanent joins.
For a raised seam similar to the strong cream divisions in the reference image, place two motifs together and join corresponding edge stitches with sc.
Match one stitch from the first square with one stitch from the second square. Do not add extra stitches to compensate for small differences in tension.
Continue until every motif in the row has been connected.
Join the completed rows with the same technique.
At every four-square intersection, all four corners should meet at a single controlled junction. Extra stitches at these intersections create bumps and can distort the surrounding daisies.
A mattress stitch or whip stitch can be substituted when a flatter seam is preferred.
Calculating the Blanket Layout
Always calculate the finished dimensions from a blocked motif.
If each square measures approximately 16.5 cm, the approximate width before adding the border is:
- 6 squares: 99 cm
- 7 squares: 115.5 cm
- 8 squares: 132 cm
- 9 squares: 148.5 cm
Calculate the length using the same formula. Multiply the blocked square measurement by the number of motifs running down the blanket.
Remember that the joining technique can alter the final measurement slightly. A raised crochet join can add more width than a flat sewn seam.
Foundation Border
Yarn: warm cream.
Join cream yarn at any outside corner of the assembled blanket.
Border R1: Ch 1, sc evenly around the entire blanket. At each outside corner work (sc, ch 2, sc). Join with sl st.
Border R2: Ch 3. Dc in every st around, working (2 dc, ch 2, 2 dc) into each corner space. Join with sl st.
Lay the blanket on a flat surface after completing this round.
A rippling border indicates excessive stitches along the edge. Corners that pull upward or a border that contracts toward the center indicate too few stitches.
Openwork Border
Yarn: warm cream.
Border R3: Ch 4, skip 1 st, dc in next st. *Ch 1, skip 1 st, dc in next st.* Repeat across each side.
At every corner work dc, ch 2, dc into the corner space.
Join with sl st.
This round creates an open framework between the dense granny-square body and the decorative outer shells.
Scalloped Edge
Yarn: warm cream.
Border R4: Sl st into the first ch-1 space. Work 5 dc into that space, then sl st into the next ch-1 space.
Repeat the 5 dc shell, sl st sequence around the blanket.
Approaching each corner, inspect the remaining spaces before working the final shells. Adjust the placement slightly when required so the corner remains symmetrical and lies flat.
Fasten off.
Weave the final border tail through at least 5 cm of reverse-side stitches. Change direction and weave through another section before trimming the remaining yarn.
Assembly
- Crochet all mustard flower centers and verify 12 dc in every motif.
- Add exactly 12 white cluster petals around each center.
- Work the sage foundation and stabilizing rounds with four evenly positioned corners.
- Add identical cream framing rounds to every completed flower square.
- Block all motifs to one consistent measurement before determining the final blanket layout.
- Arrange the blocked squares on a flat surface and check the orientation of every flower.
- Join individual squares into complete horizontal or vertical strips.
- Connect the strips while accurately matching every four-square intersection.
- Work the cream foundation border followed by the openwork border.
- Add the scalloped outer edge, weave in all remaining tails, and complete the final blocking.
The blanket is complete when the border lies flat and opposite edges measure consistently.
7 Technical Tips for a Cleaner Daisy Blanket
- Mark the beginning of every border round. Losing the join point by one stitch shifts subsequent shell placement and can make the final corner visibly asymmetric.
- Block to a fixed measurement. A 16.5 cm square is a useful reference, but every motif in your blanket must match the measurement established by your own test square.
- Count exactly 12 center stitches. An 11- or 13-stitch center changes the available petal anchors and prevents consistent flower construction.
- Inspect all petals before fastening off. Two clusters accidentally worked into the same center stitch leave an empty anchor and create a visible gap after the sage background is added.
- Keep all four sage corners equivalent. Moving one corner by a single flower space creates a skewed square that becomes increasingly visible after joining.
- Pin every four-square junction before joining long rows. A displacement of only 5 mm at several intersections can produce a visibly wandering seam across the blanket.
- Weave border tails through at least 5 cm of stitches. Reverse direction before trimming because open shell borders contain fewer dense stitches to hold short yarn ends securely.
Conclusion
Measure one completed and blocked square before buying the final border yarn or committing to the full layout. That measurement determines the blanket dimensions more accurately than the reference photograph. Keep the mustard centers at 12 stitches, check all 12 petals before adding sage, and block the cream-framed motifs to one standard size before joining. These controls preserve the regular flower grid that defines this daisy granny square blanket crochet pattern. Save your finished layout to Pinterest and share the completed blanket on Instagram with #DaisyGrannySquareBlanket. For your version, would you keep the muted sage background shown here or replace it with a darker botanical green?









