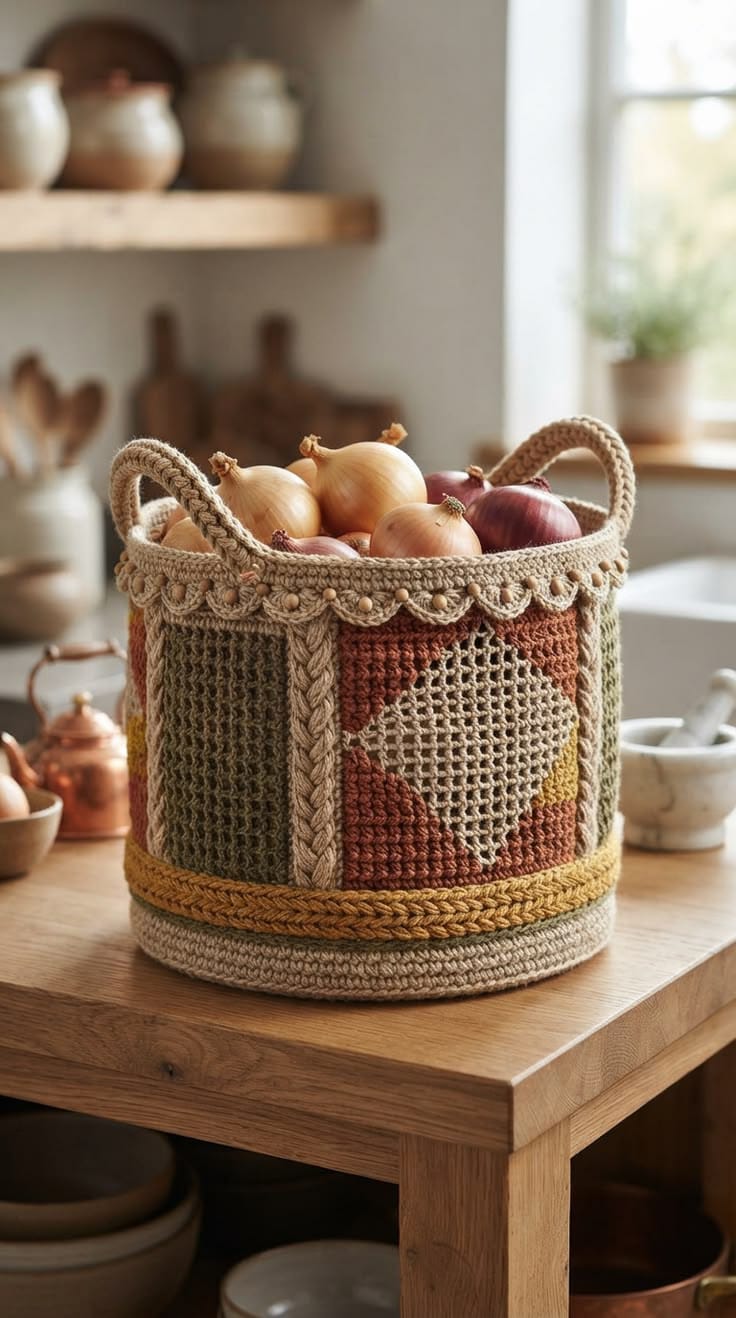
Open mesh is useful for displaying onions, but it creates the exact weakness a tall harvest basket has to overcome. This autumn harvest crochet basket pattern combines a dense circular base, olive and rust mesh panels, raised neutral dividers, mustard trim, decorative scallops, and two reinforced handles. Worked with doubled worsted cotton or firm bulky cord and a 5.5–6.0 mm hook, the target size is approximately 34 cm wide and 32 cm tall.
What Makes This Harvest Basket Different
The body deliberately mixes open and dense crochet. Olive mesh sections reduce weight and provide ventilation, while rust geometric panels introduce larger solid areas. Neutral vertical dividers visually separate those sections and add stiffness where an uninterrupted mesh wall would tend to collapse.
A second structural decision occurs at the bottom. The base and first several centimeters of the wall remain dense, giving the crochet vegetable basket a firm platform before the decorative panels begin. Mustard surface work marks that transition without weakening it.
The upper rim follows the same principle. Decorative arches sit outside a dense support band rather than replacing it. The handles are anchored below this band so carrying force reaches the main wall. One common failure with a crochet basket with handles is attaching handles only to ornamental edging, which allows the rim to stretch upward under load.
Project Information
| Skill Level | Construction | Finished Size | Hook | Recommended Yarn |
|---|---|---|---|---|
| Intermediate | Bottom-up cylindrical basket | Approx. 34 cm diameter × 32 cm high | 5.5–6.0 mm | Worsted cotton held double or firm bulky cotton |
The measurements exclude the upper handle rise. Finished dimensions depend on yarn thickness, gauge, base diameter, and the firmness of the selected fiber.
Materials and Tools
Yarn
- Natural oatmeal or beige — doubled worsted cotton or firm bulky cotton — main base, rim, handles, vertical dividers, and decorative trim.
- Olive green — matching weight — open mesh body panels.
- Rust or terracotta — matching weight — geometric body panels.
- Mustard gold — matching weight — lower decorative band.
- Optional dark olive — small quantity for an additional lower accent line.
For a basket around 34 cm in diameter and 32 cm tall, plan for a substantial yarn allowance. The neutral color requires the largest quantity because it forms the complete base, structural rounds, dividers, rim, and handles. Working two strands of worsted yarn together approximately doubles the single-strand consumption.
Tools
- 5.5–6.0 mm crochet hook
- Large tapestry needle
- Scissors
- Locking stitch markers
- Tape measure
- Optional plastic canvas or firm insert for the base
- Optional cotton fabric for an interior liner
Abbreviations
- MR — magic ring
- ch — chain
- sc — single crochet
- hdc — half double crochet
- dc — double crochet
- tr — treble crochet
- inc — increase
- sl st — slip stitch
- st/sts — stitch/stitches
- sp — space
- ch-sp — chain space
- BLO — back loop only
- FPdc — front post double crochet
Keep decreases compact by working through the front loops of the selected stitches before completing the stitch; bulky decrease points can distort a tightly worked basket wall.
Autumn Harvest Crochet Basket Pattern
This construction begins with a dense circular base. Measure frequently because yarn and cord behave differently at the same stitch count. Stop increasing when the base reaches approximately 32–34 cm in diameter.
Dense Circular Base
Use natural oatmeal yarn held double and the 5.5–6.0 mm hook.
R1: 6 sc in MR. (6)
R2: Inc ×6. (12)
R3: (sc, inc) ×6. (18)
R4: (2 sc, inc) ×6. (24)
R5: (3 sc, inc) ×6. (30)
R6: (4 sc, inc) ×6. (36)
R7: (5 sc, inc) ×6. (42)
R8: (6 sc, inc) ×6. (48)
R9: (7 sc, inc) ×6. (54)
R10: (8 sc, inc) ×6. (60)
Continue the same increase sequence, adding one additional sc between increases on every round.
For example:
R11: (9 sc, inc) ×6. (66)
R12: (10 sc, inc) ×6. (72)
R13: (11 sc, inc) ×6. (78)
R14: (12 sc, inc) ×6. (84)
Continue only until the circle measures approximately 32–34 cm.
Do not add extra rounds solely to reach a particular stitch count. Base diameter is the controlling measurement for this basket.
Turning the Base into the Basket Wall
Once the base reaches the required diameter, stop increasing.
Wall Round 1: Work one sc BLO in every stitch around.
This creates a defined fold line between the base and vertical wall.
Wall Round 2: Sc in every stitch around.
Wall Round 3: Sc in every stitch around.
Wall Round 4: Sc in every stitch around.
Continue until the dense lower wall measures approximately 5–6 cm from the base fold.
The lower section should remain substantially firmer than the decorative mesh above it.
Optional Internal Base Reinforcement
For a basket intended to hold produce or heavier household items, add a removable internal base.
Place the finished crochet base over plastic canvas or another washable firm material.
Trace a circle approximately 5–8 mm smaller than the crochet base.
Cut the insert and round any sharp corners.
Place it inside the basket after the first wall rounds have been completed.
A removable insert allows the crochet shell to be cleaned separately.
Mustard Lower Decorative Band
Use mustard-gold yarn.
The photographed basket has a prominent textured line above the neutral lower section. This can be added as surface crochet so the structural wall remains intact.
Join mustard yarn at the back of the basket approximately 5–6 cm above the base.
Work surface slip stitches around one complete round.
Keep every stitch relaxed.
For a wider band, work a second surface round directly above the first.
Fasten off and bury both tails inside the wall.
Braided-Look Mustard Band
For a stronger raised effect, crochet a separate narrow strip.
Ch enough stitches to fit around the basket without stretching.
Row 1: Hdc in the second chain from the hook and across.
Row 2: Ch 1, work hdc BLO across.
Fasten off.
Twist the strip slightly as it is positioned around the lower wall to create a rope-like appearance.
Sew the band at several-centimeter intervals using matching mustard yarn.
Planning the Decorative Body Panels
The upper body is divided into repeating vertical sections rather than worked as one uninterrupted mesh pattern.
Place stitch markers around the circumference to identify approximately four to six major panels.
A useful sequence is:
Olive mesh → neutral divider → rust geometric panel → neutral divider.
Repeat this sequence around the basket.
The exact stitch allocation depends on the final base circumference. Divide the available stitches as evenly as possible while reserving approximately 4–6 stitches for each neutral divider.
Olive Open Mesh Panel
Change to olive-green yarn for the selected panel area.
Work the remaining body colors across their assigned sections during the same round, carrying or joining yarn as preferred.
Mesh Round 1
At the beginning of an olive section:
Sc, ch 2, skip 1 st, sc in next st.
Repeat across the assigned panel.
Work the divider stitches in natural oatmeal before changing to the next panel color.
Mesh Round 2
Work sc into each ch-2 space.
Ch 2, sc in next ch-2 space.
Repeat across the olive section.
Continue this mesh construction for subsequent body rounds.
The openings should remain relatively small. Large mesh openings weaken the cylindrical wall and allow onions or similarly sized contents to push through.
Rust Geometric Panel
Use rust or terracotta yarn.
The rust sections combine dense stitches with open areas to produce the geometric effect visible in the reference.
Rust Round 1
Sc across the complete rust section.
Rust Round 2
Work sc across approximately the first quarter of the panel.
Begin the central open section with:
Ch 2, skip 1 st, sc in next st.
Repeat across the center, then finish the remaining quarter in solid sc.
Rust Round 3
Reduce the solid areas by one stitch on each side and increase the width of the central mesh.
Rust Round 4
Continue widening the mesh center.
Rust Round 5
Begin reversing the process. Increase the solid rust areas on both sides while narrowing the central mesh.
Rust Rounds 6–8
Continue until the central open section closes back toward a narrow point.
The result should resemble a large neutral/open diamond framed by rust crochet.
Natural Vertical Dividers
Use natural oatmeal yarn.
Work approximately 4–6 dense stitches between each colored panel on every body round.
These columns create attachment points for the raised cable details.
Continue the dividers vertically without changing their width.
Use stitch markers at the first and last stitch of every divider if the color changes make the boundaries difficult to track.
Raised Cable-Style Dividers
The prominent neutral braids can be added over the completed dense divider columns.
Join natural yarn near the bottom of one divider.
Work a vertical line of surface slip stitches from the mustard band toward the upper rim.
Add a second parallel surface line approximately 1 cm away.
For a twisted appearance, alternate long surface stitches diagonally between the two lines.
Cross each diagonal over the previous one to imitate a simple cable.
Repeat on each neutral divider.
Keep these stitches raised but relaxed. Tight surface crochet can shorten the basket wall and create vertical puckering.
Alternative Crochet Cable Divider
A more dimensional cable can be worked directly into a six-stitch neutral column.
Work several rounds of hdc across the divider.
On a cable round, skip the first three divider stitches temporarily.
Work FPdc around the next three stitches.
Return to the skipped three stitches and work FPdc around them, crossing the second group over the first.
Resume normal hdc on the following round.
Repeat the crossing every three or four rounds.
This method produces a stronger raised braid but also makes the divider thicker than the adjacent mesh.
Continuing the Basket Body
Repeat the established olive mesh, rust geometric sections, and neutral dividers until the decorative body measures approximately 22–24 cm above the lower dense section.
Check the basket height from the base after every few rounds.
The complete body should reach approximately 30–32 cm before the handles extend above it.
If the walls begin leaning outward, switch to a hook 0.5 mm smaller for the final body rounds.
Dense Upper Support Band
Change all sections back to natural oatmeal yarn.
Support Round 1: Sc evenly around.
Support Round 2: Sc around.
Support Round 3: Sc around.
Support Round 4: Sc around.
Work additional rounds until the support band measures approximately 3–4 cm.
This band carries the handles and supports the decorative scallops.
Decorative Scalloped Upper Trim
Join natural yarn near the lower edge of the upper support band.
Ch 5, skip approximately 3 sts, sl st in next st.
Repeat around the basket to form evenly spaced arches.
On the following decorative pass, work several sc or hdc into each chain arch.
Keep the arches below the uppermost structural edge so they hang decoratively rather than carrying the handles.
Bobble-Style Rim Details
Small raised details can be positioned between the scallops.
At the center or attachment point of each arch, work a compact bobble:
Yarn over, insert hook, pull up a loop, yarn over and pull through two loops.
Repeat this partial dc sequence four times in the same location.
Yarn over and pull through all remaining loops.
Ch 1 to close the bobble.
Continue to the next scallop.
Keep every bobble similar in size so the trim maintains an even rhythm.
Long Arched Crochet Handles — Make 2
Use natural oatmeal yarn held double.
The handles are worked separately and attached deeply to the structural band and body.
Ch enough stitches to measure approximately 45–50 cm without stretching.
Row 1: Sc in the second ch from the hook and across.
Row 2: Ch 1, sc across.
Row 3: Ch 1, sc across.
Row 4: Ch 1, sc across.
For a thicker handle, add one or two more sc rows.
Fasten off, leaving approximately 50 cm at both ends for attachment.
Make a second identical handle.
Adding a Raised Handle Edge
Join natural yarn at one end of a handle.
Work slip stitches evenly along the first long edge.
Continue across the short end and down the second long edge.
Fasten off.
Repeat for the second handle.
This additional edge makes the handle appear thicker and reduces lateral stretching.
Attaching the Handles
Mark two opposite sides of the basket.
Each handle should span one side of the upper opening, with the second handle positioned directly opposite.
Place the ends approximately 12–16 cm apart, depending on the final circumference.
Extend each handle end approximately 6–8 cm down the inside wall.
Pin all four ends before sewing.
Check the basket from above. Both handles should be centered and parallel.
Sew around each handle end with natural yarn.
Add diagonal reinforcement stitches through the attachment area.
Do not sew the handles only to the scalloped trim.
Optional Handle Core
For a basket expected to carry heavier contents, a soft internal core can reduce handle stretch.
Use cotton cord slightly shorter than the finished crochet handle.
Place the cord along the center of the handle.
Fold or crochet the edges around it and secure them with matching yarn.
Keep the cord ends several centimeters away from the handle attachment points so no hard end presses through the crochet fabric.
Assembly
- Crochet the dense natural circular base until it measures approximately 32–34 cm across.
- Work one BLO turning round, then build approximately 5–6 cm of dense vertical wall without further increases.
- Add the mustard lower accent as surface crochet or attach a separate raised band around the complete circumference.
- Divide the upper wall into olive mesh sections, rust geometric sections, and 4–6-stitch natural divider columns.
- Continue the color-block body until the basket approaches the required height, keeping every vertical divider aligned.
- Add raised cable or braided surface details over the neutral divider columns.
- Return to natural yarn and crochet a dense 3–4 cm upper support band around the complete opening.
- Add the scalloped arches and bobble-like details below the structural upper edge.
- Crochet two matching handles, position them on opposite sides, and attach each end approximately 6–8 cm down the inside wall.
- Weave in all tails, insert optional base reinforcement, reshape the cylinder, and check that the basket stands level on a flat surface.
The completed basket should measure approximately 34 cm in diameter × 32 cm high, excluding the portion of the handles extending above the rim.
7 Technical Tips for a Sturdy Crochet Basket
- Base developing waves: Stop increasing when the circle reaches approximately 32–34 cm rather than adding rounds automatically. Too many increases create excess fabric that transfers into the lower wall.
- Basket walls collapsing: Work doubled worsted cotton or firm bulky cord at a tight gauge. If the wall folds under its own weight, move down approximately 0.5 mm in hook size for the dense sections.
- Mesh openings stretching: Keep the open spaces relatively compact and avoid chain loops larger than approximately 2 cm. Oversized openings allow the wall to lengthen vertically when the basket is filled.
- Vertical dividers leaning sideways: Mark both edges of every 4–6-stitch divider before starting the mesh panels. Losing even one stitch from a divider over several rounds creates a visibly diagonal cable.
- Surface cables puckering the wall: Leave approximately 2–3 mm of ease in long decorative surface stitches. Tight cable stitches shorten the divider and pull the upper rim toward the base.
- Handles stretching at the rim: Extend each handle attachment approximately 6–8 cm down the inside of the basket. Sewing only through the uppermost round concentrates the entire load on one narrow line.
- Cylindrical body flaring outward: Measure the upper circumference every 5–6 rounds. If it increases without intentional shaping, tighten the working tension or change to a hook 0.5 mm smaller.
Controlling the Basket Structure
The base, lower wall, vertical dividers, upper support band, and handles form the structural skeleton. The olive and rust mesh sections fill the spaces between those stronger components.
For that reason, do not replace every dense panel with mesh. A fully open cylindrical wall of this height will behave more like a flexible market bag than a freestanding storage basket.
Cotton cord produces the firmest result. Doubled worsted cotton is a practical substitute when cord is unavailable, although it creates a softer wall.
If acrylic yarn is used, consider adding a fabric liner and firm base insert. Acrylic can recover well after washing but usually provides less rigid basket structure than tightly worked cotton cord.
Adjusting the Basket Diameter
Diameter is controlled at the circular-base stage. Stop increasing when the base reaches the measurement required for the finished basket.
A smaller countertop basket can use a base approximately 24–26 cm across. Medium storage versions can use approximately 28–30 cm. The image-inspired large version targets approximately 32–34 cm.
Once the base size is established, work the BLO turning round and stop increasing. Adding increases after that point causes the wall to flare outward.
Recalculate the body-panel widths after changing the diameter. The olive, rust, and neutral sections should divide the new circumference as evenly as possible.
Adjusting the Basket Height
Height changes should be made in the decorative body rather than the lower structural base.
Keep approximately 5–6 cm of dense lower wall and 3–4 cm of dense upper support band. Add or remove rounds from the mesh and geometric sections between them.
For a shallow basket, reduce the decorative center to approximately 12–15 cm. A tall hamper-style version can extend that area beyond 25 cm, but additional reinforcement may be required.
Longer walls place more force on the mesh sections. Increasing height without increasing structure can make the basket fold near its midpoint.
Planning the Autumn Color Palette
The neutral yarn should dominate because it connects the base, vertical dividers, upper band, trim, and handles. Olive and rust work as large secondary fields rather than narrow accents.
Mustard is most effective as a smaller lower detail. Limiting it to one raised band gives the basket a clear horizontal boundary without competing with the rust geometric panel.
For a cooler variation, replace rust with muted clay and mustard with camel. A darker version can use charcoal dividers, forest-green mesh, and copper geometric sections.
Keep similar values separated. If the olive and rust colors are both very dark, the neutral cables become prominent but the geometric panel divisions are harder to read.
Using the Basket for Produce
The open body makes this style visually appropriate for onions, garlic, or other dry pantry produce, but crochet itself does not regulate storage conditions.
Keep produce dry and follow normal food-storage guidance for the specific item. Remove any vegetable that begins leaking or deteriorating so moisture does not transfer to the yarn.
A washable removable liner can protect the interior. Avoid permanently enclosing the mesh with an airtight material when ventilation is desired.
For non-food use, the same basket can hold yarn, towels, blankets, craft supplies, or other lightweight household items.
Optional Fabric Lining
A lining helps prevent small objects from passing through the open panels.
Measure the internal circumference and height after the crochet basket is complete.
Cut a rectangular fabric wall with approximately 1–1.5 cm seam allowance and a circular base matching the interior diameter.
Sew the short sides of the rectangle together.
Attach the circular fabric base.
Fold the upper raw edge inward and press it.
Place the liner inside the basket and hand-sew it just below the upper structural band.
Keep the decorative scallops free from lining stitches.
Shaping and Blocking
A freestanding basket should be shaped rather than aggressively stretched.
Lightly dampen the finished crochet according to the yarn care instructions.
Place a clean cylindrical container, rolled towels, or another smooth form inside the basket.
Adjust the base until it sits flat.
Align every neutral divider vertically and arrange the upper edge into a level circle.
Position both handles at equal angles while drying.
Remove the internal form only after the basket is completely dry.
Finishing the Autumn Harvest Basket
Inspect the handle attachments, upper support band, and lower wall before putting the basket into service. Reinforce any handle end that moves more than a few millimeters when lifted, then check that every raised divider remains vertical and the base rests flat. The image-inspired target is approximately 34 cm in diameter × 32 cm high, with the handles extending above that measurement.
This autumn harvest crochet basket pattern can be resized by changing the circular base diameter and the number of decorative body rounds while retaining the same structural sequence. Record the final base measurement and panel divisions before making a second basket. Share the finished project on Pinterest or Instagram with #AutumnHarvestCrochetBasket. Would you use the olive mesh for the largest panel, or make the rust geometric section the dominant feature?









