Introduction
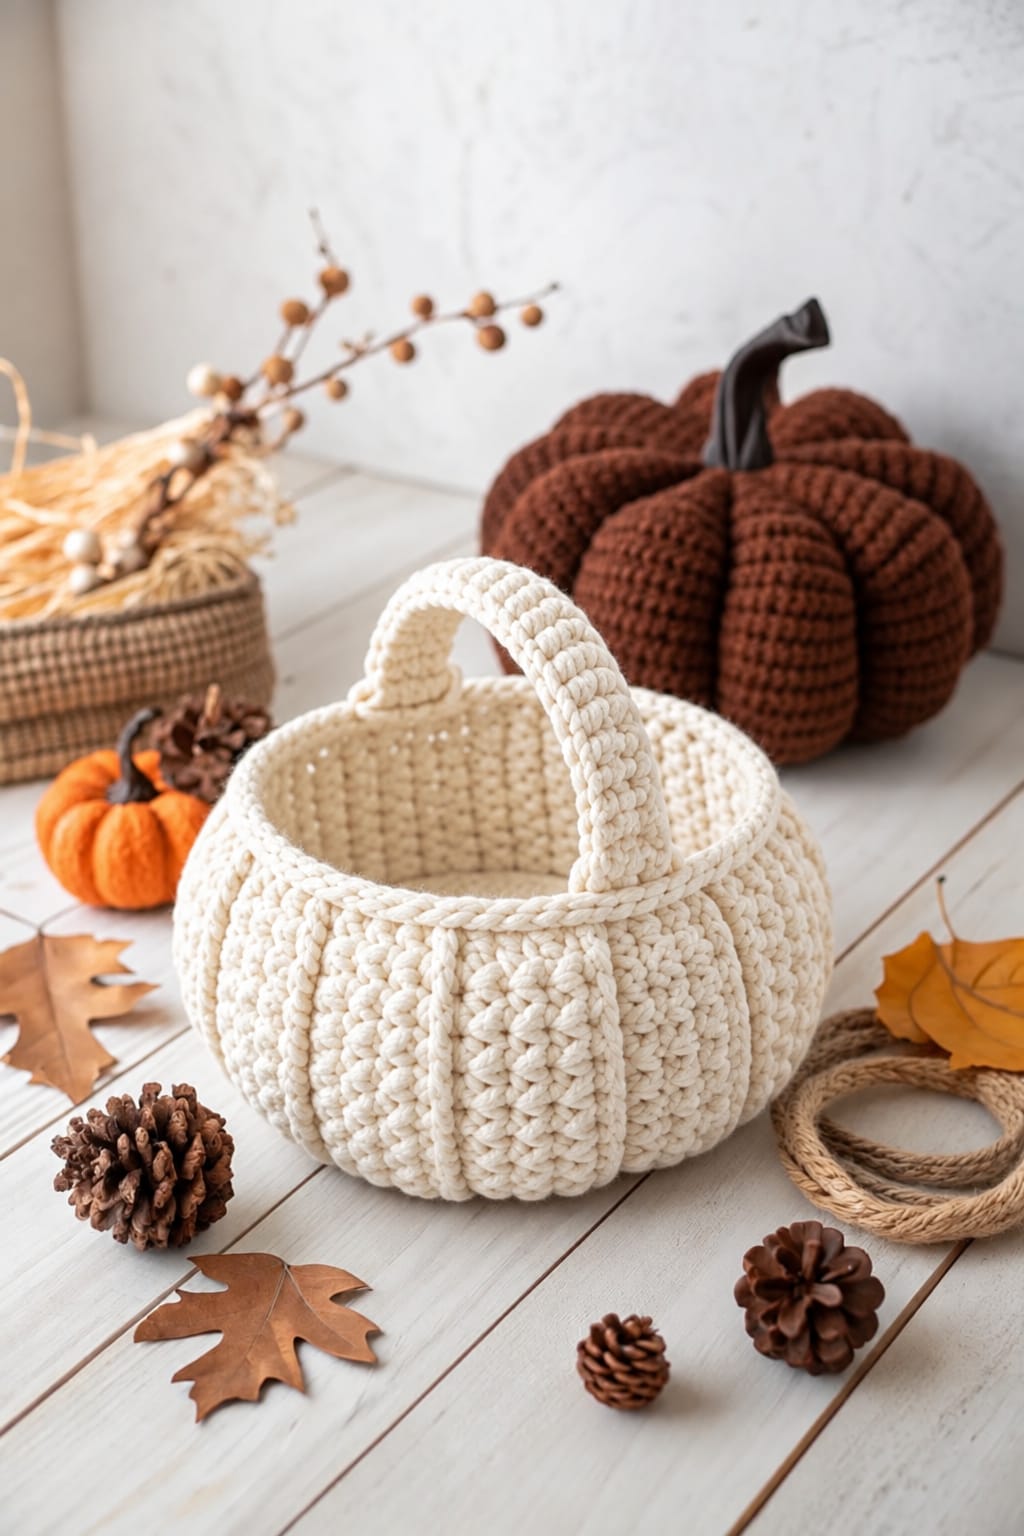
A pumpkin basket must keep its lobes after the contents come out, or the shape disappears with the storage function. This crochet pumpkin basket pattern uses thick cotton cord, a 6 mm hook and reinforced shaping to build an open ivory container about 25 cm wide. The intermediate project combines a flat base, structured walls, deep ribs and a broad handle. Use it for yarn, wrapped treats, napkins or lightweight autumn décor.
The Design: What Makes This Pumpkin Basket Different
The photographed basket depends on three structural decisions. First, the pumpkin grooves are pronounced enough to remain visible without stuffing. That requires a dense wall plus external shaping rather than a loose decorative stitch pattern.
Second, the top stays open. A reinforced rim prevents the sculpted lobes from pulling the mouth inward after the grooves are tightened. This is critical for a functional pumpkin crochet basket, because the opening needs to remain usable.
Third, the handle rises directly across the center instead of attaching to a lid or separate stem. Its width spreads the load over several stitches and gives the crochet fall basket a clean storage-basket profile.
A common failure is pulling the sculpting strands hard enough to lift the circular base. Shape each groove in several passes rather than tightening one rib fully before the others.
Project Info at a Glance
| Skill Level | Time | Finished Size | Hook | Best For |
|---|---|---|---|---|
| Intermediate | 5–7 hours | Approx. 25 cm wide × 18–20 cm tall | 6.0 mm | Fall storage, wrapped candy, yarn, table display |
Materials and Tools
Yarn
- Warm ivory cotton cord — 3 mm cord or equivalent super bulky yarn — approximately 350–500 g
- Optional matching reinforcement yarn — small reserve for handle sewing and rib shaping
Thick cotton cord, macramé rope or a firm super bulky yarn works best because the finished basket needs enough structure to stand without stuffing.
Tools
- 6.0 mm crochet hook
- Large tapestry needle
- Locking stitch markers
- Scissors
- Measuring tape
- Long blunt yarn needle
- Optional plastic canvas circle for base
- Optional flexible tubing or cord for handle reinforcement
Abbreviations
- MR — magic ring
- sc — single crochet
- inc — 2 sc in one stitch
- dec — single crochet decrease
- sl st — slip stitch
- ch — chain
- hdc — half double crochet
- BLO — back loop only
- FLO — front loop only
- st/sts — stitch/stitches
- FPsc — front post single crochet
For an invisible decrease, insert the hook through the front loops of the next two stitches and complete them together as one single crochet.
Pattern — Step by Step
Work the main basket in continuous rounds unless stated otherwise.
Circular Base
Yarn: warm ivory.
R1: 6 sc in MR (6)
R2: inc ×6 (12)
R3: (1 sc, inc) ×6 (18)
R4: (2 sc, inc) ×6 (24)
R5: (3 sc, inc) ×6 (30)
R6: (4 sc, inc) ×6 (36)
R7: (5 sc, inc) ×6 (42)
R8: (6 sc, inc) ×6 (48)
The base should measure roughly 15–17 cm across before the walls begin.
If it cups upward, the cord is being worked too tightly. If it ruffles, reduce the increase rate for one round instead of continuing to add six stitches automatically.
Base Turning Round
R9: BLO 48 sc (48)
Working through the back loops forms a clean fold line between the flat floor and vertical wall.
Optional: cut a plastic canvas circle approximately 5 mm smaller than the base diameter. Insert it once the first few wall rounds are complete.
Lower Basket Wall
R10–R13: 48 sc (48)
Keep tension firm.
The basket should rise vertically rather than flare outward. Check the diameter after R13; the opening should still be close to the base diameter.
Pumpkin Rib Structure
The basket has approximately eight strong lobes. Divide 48 stitches into eight six-stitch segments.
R14: (5 sc, FPsc around the corresponding stitch two rounds below) ×8 (48 working positions)
R15: 48 sc (48)
R16: repeat R14 (48)
R17: 48 sc (48)
R18: repeat R14 (48)
R19: 48 sc (48)
R20: repeat R14 (48)
R21: 48 sc (48)
R22: repeat R14 (48)
The post stitches form structural guide lines for the later sculpting strands.
Do not pull the post stitches unusually tight. They mark the grooves but should not shrink the circumference.
Upper Basket Shaping
A small reduction near the top creates the rounded pumpkin shoulder while maintaining a practical opening.
R23: (6 sc, dec) ×6 (42)
R24: 42 sc (42)
R25: (5 sc, dec) ×6 (36)
R26: 36 sc (36)
The opening now measures less than the widest section of the pumpkin, creating the rounded vessel shape.
Reinforced Upper Rim
The rim carries both sculpting tension and handle load, so work additional material here.
R27: FLO inc ×36 (72)
R28: 72 sc (72)
Fold R28 inward over R27.
Working through both the current stitches and corresponding unused loops from R26, sl st around to form a thick doubled rim.
Final rim count: 36 joined positions.
Fasten off.
The rim should feel substantially firmer than the wall below it.
Pumpkin Groove Shaping
Yarn: warm ivory.
Cut eight strands approximately 120–140 cm long.
Thread the first strand through the center of the base.
Bring it up along one of the front-post guide lines and over the upper rim.
Return the needle through the center base.
Tie loosely inside.
Repeat for all eight groove positions.
Once every strand is installed, tighten them gradually in this order:
- Rib 1
- Rib 5
- Rib 3
- Rib 7
- Rib 2
- Rib 6
- Rib 4
- Rib 8
Alternating around the basket distributes tension more evenly than working adjacent ribs in sequence.
Each groove should indent roughly 1–1.5 cm at the widest point.
Do not tighten until the bottom curls upward. The floor still needs to sit flat.
Handle Foundation
The broad handle is much thicker than a simple chain.
Yarn: warm ivory.
Row 1: ch 37.
Starting in second chain from hook:
Row 2: 36 sc (36)
Rows 3–6: ch 1, turn, 36 sc (36)
The strip should measure approximately 4–5 cm wide.
Fasten off only if no reinforcement will be inserted.
Reinforced Handle Option
For a basket intended to carry more than lightweight décor, add a flexible core.
Cut flexible plastic tubing or several lengths of cotton cord to about 28–30 cm.
Lay the reinforcement along the center of the handle strip.
Fold the crochet strip lengthwise around it.
Sl st through both long edges to close the tube.
The finished handle should measure approximately 2–3 cm thick.
Avoid rigid metal wire when the basket may be handled by children.
Attaching the Handle
Mark the two opposite sides of the basket.
Each handle end should overlap the inner wall by approximately 3–4 cm.
Pin the first end in place.
Sew through:
- Handle fabric
- Doubled rim
- At least 6–8 wall stitches below the rim
Repeat on the opposite side.
Work several horizontal stitches across each attachment point before making vertical securing passes.
The handle should rise approximately 18–22 cm above the opening, depending on cord stiffness.
Optional Inner Base Liner
For loose craft supplies or small decorative objects, add a circular liner.
Cut washable fabric approximately 1.5 cm wider than the inside base.
Turn the edge under by 7–8 mm.
Hand stitch it to the base wall, catching crochet stitches without passing through to the outside.
A liner is not required for the photographed appearance, but it prevents small objects from catching on the dense rib-shaping strands inside the basket.
Assembly
- Complete the 48-stitch circular base and check that it lies completely flat.
- Work the vertical wall and mark all eight rib positions before starting upper shaping.
- Crochet the shoulder decreases and doubled rim without attaching the handle yet.
- Install all eight sculpting strands from the center base to the rim.
- Tighten opposite grooves in alternating order until eight balanced lobes form.
- Set the basket on a flat surface and release any groove that lifts the base more than 5 mm.
- Crochet the handle strip and add the optional tubing or cord reinforcement.
- Pin both handle ends exactly opposite each other and check the arch from the front and side.
- Sew each handle attachment through the doubled rim and at least 6–8 wall stitches.
- Weave all ends inside the basket, reshape the lobes and make the final diameter and height measurements.
The finished basket should stand unsupported with a round opening, eight distinct lobes and a handle centered over the base.
7 Technical Tips
- Check the base diameter at R8. If the 48-stitch circle is below roughly 15 cm with 3 mm cord, your gauge is tighter than the intended basket scale and the finished container will be noticeably smaller.
- Mark every sixth stitch before starting the rib rounds. Losing one segment marker shifts the post-stitch columns and produces one visibly narrow pumpkin lobe.
- Keep the wall fabric dense enough to stand empty. If the side collapses inward when you remove your hand, reduce the hook by 0.5 mm or change to firmer cord before continuing.
- Limit each sculpted groove to roughly 1–1.5 cm depth at first. Pulling farther can buckle the circular base and reduce the usable interior volume.
- Check the doubled rim before sewing the handle. If it twists more than about 5 mm between opposite points, redistribute the joining slip stitches before applying load.
- Spread each handle attachment over 6–8 body stitches. Sewing through only two or three stitches creates concentrated stress and can stretch the rim under the weight of stored items.
- Weave shaping tails through at least 6 cm of dense crochet. Short tails can pull back through the basket wall when the lobes are repeatedly handled or adjusted.
Conclusion
Shape the eight pumpkin grooves before attaching the handle because the sculpting process changes both the diameter and the exact position of the opposite side points. For proportions close to the photographed basket, target about 25 cm across, keep the rim firmly doubled and spread each handle attachment over at least six wall stitches. The practical next step is to crochet through R8 and measure the base before committing several hundred grams of cord to the full project. Save this crochet pumpkin basket pattern to Pinterest and share the finished ivory version on Instagram with #IvoryPumpkinBasket. Would you keep the basket completely cream, or add a brown crochet wrap around the center of the handle?









