Introduction
A pumpkin bag has to cinch shut without flattening the ribs that make it look like a pumpkin. This crochet pumpkin drawstring bag uses worsted yarn, a 4 mm hook and a 36-stitch body to build a compact pouch around 14–16 cm wide. The project suits intermediate crocheters and combines shaped lobes, a ruffled opening, drawstring and curly vine. Use it for wrapped Halloween candy or small autumn gifts.
The Design: What Makes This Pumpkin Bag Different
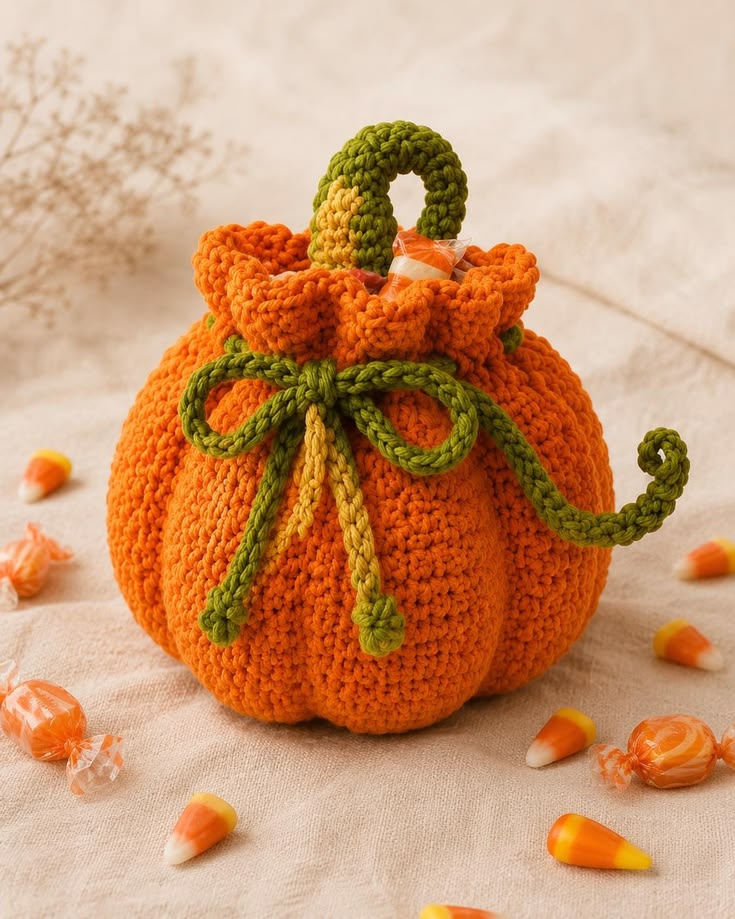
The photographed bag relies on shape before decoration. Its orange body has strongly defined vertical lobes rather than the smooth cylinder seen in many drawstring pouches. Those ribs keep the pumpkin recognizable even when the opening is filled.
A second structural choice is the gathered ruffle. The neck narrows before the upper edge expands, so pulling the green cord closes the bag while the orange scallops remain visible above it. Finally, a separate loop handle rises from the center and gives the pumpkin crochet bag a stem-like silhouette.
One common mistake when making a crochet pumpkin pouch is tightening the rib-shaping thread too early. Pulling the segments hard before the body is complete can collapse the base and reduce usable capacity. Shape the lobes after the main pouch has been crocheted.
Project Info at a Glance
| Skill Level | Time | Finished Size | Hook | Best For |
|---|---|---|---|---|
| Intermediate | 4–6 hours | Approx. 14–16 cm wide | 4.0 mm | Wrapped candy, gifts, Halloween table display |
Materials and Tools
Yarn
- Pumpkin orange — worsted / #4 — approximately 35–40 g
- Olive green — worsted / #4 — approximately 8–10 g
- Mustard yellow — worsted / #4 — approximately 2–3 g
Cotton or cotton-acrylic yarn gives the ribs more definition than a highly elastic fiber. Acrylic can also be used if worked at sufficiently tight gauge.
Tools
- 4.0 mm crochet hook
- Yarn needle
- Scissors
- Locking stitch marker
- Long tapestry or doll needle
- Measuring tape
- Optional removable pins
No stuffing or safety eyes are needed because this piece functions as an open bag.
Abbreviations
- MR — magic ring
- sc — single crochet
- inc — 2 sc in one stitch
- dec — single crochet decrease
- ch — chain
- sl st — slip stitch
- hdc — half double crochet
- dc — double crochet
- BLO — back loop only
- FLO — front loop only
- st/sts — stitch/stitches
For an invisible decrease, insert the hook through the front loops of the next two stitches, yarn over and complete both loops as one single crochet.
Pattern — Step by Step
Work the body in a continuous spiral unless a section says otherwise.
Pumpkin Base and Body
Yarn: pumpkin orange.
R1: 6 sc in MR (6)
R2: inc ×6 (12)
R3: (1 sc, inc) ×6 (18)
R4: (2 sc, inc) ×6 (24)
R5: (3 sc, inc) ×6 (30)
R6: (4 sc, inc) ×6 (36)
The 36-stitch plateau gives a medium-size pouch while preserving tight stitch density.
R7: BLO 36 sc (36)
R8–R10: 36 sc (36)
From this point, create subtle built-in rib lines.
R11: (5 sc BLO, 1 sc through both loops) ×6 (36)
R12–R20: repeat R11 (36)
The six stitches worked through both loops form reference lines for the six pumpkin segments.
Do not stuff.
Upper Body Shaping
R21: (4 sc, dec) ×6 (30)
R22: 30 sc (30)
R23: (3 sc, dec) ×6 (24)
R24: 24 sc (24)
The reduction creates the shoulder under the ruffled opening.
Do not close the bag.
Drawstring Eyelet Round
R25: (2 sc, ch 1, skip 1 st) ×8 (24 positions)
The eight chain spaces form the cord channel.
R26: work 1 sc in every sc and every ch-1 space (24).
The opening should remain wide enough to insert wrapped sweets before the cord is tightened.
Ruffled Pumpkin Top
The design uses a broad orange ruffle rather than a narrow plain rim.
R27: FLO, inc in every stitch (48)
R28: (1 sc, inc) ×24 (72)
The rapid increase forces the fabric outward.
R29: (sl st in next st, 5 dc in next st, sl st in next st) around, adjusting the final repeat if required.
Fasten off and weave the tail into the back of the ruffle.
The finished rim should form pronounced scallops rather than lying flat against the opening.
Pumpkin Rib Shaping
Yarn: orange, using a long strand.
Cut approximately 120 cm of orange yarn.
Thread a long tapestry needle and secure the yarn at the center of the base.
Bring the needle upward along one of the six rib reference lines, pass it over the top edge below the ruffle and return through the center base.
Pull gently until a groove forms.
Repeat along all six segment lines.
Work gradually around the pumpkin instead of fully tightening one lobe before moving to the next. The body should become round and segmented while the base remains flat enough to stand.
Secure the shaping yarn inside the pouch.
Green Drawstring
Yarn: olive green.
Row 1: ch 81.
Starting in the second chain from the hook:
Row 2: sl st in all 80 chains (80).
Fasten off.
A slip-stitched cord is thicker and more stable than a plain chain while still passing easily through the eyelets.
Thread the cord alternately in and out through the eight openings of R25.
Bring both ends to the front.
Tie them into a large bow.
Long Curly Vine
Yarn: olive green.
Row 1: ch 36.
Starting in the second chain from hook:
Row 2: work 3 sc in each chain across.
The excess stitches force the strand into a corkscrew.
For a tighter curl, work 4 sc per chain.
Fasten off.
Leave a 15 cm tail.
Attach one end near the drawstring bow and allow the spiral to extend outward.
Short Drawstring Ends
For the two dangling pieces beneath the bow, either use the tails of the main cord or crochet two decorative cords.
Yarn: olive green and mustard.
For each cord:
Row 1: ch 26.
Row 2: sl st back through all 25 chains.
Fasten off.
Add a small knot at the bottom or work 6 sc into the final chain to form a compact rounded end.
One cord can be made in olive green and the other in mustard for a closer color match.
Loop Handle / Pumpkin Stem
The upper loop combines the visual job of a pumpkin stem with a functional carrying handle.
Yarn: olive green.
R1: ch 31.
Join with sl st to the first chain without twisting.
R2: sc in each chain around (30)
R3–R4: 30 sc (30)
Fasten off.
Flatten the lower 2 cm of both ends and sew them securely to opposite sides of the opening below the ruffle.
For the mustard center section, join mustard yarn around approximately 8 stitches at the bottom of one side.
R1–R4: 8 sc (8)
Fasten off and stitch the accent section firmly around the handle base.
The finished loop should stand approximately 7–9 cm above the opening.
Optional Reinforced Base
If the bag will regularly carry candy rather than serving only as decoration, add a second circular base.
Yarn: orange.
R1: 6 sc in MR (6)
R2: inc ×6 (12)
R3: (1 sc, inc) ×6 (18)
R4: (2 sc, inc) ×6 (24)
R5: (3 sc, inc) ×6 (30)
R6: (4 sc, inc) ×6 (36)
Fasten off.
Place the circle inside the bottom of the finished pouch and sew around its edge.
This double layer helps prevent individually wrapped sweets from stretching the original magic-ring base.
Assembly
- Complete the orange pumpkin body and ruffled opening before adding any external cords.
- Thread the long orange shaping yarn through the base and form six equally spaced pumpkin ribs.
- Check that the bag still stands flat after the ribs are tightened.
- Thread the green drawstring through the eight eyelets around the neck.
- Center the cord ends at the front and tie a broad bow.
- Sew the loop handle to opposite sides of the upper body immediately below the ruffle.
- Wrap or crochet the mustard accent around the lower portion of the loop handle.
- Attach the curly green tendril close to the bow and allow its final curl to hang freely.
- Add the green and mustard dangling cords, then weave every tail to the inside.
- Fill the pouch lightly, close the drawstring and adjust each lobe until the pumpkin remains symmetrical.
The completed bag should maintain six visible lobes with the opening fully functional.
7 Technical Tips
- Mark the first stitch of every round. A one-stitch drift across the body moves each rib reference line and produces visibly twisted pumpkin segments.
- Stop increasing at 36 stitches for this medium pouch. Moving to 42 stitches without adding proportional height creates a flatter pumpkin and reduces the tall rounded profile.
- Keep rib tension moderate. If the base lifts more than approximately 5 mm from the table after shaping, release each segment slightly until it sits flat again.
- Place all eight drawstring eyelets at equal intervals. Irregular spacing makes the ruffle gather heavily on one side when the bag is closed.
- Test the ruffle after R28. If it points vertically rather than spreading outward, add more increase before working the scalloped edge.
- Sew each handle end through at least six body stitches. Attaching it through only one or two stitches concentrates the load and can stretch holes when the pouch contains candy.
- Work at least 3 sc into every tendril chain for a visible curl. One sc per chain produces a straight cord, while four per chain creates a tighter corkscrew.
Conclusion
Finish the orange body before deciding how tightly to pull the rib-shaping yarn; the final capacity depends directly on that adjustment. For a pouch close to the photographed proportions, target roughly 14–16 cm across, keep six deep lobes and position the eyelets below the expanding ruffle rather than inside it. Crochet one short test tendril first to compare three versus four single crochets per chain, then make the final vine at the preferred curl. Save this crochet pumpkin drawstring bag to Pinterest and share the finished version on Instagram with #RuffledPumpkinBag. Would you keep the olive-green bow, or replace it with a darker forest-green cord?









