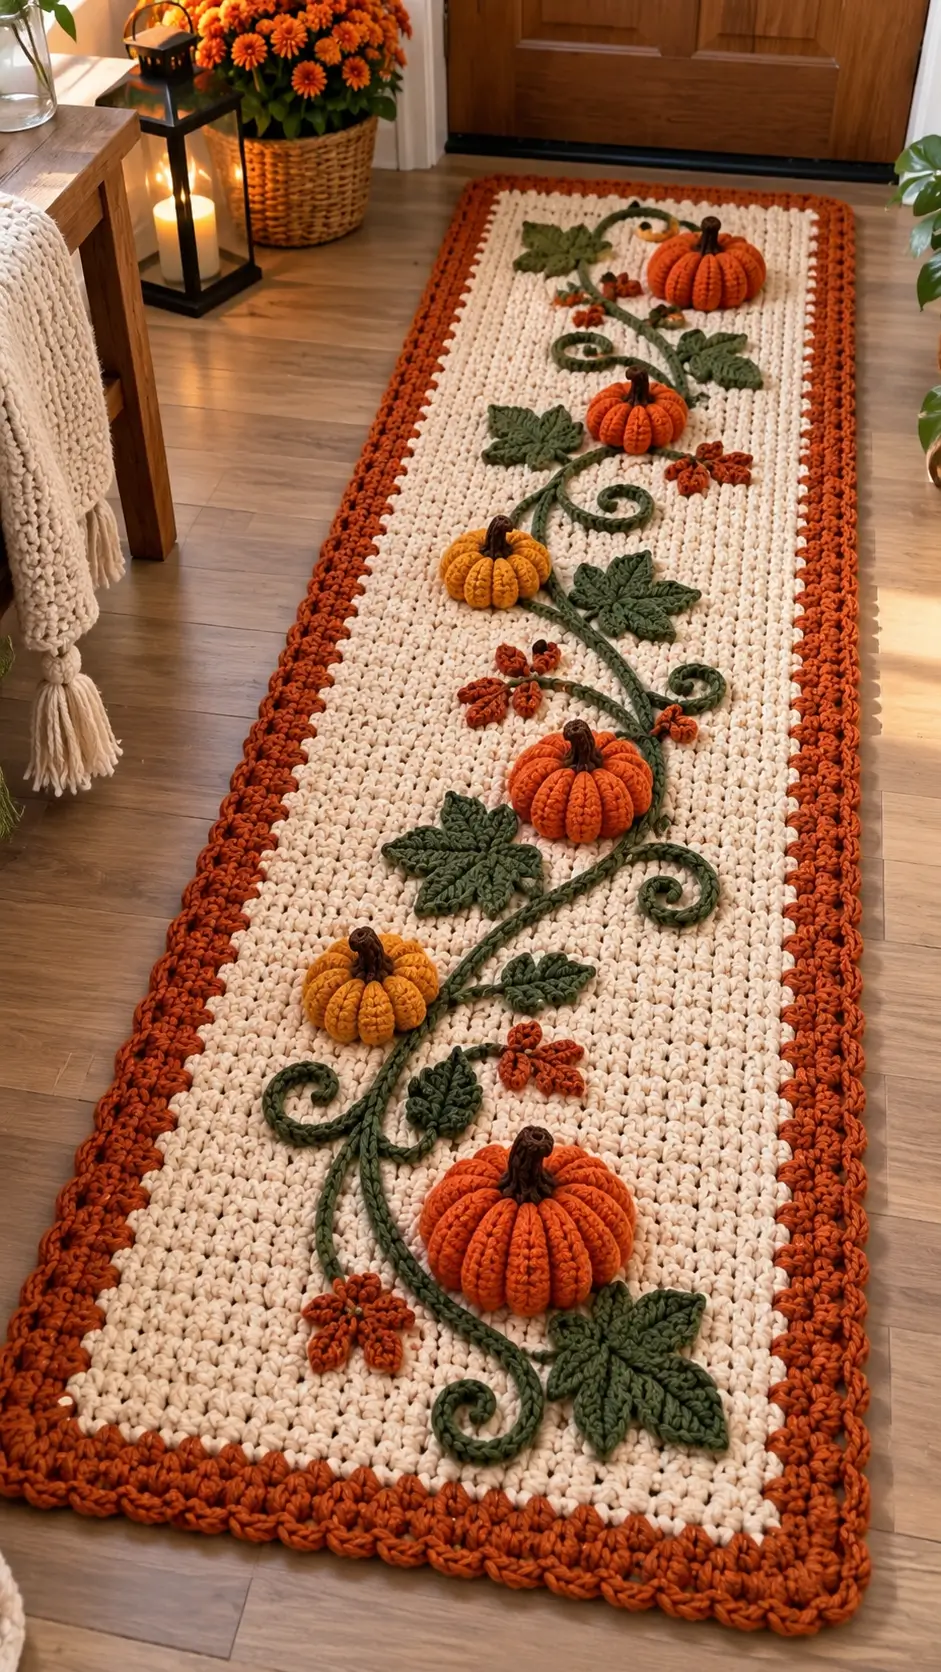
A pumpkin needs deep vertical ribs to remain recognizable when it is flattened against a long crochet runner. This crochet pumpkin vine runner pattern combines stuffed pumpkin appliqués, olive vines, leaves, a cream field, and a rust border in a roughly 75 × 220 cm format. Use chunky yarn and an 8 mm hook for an intermediate-level floor piece whose dimensional motifs create considerably more relief than flat colorwork.
The Design: What Makes This Pumpkin Vine Runner Different
The photographed design depends on three structural layers. First comes a thick cream rectangle, which provides enough visual space for the botanical line to remain readable. A rust border then frames that field instead of competing with it.
Raised pumpkins form the second layer. Their segmented construction matters because a smooth orange sphere would lose the characteristic pumpkin profile when attached to the runner. Tight vertical shaping lines create the ribs.
Finally, an olive crochet pumpkin vine runs diagonally rather than following the edge. Large leaves and spiral tendrils interrupt that line. The common mistake in a fall crochet runner of this type is attaching every appliqué before testing the full composition. That produces crowded pumpkins at one end and empty background at the other.
Project Info at a Glance
| Skill Level | Time | Finished Size | Hook | Best For |
|---|---|---|---|---|
| Intermediate | 12–18 hours | Approx. 75 × 220 cm | 8 mm main / 5–6 mm appliqués | Fall floor or oversized table display |
The finished dimensions are a target for this photo-inspired version. Because yarn thickness and individual tension affect both width and length, measure the runner during construction rather than relying on row count alone.
Materials and Tools
Yarn
- Cream/ivory — super bulky — cotton cord, tube yarn, or equivalent sturdy yarn
- Burnt orange — super bulky — for the wide border
- Pumpkin orange — chunky or super bulky — for dimensional pumpkins
- Mustard — chunky or super bulky — for contrast pumpkins
- Dark olive green — chunky — for vines, tendrils, and leaves
- Dark brown — worsted or chunky — for pumpkin stems
- Rust orange — worsted or chunky — for small botanical clusters
- Polyester fiberfill — small amount for dimensional pumpkins
Tools
- 8 mm crochet hook for the main runner
- 5–6 mm crochet hook for dimensional motifs
- Large yarn needle
- Locking stitch markers
- Scissors
- Rust-resistant pins
- Tape measure
- Polyester stuffing
- Nonslip rug backing if the finished piece will be placed on a smooth floor
Safety eyes are not required. This design is botanical rather than character-based.
Abbreviations
- MR — magic ring
- sc — single crochet
- inc — 2 sc in one stitch
- dec — single crochet decrease
- sl st — slip stitch
- ch — chain
- hdc — half double crochet
- dc — double crochet
- BLO — back loop only
- FLO — front loop only
For an invisible decrease, insert the hook through the front loops of the next two stitches, pull through both front loops, then complete the single crochet.
Crochet Pumpkin Vine Runner Pattern — Step by Step
The runner itself is worked flat. Pumpkin motifs are worked in continuous spirals unless otherwise stated. Use a stitch marker to identify the first stitch of every amigurumi round.
Main Runner Panel
Yarn: cream/ivory.
Foundation: Ch 62 loosely.
R1: sc in second ch from hook and across (61).
R2: ch 1, turn, sc across (61).
R3–R150: repeat R2 (61).
For a longer runner, continue working even rows until the cream panel reaches approximately 200 cm before adding the border. For a shorter table-runner version, stop when the panel measures approximately 120–150 cm.
Fasten off.
Measure the panel before continuing. Stitch gauge changes considerably with cotton cord and tube yarn, so the physical dimensions are more useful than copying a fixed number of rows.
Burnt Orange Border
Yarn: burnt orange.
Join yarn at one corner of the cream panel.
Border R1: sc evenly around all four edges, placing 3 sc in each corner.
Border R2: ch 1, sc around, placing 3 sc in the center corner stitch at each corner.
Border R3: repeat Border R2.
Border R4: repeat Border R2 to create the broad framed appearance.
Fasten off and weave the yarn tail securely through the dense border fabric.
Large Pumpkin — Make 3
Yarn: pumpkin orange.
R1: 6 sc in MR (6)
R2: inc ×6 (12)
R3: (sc, inc) ×6 (18)
R4: (2 sc, inc) ×6 (24)
R5: (3 sc, inc) ×6 (30)
R6: (4 sc, inc) ×6 (36)
R7: sc around (36)
R8: sc around (36)
R9: sc around (36)
R10: sc around (36)
R11: sc around (36)
R12: (4 sc, dec) ×6 (30)
R13: (3 sc, dec) ×6 (24)
R14: (2 sc, dec) ×6 (18)
Stuff firmly enough to hold a low dome, but do not make the pumpkin rigid or spherical.
R15: (sc, dec) ×6 (12)
R16: dec ×6 (6)
Fasten off, leaving approximately 80 cm of yarn for shaping.
Pass the long tail through the center from bottom to top. Bring the yarn down around the outside of the pumpkin and pass it through the center again. Pull carefully to create a vertical groove.
Repeat around the pumpkin at evenly spaced intervals until six to eight ribs have formed. Flatten the underside slightly before sewing the pumpkin onto the runner.
Medium Pumpkin — Make 3
Yarn: pumpkin orange or mustard.
R1: 6 sc in MR (6)
R2: inc ×6 (12)
R3: (sc, inc) ×6 (18)
R4: (2 sc, inc) ×6 (24)
R5: (3 sc, inc) ×6 (30)
R6: sc around (30)
R7: sc around (30)
R8: sc around (30)
R9: sc around (30)
R10: (3 sc, dec) ×6 (24)
R11: (2 sc, dec) ×6 (18)
Add stuffing at this point. Keep the lower surface relatively flat.
R12: (sc, dec) ×6 (12)
R13: dec ×6 (6)
Fasten off with a 60–70 cm tail. Use the remaining yarn to divide the pumpkin into six raised sections.
Alternate orange and mustard motifs across the runner. Avoid positioning both mustard pumpkins next to each other because the contrast works better when distributed along the vine.
Pumpkin Stems — Make 6
Yarn: dark brown.
R1: 6 sc in MR (6)
R2: sc around BLO (6)
R3: sc around (6)
R4: sc around (6)
R5: sc around (6)
R6: sc around (6)
For the largest pumpkins:
R7: sc around (6)
R8: sc around (6)
Fasten off. Leave approximately 20 cm of yarn for sewing the stem to the pumpkin.
Main Pumpkin Vine
Yarn: dark olive green.
Ch 190, or make a chain approximately 15–20 cm shorter than the cream section of your runner.
R1: Beginning in the second ch from hook, sl st along the entire chain.
For the thicker vine visible in the reference design:
R2: Turn and sc back along the opposite side of the foundation chain.
Fasten off with approximately 30 cm of yarn remaining.
Make two additional branch vines using 35–55 chains. Do not sew the branches down until all pumpkins have been positioned.
Curly Vine Tendrils — Make 6–8
Yarn: dark olive green.
Ch 25.
Beginning in the second chain from the hook, work 3 sc in each chain across. The increases cause the strip to coil into a spiral automatically.
For a wider tendril, work 3 hdc in each chain instead.
Fasten off with approximately 20 cm of yarn for attachment.
Do not stretch or flatten the coils during blocking.
Large Pumpkin Leaves — Make 5–6
Yarn: dark olive green.
Ch 14.
R1: sl st in second ch from hook, sc in next 2, hdc in next 3, dc in next 4, hdc in next 2, 3 sc in final ch.
Rotate the work and continue along the opposite side of the foundation chain.
R2: hdc in next 2, dc in next 4, hdc in next 3, sc in next 2, sl st in final stitch.
Do not fasten off.
Ch 8 for the first side lobe. Work sl st, sc, hdc, 3 dc, hdc back toward the center. Sl st into the edge of the main leaf.
Repeat with another 8-chain lobe lower on the same side.
Work two matching lobes on the opposite side.
For a smaller lower lobe, ch 6 and work sl st, sc, hdc, 2 dc back toward the center.
Fasten off and leave approximately 25 cm for sewing.
Shape the leaf with your fingers before pinning it to the runner. The central spine should follow the direction of the vine while the lobes spread into the cream background.
Small Leaves — Make 5
Yarn: dark olive green.
Ch 9.
R1: sl st in second ch, sc, hdc, dc in next 3, hdc, 3 sc in final chain.
Continue along the opposite side.
R2: hdc, dc in next 3, hdc, sc, sl st.
Fasten off with approximately 20 cm of yarn for sewing.
Orange Botanical Clusters — Make 5–7
Yarn: rust orange.
These smaller pieces reproduce the orange botanical accents positioned between the larger pumpkins and leaves.
R1: 6 sc in MR (6)
R2: inc ×6 (12)
For the petal round, work a combination of sl st, ch 4, 2 dc in the same stitch, ch 3, and sl st into the following stitch. Repeat around while keeping the petals evenly distributed.
Fasten off and leave a sewing tail.
Optional Raised Berries — Make 6
Yarn: rust orange.
R1: 6 sc in MR (6)
R2: inc ×6 (12)
R3: sc around (12)
R4: dec ×6 (6)
Add a very small amount of stuffing before closing.
Fasten off and close the remaining opening.
Keep these pieces relatively small. Approximately 2–3 cm is enough for them to register as secondary botanical details without competing with the dimensional pumpkins.
Assembly
- Block the cream panel and burnt orange border to the intended rectangular dimensions before attaching any dimensional pieces.
- Lay the main olive vine diagonally from the lower section toward the opposite upper section. Form broad S-shaped curves instead of pulling the vine into a straight line.
- Position all six pumpkins before sewing. Alternate large and medium sizes and distribute the mustard pumpkins between the orange motifs.
- Sew each pumpkin to the cream field through its lower stitches. Keep the ribbed upper surface free so the dimensional structure remains visible.
- Attach the dark brown stems vertically. Conceal the lower edge of each stem between the pumpkin ribs.
- Sew the main vine at approximately 4–6 cm intervals. Add the shorter branches only after the primary vine has been secured.
- Position the large leaves beside the major pumpkins and the small leaves around branch junctions. Stitch the center spine first, followed by each lobe.
- Add the curly tendrils to open areas. Secure the base and one concealed point of each coil rather than sewing the entire spiral flat.
- Sew the rust botanical clusters into the remaining open spaces. Keep them away from the burnt orange border so their silhouettes remain visible.
- Turn the runner over and weave every yarn tail securely through the backing stitches. Add a suitable nonslip rug layer when placing the finished runner on a smooth floor.
The completed runner should have a flat rectangular foundation with dimensional pumpkins and controlled botanical relief concentrated around the central vine.
7 Technical Tips for a Cleaner Pumpkin Runner
- Watch for a wavy border. If the outer edge starts ruffling after the second border round, reduce excess corner increases before adding another round.
- Mark every pumpkin round. Losing the start position by two or three stitches shifts the decrease columns and can make the pumpkin lean to one side.
- Control stuffing firmness. The pumpkin should compress approximately 2 cm when pressed before the shaping strands are added; an overfilled sphere is difficult to divide into deep ribs.
- Use invisible decreases. Ordinary decreases can leave six visible openings near the bottom of the pumpkin, particularly when using mustard or other lighter-colored yarn.
- Pin every leaf lobe. Securing only the leaf center can leave 3–5 cm lobes curling upward, which is unsuitable for a floor runner.
- Anchor the vine every 4–6 cm. Larger unsecured gaps can form loops that catch under feet, while stitching every centimeter can flatten the intended curves.
- Weave tails for at least 8 cm. Short tails can work loose under floor abrasion, particularly beneath pumpkins and along the outer border.
Adjusting the Runner Size
The approximately 75 × 220 cm format works as a long floor runner, but the same construction can be adapted to other spaces. Change the cream foundation before making the decorative pieces.
For a table runner, reduce both the starting chain and total number of rows. A finished length of approximately 120–150 cm allows three or four pumpkins instead of six. Keep enough blank cream space around each motif so the vine remains visible.
For a longer hallway runner, extend the cream panel first and add extra pumpkins only when necessary. Maintaining the spacing is more important than filling every section with an appliqué.
When changing width, check the pumpkin scale against the base. A 12 cm pumpkin on a 35 cm-wide runner occupies a large percentage of the usable field and may require smaller leaves and thinner vines.
Choosing Colors for the Pumpkin Vine
The reference composition uses a restrained autumn palette: cream, burnt orange, pumpkin orange, mustard, dark brown, and olive green. The cream background carries most of the surface area, allowing the raised elements to remain distinct.
Keep the outer border darker than the central field. This visually contains the botanical composition and separates the cream runner from a pale floor.
Mustard works best as a limited accent rather than an equal partner to orange. Two mustard pumpkins among four orange pumpkins create visible variation without breaking the repeated pumpkin motif.
Dark olive is more practical than bright green for this design because it maintains contrast against cream while remaining distinct from both orange shades. Brown should be restricted mainly to stems so the central vine continues to read as one connected green structure.
Finishing and Floor Use
Inspect the reverse side after every appliqué has been attached. No long yarn floats should remain exposed because they can catch during cleaning or regular movement.
Steam or wet block according to the yarn manufacturer’s care instructions. Do not aggressively flatten the pumpkins, tendrils, or leaf lobes; block the rectangular foundation first and manually reshape the dimensional elements afterward.
A crochet runner placed on wood, laminate, tile, or another smooth surface can move underfoot. Use a nonslip backing designed for rugs and compatible with the flooring material. The raised pumpkins also make this design more suitable for decorative, low-traffic placement than a main walking route.
If the piece will be used primarily as an oversized table runner or decorative bench covering, nonslip backing is unnecessary. In that case, the pumpkins can also be stuffed more firmly because foot clearance is no longer a concern.
Conclusion
The defining feature of this design is the spacing between the six dimensional pumpkins, not simply the number of appliqués. Complete the cream field first, block it, then arrange every pumpkin, leaf, branch, and tendril before sewing. This sequence keeps the botanical line balanced from one end of the runner to the other. The next practical step is to crochet a 15 × 15 cm base swatch and calculate the starting chain required for your intended width. Save this crochet pumpkin vine runner pattern to Pinterest and share the finished version on Instagram with #PumpkinVineRunner. Will your two mustard pumpkins sit at opposite sections of the vine, or will you work all six pumpkins in orange?









