Introduction
A daisy needs a flat yellow disk and radiating petals, but this blanket makes both rise above an openwork field. This crochet daisy blanket pattern uses worsted yarn, a 3.5 mm hook and a 114 × 132 cm target size, with intermediate-level appliqué and border work. The separate flowers make placement adjustable, which is useful when adapting the design to a bed, sofa or smaller throw.
The Design: What Makes This Daisy Blanket Different
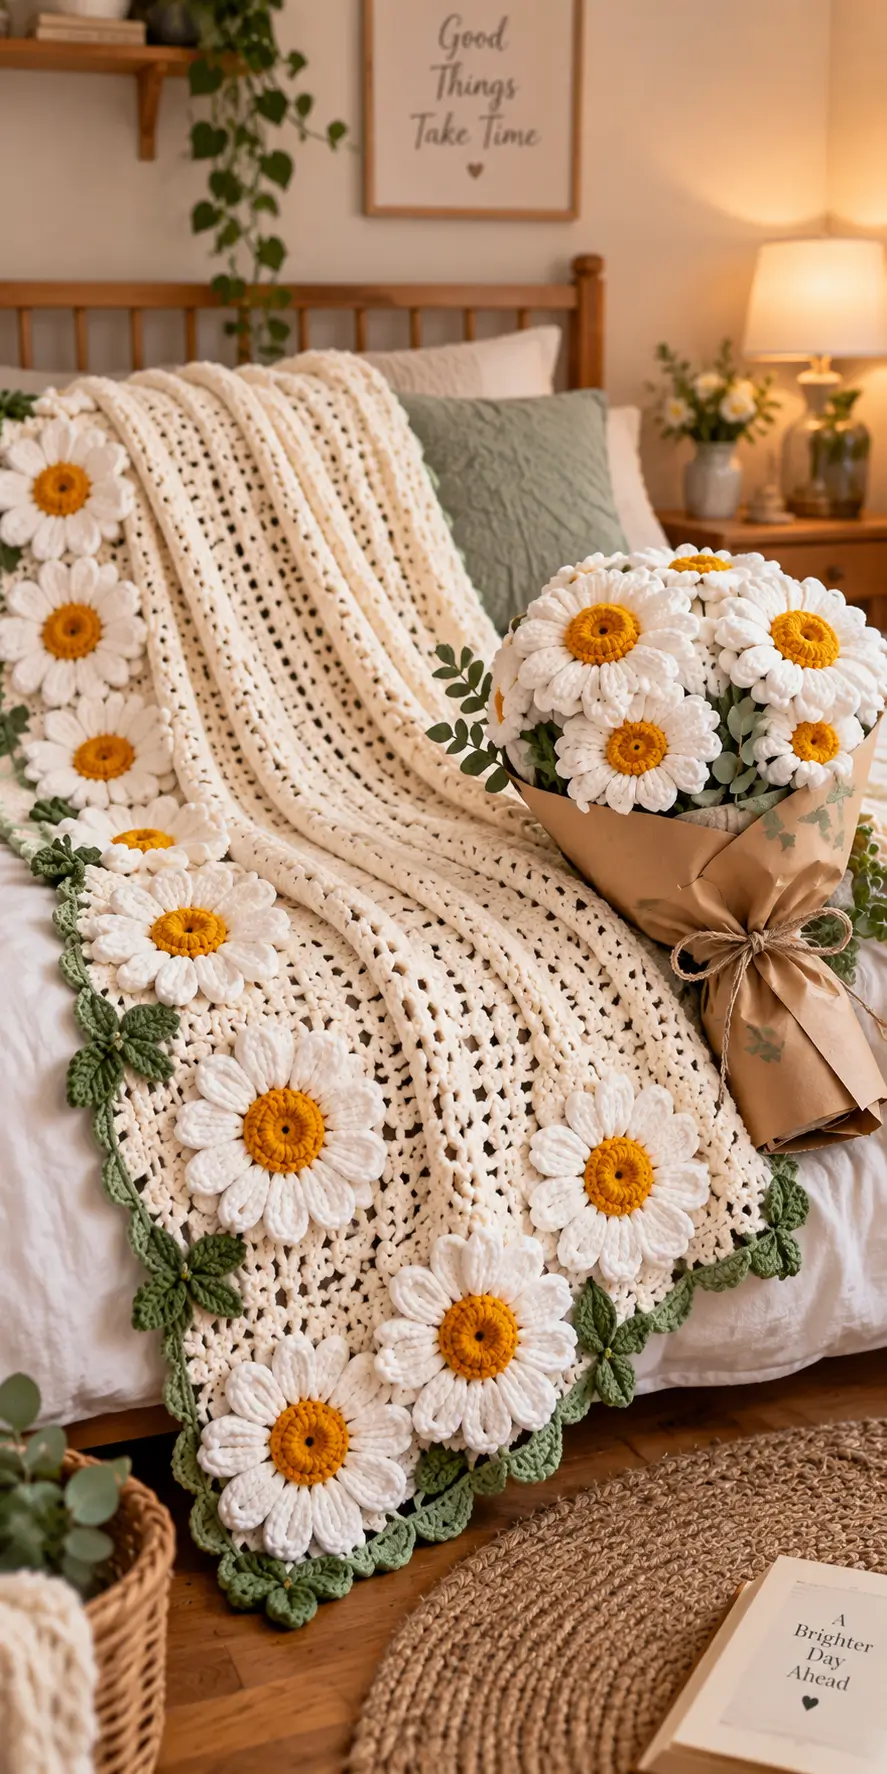
The reference image does not use the usual grid of obvious floral granny squares. Instead, the cream field reads as one continuous openwork surface, while dimensional daisies sit above it. That distinction controls the construction.
Each crochet daisy applique therefore has a compact mustard center and raised white petals. Green leaves are concentrated around the perimeter rather than filling the entire field, keeping the floral crochet throw visually close to the reference. A few flowers can also overlap the edge.
The most common structural mistake is making every element equally prominent. Oversized centers reduce the recognizable daisy proportion, while loose petals collapse into the background. The flower center should remain substantially narrower than the completed white petal span. Pin all flowers before sewing because random-looking placement still requires controlled spacing.
Project Info at a Glance
| Skill Level | Time | Finished Size | Hook | Best For |
|---|---|---|---|---|
| Intermediate | Multi-session project | Approx. 114 × 132 cm | 3.5 mm | Bed throw, sofa throw, floral décor |
The 114 × 132 cm dimension is used as a practical target size rather than a measurement extracted from the reference photograph. Adjust the foundation chain and number of rows when making a different blanket size.
Materials and Tools
Yarn
- Warm ivory — light worsted/worsted — approximately 1,000–1,300 g purchasing allowance for the blanket body
- White — light worsted/worsted — approximately 250–350 g purchasing allowance for the petals
- Mustard yellow — light worsted/worsted — approximately 80–120 g purchasing allowance for the flower centers
- Sage green — light worsted/worsted — approximately 180–250 g purchasing allowance for the leaves and edging
These yarn quantities are project estimates. Actual consumption changes with gauge, yarn density, finished dimensions and the number of flowers used.
A smooth acrylic, cotton/acrylic blend or wool/acrylic yarn gives the petals enough stitch definition to retain their individual shapes. Avoid highly fuzzy yarn when crisp flower outlines are required.
Tools
- 3.5 mm crochet hook
- Yarn needle
- Locking stitch markers
- Sharp scissors
- Blocking pins
- Blocking mats
- Tape measure
No stuffing or safety eyes are required because this project is a blanket rather than amigurumi.
Abbreviations
- MR — magic ring
- ch — chain
- sc — single crochet
- hdc — half double crochet
- dc — double crochet
- tr — treble crochet
- sl st — slip stitch
- sp — space
- st/sts — stitch/stitches
- inc — 2 stitches in one stitch
- BLO — back loop only
Invisible decreases are not required for this construction because there are no stuffed spherical components.
Pattern — Step by Step
The blanket body is worked flat. Daisy centers and leaves are crocheted separately and attached after the main field has been completed.
Blanket Body
Yarn: warm ivory.
For a 114 cm target width, crochet a foundation chain long enough to reach approximately 114 cm after making a gauge swatch. Use a stitch multiple of 3 + 2.
Row 1: Dc in fourth ch from hook, dc across. Turn.
Row 2: Ch 3, dc in next st, *ch 1, skip 1 st, dc in next 2 sts* across. Adjust the final repeat as required. Turn.
Row 3: Ch 3, dc across, placing 1 dc in each dc and 1 dc in every ch-1 sp. Turn.
Row 4: Repeat Row 2.
Continue alternating Rows 3 and 4 until the work measures approximately 132 cm, ending with a solid dc row.
Do not cut the yarn if working the first border round immediately.
The alternating solid and open rows create the vertical perforated structure required for the background while maintaining enough fabric for securely attaching the flowers.
Foundation Border
Yarn: warm ivory.
Round 1: Ch 1. Work sc evenly around all four sides, placing 3 sc in each corner. Join with sl st.
Round 2: Ch 1, sc in every st around, working 3 sc in each corner stitch. Join.
Fasten off.
The foundation border gives the decorative green edging a controlled attachment line and reduces stretching along the openwork sides.
Daisy Centers
Make approximately 14–18 for a throw with substantial flower coverage.
Yarn: mustard yellow.
R1: 6 sc in MR (6)
R2: Inc ×6 (12)
R3: (sc, inc) ×6 (18)
R4: (2 sc, inc) ×6 (24)
Fasten off. Leave a 25 cm tail for attachment.
For a more pronounced center, work R4 in BLO and allow the unused front loops to form a subtle ridge. Do not stuff the disk. The center should remain relatively flat so it sits securely against the blanket.
Large White Petal Layer
Yarn: white.
Join white yarn to any stitch of the completed yellow center. Each petal occupies approximately two center stitches.
Petal 1: Ch 8. Beginning in the second ch from the hook, work sc, hdc, dc, 2 tr, dc, hdc. Sl st into the next available center stitch.
Repeat around the center to form 12 petals, distributing them evenly.
Fasten off. Leave a 20 cm tail.
The 12-petal arrangement produces a broad radial flower while keeping the mustard center clearly visible.
Raised Petal Overlay
Make this additional layer only for flowers requiring stronger three-dimensional relief.
Join white yarn behind the base of one existing petal.
Petal: Ch 7, sc in second ch, hdc, 3 dc, hdc; sl st at the base between two first-layer petals.
Repeat around.
Fasten off.
Position the second layer between the lower petals rather than directly over them. Selective use keeps the finished blanket from becoming excessively heavy.
Small Daisy Version
Make 2–4 when varied flower scale is required.
Yellow Center R1: 6 sc in MR (6)
R2: Inc ×6 (12)
Change to white yarn.
For each petal, ch 6, then work sc, hdc, 2 dc, hdc back along the chain. Sl st into the following center stitch.
Repeat for 12 petals.
Fasten off, leaving a 20 cm sewing tail.
Use the smaller flowers near corners or between larger daisies where a full-size motif would reduce the visible cream background.
Green Leaves
Make approximately 30–45 depending on the required border density.
Yarn: sage green.
Foundation: Ch 8.
Working from the second chain from the hook:
Side 1: Sc, hdc, dc, 2 tr, dc, 3 sc in final ch.
Rotate the chain.
Side 2: Dc, 2 tr, dc, hdc, sc.
Join with sl st at the base.
Fasten off, leaving a 15 cm tail when the leaf will be sewn individually.
The three stitches at the chain tip create the turn and pointed shape required for an elongated crochet leaf.
Leaf Clusters
Make as needed for the perimeter.
Arrange three completed leaves so their bases meet. Thread a yarn needle with sage yarn and sew through all three bases several times.
Rotate the leaves so the center leaf points outward while the side leaves sit at approximately 35–45 degrees.
Secure the cluster to the border through the leaf bases only. Leaving the tips unattached maintains the raised botanical outline.
Green Vine Border
Yarn: sage green.
Join the yarn to the ivory foundation border.
Round 1: Sc in each stitch around, placing 3 sc at each corner. Join.
Round 2: *Ch 5, skip 2 sts, sl st in next st.* Repeat around. At each corner, shorten or lengthen one chain loop when necessary to keep the border flat.
Round 3: Work *(sc, hdc, 3 dc, hdc, sc)* into each ch-5 loop.
Join and fasten off.
The scalloped green foundation provides attachment points for the separate leaves. Pin the completed border flat before adding leaf clusters because their additional weight can conceal existing border distortion.
Flower Placement
This stage determines the final appearance of the daisy crochet blanket.
Lay the blocked blanket flat. Position the largest daisies irregularly across the lower third, then distribute several through the middle field. Keep substantial areas of cream visible between the flowers.
Place two or three flowers so their petals approach or slightly overlap the green perimeter. Rotate each flower before pinning. Aligning every set of petals in the same direction makes the arrangement appear mechanically repeated.
Use four pins per flower until the complete layout has been approved.
Sew the yellow center firmly to the blanket with mustard yarn. Tack approximately every second petal near its base with white yarn rather than sewing continuously around every outer edge.
Optional Bouquet Flowers
The matching crochet bouquet can be treated as a separate decorative project. Make additional daisies using the same yellow center and white petal instructions.
Do not attach these flowers to the blanket. A freestanding bouquet requires stems and additional structural components that are separate from the throw construction.
Assembly
- Block the cream blanket body to approximately 114 × 132 cm or to the dimensions calculated from your own gauge.
- Add the two-round ivory foundation border and check that all four corners lie flat.
- Crochet the green vine border without attaching the leaves yet.
- Make all mustard centers, checking that the final rounds remain flat rather than cupping.
- Add the white petals and sort the completed flowers according to diameter.
- Pin every flower onto the blanket before sewing the first motif permanently.
- Sew each yellow center securely, then tack alternate white petals close to their bases.
- Assemble the three-leaf clusters and pin them around the green perimeter at controlled intervals.
- Sew the leaf bases to the border while leaving most of each leaf tip free.
- Weave every tail through at least 4–5 cm of matching-color stitches, trim, then block the completed border again.
The completed piece is an ivory openwork floral throw with raised white daisies, mustard centers and a dimensional sage-green perimeter.
7 Technical Tips for a Cleaner Daisy Blanket
- Mark every row edge. Losing one edge stitch on alternate openwork rows creates a progressively diagonal side. Place a marker in the first and last working stitch before turning.
- Check the body every 20 cm. If the width changes by more than 2 cm, recount the mesh repeat before continuing. Blocking should not be used to correct a substantial stitch-count error.
- Keep the flower centers flat. A yellow disk that cups after the 24-stitch round usually indicates excessive tension. Try a hook approximately 0.5 mm larger for the center rather than forcing it flat during attachment.
- Pin before attaching petals. A flower sewn only through its outer petal tips can pucker the blanket. Anchor the center first and tack petals approximately 10–15 mm from their bases.
- Control petal length. Unequal foundation chains produce visibly mismatched flowers. Every large petal should begin with the specified 8 chains before the return stitches are worked.
- Test border expansion at each corner. A green border that curls upward lacks sufficient corner allowance. Each corner needs enough additional stitches or chain space to turn approximately 90 degrees without pulling the blanket inward.
- Bury attachment tails deeply. Short tails can work free as a large throw flexes during use. Weave flower and leaf tails through at least 4–5 cm of same-color stitches and reverse direction once before trimming.
Finishing the Crochet Daisy Blanket
Measure and block the cream field before committing to the floral layout; that step determines whether the appliqués remain balanced after the border is attached. Next, make one complete daisy and one three-leaf cluster as gauge samples before producing the remaining motifs.
Photograph the finished crochet daisy blanket pattern from directly above so the flower spacing, leafy border and overall scale remain visible. The same construction can be adapted by reducing the foundation width and total rows for a smaller throw or increasing both dimensions for a bed blanket.
Share the finished version on Pinterest or Instagram with #DaisyGardenThrow. Record the yarn, hook size and final dimensions before starting another version. For this particular floral layout, would you keep the mustard-yellow daisy centers or replace them with a softer gold?









