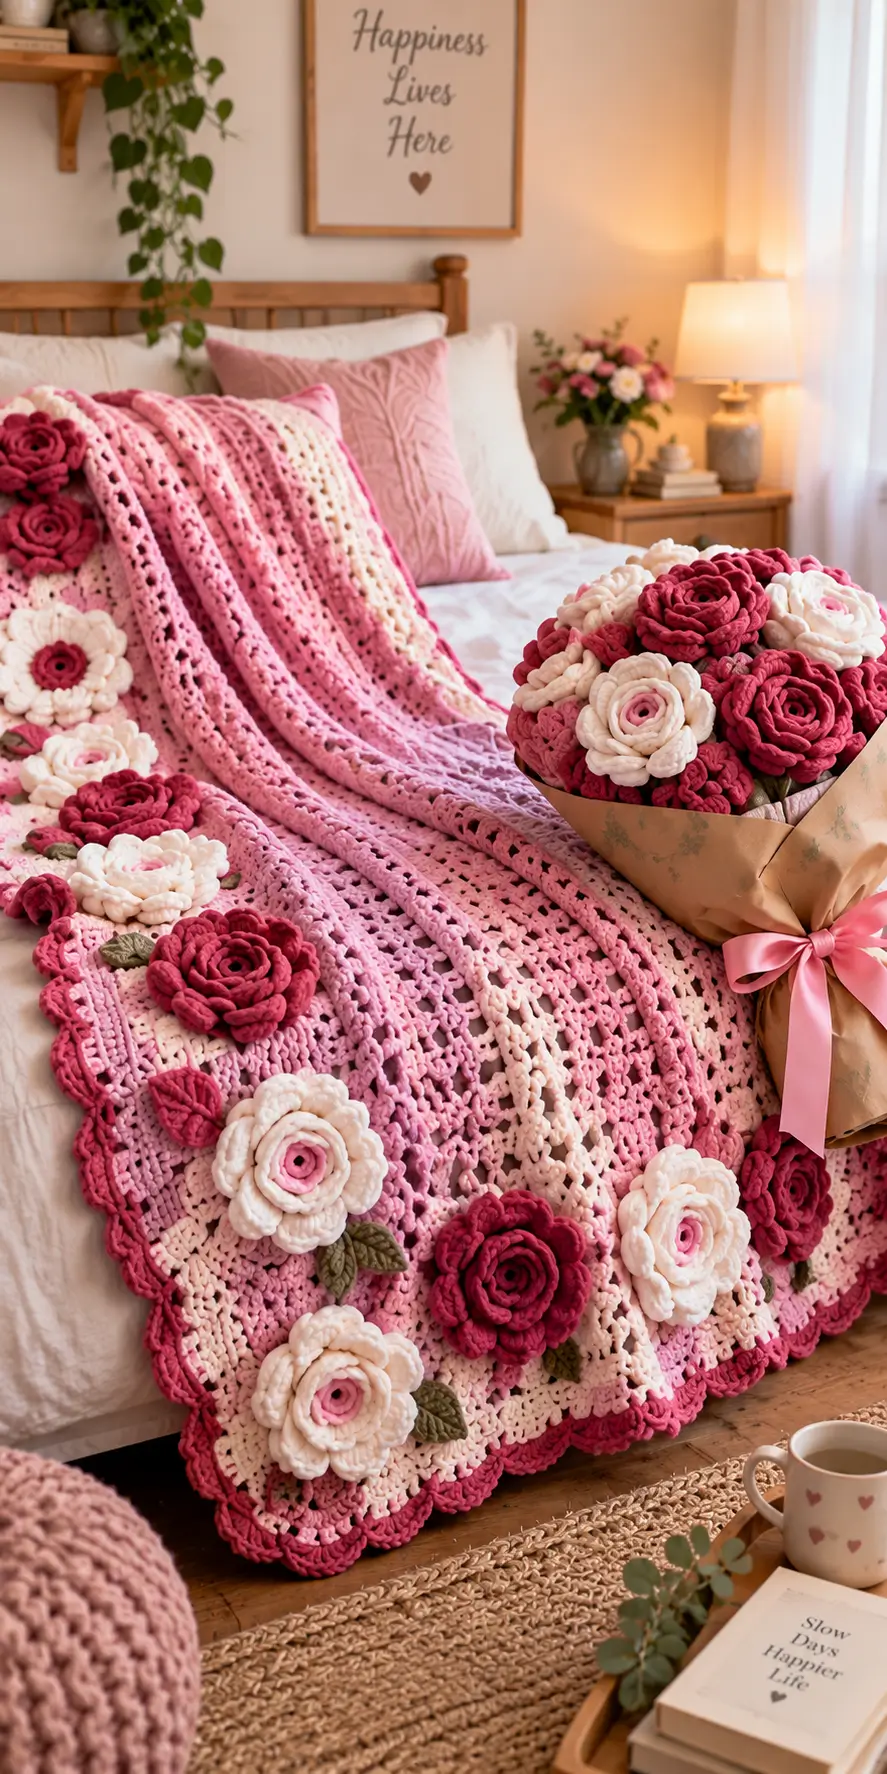
The raised roses are the defining construction feature of this blanket. A striped pink-and-cream crochet base provides the structure, while separately crocheted flowers and leaves are attached across the surface and border. The photographed design uses dusty pink, blush, cream, deep raspberry, and muted olive green. A medium-to-heavy yarn works best because the flowers need enough body to keep their layered shape.
The Design: What Makes This Rose Blanket Different
This crochet rose blanket combines three separate techniques: an openwork blanket body, a scalloped border, and dimensional floral appliqués. Keeping those elements separate matters. The blanket can remain flexible while the roses are worked more tightly so their petals do not collapse.
The largest flowers use several layers of overlapping petals, while smaller cream roses create visual spacing between the darker raspberry blooms. Olive-green leaves break up the pink palette and make each flower easier to distinguish.
A common mistake is sewing every rose flat against the blanket. Only the lower portion of each flower should be secured firmly. Leaving the upper petal edges free preserves the three-dimensional appearance visible in the photographed design.
Project Info at a Glance
| Skill Level | Time | Finished Size | Hook | Best For |
|---|---|---|---|---|
| Intermediate | Multi-day project | Adjustable | 4.5–5.5 mm | Bed throw, decorative blanket |
The exact finished dimensions depend on the number of rows and the yarn chosen.
Materials and Tools
Yarn
Use colors close to the photograph for the strongest match:
- Dusty pink — medium/worsted yarn — main blanket color
- Blush pink — medium/worsted yarn — stripe and flower color
- Cream — medium/worsted yarn — stripes and large flowers
- Deep raspberry — medium/worsted yarn — roses and edging
- Soft pink — medium/worsted yarn — flower centers
- Muted olive green — medium/worsted yarn — leaves
For a bed-size blanket, the base requires substantially more yarn than the floral decorations. Buy the main pink shade in one dye lot whenever possible.
Tools
- 4.5–5.5 mm crochet hook
- Yarn needle
- Scissors
- Stitch markers
- Measuring tape
- Blocking mats
- Rust-resistant blocking pins
A smaller hook can be used for the flowers if the petals appear too loose.
Abbreviations
- MR — magic ring
- ch — chain
- sc — single crochet
- hdc — half double crochet
- dc — double crochet
- tr — treble crochet
- sl st — slip stitch
- st/sts — stitch/stitches
- sp — space
- inc — increase
- dec — decrease
- BLO — back loop only
An invisible decrease is made through the front loops of the next two stitches before completing one single crochet through both loops.
Pattern — Step by Step
Blanket Foundation
Yarn: dusty pink.
The width can be adjusted by changing the starting chain while maintaining the stitch repeat used for the openwork section.
Chain to the required blanket width.
Row 1
Dc in the fourth chain from the hook. Work 1 dc in each chain across.
Turn.
Row 2
Ch 3.
Skip 1 st, dc in next st, ch 1, skip 1 st, dc in next st.
Repeat across.
Turn.
Row 3
Ch 3.
Work dc into each dc and each ch-1 space across.
Turn.
Row 4
Repeat Row 2.
Row 5
Repeat Row 3.
Continue alternating solid and openwork rows to create the lightly textured striped appearance shown in the photograph.
Change between dusty pink, blush pink, and cream at planned intervals.
A useful sequence is:
- 6–10 rows dusty pink
- 2–4 rows blush
- 2–4 rows cream
- 4–8 rows dusty pink
Repeat the color sequence until the blanket reaches the required length.
Fasten off after completing a solid row.
Decorative Raised Stripe
Yarn: dusty pink or raspberry.
The photographed blanket includes pronounced vertical and horizontal raised lines. These can be added after the blanket body is finished.
Join yarn around the post or surface loop at the starting edge.
Ch 1.
Work surface slip stitches along the selected line of stitches.
Keep each slip stitch loose enough that the blanket remains flat.
Fasten off and weave the yarn ends into the wrong side.
Repeat wherever a raised dividing line is required.
Large Raspberry Rose
Yarn: deep raspberry.
The rose is made as a long petal strip and rolled into shape.
Foundation
Ch 51.
Row 1
Dc in the fourth ch from hook.
Work dc across.
Turn.
Row 2
Ch 3.
Work 4 dc into the first suitable stitch or space.
Sl st into the next stitch.
Work 5 dc into the following stitch.
Sl st into the next stitch.
Repeat across to form overlapping shell-shaped petals.
Fasten off, leaving approximately 40 cm of yarn.
Shaping
Begin rolling from the end containing the smaller inner petals.
Coil the strip tightly for the center.
Allow the outer layers to become progressively looser.
Thread the long yarn tail through a yarn needle.
Stitch through the bottom edge of every rolled layer several times.
Do not sew through the upper petal edges.
Fasten securely on the underside.
Large Cream Rose
Yarn: cream with a soft-pink center.
Make the flower using the same basic rolled-rose construction, but introduce the pink center before working the cream petals.
Center
With soft pink, ch 12.
Work 2–3 dc into selected stitches to create a short petal strip.
Fasten off.
Roll tightly.
Outer Petals
Join cream yarn.
Ch 36–45, depending on the required flower diameter.
Work a row of dc.
Turn.
Work groups of 5 dc separated by sl sts across the strip.
Fasten off with a long sewing tail.
Wrap the cream petal strip around the pink center.
Stitch through the base repeatedly to hold the layers together.
Keep the final petals slightly open.
Medium Pink Rose
Yarn: blush or medium pink.
Ch 36.
Row 1
Dc across.
Turn.
Row 2
Ch 3.
Work 4 dc in next st.
Sl st in next st.
Work 5 dc in next st.
Sl st in next st.
Continue across.
Fasten off with a long tail.
Roll into a rose, keeping the center compact and the final petal layer looser.
Sew through the base.
Small Rose
Yarn: raspberry, blush, cream, or soft pink.
Ch 24.
Row 1
Hdc across.
Turn.
Row 2
Ch 2.
Work 4 hdc in next st.
Sl st in next st.
Repeat across.
Fasten off.
Roll the strip tightly and stitch through the base.
These smaller roses are useful for filling spaces between the larger flowers without making the blanket excessively heavy.
Flat Flower Center
Yarn: soft pink.
R1: 6 sc in MR (6)
R2: inc ×6 (12)
R3: (sc, inc) ×6 (18)
Sl st to the first stitch.
Fasten off.
The circle can be placed beneath a cream flower or used as a visible contrasting center.
Crochet Leaf
Yarn: muted olive green.
Ch 9.
Starting in the second chain from the hook:
Sl st in next ch.
Sc in next ch.
Hdc in next ch.
Dc in next 2 ch.
Hdc in next ch.
Sc in next ch.
Work 3 sc into the final chain.
Continue along the opposite side of the foundation chain.
Sc in next ch.
Hdc in next ch.
Dc in next 2 ch.
Hdc in next ch.
Sc in next ch.
Sl st in final ch.
Fasten off, leaving a sewing tail.
Textured Leaf
For the ribbed appearance visible on some of the leaves, add a surface slip-stitch line from the base to the tip after completing the leaf.
Work additional short surface stitches diagonally from the center vein toward the outer edges.
Keep these stitches loose enough that the leaf remains flat.
Scalloped Border
Yarn: deep raspberry.
Attach the border only after the main blanket body has been completed.
Round 1
Join yarn in any corner.
Ch 1.
Sc evenly around the entire blanket.
At each corner, work 3 sc into the same corner space.
Sl st to first sc.
Round 2
Ch 1.
Sc around again, maintaining 3 sts at each corner.
Sl st to join.
Round 3
Skip approximately 2 sts.
Work 5–7 dc into the next stitch.
Skip approximately 2 sts.
Sl st into the next stitch.
Repeat around the blanket to form scallops.
Adjust the spacing slightly near each corner so the edging lies flat.
Fasten off.
Flower Placement
Do not attach the roses before deciding the full layout.
Spread the blanket on a flat surface.
Position the largest raspberry roses first.
Place cream roses between them.
Add medium pink flowers to transitional areas.
Finish with small roses where visible gaps remain.
The photographed design concentrates large flowers around the lower edge and selected areas of the blanket instead of covering every section uniformly.
Pin every flower temporarily before sewing.
Attaching the Roses
Use a yarn needle and matching yarn.
Insert the needle through the blanket from the wrong side.
Catch only the bottom layer of the rose.
Pass back through the blanket.
Repeat around several points of the flower base.
Large roses should be attached at four to six points.
Smaller flowers generally need three or four attachment points.
Avoid stitching through the outer petals.
The petals should remain raised after attachment.
Attaching the Leaves
Position one or two leaves beside selected roses.
Allow part of each leaf to extend beyond the flower.
Sew the lower center vein to the blanket.
Add one small securing stitch near the leaf tip if necessary.
Do not stitch completely around the leaf perimeter because this removes the dimensional effect.
Assembly
- Complete the entire pink, blush, and cream blanket body before attaching decorative pieces.
- Work the raspberry scalloped border around all four edges and check that the corners remain flat.
- Crochet all large raspberry roses and secure their rolled bases.
- Make the cream roses with contrasting pink centers.
- Crochet the medium and small flowers needed to fill the planned arrangement.
- Make the olive-green leaves and add surface stitching if a defined central vein is required.
- Lay the blanket flat and pin the largest roses into position first.
- Position cream and pink flowers between the main roses, then place leaves beside selected blooms.
- Sew every flower through its base only, checking the reverse side frequently for loose yarn loops.
- Weave in all remaining tails, lightly block the blanket, and allow it to dry completely while lying flat.
The finished piece should remain flexible despite the weight of the three-dimensional flowers.
7 Technical Tips
- Avoid a waving border. If the scallops begin to ripple, too many stitches have been placed along the blanket edge; reduce the stitch frequency before starting the final shell round.
- Control rose diameter during rolling. Keep the first 2–3 cm of the petal strip tightly coiled, then loosen each following layer slightly so the flower develops a defined center instead of becoming a flat spiral.
- Check flower weight before permanent attachment. A large yarn rose may require four to six anchoring points at its base; fewer attachment points can allow the flower to pull the blanket out of shape.
- Keep the blanket base looser than the flowers. If the same tension makes the roses floppy, crochet the appliqués with a hook approximately 0.5 mm smaller than the hook used for the blanket.
- Pin every large rose before sewing. A placement difference of only 3–5 cm can make one section appear noticeably heavier than the opposite side once several dimensional flowers are attached.
- Do not pull leaf stitches tightly. A tightly sewn center vein can fold the leaf permanently; the surface stitches should follow the fabric without shortening its finished length.
- Hide long yarn tails inside the flower base. Weave each tail through several different directions for at least 4–5 cm rather than trimming it directly beside the final knot, where repeated blanket movement can loosen the join.
Conclusion
This pink crochet rose blanket depends on construction order more than complicated stitches. Build the striped blanket first, finish its raspberry scalloped edge, then make the roses and leaves as separate components. Large raspberry blooms establish the main placement, while cream flowers with pink centers create the contrast visible in the reference image. Pinning the complete arrangement before sewing also prevents one area from becoming overloaded with dimensional pieces.
Your next step is to make one large rose and one cream rose as samples before calculating the total number required for the blanket. Save the finished project to Pinterest or share it on Instagram with #PinkCrochetRoseBlanket. Which would you use more heavily on the border: the deep raspberry roses or the cream roses?









