Introduction
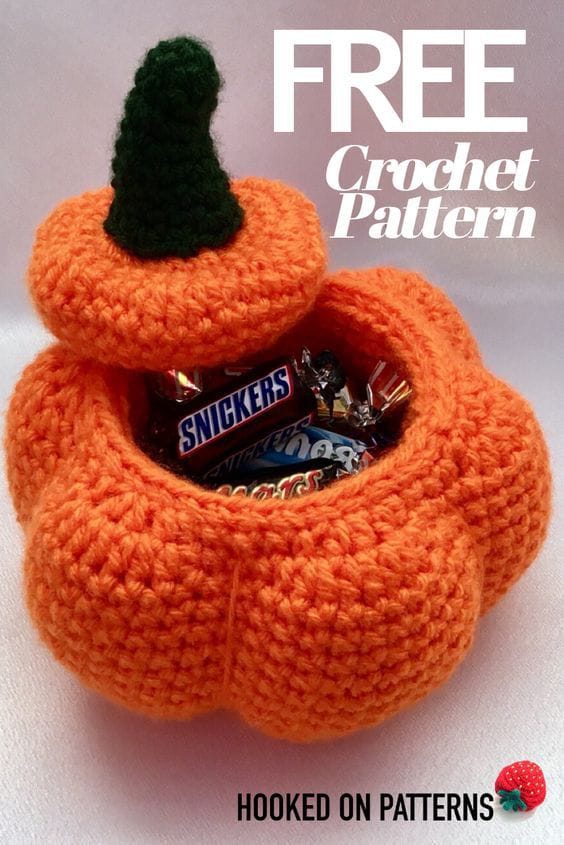
A pumpkin lid with a tall stem becomes useless if its rim falls through the candy opening. This crochet pumpkin candy bowl pattern treats the container and lid as two measured structures: a 60-stitch hollow body and a broad removable crown. Super-bulky yarn with a 6 mm hook creates an approximately 22 cm bowl suitable for wrapped Halloween treats, while the dark stem provides a functional lifting point.
The Design: What Makes This Pumpkin Bowl Different
The reference combines pumpkin shaping with container engineering. The lower half has to stay open under its own weight, so the fabric is worked significantly denser than a stuffed decorative pumpkin. A circular base supports straight walls before the upper rounds narrow slightly toward the opening.
The second structural decision is the removable crown. Its diameter is wider than the bowl opening but smaller than the maximum body width, allowing the lid to overlap without dropping into the cavity. That separates this pumpkin candy bowl crochet project from an ordinary stuffed pumpkin.
Deep exterior lobes are added after the bowl is complete. The shaping strands pull the walls inward at selected points but must stop before distorting the interior.
A common error with a Halloween crochet bowl is over-tight sculpting. Deep grooves look appropriate from outside but can reduce usable candy capacity and make the rim oval.
Project Info at a Glance
| Skill Level | Time | Finished Size | Hook | Best For |
|---|---|---|---|---|
| Intermediate | 6–9 hours | Approx. 21–23 cm wide × 20–23 cm tall | 6 mm | Halloween candy, wrapped treats, fall display |
Materials and Tools
Yarn
- Pumpkin orange — super bulky #6 — approximately 250–300 g
- Dark forest green or black-green — worsted/Aran #4 — approximately 20–30 g
- Orange shaping yarn — reserve approximately 8–10 m
Tools
- 6 mm crochet hook
- 4.5 mm crochet hook for the stem
- Large tapestry needle
- Scissors
- 4 locking stitch markers
- Flexible measuring tape
- Optional plastic canvas circle, approximately 16–17 cm diameter for an extra-firm base
No fiberfill is needed in the main bowl. Use only a small amount inside the stem if necessary.
Abbreviations
- MR — magic ring
- ch — chain
- sc — single crochet
- hdc — half double crochet
- sl st — slip stitch
- inc — 2 sc in one stitch
- dec — invisible or standard decrease
- BLO — back loop only
- st/sts — stitch/stitches
- rnd — round
Invisible decrease is worked through the front loops of the next two stitches, then completed as one sc; here it is used only where the rim narrows.
Gauge and Structure
Work tightly.
The bowl walls should feel noticeably firmer than a plush toy.
Make a small single-crochet swatch.
Stand it vertically on the table.
If it immediately folds flat under its own weight, reduce the hook to 5.5 mm or choose denser super-bulky yarn.
If the stitches are so tight that the hook cannot pass through without force, return to 6 mm.
Pattern — Step by Step
Work the bowl in continuous spiral rounds.
Place a marker in the first stitch.
Pumpkin Bowl Base
Round 1
With orange, make MR.
6 sc in MR. (6)
Round 2
Inc ×6.
(12)
Round 3
Sc 1, inc.
Repeat 6 times.
(18)
Round 4
Sc 2, inc.
Repeat 6 times.
(24)
Round 5
Sc 3, inc.
Repeat 6 times.
(30)
Round 6
Sc 4, inc.
Repeat 6 times.
(36)
Round 7
Sc 5, inc.
Repeat 6 times.
(42)
Round 8
Sc 6, inc.
Repeat 6 times.
(48)
Round 9
Sc 7, inc.
Repeat 6 times.
(54)
Round 10
Sc 8, inc.
Repeat 6 times.
(60)
The base contains 60 stitches.
Lay it flat.
Target diameter before the wall transition: approximately 17–18 cm.
Base-to-Wall Transition
Round 11
Sc BLO around.
(60)
The unused front loops create a clear lower turning line.
Round 12
Sc around.
(60)
Round 13
Sc around.
(60)
Push the wall upward.
The base should remain flat while the sides begin standing vertically.
Lower Bowl Wall
Rounds 14–18
Sc around.
(60 each round)
Do not increase.
Check the bowl after Round 18.
The walls should stand at least partially without your hands supporting them.
If the lower wall flares outward, recount the round immediately.
Middle Bowl
Round 19
Sc 9, inc.
Repeat 6 times.
(66)
This small expansion creates the fuller pumpkin belly visible in the reference.
Rounds 20–24
Sc around.
(66)
The center circumference is now wider than the base.
This is intentional.
Upper Bowl Shaping
Round 25
Sc 9, dec.
Repeat 6 times.
(60)
Round 26
Sc around.
(60)
Round 27
Sc 8, dec.
Repeat 6 times.
(54)
Round 28
Sc around.
(54)
Round 29
Sc around.
(54)
The opening should now measure approximately 15–17 cm across depending on yarn density.
Do not narrow farther unless the lid has already been tested.
A smaller opening holds candy securely but also makes removal inconvenient.
Reinforce the Bowl Rim
Round 30
Sc BLO around.
(54)
Round 31
Sc around.
(54)
Round 32
Sl st loosely in each stitch.
(54 sl sts)
Fasten off.
The final slip-stitch round adds density but should not pull the opening into an oval.
Optional Base Insert
If your yarn is soft, cut a plastic-canvas circle approximately 1 cm smaller than the inside base.
Insert it before the upper opening becomes too narrow.
The insert should lie flat without curling the side walls.
Do not use cardboard if the bowl may be washed or exposed to damp surfaces.
Sculpting the Pumpkin Bowl
The reference has roughly six to eight prominent exterior lobes.
Use orange yarn approximately 2 m long.
Start at the underside.
Run the yarn vertically along the outside wall, positioning it in one natural stitch channel.
Pass it under the bottom and return up the opposite side.
Pull lightly.
The wall should indent without collapsing inward.
Repeat until 6–8 large sections are visible.
Check the opening after every two grooves.
It must remain circular.
If one shaping strand pulls the top edge inward more than approximately 5 mm, reduce tension.
Tie the yarn securely beneath the bowl.
Hide the ends inside dense base stitches.
Removable Pumpkin Lid
The lid is worked separately from the center outward.
Use orange yarn and the 6 mm hook.
Round 1
Make MR.
6 sc in MR. (6)
Round 2
Inc ×6.
(12)
Round 3
Sc 1, inc ×6.
(18)
Round 4
Sc 2, inc ×6.
(24)
Round 5
Sc 3, inc ×6.
(30)
Round 6
Sc 4, inc ×6.
(36)
Round 7
Sc 5, inc ×6.
(42)
Round 8
Sc 6, inc ×6.
(48)
Lay the circle across the bowl opening.
At this point it should cover most of the opening but may still be too small for a dependable overlap.
Round 9
Sc 7, inc ×6.
(54)
Round 10
Sc 8, inc ×6.
(60)
The lid should now extend approximately 1–2 cm beyond the opening all around.
Shape the Lid Into a Crown
Round 11
Sc BLO around.
(60)
Round 12
Sc 8, dec ×6.
(54)
Round 13
Sc around.
(54)
Round 14
Sc 7, dec ×6.
(48)
Round 15
Sc around.
(48)
Fasten off.
The lid should form a shallow pumpkin crown rather than remain perfectly flat.
Do not stuff it.
The curved fabric should sit over the opening by itself.
Sculpt the Lid
Cut approximately 1 m orange yarn.
Pass the yarn from the center to the outer edge.
Return to the center.
Pull lightly.
Repeat around the lid to create approximately 6 matching segments.
The sculpting should be shallow.
Strong compression can make the lid curl and reduce its diameter.
Place the lid on the bowl after every two shaping passes.
Tall Dark Stem
Yarn: forest green or black-green. Hook: 4.5 mm.
The reference has a tall tapered stem rather than a short stalk.
Round 1
Make MR.
6 sc in MR. (6)
Round 2
Sc around.
(6)
Round 3
Sc around.
(6)
Round 4
Inc in first st, sc 4, inc in final st.
(8)
Rounds 5–7
Sc around.
(8)
Round 8
Sc 3, inc ×2.
(10)
Rounds 9–11
Sc around.
(10)
Round 12
Sc 4, inc ×2.
(12)
Round 13
Sc around.
(12)
Fasten off with a 35 cm tail.
Target height: approximately 9–11 cm.
Stuff only the lower half if the yarn is soft.
Keep the upper section flexible enough to taper naturally.
Attach the Stem to the Lid
Center the stem over the lid’s MR.
The stem is functional because it will be used to lift the lid.
Sew through the full thickness of the lid rather than catching only surface loops.
Make at least 12–16 attachment stitches around the stem base.
After the first complete pass, pull gently upward on the stem.
If the lid fabric stretches at the attachment point, make a second reinforcement pass through a wider circle of lid stitches.
The stem should lift the lid without visibly distorting the center.
Lid Fit Test
Place the completed lid over the bowl.
The outer edge should overlap the opening by approximately 1 cm or more.
Lift the lid by the stem five times.
Replace it each time.
Check three points:
- The lid should not fall into the bowl.
- The rim should not curl upward.
- The stem should not lean permanently after lifting.
If the lid is slightly undersized, add one additional 54- or 60-stitch round to the outer edge.
If it is substantially oversized, tighten the final shaping round rather than forcing the bowl opening wider.
Assembly
- Crochet the bowl base through 60 stitches and confirm that it lies flat before beginning the wall.
- Work the lower wall without increases, then expand briefly to 66 stitches to create the pumpkin belly.
- Narrow the upper body back to 54 stitches and reinforce the opening with BLO and slip-stitch rounds.
- Add six to eight exterior sculpting grooves while checking that the opening stays circular.
- Crochet the separate lid to 60 stitches and compare its diameter directly against the finished bowl.
- Shape the lid into a shallow crown without adding fiberfill.
- Add shallow sculpting grooves to the lid and keep the finished overlap near 1–2 cm.
- Crochet the dark tapered stem and lightly fill only its lower section if additional support is needed.
- Sew the stem through the lid with at least 12–16 attachment stitches because it serves as the lifting handle.
- Fill the bowl with lightweight wrapped treats, replace the lid and verify that the sides remain upright under normal use.
The finished piece functions as a hollow segmented pumpkin with a stable candy cavity, fitted crown lid and tall stem handle.
7 Technical Tips
- Collapsing wall: Soft yarn or loose tension can make the bowl fold under its own weight. Test the lower wall after five straight rounds and reduce the hook from 6 mm to 5.5 mm if necessary.
- Wavy base: Too many increases create ripples before the walls begin. Keep the base increase rate at exactly six stitches per round through the 60-stitch circle.
- Oval opening: Unequal sculpting tension can pull the rim out of round. Measure across two perpendicular directions and keep the difference below approximately 1 cm.
- Lost candy capacity: Exterior grooves that are pulled too tightly push the wall inward. Limit each sculpted valley to roughly 5–8 mm depth at the upper body.
- Falling lid: A lid matching the opening diameter exactly can drop inside the bowl. Maintain at least 1 cm overlap around the finished rim.
- Loose stem: The stem acts as the handle, so ordinary decorative attachment is insufficient. Use at least 12–16 full-depth sewing stitches through the lid center.
- Tight rim: Slip stitches naturally contract fabric. Work the final 54 slip stitches with loops approximately the same width as the sc stitches immediately below them.
Why the Bowl Needs Dense Yarn
A plush pumpkin is allowed to flex because stuffing supports it from inside.
A candy bowl has no such support.
The wall has to carry its own weight plus the pressure of whatever is stored inside.
A loose hook can create faster fabric, but the wall may behave more like a soft basket.
Use the 6 mm hook as a starting point, then judge the fabric itself.
Planning the Bowl Opening
A pumpkin candy container needs a compromise.
A very narrow top produces a convincing pumpkin shape but makes it difficult to remove treats.
A wide top improves access but can make the project look like a plain basket.
For this version, the 54-stitch upper opening balances both requirements.
Measure the opening after Round 29.
Aim near 15–17 cm.
If your yarn produces only 13 cm at 54 stitches, stop decreasing at 60 instead.
Matching the Lid to Your Gauge
The stitch count alone cannot guarantee fit.
Two makers can both have 60-stitch circles and produce noticeably different diameters.
Finish the bowl first.
Then crochet the lid through Round 8 and physically test it.
Continue increasing until the flat diameter is slightly larger than the actual opening.
The edge needs overlap because the crown will contract when shaped.
Treat approximately 1–2 cm of overlap as a practical target.
Creating Strong Pumpkin Lobes
The reference body has large rounded divisions rather than dozens of fine ribs.
Six to eight sculpting channels work better for that shape.
Start with four channels positioned like compass points.
Then divide the gaps.
This distributes pressure around the container.
Do not use sculpting yarn to compensate for a floppy wall.
The bowl must stand before the shaping strands are added.
Sculpting changes silhouette; it should not provide the primary structural support.
Making a Smaller Candy Bowl
For a small desk or entry-table version, stop the base at:
48 stitches.
Work the wall at 48, expand briefly to 54 for the belly, then return to 48 at the opening.
Make the lid approximately:
48–54 stitches at its widest point.
Target finished width:
approximately 16–18 cm.
Reduce the stem to approximately 7–8 cm tall.
The smaller bowl works well for individually wrapped sweets or small seasonal decorations.
Making a Larger Pumpkin Bowl
For a larger party candy container, expand the base to:
66 or 72 stitches.
Maintain the same six-increase circle math.
The body can expand another six stitches at the widest point before narrowing.
Do not simply make the upper opening equally larger.
An overly wide opening weakens the pumpkin silhouette.
For a 28–30 cm bowl, keep the opening approximately 60–66 stitches and scale the lid accordingly.
Consider adding a plastic-canvas base insert when the diameter exceeds 25 cm.
Larger unsupported bases flex more readily.
Yarn Quantity
For this construction, begin with approximately 250–300 g orange.
Reserve yarn for the lid before completing optional extra wall rounds.
The lid consumes a meaningful portion because it reaches nearly the same diameter as the bowl opening.
Approximately 20–30 g of dark yarn should be ample for the tall stem.
If yarn supply is tight, weigh the completed bowl before beginning the lid and compare that figure with what remains.
Using the Bowl Safely
Treat the finished pumpkin as a textile storage container.
Use it for wrapped candy, small packaged snacks or lightweight seasonal items.
Do not place unwrapped sticky foods directly against crochet fabric.
The stitches contain gaps, and food residue is difficult to remove from dense super-bulky yarn.
Avoid candles, hot serving dishes or other heat sources.
If children will use the bowl, keep the stem securely sewn and inspect it periodically because repeated lid lifting concentrates stress at that attachment.
Care and Storage
Follow the yarn label for cleaning.
For acrylic super-bulky yarn, spot cleaning is often easier than washing the entire structured bowl.
Remove any plastic-canvas insert before washing if it is not washable.
Reshape the base and opening while damp.
Dry the lid separately so the stem does not press sideways against the bowl wall.
For off-season storage, place light tissue or clean fabric inside the empty cavity.
That helps the walls retain their shape without stretching them.
Do not stack heavy decorations on top of the lid.
Conclusion
Finish the bowl before finalizing the lid diameter. The 54-stitch opening should remain circular after sculpting, while the removable crown needs at least a small overlap so it cannot fall into the candy cavity. Keep the exterior grooves shallow enough that the walls still hold their capacity, then reinforce the dark stem because it functions as the lid handle rather than decoration alone. Save this crochet pumpkin candy bowl pattern to Pinterest and share the open and closed versions on Instagram with #PumpkinCandyBowl. For this specific container, would you keep the nearly black stem or switch it to olive green?









