Introduction
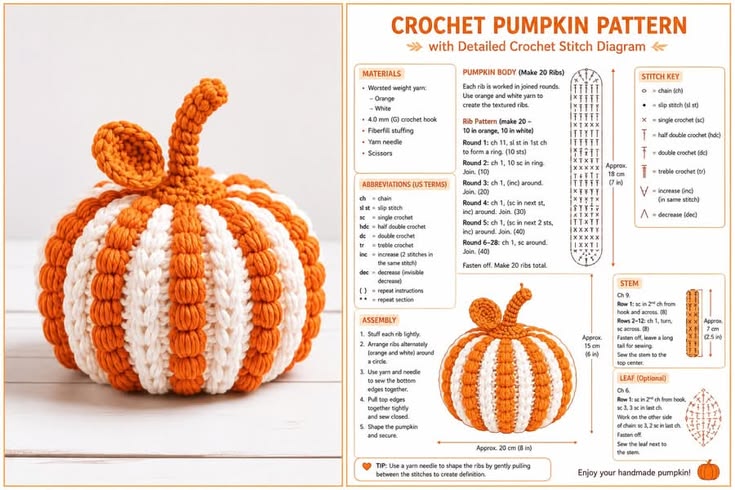
Twenty narrow ribs have to meet at two centers without one cream panel finishing shorter than the orange panel beside it. This orange and white crochet pumpkin pattern uses worsted yarn, a 4 mm hook and ten panels of each color to create an approximately 20 × 18 cm body. The intermediate construction produces unusually strong segmentation and finishes with a narrow curved stem and small crochet leaf.
The Design: What Makes This Pumpkin Different
Most ribbed pumpkins create their texture from one long rectangle. This one uses 20 separate vertical ribs, so the seams themselves become the pumpkin grooves.
Ten orange panels alternate with ten cream panels. That means color placement and structure are the same decision: each new join establishes another lobe and another stripe. The technique produces more pronounced separation than a standard striped crochet pumpkin made with flat rows.
The panels are narrow ovals rather than straight rectangles. Rounded ends converge more cleanly at the top and bottom, while the wider centers create the pumpkin’s maximum circumference.
A curved stem keeps the topper narrow relative to the heavily segmented body. The leaf remains secondary and sits close to its base.
The most visible failure mode is panel-length drift. A difference of only 5 mm becomes obvious when twenty pieces converge at the crown.
Project Info at a Glance
| Skill Level | Time | Finished Size | Hook | Best For |
|---|---|---|---|---|
| Intermediate | 6–9 hours | Approx. 20 cm wide × 18 cm body height | 4 mm | Tabletop fall décor, shelf display, centerpiece |
Materials and Tools
Yarn
- Pumpkin orange — worsted / medium #4 — approximately 90–120 g
- Cream / warm white — worsted / medium #4 — approximately 60–90 g
- Orange or brown for stem — approximately 10–15 g
- Orange for leaf — approximately 5–10 g
Use the same yarn line for orange and cream when possible. Different yarn diameters can make one color’s panels wider or longer despite identical stitch counts.
Tools
- 4.0 mm crochet hook
- Polyester fiberfill — approximately 150–220 g
- Tapestry needle
- Scissors
- Stitch markers
- Flexible measuring tape
- Long doll needle, optional for final compression
Abbreviations
- MR — magic ring
- ch — chain
- sl st — slip stitch
- sc — single crochet
- hdc — half double crochet
- dc — double crochet
- tr — treble crochet
- inc — 2 stitches in one stitch
- st/sts — stitch/stitches
- RS — right side
- WS — wrong side
Invisible decreases are not needed in the twenty ribs because each panel is worked flat around a foundation chain rather than shaped as a closed sphere.
Gauge and Rib Size
Before making all twenty pieces, crochet one orange rib and one cream rib.
Target each blocked rib at approximately:
17–18 cm long
and
2.5–3 cm wide at the center.
The two sample ribs should differ by no more than 2–3 mm in length.
Do not proceed to batch production until both colors behave similarly.
Twenty small measurement errors accumulate rapidly around a full pumpkin.
Pattern — Step by Step
Pumpkin Rib — Make 20
Make:
10 orange
and
10 cream
Each rib is crocheted around both sides of a foundation chain.
Foundation
Ch 17.
Round 1
Starting in 2nd ch from hook:
Sc in next 2 ch.
Hdc in next 3 ch.
Dc in next 8 ch.
Hdc in next 2 ch.
Work 5 sc in final ch to turn around the end.
Now work along the opposite side of the foundation chain:
Hdc in next 2 foundation loops.
Dc in next 8.
Hdc in next 3.
Sc in final 2.
Work 3 sc around the starting-chain end.
Join with sl st.
The piece should already resemble a narrow elongated oval.
Round 2
Ch 1.
Sc in first 2 sts.
Hdc in next 3.
Dc across the long center section.
At the rounded top, work increases evenly through approximately five stitches.
Continue dc down the opposite long section.
Hdc in final 3.
Sc through the lower curve, distributing increases so the panel remains flat.
Join.
Target total: approximately 46–50 stitches, depending on exact end distribution.
The rib should lie flat without cupping.
Round 3
Ch 1.
Sc around, working one stitch into each side stitch.
At each rounded end, add 3 evenly spaced increases.
Join.
The center should remain relatively straight while each end broadens gradually.
Round 4
Ch 1.
Sc around without increasing through most of both long sides.
At the top curve, place 2 increases.
At the bottom curve, place 2 increases.
Join.
Fasten off with approximately a 25 cm tail.
Measure the rib.
Target:
17–18 cm long × 2.5–3 cm wide.
If it exceeds 3.5 cm wide, omit Round 4 for all twenty pieces rather than producing an excessively bulky pumpkin.
Batch Production
Do not make all ten orange ribs first and all ten cream ribs afterward.
Instead, work in pairs:
1 orange + 1 cream
then compare them.
Repeat.
This catches a tension change before ten mismatched pieces have been completed.
Stack finished ribs flat.
Do not block them aggressively; the rounded profile should remain intact.
Joining the Twenty Ribs
Arrange the panels:
orange → cream → orange → cream
until all twenty are in sequence.
Place the first orange rib beside one cream rib with RS facing outward.
Using matching orange or cream yarn, whipstitch one long side of the two pieces together.
Catch only the inner edge loops so the seam sinks between the panels.
Add the next orange rib to the free cream edge.
Continue alternating.
After five ribs, curve the strip gently.
After ten ribs, the joined section should form roughly half a cylinder.
Do not pull joins tight enough to shorten the panel edges.
Join 19 Panels Before Stuffing
Continue until 19 ribs are connected.
Leave the final opening between Rib 1 and Rib 20 unsewn.
The structure should resemble an open segmented shell.
Check the top and bottom.
All rounded ends should converge within approximately 1 cm of one another.
A panel that ends much higher than its neighbors should be removed and remade before stuffing.
Close the Bottom Center
Thread orange yarn through a tapestry needle.
Pass through the bottom end of every panel in sequence.
Pull gradually.
The twenty lower tips should gather into one compact center.
Pass through all panel ends again.
Pull until the bottom gap closes.
Knot securely.
Do not try to force the entire bottom closed with one very tight pass; two moderate passes distribute strain better.
Stuff the Pumpkin
Begin adding fiberfill through the remaining open vertical seam.
Push stuffing into the outer sections first.
Each lobe should receive approximately equal filling.
Keep the center somewhat softer.
Rotate the pumpkin as you work.
The body should become broad and rounded rather than tall.
Stop when each rib still has a visible recessed seam on both sides.
If stuffing pushes adjacent ribs into one continuous surface, remove some fill.
Finish the Final Side Seam
Align Rib 20 with Rib 1.
Whipstitch from the bottom upward.
Pause halfway.
Add or redistribute fiberfill.
Continue to the crown.
Before fastening off, compare the last seam with the other nineteen.
It should sink to approximately the same depth.
Fasten off and bury the tail inside.
Close the Crown
Thread a long yarn tail through all twenty upper rib ends.
Pull in stages.
First reduce the opening to approximately 3 cm.
Redistribute the stuffing.
Then pull completely closed.
Pass through opposite rib ends two additional times.
Knot securely.
Leave a shallow center depression for the stem.
Optional Central Compression
The reference shows a squat pumpkin with the top and bottom pulled toward each other.
Cut approximately 1 m of orange yarn.
Insert a long needle through the exact bottom center.
Exit through the crown.
Return through the center.
Pull until the pumpkin shortens by approximately 1–1.5 cm.
The sides should widen slightly.
Stop before the center becomes sharply indented.
Secure the yarn beneath the future stem.
Curved Stem
Yarn: orange or darker orange.
Round 1
Make MR.
6 sc in MR.
(6)
Rounds 2–4
Sc around.
(6)
Round 5
Inc in first st, sc 4, inc in final st.
(8)
Rounds 6–9
Sc around.
(8)
Round 10
Sc 3, inc ×2.
(10)
Rounds 11–13
Sc around.
(10)
Fasten off with a 35 cm sewing tail.
Stuff only the bottom third.
Leave the upper section mostly empty.
Bend the stem into a soft curve before attaching it.
Stem Texture
For a more defined stem, work Round 3 and Round 7 in BLO.
Those rounds create two shallow horizontal ridges.
Another option is to embroider three long vertical stitches along the stem.
Do not pull them tightly.
The goal is surface definition, not compression.
Crochet Leaf
Yarn: orange, matching the reference.
Foundation
Ch 8.
First Side
Starting in 2nd ch:
Sl st, sc, hdc, dc, tr, dc, sc.
Tip
Ch 2.
Second Side
Working down the opposite foundation edge:
Sc, dc, tr, dc, hdc, sc, sl st.
Join at base.
Leaf Edge
Ch 1.
Sc around.
At the tip work:
sc, ch 2, sc
Fasten off with a 25 cm sewing tail.
Target leaf length: approximately 6–8 cm.
Optional Leaf Vein
Thread a short piece of darker orange yarn.
Backstitch along the central foundation chain.
Add two small diagonal stitches on each side.
Keep embroidery loose enough for the leaf to remain flat.
Attach the Stem and Leaf
Place the leaf first.
Position its base over the gathered crown and let the tip extend sideways.
Sew only the lower 1.5–2 cm of the leaf.
Set the stem directly over that attachment.
Sew the stem base through at least 8–10 surrounding pumpkin stitches.
Its lower edge should conceal both the crown gathering and leaf base.
Curve the stem away from the leaf so the two elements remain visually separate.
Assembly
- Crochet one orange and one cream test rib and compare them before making the remaining eighteen pieces.
- Complete ten orange ribs and ten cream ribs, keeping every finished panel within approximately 2–3 mm of the target length.
- Arrange the pieces in strict orange-and-cream alternation and join the first nineteen along their long edges.
- Gather all twenty lower rib ends into one bottom center using two passes of strong yarn.
- Fill each lobe through the remaining vertical opening, keeping the center softer than the outside sections.
- Join the final rib seam and compare its depth with the nineteen previous channels.
- Gather the twenty upper ends into one crown and compress top to bottom by approximately 1–1.5 cm if a lower profile is needed.
- Crochet the narrow curved stem and leave its upper section mostly unstuffed so it can bend.
- Crochet the leaf, attach only its base to the crown and sew the stem over the joining point.
- Set the pumpkin on a flat surface and redistribute stuffing until all twenty ribs appear even around the circumference.
The completed pumpkin has twenty alternating orange-and-cream ribs, deeply recessed joining channels, a gathered crown, curved stem and compact leaf.
7 Technical Tips
- Unequal ribs: A 5 mm length difference becomes obvious when twenty panel tips meet. Compare every new rib against the original sample and keep variation below 2–3 mm.
- Panel cupping: Too few increases around an oval end causes it to curl upward. Add increases only at the rounded ends and test every rib flat after Round 2.
- Loose seams: Joining only one thin outer loop can open when the pumpkin is stuffed. Catch a consistent inner edge loop from both panels along the full seam.
- Overstuffed lobes: Too much filling hides the grooves between colors. Stop when each vertical seam remains recessed at least approximately 5–8 mm below the fullest lobe surface.
- Twisted stripe order: One repeated color breaks the full alternation. Lay all 20 ribs in sequence before the first permanent seam.
- Off-center crown: Pulling one top panel harder than the others shifts the stem position. Gather all twenty rib ends loosely first, then tighten them in a second pass.
- Rigid stem: Filling the entire narrow stem prevents the reference-style curve. Stuff only the lower third and shape the rest while attaching it.
Why Individual Ribs Change the Structure
A standard rectangular ribbed crochet pumpkin uses horizontal rows that become vertical ridges after seaming.
Twenty-panel construction works differently.
Each vertical lobe is already a separate physical unit.
The join between two panels automatically creates a groove.
Color contrast then reinforces that geometry.
Orange and cream are therefore not merely decorative stripes; each color belongs to an independent structural rib.
This approach also lets a maker replace one defective panel before assembly rather than reworking an entire body rectangle.
The trade-off is consistency.
Twenty pieces require more counting, more ends and more seams.
For the reference image, that extra work is what produces the unusually deep, regular segmentation.
Controlling the Orange and Cream Balance
The body uses an exact 10:10 division.
That gives equal color area before the stem and leaf are considered.
Orange becomes visually dominant afterward because both topper pieces are also orange.
If a lighter pumpkin is wanted, make the stem cream or brown while keeping the body unchanged.
Do not switch to twelve orange ribs and eight cream ribs without planning the sequence.
Twenty panels arranged around a circle are easiest to balance when the two colors alternate perfectly.
With a 10:10 arrangement, every orange rib has cream on both sides and vice versa.
Sizing the Pumpkin
The target body is close to 20 cm across × 18 cm high.
Individual rib length controls much of that height.
Panel width and stuffing determine circumference.
For a smaller pumpkin, reduce the foundation to:
Ch 13–14
and target each rib near 12–14 cm long.
For a larger version:
Ch 21–22
and target approximately 22–24 cm long.
Retain twenty ribs unless a different segmentation style is wanted.
Reducing the number of ribs changes the visual language more dramatically than shortening each rib.
Making a 12-Rib Version
For faster construction, make:
6 orange + 6 cream ribs.
Increase each rib width to approximately 4–4.5 cm.
Join in strict alternation.
The finished body will have broader lobes and fewer grooves.
This is easier to assemble but will not match the dense segmentation shown in the reference.
Keep the same curved stem pattern.
Scale the leaf down slightly if the body is also reduced.
Yarn Quantity
For this 20 cm version, begin with approximately:
90–120 g orange
and
60–90 g cream.
The orange allowance includes stem and leaf.
Actual consumption depends on how many rounds are used per rib and how tightly each seam is worked.
Weigh the first completed orange rib.
Multiply by ten.
Then add approximately 15–20 g for the topper.
Repeat the same calculation for cream.
Stem Proportion
For a 20 cm pumpkin, keep the stem around 7 cm in visible height.
A much shorter 3 cm stem can disappear among the dense ribs.
A 10–12 cm stem can dominate the body.
Keep the base approximately 2–2.5 cm wide, with a narrower curved upper section.
The curve should begin above the attachment point rather than directly at the crown.
That allows the base to sit flat while the top bends naturally.
Care and Storage
Spot-clean where possible.
For washable acrylic or cotton-blend yarn, follow the yarn label and use low agitation.
Do not wring the stuffed pumpkin.
Press excess moisture out with towels.
Reshape the twenty ribs individually while damp.
Check that no cream panel has folded underneath an orange neighbor.
Support the stem while drying so the curve does not collapse.
Store the pumpkin without heavy objects on top.
Long compression can flatten the narrow rib panels and make the join grooves shallower.
Conclusion
Make the first orange and cream ribs as a matched pair before committing to the other eighteen panels. Each piece should finish within a few millimeters of the same length so all twenty tips meet cleanly at the crown and base. Join the colors in strict alternation, stuff the outer lobes without flattening the seam channels, then add central compression only after the full body is closed. The curved stem should remain mostly hollow above its base. Save this orange and white crochet pumpkin pattern to Pinterest and share a top view on Instagram with #TwentyRibPumpkin. Would you keep the exact ten-orange, ten-cream sequence or replace the cream ribs with olive green?









