Introduction
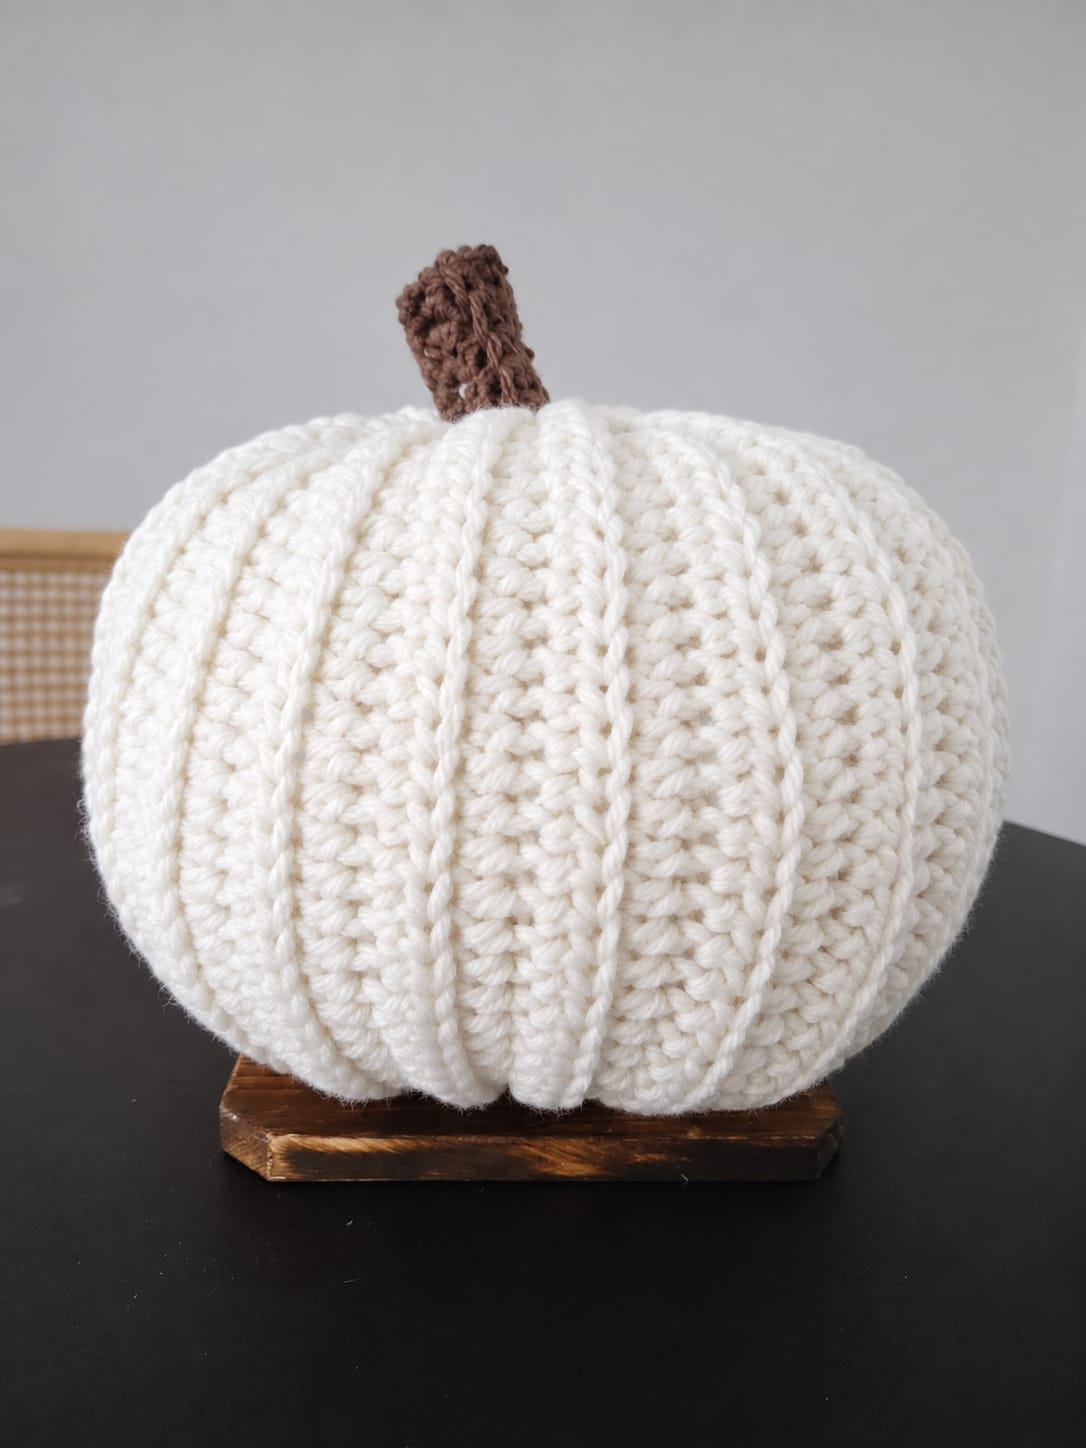
A white pumpkin this large exposes every uneven rib, because there is no color variation to hide changes in tension. This white ribbed crochet pumpkin pattern uses worsted yarn, a 5 mm hook and a wide BLO rectangle to create an approximately 30–32 cm pumpkin. Dense half double crochet, controlled stuffing and external sculpting produce the broad profile, while a short brown stem finishes the top.
The Design: What Makes This White Pumpkin Different
Monochrome fabric changes the construction priorities. On a multicolor pumpkin, contrast can separate sections visually; here, the ribs must create that separation themselves. The body therefore uses back-loop-only half double crochet across every repeated row, leaving a narrow raised line between each section.
The second decision is proportion. This large crochet pumpkin is wider than it is tall, so the rectangle needs substantially more length than vertical depth. Moderate stuffing keeps those proportions intact.
Finally, sculpting yarn is placed inside selected rib channels rather than around every ridge. Those deeper valleys break the surface into approximately 10–12 major lobes while the smaller crochet ribs remain visible between them.
A common error with a white crochet pumpkin is loose gauge. Even small openings between stitches expose fiberfill immediately against ivory yarn.
Project Info at a Glance
| Skill Level | Time | Finished Size | Hook | Best For |
|---|---|---|---|---|
| Confident beginner | 5–7 hours | Approx. 30–32 cm wide × 23–26 cm high | 5 mm | Table, mantel, shelf, neutral fall display |
Materials and Tools
Yarn
- Warm white / ivory — worsted/Aran #4 — approximately 180–230 g
- Medium brown — worsted #4 — approximately 15–20 g
- White sculpting yarn — reserve approximately 6–8 m from the main yarn
Tools
- 5 mm crochet hook
- 4.5 mm crochet hook for the stem
- Polyester fiberfill, approximately 300–400 g
- Large tapestry needle
- Long upholstery needle, optional
- Scissors
- Flexible measuring tape
- 2 locking stitch markers
Abbreviations
- MR — magic ring
- ch — chain
- sc — single crochet
- hdc — half double crochet
- sl st — slip stitch
- inc — 2 stitches in one stitch
- dec — decrease
- BLO — back loop only
- st/sts — stitch/stitches
- RS — right side
- WS — wrong side
An invisible decrease is not needed because the body is worked as a flat rectangle and shaped only after seaming.
Gauge and Panel Size
Aim for approximately:
12 hdc × 9 rows = 10 cm
with a 5 mm hook.
The final rectangle for this larger version should measure approximately:
24–26 cm high × 62–68 cm long
without stretching the ribbing.
Use those measurements as the controlling figures.
Row count comes second.
If 32 stitches produce a panel taller than 26 cm with your yarn, reduce the foundation count. When 60 rows do not reach at least 62 cm, continue working rows.
Pattern — Step by Step
White Ribbed Pumpkin Body
Yarn: warm white.
The body is worked flat in rows.
Foundation
Ch 33.
Row 1
Hdc in 2nd ch from hook and in each remaining chain.
(32)
Ch 1, turn.
Row 2
Hdc BLO in every stitch across.
(32)
Ch 1, turn.
Rows 3–60
Repeat Row 2.
(32 stitches per row)
Place a marker at the first and final stitch if either edge is difficult to identify.
After Row 60, place the panel on a table without stretching it.
Target dimensions:
24–26 cm short edge
62–68 cm long edge
Continue additional 32-stitch rows if necessary.
Stop before 60 rows if the long edge already reaches 68 cm.
Fasten off with a 130 cm tail.
Check the White Fabric Before Assembly
Hold the rectangle over a darker surface.
Gently open the ribbing.
Large dark gaps should not appear between stitches.
White yarn makes gauge defects particularly visible after stuffing. If the holes are large enough that a dark tabletop shows clearly through them, the final fiberfill will also show.
Changing to a 4.5 mm hook is preferable to stuffing the finished pumpkin with a fabric liner solely to hide loose stitches.
Check both outer edges.
Every row must still contain 32 stitches.
One missing stitch repeated several times creates a taper, and that taper becomes an off-center crown after gathering.
Seam the Rectangle
Place the first and final rows together with the RS facing outward.
Align one ridge from each edge.
Thread the 130 cm tail through a tapestry needle.
Mattress stitch through matching edge loops from bottom to top.
Pull the seam closed gradually.
Do not tighten one long section at once.
The seam should have approximately the same elasticity as the surrounding ribs.
Knot securely on the inside.
The piece now forms a tube with vertical ribs.
Close the Bottom
Cut approximately 100 cm of white yarn.
Thread the tapestry needle.
Work a running stitch around one open edge, catching the fabric approximately every 8–10 mm.
Continue around the full circumference.
Pull slowly.
The opening will gather into pleats.
Once the center is nearly closed, pass the needle directly across the opening.
Repeat in the opposite direction.
Pull firmly.
Knot.
A tiny center gap is acceptable because it will sit against the display surface.
Stuff the Body
Place fiberfill around the outside wall first.
Build a thick ring around the pumpkin perimeter.
Add smaller quantities through the center.
This distribution creates width without forcing the top upward.
Rotate the pumpkin every few handfuls.
Check each side for equal fullness.
Stop when the body can still compress roughly 2–3 cm under firm hand pressure.
Hard packing reduces rib depth.
The photo shows a substantial body, but the ribs remain clearly recessed. That balance requires enough stuffing to hold the sides without forcing the valleys flat.
Close the Top
Cut another 100 cm white yarn length.
Work a running stitch around the remaining opening.
Pull only halfway closed.
Check the side profile.
The body should measure substantially wider than tall.
If the center has risen into a dome, remove some fiberfill from the vertical core and redistribute it toward the outer edges.
Pull the opening closed.
Cross the center with the needle three times.
Knot securely.
Leave a small central depression for the stem.
Sculpt the Main Pumpkin Grooves
The crochet rectangle already creates numerous narrow ribs.
The reference also shows stronger major channels.
Cut approximately 2.5 m of white yarn.
Double it if the yarn breaks easily under tension.
Insert a long needle through the bottom center.
Exit through the top center.
Bring the yarn down the outside, positioning it inside one existing rib valley.
Push the needle through the bottom center again.
Exit through the top.
Pull until that section becomes visibly recessed.
Do not knot yet.
Create the second groove directly opposite the first.
Next, form two grooves at roughly 90 degrees to the first pair.
Continue dividing the remaining spaces.
Aim for 10–12 major pumpkin lobes.
Existing fine crochet ribs will remain visible inside each lobe.
Once all sections have similar depth, knot the sculpting yarn near the top center.
The brown stem will cover the knot.
Brown Textured Stem
Yarn: medium brown. Hook: 4.5 mm.
The photographed stem is short, thick and slightly irregular rather than a tall cylinder.
Round 1
Make MR.
8 sc in MR.
(8)
Round 2
Sc 1, inc.
Repeat 4 times.
(12)
Round 3
Sc BLO around.
(12)
Round 4
Sc around.
(12)
Round 5
Sc around.
(12)
Round 6
Sc 2, dec.
Repeat 3 times.
(9)
Round 7
Sc around.
(9)
Round 8
Sc around.
(9)
Round 9
Sc around.
(9)
Fasten off with a 35 cm tail.
The 12-stitch lower section forms a stable base. The nine-stitch upper section produces a narrower, natural-looking tip.
Shape the Stem
Place only a small quantity of fiberfill in the lowest two or three rounds.
Do not pack the stem.
Bend the top slightly to one side.
Pinch one side near Round 7 for several seconds to create the subtle lean visible in the reference.
For stronger texture, run one strand of brown yarn vertically along the outside and back down through the stem.
Repeat twice at different positions.
These surface lines imitate bark without increasing the stem diameter.
Attach the Stem
Place the stem directly over the top gathering point.
Its base should conceal the white sculpting knot.
Using the 35 cm tail, sew through one stem-base stitch and then into a dense section of the pumpkin.
Repeat around the circumference.
Use at least 10–12 attachment stitches.
Do not attach only to the gathered center. That yarn is already under tension from closure and sculpting.
Catch solid body stitches approximately 1–1.5 cm away from the center where possible.
After the stem is secure, push the needle through the pumpkin and bring it out several centimeters away.
Pull lightly and cut.
The tail will retract into the stuffing.
Assembly
- Measure the white panel before seaming; target approximately 24–26 cm high × 62–68 cm long.
- Confirm all body rows still contain 32 stitches so the rectangle has parallel edges.
- Join the first and final rows with the ribs aligned and keep the seam tension equal to the surrounding fabric.
- Gather the lower opening, cross the center twice and place that closure against the display surface.
- Add fiberfill around the outside circumference before filling the central cavity.
- Gather the top only after the body is wider than tall and the ribs remain visibly recessed.
- Add 10–12 major sculpting channels in opposite pairs, using the existing BLO valleys as guides.
- Crochet the brown stem, lightly fill only its lower section and bend the upper portion slightly.
- Sew the stem through at least 10–12 surrounding body stitches rather than attaching it only to the gathering yarn.
- Set the pumpkin on a flat surface and redistribute the stuffing by hand until the base sits level.
The completed pumpkin has a broad ivory body, fine raised ribs, deeper sculpted divisions and a short textured brown stem.
7 Technical Tips
- Fiberfill visibility: White stitches reveal stuffing faster than dark colors. Test the rectangle over a contrasting surface and switch to a 4.5 mm hook if large gaps appear.
- Tapered panel: Missing the final hdc causes one edge to narrow gradually. Confirm 32 stitches every eight rows while making the rectangle.
- Tall body: Insufficient circumference makes a large pumpkin look cylindrical. Keep the panel’s relaxed long edge at approximately 62–68 cm before assembly.
- Flattened ribbing: Excess stuffing pushes BLO valleys outward. Stop when the body still compresses approximately 2–3 cm under firm pressure.
- Off-center sculpting: Pulling grooves consecutively in one direction shifts the gathered top. Add shaping lines in opposing pairs around the body.
- Weak stem: Sewing into only the top gathering thread can loosen under handling. Catch at least 10–12 surrounding body stitches during stem attachment.
- Overlong stem: A 30 cm pumpkin can look undersized beneath a very tall topper. Keep the visible brown stem around 5–7 cm high.
Why White Yarn Changes the Pattern
Color influences how crochet texture reads.
Burnt orange naturally creates shadow variation between ribs.
White reflects more light across the surface, reducing that contrast.
The stitch structure therefore needs to carry more of the visual definition.
Back-loop-only hdc solves part of that problem because every row leaves a raised front loop behind.
Once the panel is rotated into its final pumpkin orientation, those lines run vertically.
External shaping then creates a second scale of texture.
Fine crochet ribs remain visible within wider sculpted sections.
That combination closely matches the photographed white pumpkin.
Why Rectangle Length Matters
The short edge controls the pumpkin’s vertical body.
The long edge becomes circumference.
Those two measurements should not be increased equally when making a larger pumpkin.
Adding too many foundation stitches makes the project taller.
Adding rows makes it wider.
For this photo-inspired version, increasing rows is more important because the reference is broad and rounded.
If your rectangle reaches 26 cm high before completing 32 stitches, reduce the foundation count rather than accepting a taller body.
Getting a Rounder Lower Edge
The reference does not have a sharp flat base.
Its lower lobes curve inward toward the gathered center.
Create that shape during stuffing.
Avoid placing a dense disk of fiberfill directly across the bottom.
Instead, concentrate filling around the lower outer circumference.
After closing the top, place the pumpkin on a table.
Press lightly downward with both hands.
Rotate 90 degrees.
Repeat.
This spreads the outer lobes without flattening the gathered base.
If one section touches the table before the others, move filling away from that area toward the opposite side.
Choosing the White Shade
Pure optical white produces the strongest contrast with a medium-brown stem.
Warm ivory creates a softer neutral appearance.
The photograph sits between those values: light enough to read unmistakably white but not blue-white.
Suitable yarn descriptions may include:
- Natural
- Ivory
- Cream
- Antique White
- Fisherman
Avoid mixing white shades within the body unless a deliberately marled surface is wanted.
A single-color pumpkin makes dye-lot differences more visible across the ribs.
Buy enough body yarn at the beginning if matching shade consistency matters.
Yarn Quantity
Existing ribbed pumpkins vary widely in yarn consumption.
For this 30–32 cm version, plan on approximately 180–230 g of worsted or Aran yarn.
Reserve the sculpting yarn before completing the rectangle.
A large white pumpkin can consume more shaping yarn than expected because each groove runs the full height twice through the central axis.
The brown stem should require only a small remnant.
Approximately 15–20 g provides comfortable working allowance.
Making a Smaller White Pumpkin
For a medium tabletop version:
Ch 23
Work:
22 hdc per row
Continue BLO rows until the panel measures roughly:
16–18 cm high × 38–44 cm long
Use a 4–4.5 mm hook.
After assembly, aim for approximately 18–21 cm width.
Eight sculpted sections are usually sufficient.
Reduce the brown stem to approximately 3–4 cm high.
Making an Extra-Large Pumpkin
For a floor or hearth display, switch to bulky #5 yarn.
Target a rectangle approximately:
30–33 cm high
by
75–85 cm long
before joining.
Use approximately a 6–6.5 mm body hook if the fabric remains dense enough to conceal stuffing.
Use enough stuffing for the outer wall to stand without hard packing.
Increase the stem to approximately 7–8 cm tall.
Large pumpkins benefit from 12 sculpting divisions because fewer sections can produce oversized lobes that obscure the ribbed stitch pattern.
Stem Proportion
The stem in the reference is noticeably smaller than the body.
That proportion is important.
At approximately 30 cm pumpkin width, the stem base should remain around 3.5–4.5 cm wide.
Visible height should sit near 5–7 cm.
Do not make the stem perfectly straight.
A slight lean interrupts the symmetry of the body and makes the topper read as a separate organic form.
Avoid adding a wide leaf if the goal is to reproduce this specific reference. The photographed design depends on the clean contrast between one white body and one brown stem.
Care and Storage
Spot-clean the pumpkin when possible.
Follow the yarn manufacturer’s instructions if full washing becomes necessary.
Use cool water and minimal agitation for a stuffed decorative object.
Do not wring the body.
Press excess moisture between towels.
Reshape every lobe while damp.
Keep the pumpkin supported until fully dry because wet filling increases internal weight.
For seasonal storage, place the piece in a breathable container without heavy objects above it.
Compression can permanently flatten the fine BLO ribs and weaken the deeper sculpted channels.
Conclusion
Measure the rectangle before closing either end. For this size, the white panel should sit near 24–26 cm high and 62–68 cm long so the finished body spreads outward rather than becoming cylindrical. Keep the stuffing firmest around the perimeter, then form 10–12 grooves in opposing pairs while the center still compresses. The brown stem should remain short enough that the large white body dominates the finished proportions. Save this white ribbed crochet pumpkin pattern to Pinterest and share front and top views on Instagram using #WhiteRibbedPumpkin. Would you keep this pumpkin completely neutral, or add one small olive leaf beside the brown stem?









