Introduction
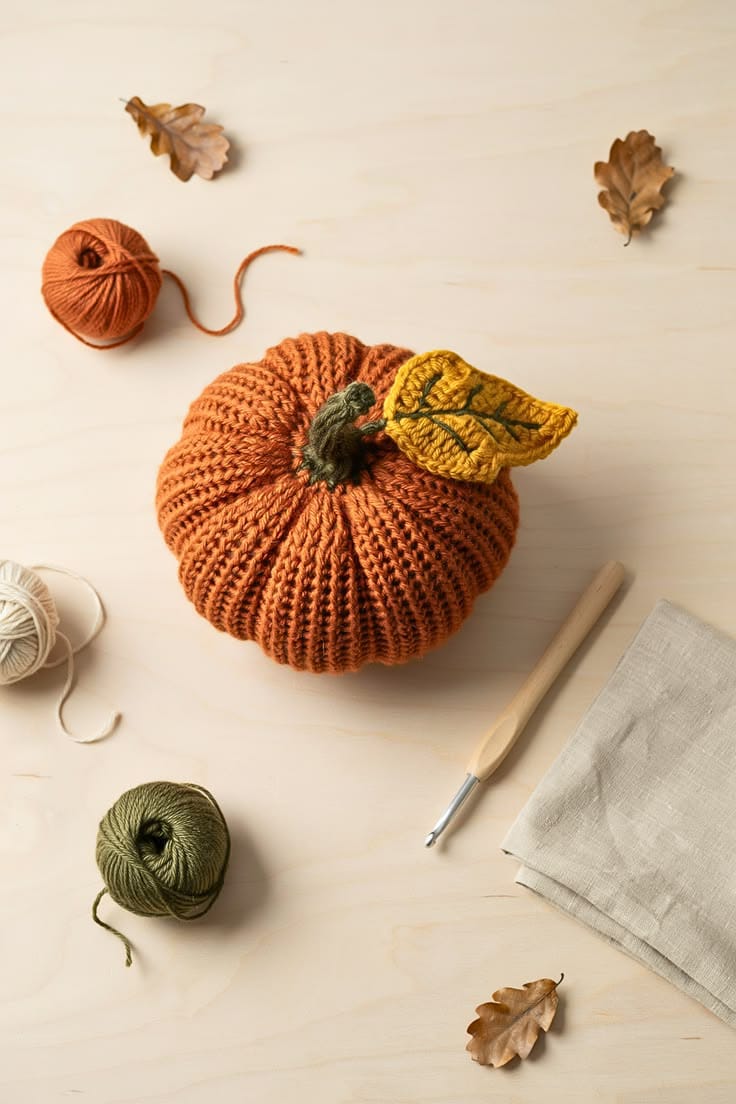
This pumpkin is almost twice as wide as its visible body height, and that proportion controls the entire construction. The ribbed crochet pumpkin pattern uses worsted yarn, a 5 mm hook and a long BLO rectangle to form a 24–26 cm pumpkin. A short green stem and mustard leaf finish the top. The project suits confident beginners who want fall décor with pronounced texture rather than a smooth stuffed sphere.
The Design: What Makes This Pumpkin Different
The body is deliberately low and broad. A standard ribbed pumpkin can become nearly spherical when the rectangle is too short, but this version uses extra circumference and moderate stuffing so the sides spread outward.
The ribbing is structural. Every body row after the foundation is worked in back-loop-only half double crochet, leaving raised lines that become vertical after the rectangle is seamed. Those narrow ridges provide texture before any sculpting thread is added.
A large mustard leaf changes the silhouette of this fall crochet pumpkin. It projects well beyond the stem and is finished with dark green embroidered veins, which creates a sharper botanical detail than a plain monochrome leaf.
The usual failure is using too much stuffing. Hard-packed filling forces the valleys outward and reduces the contrast between ribs.
Project Info at a Glance
| Skill Level | Time | Finished Size | Hook | Best For |
|---|---|---|---|---|
| Confident beginner | 4–6 hours | Approx. 24–26 cm wide × 18–20 cm high | 5 mm | Table, shelf, centerpiece, fall display |
Materials and Tools
Yarn
- Terracotta / burnt orange — worsted/Aran #4 — approximately 140–180 g
- Olive green — worsted #4 — approximately 10–15 g
- Mustard / golden yellow — worsted #4 — approximately 15–20 g
- Dark olive embroidery yarn — approximately 2–3 m for leaf veins
- Orange shaping yarn — approximately 4–5 m
Tools
- 5 mm crochet hook
- 4 mm crochet hook for stem and leaf
- Polyester fiberfill, approximately 200–300 g
- Large tapestry needle
- Long upholstery needle, optional
- Scissors
- Flexible measuring tape
- Stitch markers
Abbreviations
- MR — magic ring
- ch — chain
- sc — single crochet
- hdc — half double crochet
- dc — double crochet
- tr — treble crochet
- sl st — slip stitch
- inc — 2 sts in one stitch
- dec — decrease
- BLO — back loop only
- st/sts — stitch/stitches
- RS — right side
- WS — wrong side
Invisible decreases are not required in the pumpkin body because it is made from a flat rectangle.
Rectangle Proportion
The foundation chain controls height.
The number of rows controls circumference.
For the reference photo, target:
18–20 cm short edge
and
48–54 cm long edge
before assembly.
Do not stretch the ribbing flat while measuring.
Pattern — Step by Step
Pumpkin Body
Yarn: terracotta.
The body is worked flat.
Foundation
Ch 27.
Row 1
Hdc in 2nd ch from hook and in each ch across.
(26)
Ch 1, turn.
Row 2
Hdc BLO in each stitch across.
(26)
Ch 1, turn.
Rows 3–52
Repeat Row 2.
(26 stitches per row)
After Row 52, lay the rectangle flat without stretching.
Target dimensions:
18–20 cm tall × 48–54 cm long.
If the long edge is still below 48 cm, add more rows while keeping 26 stitches.
If it exceeds 54 cm before Row 52, stop early.
Fasten off with a 100–120 cm tail.
Seam the Rectangle
Bring the first and final rows together.
Align the ribs carefully.
With the long tail, mattress stitch or whipstitch the two row edges together.
Pull until the seam closes but does not pucker.
Turn the tube so the neater rib texture faces outward.
The rib lines should now run vertically from one open end to the other.
Close the Bottom
Thread approximately 80 cm of orange yarn onto a tapestry needle.
Sew a running stitch around one open edge.
Catch the fabric every 8–10 mm rather than making extremely small stitches.
Pull the opening closed.
Pass the yarn through the gathered center twice.
Knot firmly.
Leave the tail inside.
Stuffing
Add fiberfill in small sections.
Place more stuffing around the outer circumference and less directly through the vertical center.
This distribution supports the wide profile.
Stop when the pumpkin holds its shape but still compresses approximately 2 cm under firm hand pressure.
If the body becomes hard, remove stuffing before closing the top.
A soft center is important because the final sculpting strands must pull the top and bottom toward each other.
Close the Top
Work a second running stitch around the remaining opening.
Before pulling completely closed, inspect the silhouette.
The pumpkin should already be wider than tall.
Redistribute fiberfill toward any narrow side.
Pull the opening closed.
Cross the yarn through the center two or three times.
Knot securely.
A small opening can remain under the future stem.
Sculpting the Lobes
The BLO ribs create many narrow vertical lines. Add approximately 8–10 deeper sculpted valleys rather than tightening every rib.
Cut about 2 m of orange yarn.
Insert the needle through the bottom center and bring it out through the top.
Run the yarn down one visible groove.
Pass through the bottom center and back to the top.
Pull until a defined valley appears.
Repeat on the exact opposite side.
Continue in opposite pairs around the pumpkin.
Use the ribbing as a guide so each sculpting strand sinks naturally between raised columns.
Do not overtighten the first two valleys.
Final tension can be adjusted after all 8–10 sections are placed.
The result should be slightly flattened through the center with rounded lobes around the perimeter.
Short Olive Stem
Yarn: olive green. Hook: 4 mm.
Round 1
Make MR.
6 sc in MR.
(6)
Round 2
Sc around.
(6)
Round 3
Sc around.
(6)
Round 4
Sc around.
(6)
Round 5
Inc around.
(12)
Round 6
Sc 1, inc.
Repeat 6 times.
(18)
Round 7
Sc around.
(18)
Fasten off with a 25 cm tail.
The 18-stitch final round forms a broad attachment base while the upper stem remains narrow.
Add only a tiny amount of stuffing.
Bend the upper section slightly before sewing.
Mustard Leaf
Yarn: mustard. Hook: 4 mm.
Foundation
Ch 15.
First Side
Starting in 2nd ch from hook:
sl st, sc, hdc, dc, dc, tr, tr, tr, dc, dc, hdc, sc, sc, sl st
Tip
Ch 2.
Second Side
Work along the opposite side of the foundation chain:
sl st, sc, sc, hdc, dc, dc, tr, tr, tr, dc, dc, hdc, sc, sl st
Join at the base.
Do not fasten off yet.
Leaf Edge
Work one round of sc evenly around the leaf.
At the tip, work:
sc, ch 2, sc
to preserve the point.
Along each side, make one small decorative picot approximately halfway down:
ch 3, sl st in first ch
then continue sc.
Fasten off with a 30 cm sewing tail.
Target finished length:
9–11 cm
Target width:
5–6 cm
The leaf should be large enough to project clearly beyond the stem.
Embroidered Leaf Veins
Thread approximately 1 m of dark olive yarn onto a tapestry needle.
Begin at the leaf base.
Work one long running or backstitch line along the center foundation chain toward the tip.
This is the main vein.
Add three diagonal branches on each side.
Each branch should begin at the center vein and angle toward the leaf edge.
Keep all embroidery on the surface.
Do not pull so tightly that the mustard leaf cups.
The darker vein line is an important feature of the reference image; without it, the leaf reads as a simple flat appliqué rather than a botanical accent.
Attach the Stem
Place the stem over the gathered top.
The narrow portion should point upward while the wider 18-stitch base sits flat.
Using the green sewing tail, whipstitch around the stem base.
Make at least 10–12 secure stitches.
Pass through dense pumpkin fabric rather than only through the gathered yarn.
Hide the tail inside the body.
Attach the Leaf
Place the leaf so its base tucks partly beneath the stem.
Angle the point outward approximately 30–40 degrees from horizontal.
Sew the first 2–3 cm of the leaf base to the pumpkin.
Leave most of the leaf free.
This prevents the leaf from appearing pasted flat onto the pumpkin.
Add one additional small anchoring stitch near the center vein if the leaf flops completely downward.
Do not stitch around its whole perimeter.
Assembly
- Measure the ribbed rectangle and confirm the long edge sits near 48–54 cm before sewing.
- Seam the first and final rows, keeping all vertical ribs aligned.
- Gather the bottom with strong orange yarn and reinforce the closure by crossing the center twice.
- Stuff mostly around the outside circumference, leaving the center softer.
- Gather the top and check that the pumpkin is visibly wider than tall.
- Add 8–10 sculpting strands in opposite pairs, following existing rib valleys.
- Crochet the olive stem and keep its upper section lightly filled.
- Crochet and edge the mustard leaf, then embroider the dark green central and side veins.
- Sew the stem over the top gathering and tuck the leaf base beneath one side.
- Press the pumpkin gently downward on a flat surface and redistribute filling until the base sits level.
The finished piece has a low ribbed terracotta body, darker green stem and oversized mustard leaf with visible vein detail.
7 Technical Tips
- Tall pumpkin failure: A rectangle with insufficient circumference becomes cylindrical after stuffing. Keep the relaxed long edge near 48–54 cm for an 18–20 cm short edge.
- Narrowing rows: Missing one edge hdc repeatedly creates a tapered panel. Count all 26 stitches every 8 rows and mark the first and last stitch if needed.
- Stuffing visibility: BLO fabric can open at the ridges when stretched. If white fiberfill shows through the swatch, drop from a 5 mm to 4.5 mm hook.
- Smooth body failure: Too much filling eliminates the valleys. Stop when the side can still compress around 2 cm under firm pressure.
- Off-center top: Sculpting every groove clockwise can pull the gathering point sideways. Tighten sections in opposing pairs.
- Leaf curling: Embroidery pulled too tightly shortens the center line and cups the fabric. Keep the center vein flat and leave at least 1–2 mm of slack between long stitches.
- Weak topper: Sewing only through the gathered center can loosen the stem. Anchor its base into at least 10–12 surrounding pumpkin stitches.
Why Ribbed Rectangle Construction Works
Back-loop-only crochet creates raised lines without requiring post stitches.
Each row leaves one loop visible on the fabric surface.
When the rectangle is sewn into a tube, those ridges turn vertically and imitate pumpkin segmentation.
The shape comes later.
Seaming creates circumference.
Gathering forms the poles.
Fiberfill establishes volume.
Sculpting strands compress the finished piece into lobes.
That sequence makes the finished dimensions easier to alter than a fixed amigurumi-style sphere.
Getting the Low, Broad Shape
The photo shows a lower pumpkin than many standard rectangular patterns.
Three adjustments produce that profile.
First, do not make the foundation too long. Foundation length controls vertical body size.
Second, continue ribbed rows until enough circumference is available.
Third, position stuffing around the outside edge instead of packing a dense vertical core.
External shaping then pulls the two gathered centers slightly closer.
If the pumpkin still appears too tall, do not tighten every sculpting strand harder. Reopen the top and remove a small amount of center stuffing first.
Aggressive sculpting can create a deep central dent while leaving the sides rigid.
Planning the Leaf Scale
The leaf should be proportionally large.
A tiny 4 cm leaf can disappear against a 25 cm pumpkin.
For this version, target approximately 9–11 cm long.
Its base should sit beside the stem while the pointed half projects beyond the upper pumpkin curve.
The mustard color also needs enough surface area to remain visible beside the terracotta body.
Green vein embroidery adds contrast without introducing another bulky crochet layer.
If using DK yarn for the leaf while keeping worsted for the pumpkin, increase the foundation chain until the leaf still reaches the 9–11 cm target.
Yarn Quantity
This larger photo-inspired version budgets 140–180 g of worsted yarn rather than relying on one exact quantity.
Reserve orange yarn before finishing the body.
The sculpting passes require several meters.
The stem and leaf use comparatively little yarn, so small leftover balls are suitable.
Making a Smaller Pumpkin
For a smaller tabletop version:
Ch 20–22
Work BLO hdc rows until the rectangle measures approximately:
13–15 cm tall × 31–36 cm long.
Use a 4–4.5 mm hook.
Reduce the leaf to approximately 6–7 cm.
Keep the stem around 3 cm tall.
Six to eight shaping divisions are enough for the smaller body.
Making a Larger Pumpkin
Switch to bulky #5 yarn.
For a large centerpiece:
- Use a 6–6.5 mm hook
- Target about 25–28 cm panel height
- Continue rows until the panel reaches 65–72 cm long
- Increase the leaf to 12–14 cm
- Use 10–12 sculpted lobes
Keep the stitch fabric dense.
A larger hook is useful only if the body still hides the stuffing.
Stem and Leaf Placement
The topper should not sit symmetrically.
The reference leaf exits one side of the central stem and covers part of the upper pumpkin.
Place the stem first.
Then turn the pumpkin until the seam is positioned toward the back.
Angle the leaf away from the seam.
That gives the cleanest front view.
The stem can lean slightly in the opposite direction to the leaf.
This creates visual balance without requiring additional vines or tendrils.
Care and Storage
This project is intended as seasonal décor.
Spot-clean when possible.
If the yarn label permits washing, use cool water and minimal agitation.
Do not wring the stuffed pumpkin.
Press water out gently with towels.
Reshape all lobes while damp.
Lift the mustard leaf so it dries flat rather than folded beneath the pumpkin.
Do not iron the stuffed body.
For storage, place it loosely in a breathable container. Heavy compression can flatten BLO ribs and distort the sculpting valleys.
Conclusion
Measure the ribbed rectangle before assembly; the 48–54 cm long edge is what gives this pumpkin its broad profile. Keep the fiberfill concentrated toward the outside, close both centers firmly and add sculpting strands in opposing pairs so the ribbed body stays balanced. The mustard leaf should remain large enough to extend beyond the pumpkin curve, with dark green embroidery defining its central and side veins. Attach that leaf only after the olive stem is secure. Save this ribbed crochet pumpkin pattern to Pinterest and share a top and side view on Instagram using #MustardLeafPumpkin. Would you keep the mustard leaf or switch it to olive green to match the stem?









