Introduction
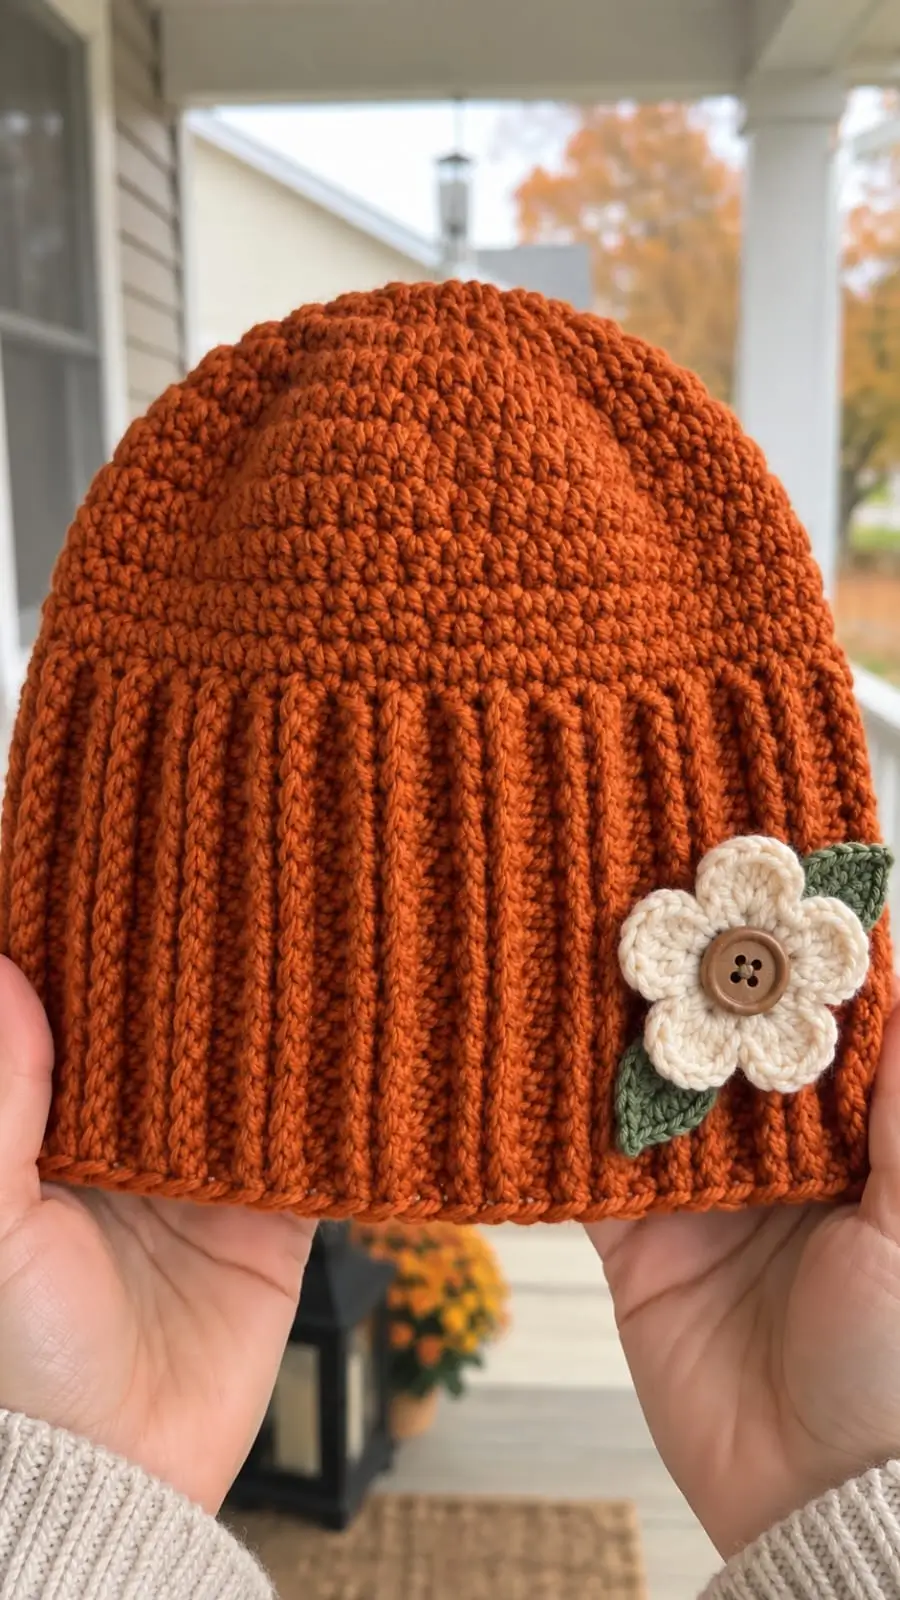
A rust beanie needs more than orange yarn to reproduce the photographed design: the lower half is dominated by tall vertical ribs while the crown changes texture completely. This crochet ribbed beanie with flower applique uses worsted-weight yarn, a 5 mm hook and an adult 52 cm finished circumference. The intermediate-level construction keeps crown bulk under control and provides a practical cold-weather hat with a replaceable decorative motif.
The Design: What Makes This Rust Beanie Different
The photographed hat separates visual structure into two zones. First, the deep lower ribbing extends roughly one-third of the total height, which gives the edge more elasticity than a narrow decorative band. Second, the crown changes to a flatter stitch texture so the upper hat does not become excessively thick. A controlled series of decreases then closes the crown without leaving a large folded bundle at the top.
The flower is mounted low and off-center rather than near the temple line. Two narrow green leaves extend diagonally behind it, breaking up the circular outline of the cream petals. This arrangement distinguishes the design from a basic ribbed crochet hat pattern and gives a crochet flower beanie a defined focal point.
A common failure is making the brim to the wearer’s full head measurement. Ribbing stretches; an uncompressed band can become loose after wear.
Project Info at a Glance
| Skill Level | Time | Finished Size | Hook | Best For |
|---|---|---|---|---|
| Intermediate | 4–6 hours | Approx. 52 cm circumference × 26 cm tall | 5 mm hat; 4 mm flower optional | Adult cold-weather beanie |
The 52 × 26 cm reference dimensions come from a current medium-weight ribbed beanie pattern by Viv Crochets.
Materials and Tools
Yarn
- Burnt orange / rust — worsted #4 — approximately 90–100 g — Red Heart Super Saver, Knit Picks Brava Worsted or another smooth #4 yarn.
- Cream — worsted #4 — approximately 4–6 g for the flower.
- Sage or olive green — worsted #4 — approximately 3–5 g for two leaves.
- Brown sewing thread or matching yarn — small quantity for securing the button.
Tools
- 5 mm crochet hook for brim and crown
- 4 mm crochet hook for a firmer flower
- 15 mm four-hole button
- Tapestry needle
- Scissors
- Locking stitch markers
- Flexible measuring tape
No safety eyes or stuffing are required.
Abbreviations
- ch — chain
- sl st — slip stitch
- sc — single crochet
- hdc — half double crochet
- dc — double crochet
- tr — treble crochet
- hdc2tog — half double crochet two together
- BLO — back loop only
- st/sts — stitch/stitches
- rnd — round
- RS — right side
An invisible decrease is an amigurumi technique and is not used for the hat crown; hdc2tog produces the flatter shaping needed here.
Gauge and Fit
Work a ribbing swatch before committing to the full brim. A comparable ribbed beanie uses a gauge of 18 half double crochets by 11 rows per 10 cm square and a finished circumference of 52 cm.
For this construction, measure the brim after gently stretching and relaxing it. Aim for 48–50 cm unstretched if the intended head circumference is about 54–57 cm. The finished hat should recover after stretching rather than remain at maximum width.
If the row count below does not reach that measurement at your gauge, add or remove complete brim rows. Circumference matters more than copying a row total.
Pattern — Step by Step
Ribbed Brim
Yarn: rust — construction based on standard BLO crochet ribbing.
The brim is worked flat, then joined into a ring.
Row 1: Ch 16. Hdc in 2nd ch from hook and in each ch across. (15)
Row 2: Ch 1, turn. Hdc BLO in each st across. (15)
Rows 3–60: Repeat Row 2. (15)
Measure the long edge. It should sit near 48–50 cm unstretched for the target adult fit. Add or remove rows in pairs if required.
Bring Row 1 and Row 60 together with the RS facing inward. Slip stitch through corresponding loops to form a tube.
Do not fasten off.
The resulting band should measure roughly 8–9 cm from lower edge to upper edge.
Crown Setup
Rotate the brim so its row ends form the upper working edge.
Rnd 1: Ch 1. Work 72 hdc evenly around the top edge. Join with sl st. (72)
Place markers after every 9 stitches. These eight sections control the crown reductions.
Rnd 2: Ch 1, hdc in each st around. Join. (72)
Rnd 3: Repeat Rnd 2. (72)
Rnd 4: Repeat Rnd 2. (72)
Rnd 5: Repeat Rnd 2. (72)
Rnd 6: Repeat Rnd 2. (72)
Rnd 7: Repeat Rnd 2. (72)
Rnd 8: Repeat Rnd 2. (72)
At this point, measure from the lower brim edge. Continue one or two 72-stitch rounds only if more height is needed.
Crown Shaping
Decreases are distributed across eight sections rather than concentrated at one seam.
Rnd 9: Hdc in next 7 sts, hdc2tog. Repeat 8 times. (64)
Rnd 10: Hdc in each st around. (64)
Rnd 11: Hdc in next 6 sts, hdc2tog. Repeat 8 times. (56)
Rnd 12: Hdc in each st around. (56)
Rnd 13: Hdc in next 5 sts, hdc2tog. Repeat 8 times. (48)
Rnd 14: Hdc in next 4 sts, hdc2tog. Repeat 8 times. (40)
Rnd 15: Hdc in next 3 sts, hdc2tog. Repeat 8 times. (32)
Rnd 16: Hdc in next 2 sts, hdc2tog. Repeat 8 times. (24)
Rnd 17: Hdc in next st, hdc2tog. Repeat 8 times. (16)
Rnd 18: Hdc2tog around. (8)
Fasten off, leaving a 20 cm tail. Thread the tail through the front loops of the final eight stitches, pull the opening closed and secure on the inside.
This reduction sequence removes eight stitches per shaping round. That differs from six-stitch amigurumi sphere math because an adult hat begins with a much larger circumference and needs broad, evenly distributed crown segments.
Five-Petal Flower
Yarn: cream.
With the 4 mm hook, make a magic ring.
Rnd 1: Work 5 sc in MR. Join with sl st to first sc. (5)
Petal sequence: Into each stitch work: sl st, ch 2, 2 dc, 1 tr, 2 dc, ch 2, sl st.
Repeat the sequence in all five stitches. Five petals formed.
Fasten off with a 25 cm tail for attachment.
Flatten the petals before positioning the button. The flower should finish near 5–6 cm diameter.
Leaf 1
Yarn: sage green.
With the 5 mm hook:
Row 1: Ch 11.
Starting in 2nd ch from hook: sl st, sc, hdc, dc, tr, tr, dc, hdc, sc, sl st. (10)
Ch 2.
Working down the opposite side of the foundation chain: sl st, sc, hdc, dc, tr, tr, dc, hdc, sc, sl st.
Sl st to the leaf base.
Fasten off, leaving a 20 cm tail.
Leaf 2
Make a second leaf exactly as Leaf 1.
For a closer image match, rotate one leaf about 35–45 degrees upward behind the flower and point the second approximately 35 degrees downward. Their tips should remain visible beyond the cream petals.
Button Center
Use a 15 mm four-hole brown button.
Place the button centrally over the flower’s magic-ring opening. Sew through all four holes in a cross or parallel pattern, catching several flower stitches on the back with each pass.
For infant or toddler hats, omit a detachable button because loose small parts create a choking hazard.
Assembly
- Place the hat flat with the brim seam centered at the back.
- Check the crown closure and weave the 20 cm crown tail through at least four nearby stitches before trimming.
- Position the upper leaf on the lower-right front quadrant, with its tip angled toward the crown.
- Place the second leaf below it so the two leaves form a shallow V rather than stacking directly over each other.
- Pin both leaves through their center lines. Keep the outer edges free so the appliqués retain definition.
- Sew each leaf to the hat with small stitches through the back layer of the appliqué and the outer surface of the brim.
- Center the cream flower over the inner ends of both leaves. Keep most of the lower leaf visible.
- Sew the flower around its center and at one point near the base of each petal; do not stitch down every outer petal edge.
- Attach the 15 mm button through the flower center, passing through the appliqué and a stable section of hat fabric.
- Weave all tails across several stitch directions on the inside, trim them, and check that the flower assembly does not pull the ribbing out of alignment.
The finished hat has a deep rust ribbed band, a shaped upper crown and one low-set floral cluster matching the major structural features visible in the reference photo.
7 Technical Tips
- Brim growth: A band that measures the wearer’s full head circumference before stretching can loosen during use. Target roughly 2–6 cm of negative ease, then check recovery after stretching the band by hand.
- Row tracking: Missing one BLO row changes the seam alignment and can produce a visible diagonal at the join. Clip a stitch marker into every 10th brim row so the final count can be checked without recounting all sixty rows.
- Crown puckering: Removing too many stitches in one round creates deep folds at the top. The pattern spaces eight decreases around each shaping round and introduces plain rounds early in the crown reduction.
- Crown height: Starting decreases too early produces a shallow cap that rides upward. Before Rnd 9, compare the hat depth with the target 26 cm finished height, remembering that several decrease rounds still add vertical length.
- Flower distortion: Pulling the appliqué thread through the tips of all five petals can flatten the flower into the ribbing. Anchor each petal near its inner third, leaving the rounded outer edge unattached.
- Leaf placement: Leaves hidden completely beneath the flower lose their function in the composition. Leave at least 2–3 cm of each green leaf visible outside the petal edge before sewing.
- Button stress: A button attached only to the cream flower can pull the center forward after repeated handling. Pass the securing thread through the flower and into the hat fabric beneath it on at least four passes before knotting inside.
Sizing Adjustments
The reference size is approximately 52 cm circumference × 26 cm tall. The photographed hat also appears to be adult-sized, although an exact measurement cannot be recovered from an image alone.
For a smaller adult size, shorten the brim until it measures about 46–48 cm unstretched and reduce the crown setup count proportionally. A larger version can use a 50–53 cm relaxed brim if the yarn has moderate recovery.
Do not enlarge only by adding crown rounds. Extra rounds change height, not circumference.
Likewise, increasing the hook size without swatching changes the rib density. A loose 6 mm fabric may resemble the dimensions of a 5 mm sample yet stretch far more under wear.
Why the Separate Ribbed Brim Matters
A single rectangular BLO beanie is one of the most common crochet constructions. The photographed hat does not look like a uniform rectangle from bottom edge to crown. Its lower ribs are much deeper and more sharply defined than the upper fabric. Working the band independently makes that contrast easier to reproduce.
It also gives the maker direct control over negative ease. You can finish the brim first, test its circumference, then build the crown from the fixed edge instead of discovering after seaming that an entire rectangular hat is too loose.
Flower and Leaf Scale
Decoration should remain subordinate to the hat structure. The photographed cream flower appears to span only several brim ribs, rather than covering a quarter of the hat.
A flower around 5–6 cm diameter is an appropriate target for this design.
The leaf scale can be more flexible. A medium worsted-weight leaf can sit around 3 cm wide × 8 cm long, but it can be shortened if that proportion overwhelms the flower.
If an 8 cm leaf looks too long against your brim, remove one tall stitch from each side of the leaf sequence or work the leaves with the 4 mm flower hook.
Conclusion
The key measurement to check next is the ribbed band, not the crown. Work the brim until it sits roughly 2–6 cm below the intended head circumference, join it, then distribute the 72 crown stitches without bunching the row ends. Finish the five-petal flower only after checking its scale against the completed hat; about 5–6 cm suits this design. Save the crochet ribbed beanie with flower applique to Pinterest with a finished front-view photo, and post the crown plus appliqué details on Instagram with #RustFlowerBeanie. Which detail would you change first on this rust version: the cream petal color, the sage leaves, or the brown button?









