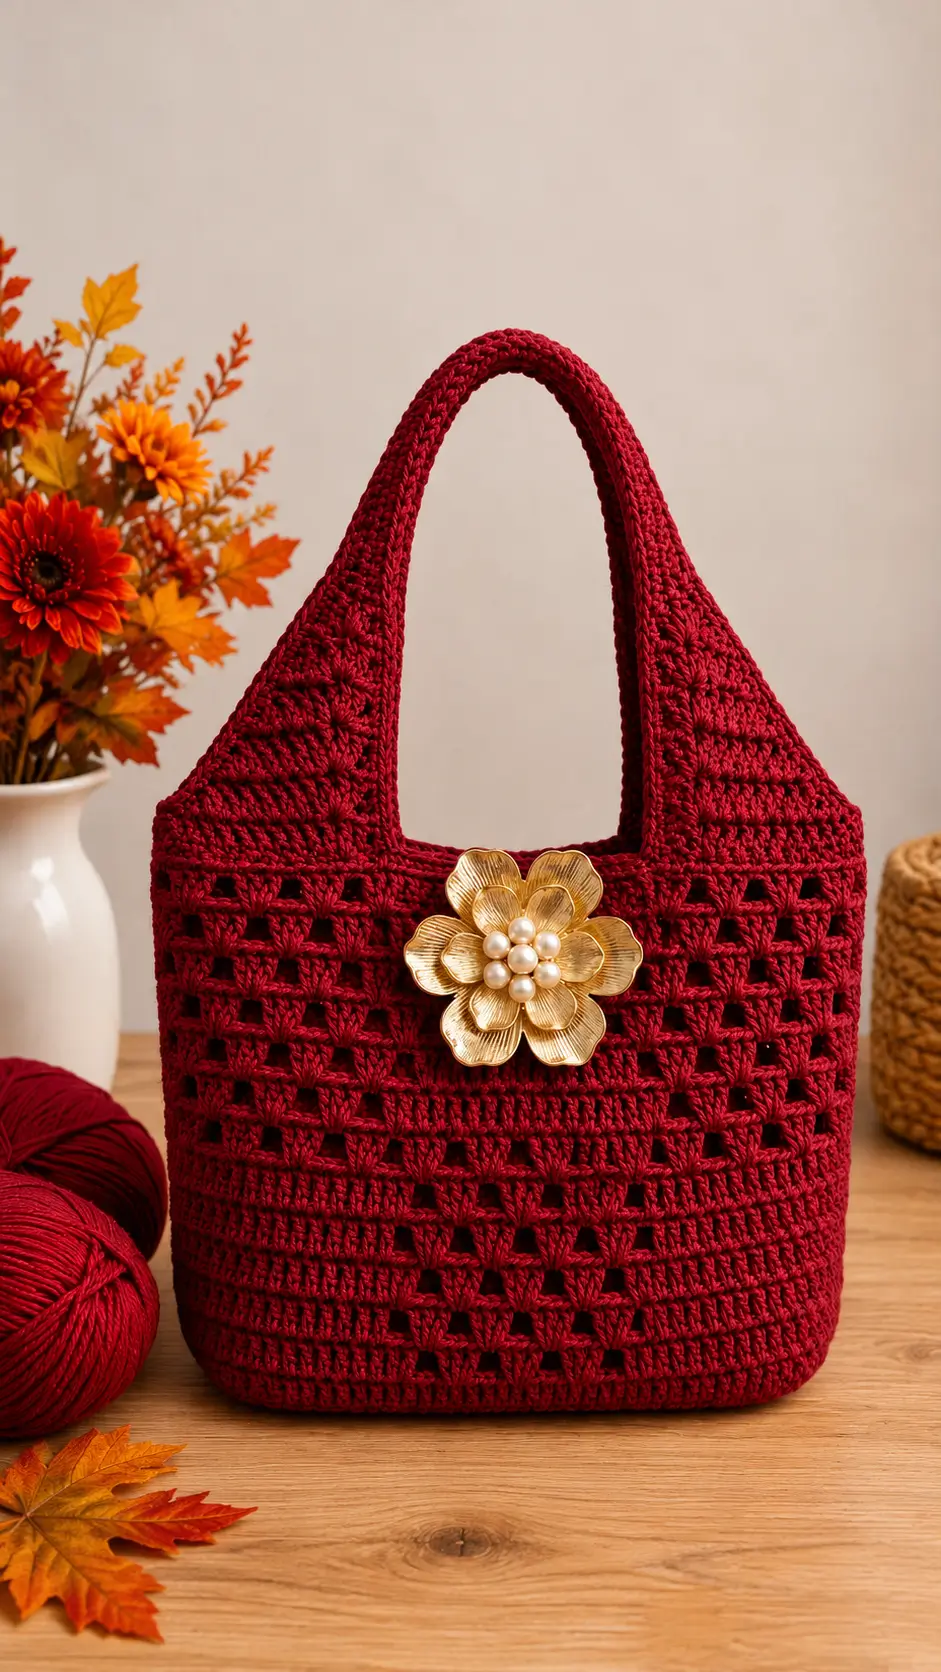
A burgundy granny grid cannot carry a heavy flower brooch unless the fabric behind it is dense enough to resist sagging. This crochet granny stitch tote bag pattern builds that support into the construction. Use about 200 g of worsted cotton with a 4.5 mm hook for a bag near 32 cm wide and 25 cm high. The project suits an advanced beginner and produces a practical shoulder bag with fewer seams.
The Design: What Makes This Burgundy Tote Different
Three structural decisions define this bag. First, the bottom begins as a dense rectangle rather than open granny mesh because groceries, notebooks and crochet tools need a base that does not stretch through large chain spaces. Second, the open body terminates in solid crochet before the handles begin. That change transfers load from individual clusters into a broader section of fabric.
The third decision is visible at each handle root: the strap does not meet the body at one narrow point. It tapers inward through several rows, producing a triangular load path. That construction gives the granny stitch handbag its distinctive silhouette and reduces pulling at the upper corners.
A common mistake on a crochet shoulder bag pattern of this type is beginning the handle opening while the granny mesh is still active. The resulting corner can elongate under load. A dense transition band corrects that weakness.
Project Info at a Glance
| Skill Level | Time | Finished Size | Hook | Best For |
|---|---|---|---|---|
| Advanced beginner | 8–12 hours | Approx. 32 × 25 cm body; about 42.5 cm total height | 4.5 mm | Everyday tote, project bag, shoulder handbag |
Materials and Tools
Yarn
- Deep burgundy — worsted/#4 cotton or cotton-rich yarn — approximately 200 g
- Optional matching burgundy — 5–10 g reserved for reinforcement and repairs
Tools
- 4.5 mm crochet hook
- 4–6 locking stitch markers
- Tapestry needle
- Scissors
- Tape measure
- Optional fabric lining
- Large decorative flower brooch, approximately 7–9 cm wide
- Small felt patch, roughly 4 × 4 cm, for backing a heavy brooch
No stuffing or safety eyes are required.
Abbreviations
- ch — chain
- sc — single crochet
- hdc — half double crochet
- dc — double crochet
- sl st — slip stitch
- st(s) — stitch(es)
- sp — space
- sk — skip
- rep — repeat
- BLO — back loop only
- cl — 3 dc worked into the same space
Invisible decrease is not part of the bag construction; shaping is produced by omitting edge stitches or using slip stitches at the handle transition instead.
Pattern — Step by Step
The photographed bag is not built with amigurumi rounds, so a six-stitch magic ring would be structurally inappropriate. The tote begins with a rectangular foundation. Work with an even, firm tension and check the width before continuing past the base.
Base
Yarn: burgundy
Foundation: ch 39.
Row 1: sc in second ch from hook and in each ch across. (38)
Rows 2–7: ch 1, turn, sc in each st across. (38)
The strip should measure roughly 25–27 cm long depending on gauge.
Do not cut yarn.
Base Perimeter
Work around all four edges of the rectangle.
Rnd 1: ch 1, 38 sc across first long edge, 7 sc evenly across short edge, 38 sc across opposite long edge, 7 sc across final short edge; sl st to first sc. (90)
Rnd 2: ch 1, sc in each st around; sl st. (90)
Rnd 3: repeat Rnd 2. (90)
The base now has a shallow boxed appearance rather than a thin sheet.
Lower Solid Body
Rnds 1–5: ch 1, sc in each st around; sl st. (90)
Keep the first stitch marked. Do not allow the side seams to drift.
Granny-Grid Body
The 90-stitch perimeter is adjusted into repeated cluster spaces. A small number of stitches can be absorbed during the transition rather than forcing an uneven final repeat.
Transition Rnd: ch 3, 2 dc in same st, sk 2 sts, 3 dc in next st around, adjusting the final skip so the clusters meet cleanly; sl st to top of beginning ch.
From this point, count cluster spaces, not individual double crochets.
Granny Rnd 1: sl st into first gap, ch 3, 2 dc in same gap, ch 1, 3 dc in next gap, ch 1 around; sl st.
Granny Rnds 2–7: repeat Granny Rnd 1.
This creates the square openings visible across the centre of the photographed bag.
Mid-Bag Solid Band
Rnd 1: ch 1, work sc evenly around, placing one sc in each dc and one sc in each ch-1 space.
Rnds 2–3: ch 1, sc in every st around; sl st.
Measure the circumference after Rnd 3. The bag should remain approximately 32 cm across when laid flat rather than flaring substantially wider than the base.
Upper Granny Panel
Rnd 1: ch 3, 2 dc at beginning, ch 1, sk 2, 3 dc in next st around; adjust only at the side seam if one stitch remains.
Rnds 2–4: work 3-dc clusters into each ch-1 space, separated by ch 1.
Fasten off only if you prefer to reposition the beginning of the next section at a side seam.
Upper Reinforcement Band
Join burgundy at one side seam.
Rnd 1: sc evenly around, filling the cluster tops and chain spaces.
Rnds 2–4: sc in each st around.
This band takes the load from the straps and also supplies a stable area for the flower brooch.
Front Handle Root
Lay the bag flat and mark the centre front. Place markers approximately 9–10 cm apart.
Join yarn at the first front marker.
Row 1: sc from first marker to second marker.
Row 2: ch 1, turn, sl st in first 2 sts, sc across to last 2 sts, leave last 2 unworked.
Row 3: ch 1, turn, sl st in first st, sc across to final st, leave final st unworked.
Rows 4–5: repeat Row 3.
The section now narrows gradually rather than forming an abrupt rectangular strap.
Front Handle
Continue across the remaining centre stitches.
Rows 1–34: ch 1, turn, sc across.
Target a strap length of approximately 34–38 cm from the top of one tapered root to the other joining point. Add or remove rows according to shoulder fit.
At the far side of the front panel, widen symmetrically.
Expansion Row 1: ch 1, turn, 2 sc in first st, sc across, 2 sc in last st.
Rows 2–4: repeat, adding one stitch at each edge on every row as needed to mirror the opposite root.
Pin the end to the front band. Sew across the full width with matching yarn.
Back Handle
Repeat the front-handle instructions on the back panel.
Check both handles against each other every five rows. A one-centimetre difference becomes obvious when the bag hangs from the shoulder.
Handle Edging
Join yarn at the base of one handle.
Work 1 round of sl st around the complete outer handle edge. Work a second round of sc if the strap still curls or feels narrow.
Repeat on the second handle.
Top Edge
Join yarn at a side seam.
Rnd 1: sc evenly around the inside opening, including the inner edges beside both handles.
Rnd 2: sl st loosely in every st around.
Fasten off. Leave a 15 cm tail and weave it through at least 5 cm of dense fabric before trimming.
Brooch Reinforcement
The photographed accessory appears metallic rather than crocheted, so it should not be recreated as an unsupported yarn appliqué.
Cut a 4 × 4 cm felt square. Position it inside the front wall behind the intended brooch location.
Stitch the felt to the dense upper band with small running stitches. Keep those stitches between crochet columns so they remain inconspicuous from the front.
Push the brooch pin through the crochet and felt together. The felt distributes the point load across a larger area and reduces distortion.
Optional Crochet Flower Alternative
For a yarn version, use sport or DK cotton and a 2.5–3 mm hook. Aim for a finished flower approximately 6–8 cm across.
Rnd 1: 6 sc in MR. (6)
Rnd 2: inc ×6. (12)
Rnd 3: (sc, inc) ×6. (18)
Rnd 4: (2 sc, inc) ×6. (24)
For each petal, work sl st, hdc, 3 dc, hdc, sl st across successive stitches, spacing six petals evenly around the circle.
Fasten off. Leave a 20 cm tail for sewing.
This optional flower differs from the metal ornament in the supplied photograph.
Assembly
- Block the completed bag flat to approximately 32 cm wide without stretching the granny spaces beyond their natural shape.
- Square the base by pressing the lower side folds with the fingers rather than permanently creasing the crochet.
- Compare the two handle lengths from root to root; correct any difference greater than 1 cm before final reinforcement.
- Sew any joined handle end using two passes through the complete strap width rather than attaching only the edge loops.
- Position the bag opening flat and check that the front and back handle roots align vertically.
- Weave all tails through at least 5 cm of dense single crochet, reversing direction once.
- Place the felt reinforcement behind the front centre if the metal flower brooch will be used.
- Attach the flower approximately 3–4 cm below the bag opening, centred between the handle roots.
- Add a fabric lining only after the brooch placement has been tested, since the lining must not trap an inaccessible pin mechanism.
- Load-test the bag with approximately 2 kg for ten minutes and inspect the handle roots, upper band and base for abnormal elongation.
The finished construction has a dense rectangular base, open granny-grid body, reinforced upper wall and two integrated shoulder straps.
7 Technical Tips
- Mark the side seams. A missed beginning point can shift the join by one stitch per round, causing the handle roots to sit diagonally after several rounds.
- Check load stretch. If the bag grows more than 2 cm vertically during the 2 kg test, add a fabric lining or another sc reinforcement round.
- Do not use tight decreases at the handle roots. They can pucker the fabric; tapering by leaving edge stitches unworked produces a flatter transition.
- Set handle length before edging. A difference greater than 1 cm between the straps makes one side carry more of the load.
- Keep cotton tension firm through the granny section. Chain spaces wider than roughly 1 cm can let small objects protrude and make the grid look too loose.
- Pin the handle roots before sewing. A root displaced even 1.5 cm from its opposite partner can cause the bag mouth to twist when carried.
- Reinforce the brooch area. Back a large metal ornament with approximately 4 × 4 cm of felt so its weight is not concentrated on only a few crochet stitches.
Conclusion
Measure the finished handle roots before attaching the decorative flower; that check matters more than adding another ornamental row. This crochet granny stitch tote bag pattern is built around a 32 cm reference width, medium-weight cotton, a reinforced bottom and a solid upper section that supports the handles and brooch. The next practical step is to crochet a 10 cm tension swatch with the intended burgundy yarn and 4.5 mm hook, then adjust hook size before making the foundation chain. Save the finished bag to Pinterest and share the completed version on Instagram with #BurgundyGrannyTote. Would you keep the large gold flower at the centre or replace it with a smaller crochet flower?









