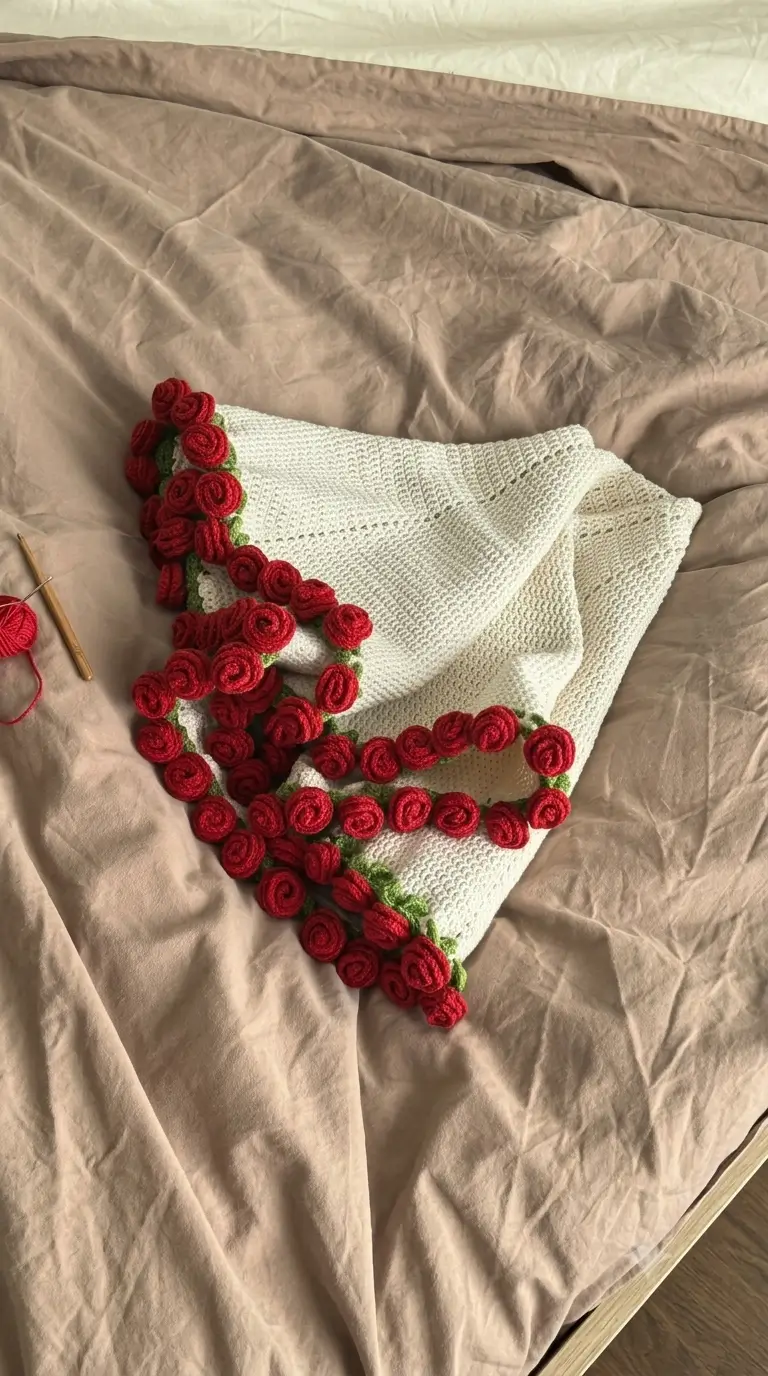
Rows of raised red roses change this cream crochet blanket from a basic textured square into a floral statement piece. This crochet rose border blanket pattern combines a neutral main fabric with individually worked spiral roses, green leaves, and trailing floral sections. The construction is suitable for intermediate crocheters and can be resized by adjusting the blanket foundation and the number of flowers used around the edge.
The Design: What Makes This Rose Border Different
The main feature is the contrast between the flat cream crochet fabric and the heavily textured flower border. Instead of working flowers directly into the blanket edge, the roses are crocheted separately and attached after shaping. This keeps each flower three-dimensional and allows the maker to control spacing before sewing.
Green leaves and short connecting sections sit underneath the flowers so the border does not look like an uninterrupted red strip. The roses can also be rotated independently during assembly, which creates a less repetitive arrangement.
A common mistake with a crochet rose blanket is attaching every flower at exactly the same angle. That produces a rigid border. Pinning the roses first and varying their orientation gives the floral edge a more natural structure.
Project Info at a Glance
| Skill Level | Intermediate |
|---|---|
| Construction | Blanket worked flat; roses and leaves made separately |
| Recommended Yarn | DK or light worsted yarn |
| Recommended Hook | 3.5–4.5 mm depending on yarn |
| Colors | Cream, deep red, and green |
| Best For | Throws, decorative blankets, shawls, and floral crochet gifts |
Materials and Tools
Yarn
- Cream — DK or light worsted yarn — main blanket color
- Deep red — DK or light worsted yarn — roses
- Green — DK or light worsted yarn — leaves and floral stems
Tools
- 3.5–4.5 mm crochet hook matched to the selected yarn
- Yarn needle
- Scissors
- Stitch markers
- Blocking pins
- Blocking mat
Abbreviations
- ch — chain
- sc — single crochet
- hdc — half double crochet
- dc — double crochet
- tr — treble crochet
- sl st — slip stitch
- st — stitch
- sts — stitches
- sp — space
Crochet Rose Border Blanket Pattern
The blanket and flowers are worked separately. Complete and block the cream base before attaching the roses. This makes it easier to distribute the floral border evenly.
Cream Blanket Base
Yarn: cream
Choose the finished width required for the project. Make a foundation chain in a multiple suitable for your preferred blanket stitch.
Row 1: Work 1 dc into the fourth chain from the hook and 1 dc into each remaining chain. Turn.
Row 2: Ch 3, work 1 dc into each stitch across. Turn.
Repeat Row 2 until the blanket reaches the required length.
For a more open fabric similar to the photographed piece, replace selected solid rows with mesh rows.
Mesh Row: Ch 3, dc in next st, *ch 1, skip 1 st, dc in next st*. Repeat across.
Alternate solid and mesh sections as desired. Keep the outer edge stable so it can support the weight of the flowers.
Fasten off and weave in the ends.
Simple Blanket Edging
Yarn: cream
Join yarn at one corner.
Round 1: Ch 1 and work sc evenly around the entire blanket, placing 3 sc into each corner. Join with a sl st.
Round 2: Ch 1, sc in every stitch around, working 3 sc into the center corner stitch. Join with a sl st.
Fasten off.
Large Spiral Rose
Yarn: deep red
Ch 41.
Row 1: Work 2 dc into the fourth chain from the hook. Work 3 dc into each chain across.
The strip will begin curling automatically as additional stitches are added.
Fasten off, leaving approximately 25 cm of yarn for sewing.
Beginning at one end, roll the crocheted strip into a spiral. Keep the first few coils tight to form the center of the rose, then allow the outer coils to sit slightly wider.
Thread the yarn tail through a needle and sew through several layers across the underside of the flower. Make additional securing stitches in different directions so the rose cannot unroll.
Medium Spiral Rose
Yarn: deep red
Ch 31.
Row 1: Work 2 dc into the fourth chain from the hook. Work 3 dc into each remaining chain.
Fasten off with a 20–25 cm sewing tail.
Roll the strip from one end, keeping the center compact. Stitch through the base several times to secure the spiral.
Small Spiral Rose
Yarn: deep red
Ch 21.
Row 1: Work 2 hdc into the third chain from the hook. Work 3 hdc into each remaining chain.
Fasten off and leave a long tail.
Roll into a compact flower and stitch securely across the underside.
Pointed Crochet Leaf
Yarn: green
Ch 8.
Row 1: Sl st in second ch from hook, sc in next ch, hdc in next ch, dc in next ch, hdc in next ch, sc in next ch, sl st in final ch.
Working down the opposite side of the foundation chain, sl st in first loop, sc in next, hdc in next, dc in next, hdc in next, sc in next and sl st into the end.
Fasten off, leaving a sewing tail.
Small Crochet Leaf
Yarn: green
Ch 6.
Row 1: Sl st in second ch from hook, sc in next ch, hdc in next ch, sc in next ch and sl st in final ch.
Repeat the same sequence along the opposite side of the foundation chain.
Fasten off and leave a tail for sewing.
Green Connecting Vine
Yarn: green
Make a chain long enough to fit the section of blanket where the flowers will be placed.
Row 1: Beginning in the second chain from the hook, work 1 sl st into each chain.
For small leaf-like projections, work the following at selected intervals:
Ch 4, sl st in second ch from hook, sc in next ch, hdc in next ch, then sl st back into the main vine.
Continue along the vine and repeat the projection where required.
Fasten off with a long sewing tail.
Planning the Rose Arrangement
Do not sew the first rose onto the blanket as soon as it is finished. Make a group of flowers in at least two or three sizes first.
Lay the blanket flat. Position the largest roses at visually important points such as corners, changes in direction, or the beginning of a floral cluster. Fill the spaces between them with medium roses, then use smaller flowers where the border needs a tighter transition.
The photographed style uses dense clusters rather than a single evenly spaced row. Some flowers sit very close together while small sections of green remain visible underneath them.
Pin every flower before sewing. This allows the spacing to be corrected without repeatedly removing stitches.
How to Attach the Crochet Roses
- Block the completed cream blanket and allow it to dry completely.
- Lay the blanket on a flat work surface.
- Position the green vines or leaf sections along the intended floral edge.
- Pin the vines in place without stretching them.
- Arrange the large roses first.
- Add medium flowers between the large roses.
- Use small roses to close excessive gaps.
- Place green leaves underneath and between selected flowers.
- Sew each component through several blanket stitches rather than through a single loop.
- Weave every yarn tail into the reverse side and trim only after checking the front of the blanket.
The completed border should remain flexible enough for the blanket to fold without the flowers pulling away from the base fabric.
How Many Crochet Roses Do You Need?
The number depends on the size of the blanket, the diameter of each flower, and how densely the border is arranged. A heavily covered edge requires considerably more flowers than an evenly spaced decorative border.
For planning, place completed sample roses along 20 cm of the finished edge. Count how many flowers are needed to achieve the preferred density, then multiply that number by the total length of the area being decorated.
For example, if four flowers cover 20 cm, approximately 20 flowers would be required for one metre of similarly dense border. Mixed flower sizes will change that estimate.
Changing the Size of the Roses
The easiest adjustment is the starting chain. A longer chain creates more petals and usually produces a larger finished spiral.
Stitch height also changes the flower diameter. A strip made mostly with half double crochet produces a lower, tighter rose. Double crochet gives more height and creates broader outer petals.
A third option is changing yarn weight. Keep in mind that heavier roses place more stress on the blanket edge, so the base fabric may need additional edging rounds for support.
7 Technical Tips for a Better Rose Border
- Prevent a stretched blanket edge. Do not pull the green vine tightly while sewing it down. A vine shortened by even 2–3 cm can cause the finished edge to curl.
- Secure the rose center completely. Pass the sewing yarn through at least three layers at the base of each spiral. A single securing stitch can allow the flower to rotate or loosen.
- Keep the flower backs flat. Avoid stacking several knots underneath one rose. A bulky base can make the flower lean instead of sitting against the blanket.
- Pin before sewing. Check the arrangement from approximately one metre away after pinning the flowers. Closely positioned roses can hide uneven gaps that are difficult to see while working directly over the fabric.
- Reinforce heavy clusters. When three or more large roses meet at one point, distribute attachment stitches over several blanket stitches. Concentrating every sewing stitch in one location can distort the cream fabric.
- Control rose diameter. Measure the first completed flower before producing the full batch. A difference of 1 cm per flower becomes noticeable when dozens of roses are arranged in a continuous border.
- Weave tails away from open mesh. Run yarn ends through solid crochet sections whenever possible. Tails woven through large eyelets may remain visible from the front.
Using the Rose Border on Different Projects
This construction is not limited to a full-size blanket. The same separate-flower method can be applied to a rectangular shawl, table runner, decorative cushion, baby blanket, or crochet wrap.
For smaller projects, reduce both the number and diameter of the roses. A large flower that works well on a throw can overpower the edge of a narrow scarf.
The floral decoration can also be limited to one corner rather than continuing around the entire piece. Corner arrangements require fewer flowers and reduce the added weight while preserving the dimensional design.
Color Variations
Deep red against cream creates the strongest contrast in this design, but the construction does not depend on those exact colors. Burgundy flowers can produce a darker border, while pale pink or dusty rose creates less contrast with the base.
Green should remain visible between some of the flowers. If every leaf is completely covered, the border can lose definition and appear as a continuous mass of one color.
Using one dye lot for the main blanket is particularly important because the cream section occupies most of the finished surface. Small dye-lot differences are usually much easier to conceal in the individual roses.
Finishing the Blanket
After all flowers and leaves have been attached, inspect both sides of the work. Check every rose by gently lifting the outer edge. Add another attachment stitch if the flower separates noticeably from the blanket.
Weave remaining tails into matching colors rather than carrying red yarn through cream stitches or green yarn through the open blanket fabric.
Steam or wet blocking should be handled carefully after the flowers are installed. Flattening the rose border under heavy pressure can reduce its three-dimensional shape. If the blanket needs further reshaping, block the base while arranging each rose manually instead of pressing the flowers flat.
Conclusion
A crochet rose border blanket depends on two separate construction stages: a stable base fabric and a carefully planned floral layer. Complete and block the cream section first, make the roses in several sizes, then arrange every flower before sewing. The next practical step is to crochet one large, one medium, and one small sample rose so their proportions can be checked against the blanket edge. Save the finished crochet rose border blanket pattern to Pinterest and share the completed floral arrangement on Instagram with #CrochetRoseBorderBlanket. How densely would you place the red roses along the cream edge?









