Introduction
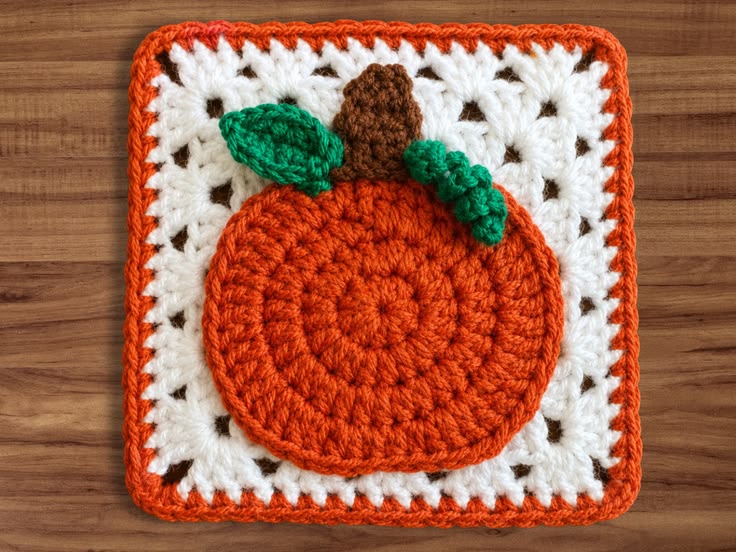
A pumpkin loses its silhouette when the stem, leaf and top indentation all compete for the same few stitches. This pumpkin granny square crochet pattern separates those details, placing a raised orange pumpkin over an open white granny square with a brown stem, green leaf and curling vine. Using worsted-weight yarn and a 4 mm hook, the finished block measures approximately 14 cm square and works well as a coaster, blanket block or fall table accent.
The Design: What Makes This Pumpkin Square Different
The pumpkin is constructed as a separate appliqué instead of being built directly into the granny-square rounds. That choice creates the raised orange surface visible in the reference and keeps the white background openings clean. A 36-stitch plateau gives the pumpkin enough width without covering the corners of the square. The stem is narrow and vertical, while the leaf sits diagonally across the upper left edge to break the symmetry.
The crochet pumpkin square also uses a separate spiral vine rather than embroidering a green line over the pumpkin. That produces the distinct curled texture beside the stem. One frequent problem with a fall granny square of this type is sewing the pumpkin down too tightly. Stretching the appliqué while attaching it can pull the white square inward and leave all four corners curved instead of square.
Project Info at a Glance
| Skill Level | Time | Finished Size | Hook | Best For |
|---|---|---|---|---|
| Advanced beginner | 2–3 hours | Approx. 14 × 14 cm | 4 mm | Coasters, blankets, pillows, garlands and table decor |
A 14 cm finished width matches published worsted-weight pumpkin granny squares made with a 4 mm hook. Block the background before attaching the pumpkin because the square can gain several millimeters after shaping.
Materials and Tools
Yarn
- Pumpkin orange — worsted / #4 — approximately 9–12 g — pumpkin and outer border.
- Warm white — worsted / #4 — approximately 14–18 g — granny-square background.
- Emerald or leaf green — worsted / #4 — approximately 2–3 g — leaf and curling vine.
- Medium brown — worsted / #4 — approximately 2 g — pumpkin stem.
Published 5.5-inch pumpkin squares use about 8.5 g of orange and roughly 14.2 g of border yarn, so these quantities provide a practical allowance for the separate raised appliqué and contrasting outer edge shown here.
Tools
- 4 mm crochet hook
- Yarn needle
- Scissors
- Stitch marker
- Blocking pins
- Measuring tape
Abbreviations
- MR — magic ring
- ch — chain
- sc — single crochet
- hdc — half double crochet
- dc — double crochet
- tr — treble crochet
- inc — 2 stitches in the same stitch
- sl st — slip stitch
- sp — space
- st / sts — stitch / stitches
- BLO — back loop only
An invisible decrease is worked through the front loops of two adjacent stitches; no decrease rounds are required for the main pumpkin in this pattern.
Pattern — Step by Step
The square and pumpkin are made separately. Block the white square before sewing the appliqué in place so the final attachment does not distort the corners.
White Granny Square Background
Yarn: warm white worsted-weight yarn.
Ch 4 and join with a sl st to form a ring.
Round 1: Ch 3, 2 dc into ring, ch 2, *3 dc into ring, ch 2; repeat from * 2 more times. Join with sl st to top of beginning ch-3. You now have 4 groups of 3 dc and 4 corner spaces.
Round 2: Sl st across to first ch-2 corner. Ch 3, 2 dc, ch 2, 3 dc in same corner. Ch 1. In each remaining corner work 3 dc, ch 2, 3 dc, placing ch 1 between corner groups. Join with sl st.
Round 3: Sl st to first corner. Work 3 dc, ch 2, 3 dc in the corner. Ch 1, 3 dc into the next ch-1 side space, ch 1. Repeat around, working 3 dc, ch 2, 3 dc in every corner. Join with sl st.
Round 4: Work 3 dc, ch 2, 3 dc in each corner. Work 3 dc into every ch-1 side space with ch 1 between all clusters. Join with sl st.
Round 5: Repeat the established granny-square sequence. Each side now contains four groups between the corners.
Fasten off white. Block the square to approximately 13–13.5 cm before adding the outer orange edge.
Orange Outer Border
Yarn: pumpkin orange.
Join orange in any corner ch-2 space.
Border Round 1: Ch 1, work 2 sc, ch 2, 2 sc in the corner. Sc once in every dc and once in every ch-1 space across the side. Repeat the 2 sc, ch 2, 2 sc corner treatment in all four corners. Join with sl st.
Border Round 2: Ch 1 and sc in every stitch around. In each ch-2 corner work sc, ch 2, sc. Join with sl st.
Fasten off and weave the orange tail into the back. Block again if necessary until the finished square measures close to 14 × 14 cm.
Round Pumpkin Appliqué
Yarn: pumpkin orange. Work joined rounds.
R1: 6 hdc in MR (6)
R2: hdc inc ×6 (12)
R3: (hdc 1, inc) ×6 (18)
R4: (hdc 2, inc) ×6 (24)
R5: (hdc 3, inc) ×6 (30)
R6: (hdc 4, inc) ×6 (36)
The 36-stitch plateau produces a medium appliqué large enough to dominate the square while leaving a visible white margin.
R7 shaping round: sl st in next 3 sts, sc in next 5 sts, hdc in next 5 sts, dc in next 8 sts, hdc in next 5 sts, sc in next 5 sts, sl st in final 5 sts (36).
This variation in stitch height shifts the pumpkin away from a perfect circle and gives it a slightly broader center with flatter upper and lower edges.
Fasten off. Leave a 40 cm sewing tail.
Pumpkin Rib Lines
Yarn: pumpkin orange or a slightly darker orange.
The reference pumpkin shows subtle vertical divisions rather than separate stuffed lobes. Thread approximately 60 cm of orange yarn onto a yarn needle.
Bring the yarn from the back near the lower center. Run one loose line toward the upper center, following the curve of the stitches rather than pulling straight across the surface.
Create one matching line on each side of the center. Three shallow divisions are enough. Pulling these lines tightly will pucker the appliqué, so keep them lying against the surface.
Brown Pumpkin Stem
Yarn: medium brown.
Ch 7.
Row 1: sc in 2nd ch from hook and across (6).
Row 2: ch 1, turn, sc across (6).
Row 3: ch 1, turn, sc2tog, sc 2, sc2tog (4).
Row 4: ch 1, turn, sc across (4).
Row 5: ch 1, turn, sc2tog twice (2).
Fasten off. Leave a 20 cm tail.
The tapered top prevents the stem from reading as a rectangular tab. Pin its lower edge behind the upper center of the pumpkin before sewing.
Green Leaf
Yarn: emerald green.
Ch 9.
Starting in the second chain from the hook, work:
sl st, sc, hdc, dc, dc, hdc, sc, sl st.
Working along the opposite side of the foundation chain, repeat:
sl st, sc, hdc, dc, dc, hdc, sc, sl st.
Join at the leaf base.
Fasten off and leave a 25 cm tail. The finished leaf should measure approximately 5–6 cm long with a pointed outer end.
Pin the leaf diagonally so its base disappears beneath the lower left side of the brown stem. The tip should angle toward the upper-left area of the pumpkin.
Curly Green Vine
Yarn: emerald green.
Ch 18.
Work 3 sc in the second chain from the hook and 3 sc in every remaining chain.
The excess stitches cause the chain to twist into a spiral automatically. Do not stretch it flat after crocheting.
Fasten off and leave a 20 cm tail.
For the compact curl shown in the reference, fold the spiral into two or three visible loops before sewing only the first few centimeters to the square.
Positioning the Pumpkin
Place the blocked square flat with one edge parallel to the table.
Center the pumpkin horizontally, then move it slightly downward so the brown stem remains inside the white section rather than touching the orange outer border. Approximately 1.5–2 cm of white background should remain visible along the lower edge of the appliqué.
Pin the pumpkin at the top, bottom and both sides. Check all four square corners before sewing.
Use the long orange tail to whipstitch through the back loops of the pumpkin edge and only the upper strands of the white square. Do not pull the stitches tight enough to compress the granny openings.
Assembly
- Block the completed white and orange granny square to approximately 14 × 14 cm.
- Position the brown stem behind the upper center of the orange pumpkin and stitch its lower section to the square.
- Center the pumpkin over the white background, leaving an even visible margin around its sides and bottom.
- Pin the pumpkin at four points before sewing so the appliqué does not rotate during attachment.
- Whipstitch the pumpkin perimeter to the white square without catching through the orange outer border.
- Position the green leaf diagonally across the upper-left section of the pumpkin and secure the base first.
- Sew around the leaf perimeter with small stitches while keeping the pointed end flat.
- Place the spiral vine to the upper-right side of the stem and arrange two or three compact curls.
- Secure the vine at several hidden points instead of stitching continuously through every spiral loop.
- Weave all remaining tails through at least 4–5 cm of matching-color stitches on the back and trim.
The finished block contains one open granny-square background, one raised pumpkin appliqué, one tapered stem, one leaf, one spiral vine and a contrasting orange frame.
7 Technical Tips
- Rounded-square failure: Sewing the pumpkin down before blocking can pull all four sides inward. Block the background to approximately 14 cm square before attaching any appliqué parts.
- Pumpkin ruffling: The circular increase sequence must remain 6, 12, 18, 24, 30 and 36 stitches. An accidental seventh increase in one round introduces excess fabric that becomes visible near the outer edge.
- Pumpkin cupping: If the orange disc curves upward before R6, the working tension is too tight for the 4 mm hook. Check that 36 stitches lie flat before beginning the shaping round.
- Stem distortion: A stem wider than approximately four stitches at its top makes the pumpkin silhouette top-heavy. The final tapered rows reduce the width from six stitches to two.
- Leaf rotation: Pin both the base and pointed tip before sewing. A leaf that turns even 1 cm downward can cover the pumpkin’s top indentation and obscure the stem.
- Vine flattening: Sewing through every spiral stitch removes the three-dimensional curl. Anchor the vine at only three or four points and leave the outer loops free.
- Visible attachment stitches: Catch only the upper strands of the white background when sewing the appliqué. Passing the needle through the complete granny-square fabric leaves orange sewing lines visible on the reverse.
How to Keep the Pumpkin Round Without Making It Flat
The orange section needs two conflicting properties. It must sit flat enough to attach cleanly, yet retain enough relief to remain visibly separate from the white background.
The first six rounds establish the diameter with a controlled six-stitch increase. Stop at 36 stitches instead of continuing to 42. A larger circle would push too close to the orange frame on a 14 cm square.
The final shaping round changes stitch height without changing the stitch total. Short slip stitches and single crochets reduce the visual height at one section, while taller half double and double crochet stitches preserve width through the body.
When sewing, insert the needle close to the outer edge rather than one full round inward. The center remains unattached and can sit slightly above the granny-square surface. That shallow relief matches the raised look visible in the reference image without stuffing the pumpkin.
Adjusting the Granny Square Size
The published size reference for a worsted-weight pumpkin granny square with a 4 mm hook is approximately 5.5 inches, or 14 cm. That measurement works well for the proportions shown here.
For a larger block, add another white granny round before the orange border. Each additional round typically increases the width by roughly 2–3 cm with worsted yarn, although actual growth depends on gauge.
Do not enlarge only the pumpkin if the square remains 14 cm. A 42-stitch pumpkin circle may cover too much of the white background and interfere with the open granny-square texture that frames the appliqué.
For a smaller coaster, remove one white background round and stop the pumpkin after R5 at 30 stitches. Reduce the stem by one foundation chain and start the leaf with approximately seven chains instead of nine.
Using the Square in Larger Projects
A single square functions as a fall coaster or small decorative mat. Multiple blocks can be joined for a table runner, cushion front or blanket.
Before joining several squares, block every piece to the same measurement. A difference of only 4 mm per square becomes 2 cm across a row of five blocks.
For a blanket, alternate pumpkin blocks with plain white-and-orange granny squares. The plain blocks reduce bulk because the raised appliqué adds several layers of yarn wherever motifs meet.
If the squares will be used as coasters, cotton worsted yarn is a practical fiber choice because it produces a firm surface. Keep the stem, leaf and spiral fully sewn down in that application so cup bases do not catch beneath the raised details.
Conclusion
Block the white background first, then test the pumpkin position before attaching the stem, leaf and vine permanently. The 36-stitch orange appliqué should leave enough white space to keep the granny-square structure visible on all four sides. Save this pumpkin granny square crochet pattern to Pinterest with the full square photographed from above, then share the finished block on Instagram with #PumpkinLeafGrannySquare. Record the blocked measurement and yarn weight before making a second square so repeated motifs remain consistent. For this pumpkin specifically, would you keep the green spiral vine compact beside the stem or extend it farther across the white background?









