Introduction
A yarn basket fails first at the rim: once loaded with skeins, weak walls spread outward and the handles collapse. This crochet storage basket pattern counters that problem with 5 mm cotton cord, an 8 mm hook and a dense 30 cm circular base. The finished project measures about 30 × 25 cm, suits a confident beginner and provides working storage for yarn, tools or folded craft materials.
The Design: What Makes This Sage Basket Different
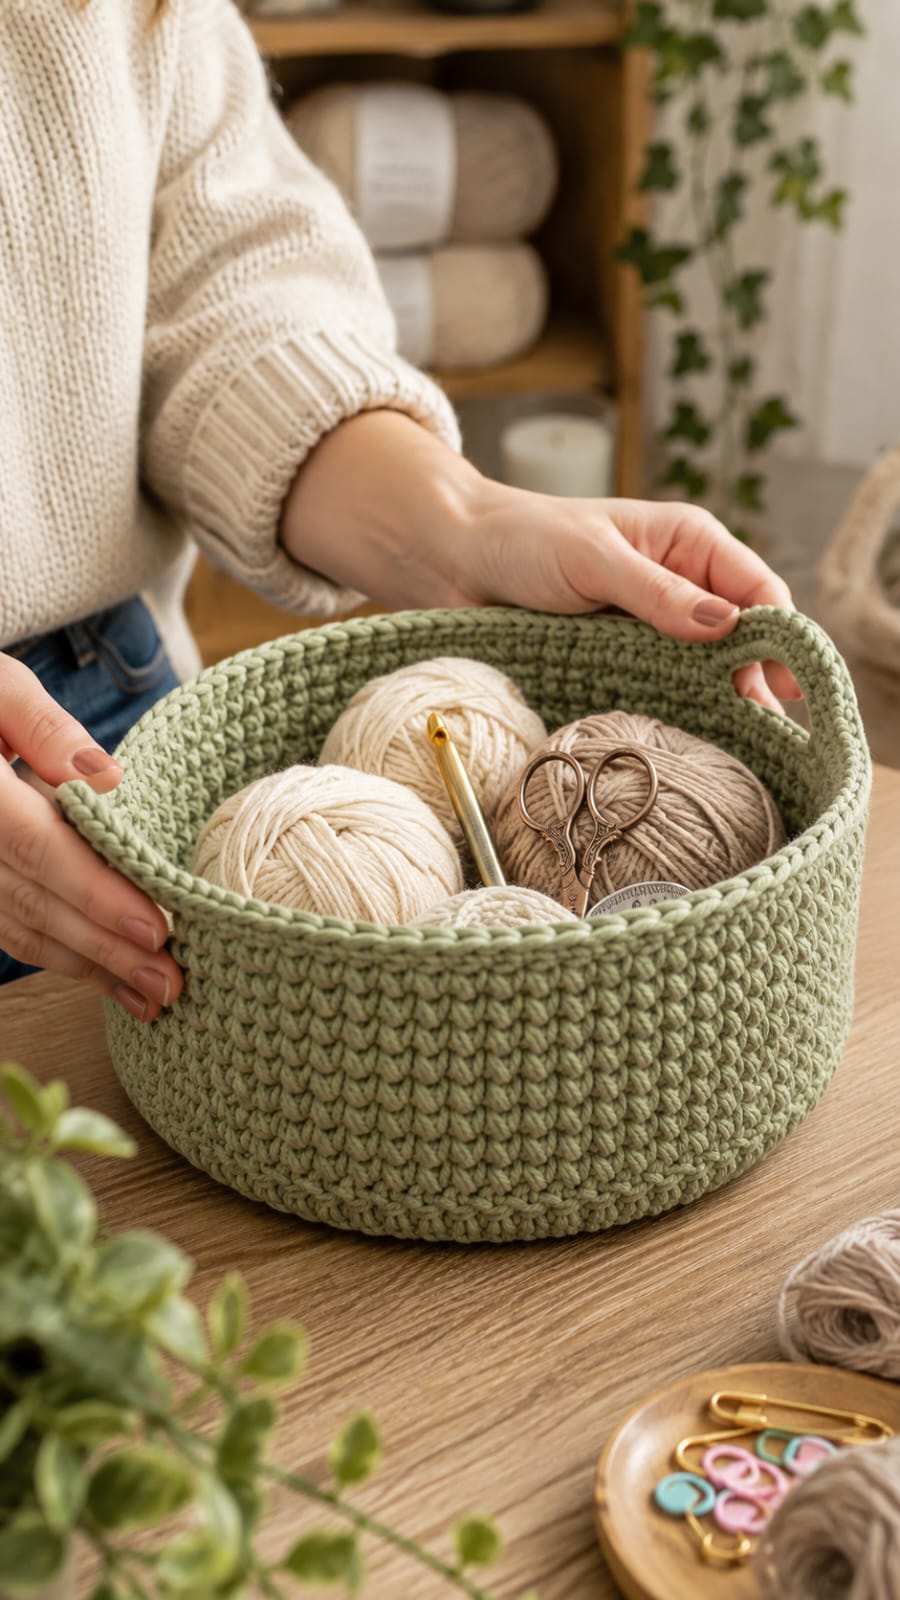
The photographed basket uses three structural ideas that matter more than decorative stitch work. First, the base is broad relative to the wall height, which lowers the center of gravity and reduces tipping. Second, a firm transition round redirects the fabric from a flat circle into vertical walls. Third, the handles are openings in the wall rather than separately sewn straps, removing two high-stress attachment points.
A round crochet basket pattern also needs controlled increase spacing. Stacking every increase directly above the previous one can make the base look polygonal; shifting some increase positions produces a smoother circle. The cotton cord crochet basket format benefits from dense stitches because loose loops produce a soft wall. A common mistake is continuing base increases after the desired diameter has been reached. The result flares instead of standing upright.
Project Info at a Glance
| Skill Level | Time | Finished Size | Hook | Best For |
|---|---|---|---|---|
| Confident beginner | 4–7 hours | 30 cm diameter × 25 cm high | 8 mm | Yarn, tools, craft storage |
The 30 cm diameter is supported by current cotton-basket dimensions and by a current 30 cm cord-basket pattern listing. Bobbiny specifies an 8–10 mm tool range for 5 mm braided cord.
Materials and Tools
Yarn
- Muted sage green — 5 mm jumbo braided cotton cord — up to 1,000 g / 200 m — Bobbiny Premium Braided Cord or similar firm cord.
- Accent yarn — none — 0 g.
The photograph is most consistent with firm cotton cord rather than ordinary worsted yarn. Standard soft yarn can produce the same shape, but the walls will have less resistance to compression.
Tools
- 8 mm crochet hook
- Locking stitch marker
- Large-eye tapestry needle
- Sharp scissors
- Flexible measuring tape
- Four removable markers for handle positioning
No stuffing or safety eyes are required.
Abbreviations
- MR — magic ring
- sc — single crochet
- ssc — split single crochet / waistcoat stitch
- inc — two single crochet in one stitch
- sl st — slip stitch
- ch — chain
- BLO — back loop only
- st / sts — stitch / stitches
- rnd — round
For a flatter decrease in other projects, an invisible decrease is made through the front loops of two adjacent stitches, but this basket does not require decreases.
Pattern — Step by Step
Work in a continuous spiral unless a round specifically says to join. Move the stitch marker after each completed round.
The base uses the standard six-point single-crochet circle principle: start with six stitches and add six stitches per increase round.
Circular Base
Yarn: sage green 5 mm braided cotton cord — construction based on standard six-point circular crochet math.
R1: 6 sc in MR (6)
R2: inc ×6 (12)
R3: (sc 1, inc) ×6 (18)
R4: (sc 2, inc) ×6 (24)
R5: (sc 3, inc) ×6 (30)
R6: (sc 4, inc) ×6 (36)
R7: (sc 5, inc) ×6 (42)
R8: (sc 6, inc) ×6 (48)
R9: (sc 7, inc) ×6 (54)
R10: (sc 8, inc) ×6 (60)
R11: (sc 9, inc) ×6 (66)
R12: (sc 10, inc) ×6 (72)
At this point, place the work on a flat table and measure across the widest point. Cord diameter, hook shape and hand tension change physical size even when stitch count stays constant.
Do not fasten off.
Wall Transition
Yarn: sage green — original transition matched to the photographed upright wall.
R13: BLO sc in every st around (72)
Working one complete round in the back loops forms a hinge at the perimeter of the base. It produces the visible lower corner without adding another piece.
Do not increase after this point.
Textured Basket Walls
Yarn: sage green — split single crochet selected to reproduce the compact V-shaped surface visible in the photo.
R14: ssc around (72)
R15: ssc around (72)
R16: ssc around (72)
R17: ssc around (72)
R18: ssc around (72)
R19: ssc around (72)
R20: ssc around (72)
R21: ssc around (72)
R22: ssc around (72)
R23: ssc around (72)
R24: ssc around (72)
Split single crochet places the hook through the center of the V rather than beneath the two upper loops. The resulting fabric is compact and more resistant to collapse than loose single crochet.
Measure the side height after R24. The handle section should begin several centimeters below the intended final rim.
Integrated Handles
Yarn: sage green — handle opening formed with a chain-and-skip method.
Place four removable markers before starting R25. Each handle occupies 10 stitch positions, with 26 stitches separating the two openings.
R25: ssc 13, ch 10, skip 10 sts, ssc 26, ch 10, skip 10 sts, ssc 13 (72 positions)
Check that both openings sit directly opposite each other before proceeding.
R26: ssc 13, sc 10 evenly across first ch-10 space, ssc 26, sc 10 across second ch-10 space, ssc 13 (72)
R27: ssc around (72)
R28: ssc around (72)
The two full rounds above the openings spread carrying force across the rim instead of concentrating it in a single chain loop.
Reinforced Top Rim
Yarn: sage green — original finish matched to the thick edge visible in the photo.
R29: sc around (72)
R30: sl st loosely in each st around (72)
Fasten off. Leave a 20 cm tail.
Pass the tail through the interior side of several dense stitches and trim only after the end is locked into the fabric.
Assembly
- Place the finished base on a flat surface and press outward from the center to check that all 12 increase rounds lie flat.
- Shape the R13 BLO transition into a clean 90-degree change between the base and the side wall.
- Work around the wall with both hands to remove local twists in the split-single-crochet columns.
- Check the first handle opening against the opposite opening and compare their widths.
- Insert four fingers through each slot and inspect the lower corners for stretched chain stitches.
- Massage R26 so the ten stitches worked over each chain space distribute evenly from corner to corner.
- Level the rim by measuring from the table to R30 at four quarter points around the basket.
- Thread the final 20 cm tail through the large-eye needle and weave it horizontally through dense interior stitches.
- Turn the basket slightly while pressing the base flat so any minor increase points redistribute around the circle.
- Load the basket with yarn balls for several hours to set the cylindrical wall shape under normal working weight.
The completed basket has one circular base, continuous walls, two integral handle openings and a reinforced upper rim.
7 Technical Tips
- Stitch-marker drift: Move the locking marker immediately after finishing each round. Losing the true first stitch by even one position per round makes the handle openings visibly offset after several wall rounds.
- Base cupping: If the base forms a bowl before R12, the working tension is too tight for the stated increase rate. Measure across the circle every two rounds and change hook size before continuing into the wall.
- Base ruffling: Extra stitches create waves that remain visible after the wall begins. The specified counts must finish at exactly 6, 12, 18, 24, 30, 36, 42, 48, 54, 60, 66 and 72 stitches.
- Loose wall fabric: A split single crochet that opens visibly around the hook produces a basket that folds when lifted. With 5 mm cord, an 8 mm hook produces a firm fabric for this design.
- Uneven handle placement: Count all 72 positions before making R25 and mark both ten-position openings first. The remaining 52 stitch positions are divided as 13 + 26 + 13, which places the handles opposite each other.
- Handle elongation: Do not stop immediately after the chain-opening round. R26 plus two additional 72-stitch rounds distribute force above the opening and reduce distortion at the upper corners.
- Visible tail: A 5 mm cord tail can work loose if it is only passed beneath one or two stitches. Weave the final 20 cm tail through several interior columns, reverse direction once, then trim close to the fabric.
Sizing Adjustments
The photographed basket is wide enough to hold several yarn balls without stacking them vertically. That proportion calls for a broad base and a wall height lower than the diameter.
To make a smaller basket, stop the circular increase sequence earlier. R10 gives 60 stitches, while R11 gives 66. Physical diameter will still depend on cord and tension.
For a larger version, add another conventional increase round after R12:
Optional R13: (sc 11, inc) ×6 (78)
The original wall-transition round would then become the following round, and every wall round would retain 78 stitches. Handle spacing must be recalculated rather than copying the 72-position layout.
Diameter is the main sizing control. Once the base reaches the required width, increases stop and the sides continue with a constant stitch count.
Yarn Choice and Structural Firmness
Five-millimeter braided cotton cord is the strongest visual match for the photograph. A firm jumbo cord gives the wall enough body to remain upright while holding yarn balls and tools.
The full 30 cm basket may approach two 100 m rolls depending on final wall height, tension and the density of the chosen cord. Buying approximately 200 m provides a practical allowance for this scale.
Ordinary acrylic worsted yarn behaves differently. It compresses more readily and may need multiple strands held together to approach the same stiffness.
Why the Handle Math Matters
Integrated handles look simple, but their placement controls how the basket hangs when loaded.
With 72 total positions and two 10-stitch openings, 52 solid positions remain. Splitting those as 13 stitches before the first opening, 26 between openings and 13 after the second opening places both slots on opposite sides of the cylinder.
The handle chain should also correspond closely to the number of skipped stitches. Too few chain stitches pull the rim inward. Too many create a loose opening.
Ten positions suit the scale of the photographed basket and leave enough solid fabric between each opening and the side curves.
Conclusion
Check the finished base diameter before committing to the wall rounds; that measurement controls the final capacity more than the stated stitch number alone. Next, mark all four handle corners before crocheting R25 so both openings stay opposite each other. Save this crochet storage basket pattern to Pinterest with a clear finished-project image, then share the completed sage version on Instagram with #SageStorageBasket. Record the cord brand, hook size and final measurements in the caption because those details help other makers compare gauge. For this specific design, would you keep the photographed low, wide profile or add more wall rounds for taller skein storage?









