Introduction
A yarn basket this large has one structural problem before the first skein goes inside: the upper third must carry its own weight without folding into the center. This large crochet yarn basket pattern uses several yarn strands held together, dense stitches and integrated handles to build a substantial storage basket about 45 cm across. The project suits an intermediate beginner and turns mixed leftover yarn into practical yarn-room storage.
The Design: What Makes This Large Yarn Basket Different
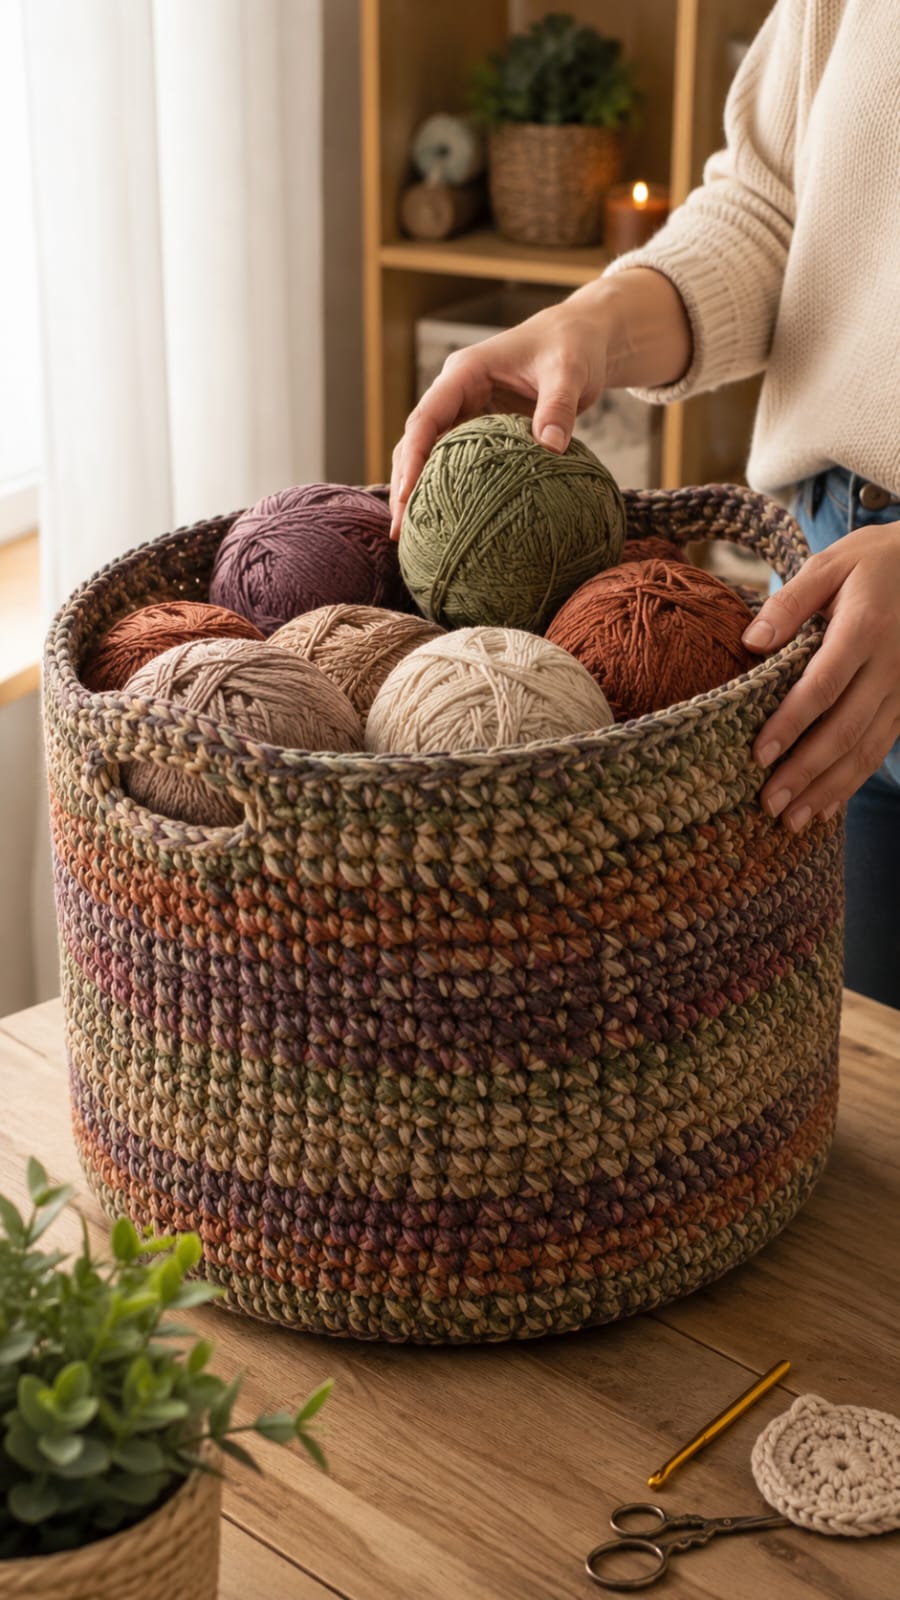
The photographed basket is taller and wider than a typical tabletop storage basket, so three construction decisions become important. The circular base needs enough diameter to support a full load of yarn without making the sides excessively tall. The wall rounds then stay at one stitch count, producing a cylinder rather than a widening bowl. Finally, each handle is formed inside the upper wall instead of being sewn on later, spreading the lifting load through several rows.
The color structure also separates this scrap yarn crochet basket from a fixed-stripe design. Olive, rust, plum, tan and neutral strands overlap rather than forming narrow isolated stripes. That mixed construction makes short yarn leftovers more useful. A common failure with a giant crochet basket is working the side fabric too loosely. At this scale, small gaps between stitches accumulate into flexible walls that buckle once the basket is loaded.
Project Info at a Glance
| Skill Level | Time | Target Size | Hook | Best For |
|---|---|---|---|---|
| Intermediate beginner | 8–12 hours | Approx. 45 cm diameter × 32–38 cm high | 7–10 mm for multistrand yarn | Yarn stash, blankets and craft supplies |
A documented giant yarn basket measures approximately 45.7 cm across and 30.5 cm high, while another large scrap-yarn basket measures about 38 cm across. The photographed basket falls visually within this large-storage category.
Materials and Tools
Yarn
- Olive green — worsted weight cotton or acrylic — approximately 200 g
- Rust — worsted weight cotton or acrylic — approximately 180 g
- Muted plum — worsted weight cotton or acrylic — approximately 180 g
- Taupe or camel — worsted weight cotton or acrylic — approximately 180 g
- Neutral brown or cream — worsted weight cotton or acrylic — approximately 150 g
Plan for roughly 850–1,000 g total yarn for a large basket at this scale. Hold three or four strands together throughout so the combined fabric behaves like super-bulky yarn. Yarn quantity changes with fiber density, wall height and hook size.
For the closest match to the photographed surface, select matte yarns in related earthy colors rather than changing from one solid stripe to another. Carrying two stable neutral strands with one changing accent strand produces blended color transitions.
Tools
- 7–10 mm crochet hook
- Large locking stitch marker
- Six removable stitch markers
- Large-eye yarn needle
- Sharp scissors
- Flexible measuring tape
Abbreviations
- MR — magic ring
- sc — single crochet
- inc — 2 single crochet in one stitch
- sl st — slip stitch
- ch — chain
- BLO — back loop only
- st — stitch
- sts — stitches
- rnd — round
An invisible decrease is worked through the front loops of two adjacent stitches, although this cylindrical basket does not require decrease rounds.
Pattern — Step by Step
Work the basket in a continuous spiral. Place a locking marker in the first stitch of every round and move it upward as each round is completed.
Hold three strands together throughout. For more color variation, keep two base strands constant for several rounds and replace the third strand whenever a new band begins.
Large Circular Base
Yarn: three strands held together. Begin with olive, tan and rust.
R1: 6 sc in MR (6)
R2: inc ×6 (12)
R3: (sc 1, inc) ×6 (18)
R4: (sc 2, inc) ×6 (24)
R5: (sc 3, inc) ×6 (30)
R6: (sc 4, inc) ×6 (36)
R7: (sc 5, inc) ×6 (42)
R8: (sc 6, inc) ×6 (48)
R9: (sc 7, inc) ×6 (54)
R10: (sc 8, inc) ×6 (60)
R11: (sc 9, inc) ×6 (66)
R12: (sc 10, inc) ×6 (72)
R13: (sc 11, inc) ×6 (78)
R14: (sc 12, inc) ×6 (84)
Measure the base after R14. The target is approximately 42–46 cm across. Yarn thickness and hand tension control the physical measurement, so stitch count alone cannot set the diameter.
If the base reaches 45 cm before R14, stop increasing at the completed round and use that stitch count for every wall round. If it remains substantially smaller, one additional increase round can be added:
Optional R15: (sc 13, inc) ×6 (90)
The base should rest flat without visible waves around the edge.
Base-to-Wall Transition
Keep the same three working strands.
R15: BLO sc around (84)
If the optional 90-stitch base round was added, work 90 stitches instead.
This back-loop round creates a defined lower corner. From this point onward, no additional increases are made.
Lower Olive and Rust Wall
Use olive, brown and rust strands together. Change only one strand at a time for a mottled result.
R16: sc around (84)
R17: sc around (84)
R18: sc around (84)
R19: sc around (84)
R20: sc around (84)
Replace the rust strand with plum after R20.
Plum Color Band
Use olive, brown and plum.
R21: sc around (84)
R22: sc around (84)
R23: sc around (84)
R24: sc around (84)
R25: sc around (84)
Keep the color change inside the basket. Do not cut every strand at the same location because three stacked joins produce a visible lump.
Central Olive and Taupe Band
Use olive, taupe and muted brown.
R26: sc around (84)
R27: sc around (84)
R28: sc around (84)
R29: sc around (84)
R30: sc around (84)
R31: sc around (84)
The basket should now begin to resemble a tall cylinder. Measure from the base transition to the current upper edge. If one section leans inward, check tension before adding further height.
Rust and Plum Upper Band
Use rust, plum and tan strands together.
R32: sc around (84)
R33: sc around (84)
R34: sc around (84)
R35: sc around (84)
R36: sc around (84)
Replace one darker strand with olive for the next section.
Upper Olive and Neutral Band
Use olive, tan and muted plum.
R37: sc around (84)
R38: sc around (84)
R39: sc around (84)
R40: sc around (84)
Before starting the handles, place the basket on a level surface. Measure its wall height at four points. Differences greater than approximately 1 cm usually indicate inconsistent stitch height or an incorrect round start.
Integrated Handles
Use a blended combination of taupe, olive and plum to match the upper rim.
The two handle openings occupy 12 stitch positions each. The remaining 60 stitches are divided as 15 stitches before the first handle, 30 stitches between the handles and 15 stitches after the second opening.
R41: sc 15, ch 12, skip 12 sts, sc 30, ch 12, skip 12 sts, sc 15 (84 positions)
Stop before R42 and check alignment. Both openings must sit directly opposite each other. Place the basket on the floor or table and view it from above rather than estimating their positions from the side.
R42: sc 15, work 12 sc evenly over first ch-12 space, sc 30, work 12 sc over second ch-12 space, sc 15 (84)
R43: sc around (84)
R44: sc around (84)
These rounds above the handle openings form the structural bridge visible in the photograph.
Reinforced Top Rim
Continue with the same three strands.
R45: sc around (84)
R46: sc around (84)
R47: sl st loosely around (84)
Fasten off and leave a 25 cm tail. Thread all strands through a large-eye needle and weave them horizontally through dense stitches on the inside of the rim.
Assembly
- Place the circular base on a flat surface and check the outer edge for waves or cupping.
- Press the BLO transition round outward to define the base-to-wall corner.
- Shape the lower wall into a cylinder without stretching individual stitches.
- Position the color-change joins toward the least visible side of the basket.
- Check both 12-stitch handle openings for equal width.
- Measure the distance between the first handle and second handle on both sides; both sections should match.
- Shape the two upper handle bridges by pressing the fabric outward rather than pulling vertically.
- Measure the top opening across two perpendicular directions to check that the rim remains circular.
- Weave every multistrand tail through at least 8–10 cm of dense interior fabric, reverse direction, then trim.
- Fill the finished basket with yarn for several hours so the walls settle under normal storage weight.
The completed basket has a wide circular base, tall multicolor walls, two integrated carrying openings and a reinforced upper edge.
7 Technical Tips
- Base ruffling: A wavy outer edge means the diameter is expanding faster than the stitch height can support. Check every round against the stated +6 progression and remove accidental increases before starting the walls.
- Base cupping: If the base rises into a bowl before the wall transition, the tension may be too tight for the hook size. Increase the hook by approximately 1 mm rather than adding random stitches.
- Weak walls: A 45 cm basket places much more fabric above the base than a small tabletop basket. Hold at least three worsted strands together and use a hook that produces dense stitches with no large spaces between them.
- Color-change lumps: Cutting all three strands on the same stitch creates a thick join. Replace one strand at a time and stagger the joins by at least 5–8 stitches.
- Handle misalignment: Mark all four corners of both openings before working R41. With 84 positions, the layout must remain 15 + 12 + 30 + 12 + 15.
- Handle stretch: A single chain round cannot carry a heavily loaded yarn basket without distortion. Work at least three full structural rounds above the opening before finishing the rim.
- Tail pullout: Short tails can escape from thick multistrand fabric when the basket flexes. Leave approximately 25 cm, weave through 8–10 cm of stitches and reverse direction before trimming.
Sizing the Large Basket
The photograph shows a storage basket intended for a substantial yarn supply rather than a single work-in-progress. Its broad base is therefore the first measurement to control.
For a smaller version, stop after R12 at 72 stitches and begin the wall transition. This reduces both diameter and yarn consumption. For a larger floor basket, continue one additional six-stitch increase round after 84 stitches and maintain the resulting 90 stitches through the walls.
Do not increase wall rounds to make the basket taller. Height comes from adding constant-count rounds. Extra increases change the shape from cylindrical to flared.
Handle dimensions should also scale with diameter. The 12-position openings in this version are intended for a large 84-stitch circumference. A smaller 72-stitch basket can use approximately 10 positions per opening instead.
How to Build the Multicolor Effect
The surface in the photo does not behave like a conventional stripe sequence. Several colors appear within the same rows, which is consistent with holding multiple yarn strands together and replacing individual strands at different points.
Start with three related colors. After four or five rounds, replace only one strand. Several rounds later, replace a second. The remaining strand connects the old and new sections, preventing an abrupt horizontal stripe.
For example, begin the lower wall with olive + tan + rust. Change to olive + tan + plum, then olive + brown + plum. Later, move toward rust + plum + tan before returning to olive near the handle section.
This method also works with leftovers of different brands. Match thickness more closely than fiber content. One unusually thin strand can be paired with another light strand so the total bundle remains close to the same diameter.
Keeping a Giant Crochet Basket Upright
Large baskets expose tension problems that remain hidden in small containers. A soft 15 cm basket can hold its shape because there is little fabric above the base. At 35 cm or more in height, the wall itself becomes a load.
Dense single crochet is the first control. Multistrand construction is the second. The third is avoiding unnecessary increases once the base is complete.
The handle section needs particular attention because skipping stitches temporarily removes part of the wall. The rounds above each opening reconnect both sides and distribute load around the upper circumference.
If the finished basket still collapses when empty, reducing hook size in a future version usually produces a firmer fabric. Changing from smooth acrylic to cotton or cotton-blend yarn can also increase structural resistance because the fabric has less spring.
Yarn Quantity and Scrap Planning
A documented 15-inch multistrand basket uses roughly 30 ounces, or about 850 g, of yarn across several colors. The taller basket shown here can require approximately 850–1,000 g depending on final height, strand thickness and gauge.
Do not divide that total equally unless a balanced stripe design is wanted. Olive and neutral browns appear most frequently in the photographed basket, so assign more yarn to those shades. Rust and plum can be treated as shorter accent sections.
A practical allocation is approximately 200 g olive, 180 g rust, 180 g plum, 180 g tan or taupe and 150–250 g mixed neutral leftovers. Small remnants can be incorporated by replacing one working strand without interrupting the other two.
Conclusion
Measure the base before starting the vertical section because diameter controls the capacity of this basket more than the number of wall rounds. Mark all four handle corners before R41, then check the openings from above before continuing. Save this large crochet yarn basket pattern to Pinterest with a full-height photo so the color transitions remain visible, and share the finished version on Instagram with #MulticolorYarnBasket. Record the final diameter, height and total yarn weight for future versions. For this specific basket, would you repeat the olive-and-rust balance shown in the photo or make plum the dominant color?









