Introduction
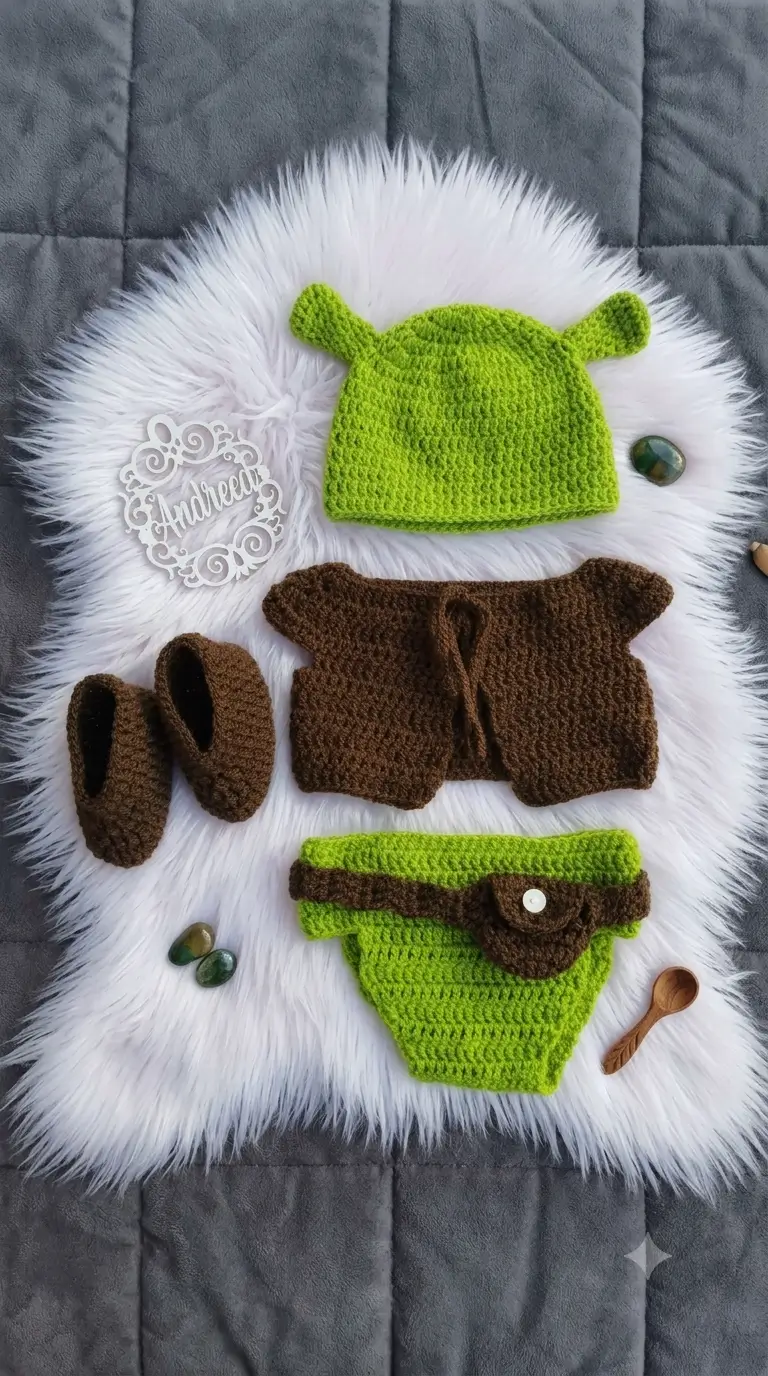
Shrek’s trumpet-shaped ears make the head silhouette identifiable before the vest, belt or face is added. This Shrek amigurumi crochet pattern builds a roughly 20 cm ogre with worsted yarn, a 3.5 mm hook and 14 mm safety eyes at intermediate level. The separate costume pieces mirror the uploaded reference and make damaged clothing replaceable without reopening the stuffed body.
The Design: What Makes This Ogre Different
The head uses a 36-stitch maximum rather than the much larger counts seen in some published Shrek patterns, keeping the proportions compatible with a 20 cm Shrek crochet doll. A broad facial plateau provides enough width for the nose, cheeks and widely spaced ears without producing a spherical head.
The ears are worked as narrow tubes with slightly expanded ends. That structure matters because flat triangular ears read as generic fantasy ears rather than the stalked ogre profile seen in the photograph. Clothing is also separated from the body: a cream torso layer sits under a brown vest, while the waist receives a removable belt and pouch. The ogre amigurumi pattern therefore keeps character anatomy and costume construction distinct. A frequent maker error is placing the ears too high; their bases should sit close to the horizontal eye line, not on the crown.
Project Info at a Glance
| Skill Level | Time | Finished Size | Hook | Best For |
|---|---|---|---|---|
| Intermediate | About 6–8 hours | Approx. 20 cm | 3.5 mm | Character display doll |
The 20 cm scale is based on a published Shrek amigurumi benchmark, while the 3.5 mm hook and worsted-yarn pairing also appears in published Shrek crochet specifications.
Materials and Tools
Yarn
- Ogre green — worsted — approximately 45 g — Paintbox Yarns Simply Aran or similar smooth acrylic/cotton blend
- Dark brown — worsted — approximately 25 g — for vest, belt, pouch and boots
- Cream — worsted — approximately 15 g — for shirt/body layer
- Black — small scrap — mouth and brows
- White — small scrap — eye detailing if required
Published Shrek patterns use several yarn weights, including DK, sport, fingering, worsted and plush yarn, so finished size changes when yarn systems are mixed.
Tools
- 3.5 mm crochet hook
- 14 mm safety eyes
- Polyester stuffing
- Tapestry needle
- Locking stitch marker
- Scissors
- Sewing pins
- One small white button, approximately 8–10 mm, for the pouch flap if the doll is display-only
Safety eyes and buttons are unsuitable for an item intended for a child under three. Use embroidered details instead.
Abbreviations
- MR — magic ring
- sc — single crochet
- inc — 2 sc in one stitch
- dec — single-crochet decrease
- sl st — slip stitch
- ch — chain
- BLO — back loop only
- hdc — half double crochet
For an invisible decrease, insert the hook through the front loops of the next two stitches, yarn over, draw through both front loops, then complete one single crochet.
Pattern — Step by Step
Work stuffed sections in a continuous spiral unless a row or joined round is specifically stated. The following instructions use an original 36-stitch medium-size construction.
Head
Yarn: green — 36-stitch medium amigurumi math.
R1: 6 sc in MR (6)
R2: inc ×6 (12)
R3: (1 sc, inc) ×6 (18)
R4: (2 sc, inc) ×6 (24)
R5: (3 sc, inc) ×6 (30)
R6: (4 sc, inc) ×6 (36)
R7–R13: 36 sc (36)
R14: (4 sc, dec) ×6 (30)
R15: 30 sc (30)
Place the 14 mm eyes between R10 and R11 with approximately 7 stitches visible between the inner edges. Add stuffing before the opening becomes narrow.
R16: (3 sc, dec) ×6 (24)
R17: (2 sc, dec) ×6 (18)
R18: (1 sc, dec) ×6 (12)
R19: dec ×6 (6)
Fasten off. Close the remaining opening and hide the tail.
Body
Yarn: cream, changing to green at the lower torso.
R1: 6 sc in MR (6)
R2: inc ×6 (12)
R3: (1 sc, inc) ×6 (18)
R4: (2 sc, inc) ×6 (24)
R5: (3 sc, inc) ×6 (30)
R6: (4 sc, inc) ×6 (36)
R7–R10: 36 sc (36)
R11: BLO 36 sc (36)
R12–R14: 36 sc (36)
R15: (4 sc, dec) ×6 (30)
R16: 30 sc (30)
R17: (3 sc, dec) ×6 (24)
R18: 24 sc (24)
R19: (2 sc, dec) ×6 (18)
R20: (1 sc, dec) ×6 (12)
R21: dec ×6 (6)
Stuff firmly enough to support the head without stretching the stitch openings.
Fasten off. Leave a 25 cm tail for attachment.
Arms — Make 2
Yarn: green for hands, cream for sleeves.
R1: 6 sc in MR (6)
R2: inc ×6 (12)
R3–R4: 12 sc (12)
R5: change to cream, 12 sc (12)
R6–R11: 12 sc (12)
Stuff only the lower two-thirds. Leave the shoulder end flatter for sewing.
Flatten the opening and work 6 sc through both layers (6). Fasten off, leaving a 20 cm tail.
Back Legs — Make 2
Yarn: green upper leg, dark brown boot.
R1: 6 sc in MR (6)
R2: inc ×6 (12)
R3: (1 sc, inc) ×6 (18)
R4–R6: 18 sc (18)
R7: change to dark brown, 18 sc (18)
R8–R11: 18 sc (18)
R12: (1 sc, dec) ×6 (12)
R13: 12 sc (12)
R14: dec ×6 (6)
Stuff through R11. Fasten off and close.
Ogre Ears — Make 2
Yarn: green.
R1: 6 sc in MR (6)
R2–R5: 6 sc (6)
R6: inc ×6 (12)
R7–R8: 12 sc (12)
Do not stuff the base. Place a small amount of filling in the rounded end only.
Fasten off. Leave a 20 cm sewing tail.
Ogre Snout
Yarn: green.
R1: 6 sc in MR (6)
R2: inc ×6 (12)
R3: (1 sc, inc) ×6 (18)
R4: 18 sc (18)
R5: (1 sc, dec) ×6 (12)
Stuff lightly so the snout stays oval rather than spherical.
Fasten off. Leave 20 cm for sewing.
Cheek Patches — Make 2
Yarn: green.
R1: 6 sc in MR (6)
R2: inc ×6 (12)
Sl st to the next stitch. Fasten off with a 15 cm tail. Keep each patch unstuffed.
Brown Vest
Yarn: dark brown.
Ch 31.
Row 1: sc in second ch from hook and across (30)
Rows 2–5: ch 1, turn, 30 sc (30)
Row 6: ch 1, turn, 7 sc, ch 6 and skip 6, 4 sc, ch 6 and skip 6, 7 sc (30 positions)
Row 7: ch 1, turn, 30 sc across stitches and chains (30)
Rows 8–9: ch 1, turn, 30 sc (30)
Fasten off.
Fold the rectangle around the torso so approximately 5–6 stitches sit on each front side and the arm openings line up with the shoulders. Tack the lower corners to stop the vest from rotating.
Boot Cuffs — Make 2
Yarn: dark brown.
Ch 19. Join without twisting.
R1: 18 sc around (18)
R2–R3: 18 sc (18)
Fasten off. Slide a cuff over each leg where green meets brown, then tack at four evenly spaced points.
Green Waist Cover
Yarn: green.
Ch 31.
Row 1: sc in second ch from hook and across (30)
Rows 2–4: ch 1, turn, 30 sc (30)
Row 5: ch 1, turn, dec, 26 sc, dec (28)
Row 6: ch 1, turn, dec, 24 sc, dec (26)
Row 7: ch 1, turn, dec, 22 sc, dec (24)
Rows 8–9: ch 1, turn, 24 sc (24)
Fasten off. Wrap the wider edge around the waist with a short overlap at the back.
Belt
Yarn: dark brown.
Ch 37.
Row 1: sc in second ch from hook and across (36)
Row 2: ch 1, turn, 36 sc (36)
Fasten off. Fit around the waist cover and sew the ends together at the back.
Belt Pouch
Yarn: dark brown.
R1: 6 sc in MR (6)
R2: inc ×6 (12)
R3: (1 sc, inc) ×6 (18)
Fold approximately the upper third downward to create the flap. Sew the lower semicircle to the front of the belt. Add an embroidered white dot or securely sewn button only when the doll is intended for display.
Assembly
- Sew the head to the body through the 12-stitch neck area, making two full passes around the seam.
- Position the body so the cream torso faces forward and the waist-cover join remains at the back.
- Sew the snout centrally below the eyes; its upper edge should sit about one round below the eye line.
- Place one cheek patch on each side of the snout, then embroider the mouth and brows with black yarn.
- Pin the arms at the upper body and sew them through both the cream torso fabric and underlying stuffed body.
- Attach both legs under the body with their boot sections facing forward; compare foot angle before tightening the seams.
- Sew the ears to opposite sides of the head near the eye line, angling each stalk slightly upward rather than vertically.
- Fit the brown vest over the torso, pass the arms through the openings and tack the vest at the shoulders and lower back.
- Wrap on the green waist cover, add the brown belt, then sew the pouch at the center front.
- Weave every structural tail at least 3 cm through the stuffed interior before trimming, then reshape the head, ears and boots by hand.
The completed figure should measure roughly 20 cm when worked with worsted yarn and the stated hook size.
7 Technical Tips
- Marker drift: A misplaced first-stitch marker shifts the facial center by one stitch every round. Move the marker after completing each round rather than before beginning the next one.
- Stuffing firmness: Overfilling the 36-stitch head can expose polyester between the stitches. Stop adding fiber when the surface is firm but a fingertip can still compress it by roughly 5 mm.
- Invisible decrease: A conventional two-loop decrease creates visible horizontal bars on the closing rounds. Work through front loops only on R16–R19 of the head.
- Eye-placement timing: Locking 14 mm eyes after R17 leaves too little access for the washers. Fit them after R15 at the latest and measure the eye line before pressing the backs on.
- Tension: Loose worsted stitches can increase the finished size and expose stuffing. If fiber shows through a 36-stitch circumference, change to a 3.25 mm hook instead of pulling each stitch excessively tight.
- Pinning: One ear sewn 5 mm higher than the other is conspicuous because the stalks extend laterally from the head. Measure from the eye line to both ear bases before sewing.
- Tail weaving: A vest or belt tail hidden for only one or two stitches can work free during handling. Run each finishing tail through at least 3 cm of same-color fabric, reverse direction once, then trim.
Conclusion
Check the ear angle, eye spacing and belt position before making the last sewing pass; those three measurements control most of the character recognition in this build. Photograph the finished doll from the front and side so the 36-stitch head proportions can be compared before changing yarn weight or hook size. Save the finished Shrek amigurumi crochet pattern project to Pinterest and post the completed version on Instagram with #ShrekOgreAmigurumi. For the next version, record actual yarn consumption by color. Which ear shape works better on your doll: a nearly horizontal stalk like the photographed hat, or a slightly upward angle?









