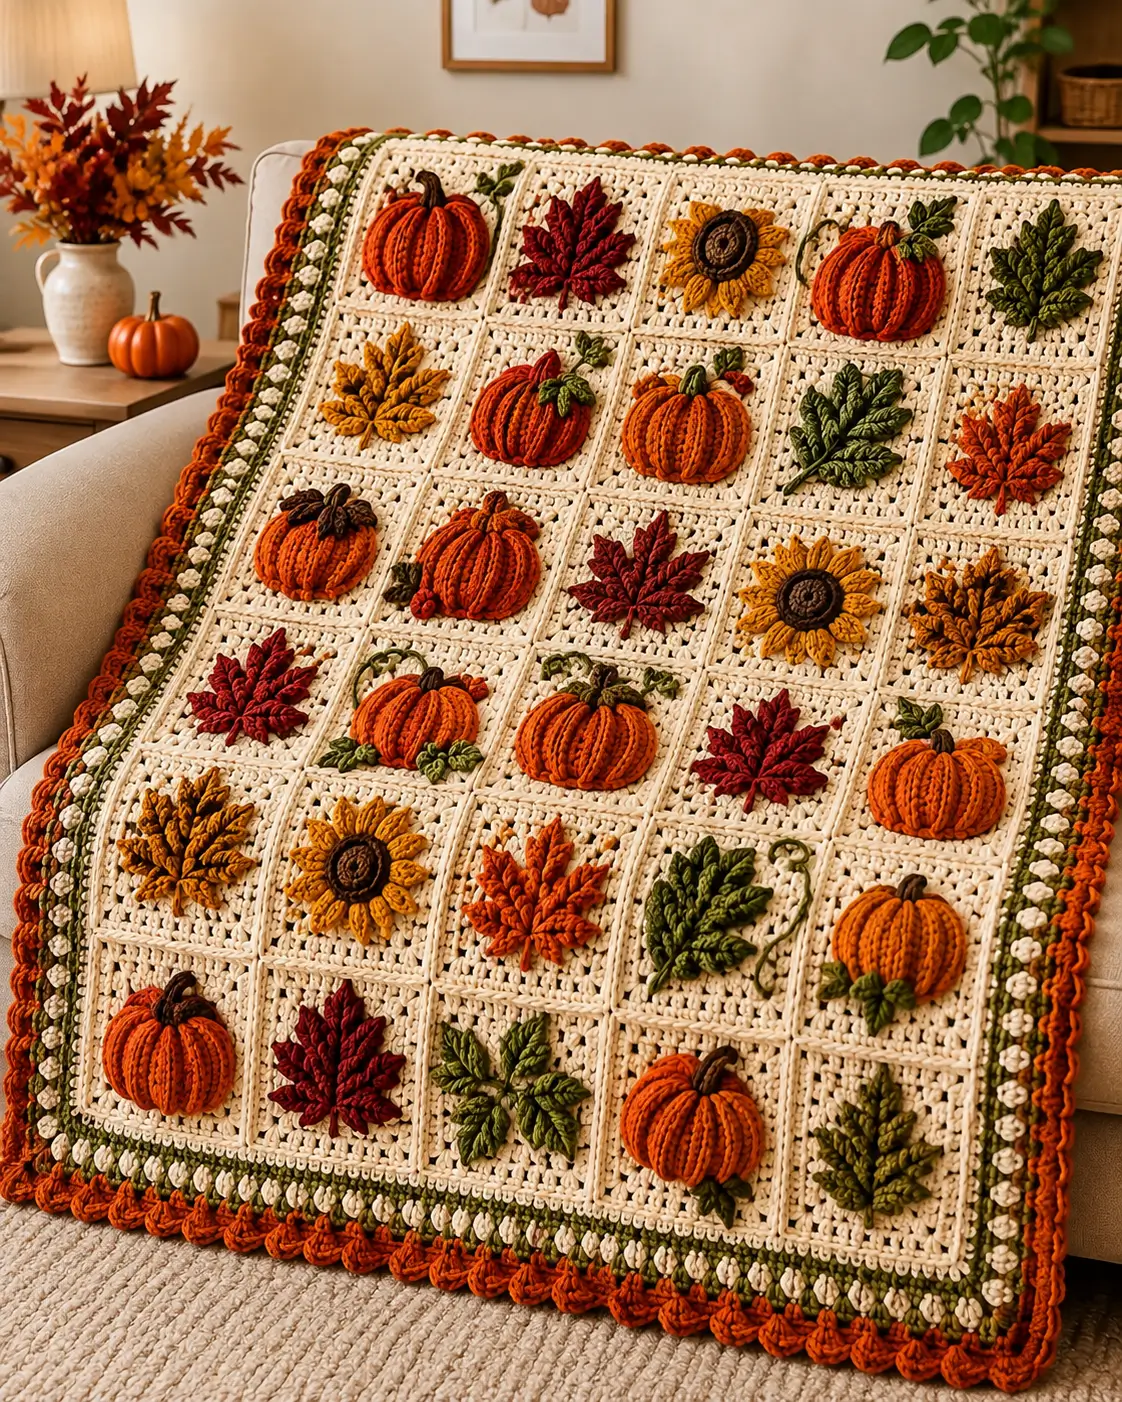
A pumpkin loses its identity fast when its ribs disappear against a flat crochet square. This crochet pumpkin blanket pattern solves that problem with raised ribbed appliqués mounted on 30 cream panels. Work it in Aran or worsted yarn with 6.5 mm and 4 mm hooks, targeting throw size and intermediate construction. Modular squares also let you replace one damaged seasonal motif without rebuilding the blanket.
The Design: What Makes This Harvest Blanket Different
Three structural choices matter. First, the pumpkins are made as shallow ribbed forms rather than plain orange circles. Vertical ridges preserve the segmented shape after each piece is stitched to the background.
Second, flatter leaves and sunflowers alternate with the dimensional pumpkins. That controls bulk. If every square carried a stuffed motif, the finished throw would become heavy and difficult to fold.
Third, the layout is intentionally irregular. Twelve pumpkins dominate the 5 × 6 grid, but burgundy maple leaves, mustard foliage, green branches, and three sunflowers interrupt the repetition. This creates a stronger fall crochet blanket pattern than a strict checkerboard.
A frequent mistake in pumpkin appliqué crochet is sewing every edge down under tension. That flattens the ribs and pulls the square into a shallow bowl.
Project Info at a Glance
| Skill Level | Time | Finished Size | Hook | Best For |
|---|---|---|---|---|
| Intermediate | 30–45 hours | Approx. 122 × 140 cm | 6.5 mm squares; 4 mm motifs | Sofa throw, seasonal display |
The 122 × 140 cm figure is based on a comparable published pumpkin throw rather than an exact measurement extracted from the photograph.
Materials and Tools
Yarn
- Vanilla cream — Aran / worsted — up to 800 g benchmark
- Burnt orange — Aran / worsted — 200–300 g planning allowance for 12 raised pumpkins and edging
- Olive green — Aran / worsted — up to 200 g
- Burgundy / red wine — Aran / worsted — up to 200 g
- Mustard yellow — Aran / worsted — up to 200 g
- Dark brown — Aran / worsted — small quantity for pumpkin stems and sunflower centers
Tools
- 6.5 mm crochet hook for the cream squares
- 4.0 mm crochet hook for appliqués
- Tapestry needle
- Locking stitch markers
- Scissors
- Dressmaking pins
- Measuring tape
- Small amount of polyester filling for shallow pumpkin shaping
- Blocking mats and pins
No safety eyes are required for the photographed motif set.
Abbreviations
- MR — magic ring
- sc — single crochet
- hdc — half double crochet
- dc — double crochet
- tr — treble crochet
- inc — 2 stitches in one stitch
- dec — single-crochet decrease
- sl st — slip stitch
- ch — chain
- BLO — back loop only
- st/sts — stitch/stitches
- sp — space
An invisible decrease is worked through the front loops of the next two stitches before completing one single crochet, reducing visible bulk on shaped crochet.
Pattern — Step by Step
This is an original image-matched construction rather than a transcription of any linked commercial or free pattern.
Cream Background Square — Make 30
Yarn: vanilla cream. Use the 6.5 mm hook.
R1: MR, ch 3, 2 dc, ch 2, [3 dc, ch 2] ×3 in ring, sl st to top of starting ch.
R2: Sl st to first corner sp, ch 3, 2 dc, ch 2, 3 dc in same corner; ch 1, (3 dc, ch 2, 3 dc) in next corner around; ch 1 and join.
R3: Sl st to corner, work (3 dc, ch 2, 3 dc) in corner; ch 1, 3 dc in side sp, ch 1. Repeat around.
R4: Continue the same granny-square structure, adding one 3-dc side cluster per side.
R5: Repeat the same structure.
R6: Repeat once more.
R7: Ch 1, sc in every dc and ch-1 sp; work (2 sc, ch 2, 2 sc) in each corner.
Fasten off. Block every square to the same measurement before appliqués are mounted.
Raised Ribbed Pumpkin — Make 12
Yarn: burnt orange. Use the 4 mm hook.
Row 1: Ch 17. Sc in second ch from hook and across (16).
Rows 2–22: Ch 1, turn, sc BLO across (16).
Fasten off with a 35 cm tail.
Bring Row 1 and Row 22 together and whipstitch the short edges. Run the needle through the row ends along one long edge and pull to gather. Place a very small amount of filling behind the center, flattening the piece into a shallow oval rather than a ball.
Gather the second edge until the pumpkin measures roughly 11–13 cm across. Stitch through the center from top to bottom two or three times to deepen the lobes.
Pumpkin Stem — Make 12
Yarn: dark brown.
Row 1: Ch 6. Sc in second ch and next 4 ch (5).
Row 2: Ch 1, turn, sl st in first st, sc in next 3 sts, sl st in last st (5).
Fasten off with a 15 cm sewing tail. Attach each stem at the top center of a pumpkin before the pumpkin is mounted.
Pumpkin Leaf and Vine — Make 6–8 Sets
Yarn: olive green.
Leaf: Ch 7. Sl st in second ch, sc, hdc, dc, hdc, 3 sc in final ch. Rotate. Hdc, dc, hdc, sc, sl st along the second side.
Vine: Continue with ch 16. Work 2 sc in each of the next 10–12 chains so the chain curls naturally.
Fasten off. Position leaves at slightly different angles rather than duplicating every pumpkin.
Burgundy Maple Leaf — Make 5
Yarn: burgundy.
R1: MR, ch 1, 6 sc in ring (6).
R2: Inc ×6 (12).
Do not fasten off. Work five lobes around the perimeter.
Lobe 1: Ch 5, sl st in second ch, sc, hdc, dc, sl st into next base st.
Repeat the lobe sequence four more times, spacing attachment points around the circle.
For the two upper side lobes, use ch 6 and add one tr before returning to the base.
Stem: Ch 8, sl st back down the chain.
Fasten off with a 25 cm tail.
Golden Pointed Leaf — Make 3
Yarn: mustard gold.
Row 1: Ch 14.
Beginning in second ch from hook: sl st, sc, hdc, dc in next 2, tr in next 3, dc in next 2, hdc, sc, 3 sc in final ch.
Rotate the chain and mirror the stitch sequence on the second side.
Fasten off. Use surface slip stitches from base to tip to form a visible midrib.
Rust Leaf — Make 2
Work the Golden Pointed Leaf pattern in rust-orange yarn.
For a broader tip, replace the final 3 sc with 5 sc in the terminal chain. This produces a visibly different silhouette.
Sunflower — Make 3
Yarn: dark brown and mustard.
Center
R1: 6 sc in MR (6).
R2: Inc ×6 (12).
R3: [sc, inc] ×6 (18).
R4: [2 sc, inc] ×6 (24).
Fasten off.
Petals
Join mustard yarn to any center stitch.
Petal 1: Ch 6, sl st in second ch, sc, hdc, dc, tr; sl st into the next center stitch.
Repeat around, placing approximately 12 petals evenly around the center.
Fasten off. Pin the sunflower before sewing so the petal tips remain radial.
Green Foliage Cluster — Make 5
Each cluster contains five small leaves.
Small Leaf — Make 25
Ch 9.
Starting in second chain: sl st, sc, hdc, dc, hdc, sc, sl st, 3 sc in final chain.
Rotate and mirror the sequence on the opposite side.
Fasten off with a sewing tail.
Arrange five leaves around a central stem. The upper leaf points nearly vertical; the lower four angle outward in pairs. Add a chain-stitch vine to two of the five clusters.
Square Layout
Before attaching anything, place all 30 cream squares in a 5 × 6 grid.
| Row | 1 | 2 | 3 | 4 | 5 |
|---|---|---|---|---|---|
| 1 | Pumpkin | Burgundy maple | Sunflower | Pumpkin | Green foliage |
| 2 | Gold leaf | Pumpkin | Pumpkin | Green foliage | Rust leaf |
| 3 | Pumpkin | Pumpkin | Burgundy maple | Sunflower | Gold leaf |
| 4 | Burgundy maple | Pumpkin | Pumpkin | Burgundy maple | Pumpkin |
| 5 | Gold leaf | Sunflower | Rust leaf | Green foliage | Pumpkin |
| 6 | Pumpkin | Burgundy maple | Green foliage | Pumpkin | Green foliage |
This arrangement uses 12 pumpkins, 3 sunflowers, and 15 leaf or foliage squares.
Joining the Squares
Use cream yarn and the 6.5 mm hook.
Place two squares wrong sides together. Work a loose slip-stitch seam through corresponding outer loops. Join all five squares in each row first, then join the six completed strips vertically.
Do not pull the joining yarn tighter than the square edge. Tight seams shorten the grid and can make the blanket curl inward.
Green Inner Border
Join olive yarn at any corner.
R1: Sc evenly around the entire rectangle, placing 3 sc in each corner.
R2: Ch 1, sc around; place 3 sc in each corner.
Fasten off.
Cream Textured Border
Join cream yarn.
R1: Ch 1, sc around, 3 sc per corner.
R2: Sc in next st, ch 1, skip 1 st. Repeat around, adjusting by one stitch near a corner when required.
R3: Sc in every sc and ch-1 sp, 3 sc per corner.
Fasten off.
Orange Scalloped Outer Border
Join burnt orange yarn.
R1: Sc evenly around.
R2: Skip 1 st, 5 dc in next st, skip 1 st, sl st in next st. Repeat along each side.
At each corner, work a 7-dc shell rather than a 5-dc shell so the edging turns without cupping.
Fasten off and weave in the final tail for at least 8 cm through the reverse side of the border.
Assembly
- Block all 30 cream squares to one measurement before arranging the grid.
- Form each orange pumpkin, add its shallow filling, and attach the brown stem.
- Pin the 12 pumpkins to their designated squares with the lower edge approximately 3–4 cm above the square edge.
- Sew around each pumpkin at the perimeter only; avoid stitching through every rib.
- Mount the three sunflowers and stitch around their centers before tacking selected petal tips.
- Attach burgundy, mustard, rust, and green foliage motifs with their central veins vertical or slightly angled.
- Arrange all 30 finished blocks in the 5 × 6 layout and check that no three identical motif colors form an unintended diagonal.
- Join the squares horizontally, then connect the six completed rows.
- Work the olive, cream, and orange border layers after the entire rectangle lies flat.
- Weave every sewing tail through at least three stitch directions on the reverse and trim only after the blanket has been blocked.
The completed piece contains 30 modular autumn panels with raised pumpkins distributed across all six rows.
7 Technical Tips
- Square-size drift: A 5 mm difference per block becomes a 25 mm difference across five columns. Block all 30 squares to one template before joining them.
- Pumpkin collapse: Excessive perimeter stitching crushes the vertical ribs. Anchor the appliqué every 1.5–2 cm around the outer edge and leave the raised ridges free.
- Overstuffed pumpkins: A pumpkin thicker than roughly 2.5–3 cm can pull the cream square forward. Add only enough filling to hold the curved face.
- Sunflower distortion: Sewing every petal tip can twist the flower center. Secure the brown disk first, then tack only four to six petal tips.
- Leaf rotation: A maple leaf sewn 90 degrees off-axis reads like a generic flower. Mark the stem position with a locking marker before pinning the motif.
- Join tension: A tight slip-stitch seam can shorten a 22 cm block by more than 5 mm. Compare each completed join with an unseamed square before continuing the row.
- Tail failure: Short border tails can work loose after repeated folding. Leave at least 12 cm before weaving through three changing directions on the reverse.
Conclusion
Finish the blanket by checking three measurements: square width, total seam length, and border depth. Those numbers control whether the final rectangle hangs flat more reliably than adding another decorative round. Photograph the finished crochet pumpkin blanket pattern square-on before folding it, then save the project to Pinterest and share the motif layout on Instagram with #AutumnPumpkinAppliqueBlanket. Your next practical step is to crochet one cream test square and one ribbed pumpkin, block both, and confirm that the pumpkin occupies roughly two-thirds of the square width. Which motif would you place beside the top-left pumpkin: the burgundy maple leaf or the mustard sunflower?









