Introduction
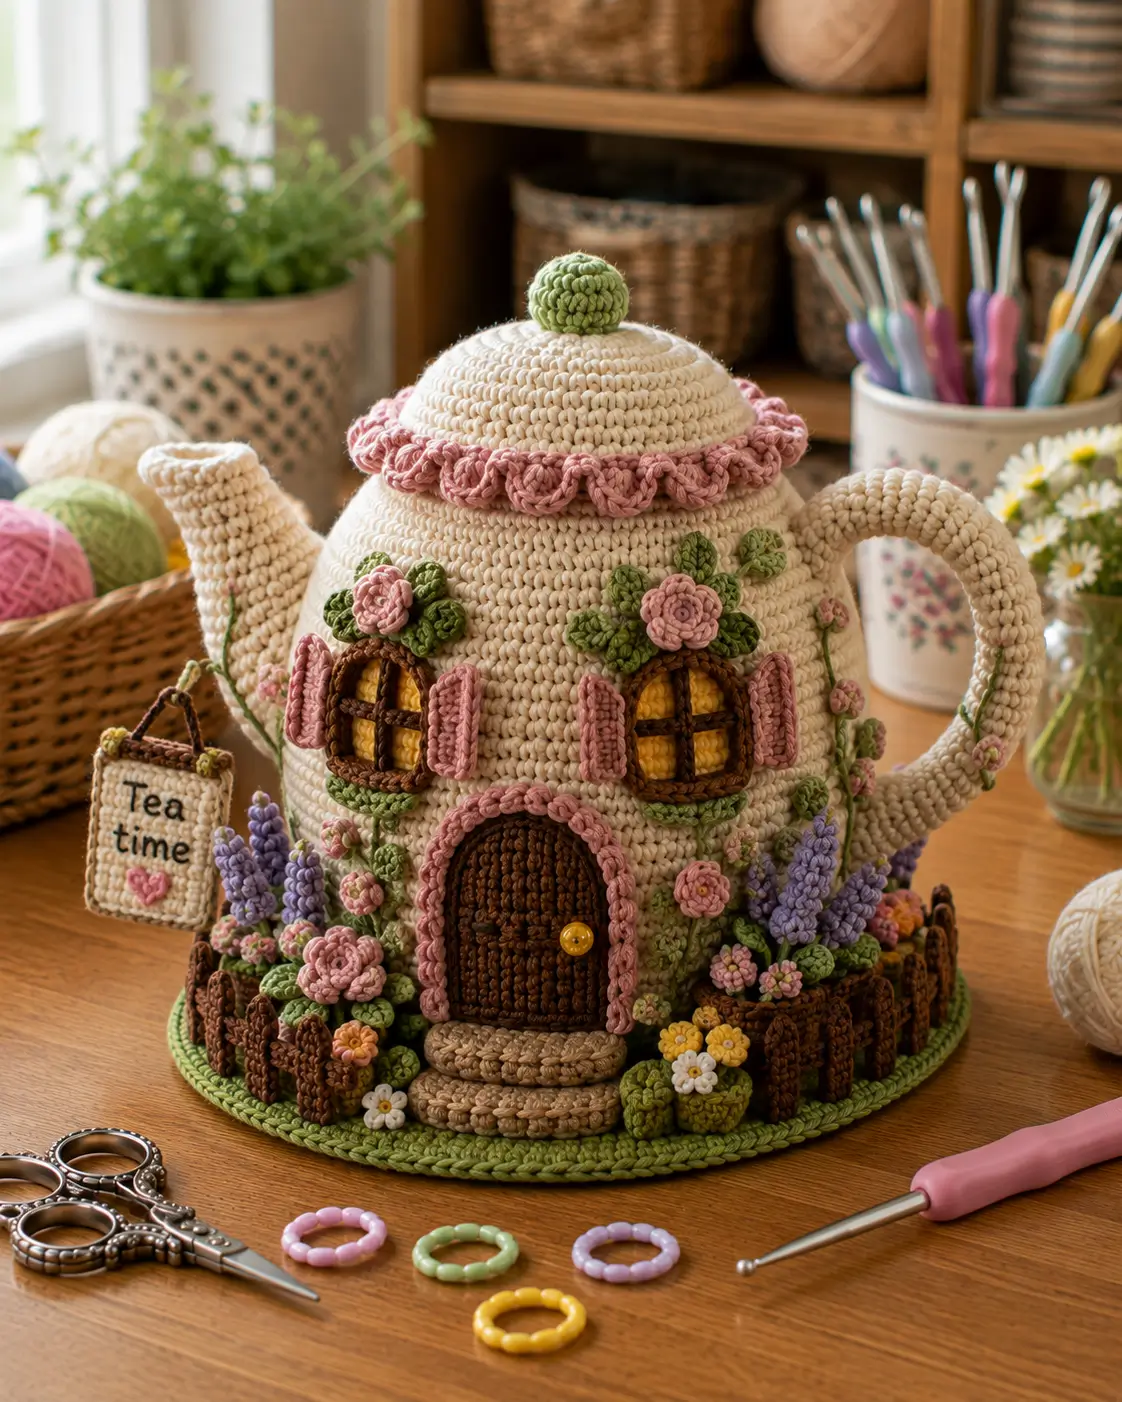
A cottage door can be moved two stitches, but a teapot spout attached at the wrong angle can tip the entire house sideways. This crochet teapot cottage pattern uses DK-to-light-worsted cotton with 3.5 mm and 3 mm hooks to make an approximately 21–23 cm decorative house. A cream teapot body, pink trim, floral garden, windows and fenced base create an intermediate-to-advanced display project.
The Design: What Makes This Teapot Cottage Different
The teapot silhouette controls every structural decision. A 42-stitch body gives the front enough width for two windows, an arched door and dense flower beds, while the spout and handle are attached on opposing sides to balance their visual weight. The lid stays separate in appearance and gains a dusty-pink scalloped edge, which distinguishes it from the cream body without turning it into a conventional roof. Below, a green circular mat carries the fence, lavender spikes and miniature flowers rather than attaching every decoration directly to the teapot. This teapot fairy house crochet design also includes a hanging sign beneath the spout. One common mistake is sewing the handle only to the outer body stitches; a long arched tube needs broad upper and lower attachment zones or it gradually leans away from the cottage.
Project Info at a Glance
| Skill Level | Time | Finished Size | Hooks | Best For |
|---|---|---|---|---|
| Intermediate–Advanced | 18–24 hours | Approx. 21–23 cm high × 26–28 cm wide | 3.5 mm structure / 3.0 mm decorations | Fairy-house displays, cottagecore décor and miniature crochet collections |
Materials and Tools
Yarn
- Warm cream — DK / light worsted cotton — approximately 180–220 g — teapot body, lid, spout, handle and sign.
- Leaf green — DK / light worsted cotton — approximately 90–120 g — base, vines, leaves, lid knob and garden foliage.
- Dark chocolate brown — DK / light worsted cotton — approximately 45–55 g — door, window frames, fence and sign cord.
- Tan — DK / light worsted cotton — approximately 25–35 g — steps and selected trim.
- Dusty pink — DK / light worsted cotton — approximately 45–60 g — lid edging, shutters, door arch and flowers.
- Lavender purple — DK cotton — approximately 15–20 g — tall flower spikes.
- Golden yellow — DK cotton — approximately 5–8 g — window interiors and flower centers.
- White — DK cotton — approximately 5 g — small flowers and sign surface details.
Tools
- 3.5 mm crochet hook for body, lid, spout, handle and base
- 3.0 mm crochet hook for door, windows, flowers, fence and sign
- Polyester fiberfill
- Long tapestry needle
- Standard yarn needle
- Stitch markers
- Dressmaking pins
- Scissors
- Measuring tape
- Optional plastic canvas or firm felt for the garden base
- Small yellow button for the door knob if preferred
Abbreviations
- MR — magic ring
- sc — single crochet
- inc — increase
- dec — decrease
- sl st — slip stitch
- ch — chain
- hdc — half double crochet
- dc — double crochet
- tr — treble crochet
- BLO — back loop only
An invisible decrease is worked through the front loops of the next two stitches before completing one single crochet through both loops.
Pattern — Step by Step
The cottage is a decorative stuffed structure rather than a cover for a working teapot. Work the large round pieces in continuous spirals unless a joined round or row is specifically stated.
Main Teapot Cottage Body
Yarn: warm cream — Source: original reconstruction using standard six-stitch amigurumi math.
R1: 6 sc in MR (6)
R2: inc ×6 (12)
R3: (sc, inc) ×6 (18)
R4: (2 sc, inc) ×6 (24)
R5: (3 sc, inc) ×6 (30)
R6: (4 sc, inc) ×6 (36)
R7: (5 sc, inc) ×6 (42)
R8: sc around (42)
R9: sc around (42)
R10: sc around (42)
R11: sc around (42)
R12: sc around (42)
R13: sc around (42)
R14: sc around (42)
R15: sc around (42)
R16: sc around (42)
R17: sc around (42)
R18: sc around (42)
R19: sc around (42)
R20: sc around (42)
R21: (5 sc, dec) ×6 (36)
R22: sc around (36)
R23: (4 sc, dec) ×6 (30)
R24: (3 sc, dec) ×6 (24)
R25: (2 sc, dec) ×6 (18)
R26: (sc, dec) ×6 (12)
R27: dec ×6 (6)
Stuff firmly through the lower half and moderately near the top. Keep the front face smooth enough for architectural appliqués.
Fasten off and close the final six stitches.
Domed Lid
Yarn: warm cream — Source: standard amigurumi expansion.
R1: 6 sc in MR (6)
R2: inc ×6 (12)
R3: (sc, inc) ×6 (18)
R4: (2 sc, inc) ×6 (24)
R5: (3 sc, inc) ×6 (30)
R6: (4 sc, inc) ×6 (36)
R7: sc around (36)
R8: sc around (36)
R9: sc around (36)
R10: (4 sc, dec) ×6 (30)
R11: sc around (30)
Fasten off with a 40 cm sewing tail.
Add a shallow layer of stuffing so the dome holds its curve without becoming spherical.
Pink Lid Scallops
Yarn: dusty pink.
Join pink yarn to the final lid round.
Repeat around:
sl st in next stitch, 5 dc in next stitch, sl st in next stitch.
Adjust the last repeat by one stitch if necessary.
Fasten off.
Green Lid Knob
Yarn: leaf green.
R1: 6 sc in MR (6)
R2: inc ×6 (12)
R3: (sc, inc) ×6 (18)
R4: sc around (18)
R5: (sc, dec) ×6 (12)
R6: dec ×6 (6)
Add a small amount of stuffing.
Fasten off with a 20 cm tail and sew to the center of the lid.
Curved Spout
Yarn: warm cream — Source: original tapered tube reconstruction.
R1: 6 sc in MR (6)
R2: sc around (6)
R3: (2 sc, inc) ×2 (8)
R4: sc around (8)
R5: (3 sc, inc) ×2 (10)
R6: sc around (10)
R7: (4 sc, inc) ×2 (12)
R8: sc around (12)
R9: sc around (12)
R10: (5 sc, inc) ×2 (14)
R11: sc around (14)
R12: sc around (14)
R13: (6 sc, inc) ×2 (16)
R14: sc around (16)
R15: (7 sc, inc) ×2 (18)
R16: sc around (18)
R17: sc around (18)
R18: sc around (18)
Stuff lightly from the tip downward.
Bend the spout upward while stuffing.
Fasten off with a 45 cm tail.
Shape the Spout Curve
Thread cream yarn from the lower inside edge to approximately R7.
Take one concealed internal stitch spanning about 4–5 cm.
Pull until the tip curves upward without folding.
Secure inside the broad base.
Large Teapot Handle
Yarn: warm cream — Source: original 12-stitch tubular handle.
R1: 6 sc in MR (6)
R2: inc ×6 (12)
R3–R50: sc around (12)
Do not stuff the complete tube densely.
Add thin rolls of fiberfill every few centimeters so the handle bends into a smooth arch.
Fasten off with a 50 cm tail.
Shape the Handle
Curve the tube into a broad upside-down U.
Target approximately 14–16 cm from the lower attachment to the highest point.
Pin both ends to the body before sewing.
The upper attachment should sit just below the lid line.
Arched Cottage Door
Yarn: dark chocolate brown.
Ch 15.
Row 1: starting in second chain, 14 sc. (14)
Rows 2–12: ch 1, turn, sc across. (14)
Row 13: dec, 10 sc, dec. (12)
Row 14: dec, 8 sc, dec. (10)
Row 15: dec, 6 sc, dec. (8)
Row 16: dec, 4 sc, dec. (6)
Fasten off.
Surface slip stitch several vertical brown lines over the door to suggest timber planks.
Pink Door Arch
Yarn: dusty pink.
Ch enough to follow both vertical door sides and the upper arch, approximately 44 chains.
Starting in the second chain, hdc back across.
Fasten off with a long sewing tail.
Pin around the door and sew through the center of the trim strip.
Door Knob
Work 6 sc in MR with golden yellow.
Join and fasten off.
Sew to the viewer’s right side of the door.
Tan Step — Make 2
Yarn: tan.
Ch 17.
Row 1: starting in second chain, 16 sc. (16)
Rows 2–5: ch 1, turn, sc across. (16)
Fasten off.
For the second step, ch 21 and work 20 sc for five rows.
Layer the smaller step above the larger one.
Window Center — Make 2
Yarn: golden yellow.
R1: 6 sc in MR (6)
R2: inc ×6 (12)
R3: (sc, inc) ×6 (18)
R4: (2 sc, inc) ×6 (24)
Fasten off.
Flatten each circle slightly into an oval while pinning.
Brown Window Frame — Make 2
Yarn: dark chocolate brown.
Ch approximately 26 and join into a loop.
Sc around.
Fasten off.
Shape into a rounded window frame around each yellow center.
Window Crossbars — Make 4
Ch 8 with brown.
Sl st back through seven chains.
Fasten off.
Use one horizontal and one vertical crossbar per window.
Pink Shutters — Make 4
Yarn: dusty pink.
Ch 6.
Row 1: starting in second chain, 5 sc. (5)
Rows 2–10: ch 1, turn, sc across. (5)
Fasten off with a sewing tail.
Attach one shutter to each window side and leave the outside edge slightly raised.
Five-Petal Pink Flower — Make 10 to 14
Yarn: dusty pink.
Work 10 sc in MR and join.
Repeat five times:
sl st in next stitch, 3 dc in next stitch.
Join and fasten off.
Yellow Flower Center
Work 6 sc in MR.
Join and fasten off.
Sew one center onto each large pink flower.
Small Green Leaf — Make 16 to 22
Yarn: leaf green.
Ch 6.
Starting in second chain work:
sl st, sc, hdc, dc, sc.
Work 3 sc in the final chain.
Return along the opposite side:
sc, dc, hdc, sc, sl st.
Fasten off.
Lavender Flower Spike — Make 6 to 8
Yarn: leaf green and lavender.
With green, ch 16.
Sl st back through 15 chains to form the stalk.
Join lavender near the upper end.
Work small groups of (sc, hdc, sc) around alternating chain spaces down approximately the upper two-thirds of the stalk.
Fasten off.
Small Pink Bud — Make 6 to 10
Yarn: dusty pink.
Work 6 sc in MR.
Join.
Work one round of sc.
Fasten off.
Pin buds among the green vines around both sides of the cottage.
Green Garden Base
Yarn: leaf green — Source: standard flat-circle expansion.
R1: 6 sc in MR (6)
R2: inc ×6 (12)
R3: (sc, inc) ×6 (18)
R4: (2 sc, inc) ×6 (24)
R5: (3 sc, inc) ×6 (30)
R6: (4 sc, inc) ×6 (36)
R7: (5 sc, inc) ×6 (42)
Continue the same six-stitch expansion sequence until the circle reaches approximately 27–29 cm across.
Fasten off.
Add a second identical circle if a heavier base is wanted, inserting a thin felt or plastic-canvas disc between the layers.
Brown Fence Picket — Make 18 to 22
Yarn: dark chocolate brown.
Ch 5.
Row 1: starting in second chain, 4 sc. (4)
Rows 2–7: ch 1, turn, 4 sc. (4)
Row 8: dec ×2. (2)
Row 9: dec. (1)
Fasten off with a sewing tail.
Join the Fence
Arrange the pickets around the front and side garden areas.
Leave open space for the steps, spout and handle.
Run one brown chain cord horizontally across the lower third of the pickets and another across the upper third.
Sew the cords through every picket.
“Tea Time” Hanging Sign
Yarn: warm cream and dark brown.
With cream, ch 13.
Row 1: starting in second chain, 12 sc. (12)
Rows 2–14: ch 1, turn, 12 sc. (12)
Fasten off.
Join brown and sc evenly around the rectangle.
Embroider tea time in brown yarn or embroidery thread.
Add a small pink heart beneath the words.
Sign Hanging Cord
With brown, ch 18.
Sl st back through the chain.
Fasten off.
Sew both cord ends to the upper corners of the sign and loop the cord beneath the teapot spout.
Garden Vines
Use green yarn to embroider or surface-slip-stitch curved stems from the base toward the windows.
Keep the main vines approximately 6–10 cm long.
Add small leaves and buds at irregular intervals.
Avoid pulling the cream body inward while making surface stitches.
Place the Cottage Features
Center the brown door on the lower front of the teapot.
Position one window to each side and slightly above the door.
Pin the steps beneath the entrance.
Add flower clusters around the lower window edges and beside the steps.
Place lavender spikes toward both outer sides where their height will not cover the windows.
Assembly
- Stuff and close the cream teapot body, then mark the exact front center and the opposing spout and handle attachment zones.
- Sew the curved spout to one side through its 18-stitch base, reinforcing an attachment area approximately 3–4 cm wide.
- Curve the 12-stitch handle into a broad arch and attach both ends opposite the spout through wide upper and lower seams.
- Sew the cream lid onto the upper body, keeping the dusty-pink scallops visible and placing the green knob on the vertical center.
- Attach the arched brown door, pink frame, yellow knob and two tan steps to the front center.
- Assemble both yellow-and-brown windows, add the pink shutters and sew one window to each side above the door.
- Attach pink flowers, green leaves, lavender spikes, buds and surface vines around the lower cottage walls without covering the architectural pieces.
- Place the teapot on the green base, sew through several concealed lower-body points, then add the brown picket fence around the garden perimeter.
- Loop the brown cord of the cream “Tea time” sign beneath the spout and tack the cord in place so the sign hangs without twisting.
- Set the completed cottage on a hard surface, correct any spout or handle lean and weave every remaining yarn tail through at least 4 cm of matching crochet.
The finished cottage should stand level with the spout and handle visually balanced, while the garden, door and windows remain readable from the front.
7 Technical Tips
- Teapot leans toward the spout: Its broad base is positioned too high or the spout contains excessive filling. Keep the spout lightly stuffed and sew the 18-stitch base across approximately 3–4 cm of body surface.
- Handle sags outward: The 12-stitch tube has been attached at only one narrow point per end. Spread both seams across approximately 30–40 mm and keep the upper section lightly filled.
- Lid tilts toward one window: Its center is not aligned with the body’s six-stitch closure. Mark both centers first and keep the green knob within approximately 5 mm of the vertical body axis.
- Door makes the cream wall pucker: Perimeter sewing is tighter than the body stitches. Pin the door at six points and leave approximately 8–10 mm between attachment stitches.
- Pink shutters curl closed: Their inner seam is shorter than the outer edge. Sew only the inside long edge and leave approximately 80 percent of each shutter surface free.
- Garden base curls upward: Flat-circle increases are insufficient or the outer stitches are tight. Maintain six evenly distributed increases per expansion round and block the circle to roughly 27–29 cm before adding the fence.
- Lavender spikes collapse under flowers: Their stalks are being sewn only at the bottom. Add one concealed tack approximately 20–25 mm above the base while leaving the upper flowers free.
Why the Spout and Handle Must Be Balanced First
The spout and handle are the largest pieces extending beyond the body. Each acts like a lever.
If one contains considerably more stuffing, or one attachment sits higher than the other, the cottage can rotate on its lower curve rather than resting flat.
Attach both components before the door and flower garden. Set the body on its green base after every major seam.
This is the structural core of the crochet teapot cottage pattern: decorations can be moved later, but the opposing side pieces determine whether the entire house stands correctly.
Why the Lid Uses a Separate Scalloped Edge
The cream lid could be sewn directly to the cream body, but the boundary would nearly disappear.
A dusty-pink scallop creates a clear horizontal division and repeats the color used in the shutters, door trim and flowers.
Keep the shells shallow.
Large scallops can cover the upper windows or make the lid appear wider than the body.
The green knob then provides a small vertical counterpoint at the center.
Controlling the Cottage Façade
Begin with the door because it establishes the vertical center.
Place both windows next.
Only after those three architectural pieces are pinned should the flower clusters be arranged.
This order prevents the garden from pushing one window too high or forcing the door away from center.
The reference uses a dense garden, but cream wall space remains visible between the foliage and windows.
Building the Flower Garden
Use pink roses as the dominant flower form.
Lavender spikes supply height while tiny buds fill narrow spaces between the door and windows.
Position green leaves behind flowers rather than on top of them.
Attach each blossom through its center plus one concealed petal point.
Leaving several petal edges free gives the garden dimension without adding stuffing.
Changing the Cottage Size
For a smaller decorative house, use sport yarn and a 2.25–2.5 mm hook while keeping the same stitch counts.
Published teapot houses made at this scale can finish close to 11–12 cm high.
For a larger version, use worsted cotton and a 4 mm hook, but test the 42-stitch body before making the windows.
Resize every façade piece only after measuring the completed body.
Changing the Garden Palette
Dusty pink and lavender match the supplied image closely.
A summer version can use yellow, white and cornflower blue.
For autumn, replace the pink with rust and mustard while keeping olive foliage.
A woodland version can use burgundy flowers, moss leaves and a darker brown door.
Keep at least one trim color repeated in three places so the cottage remains visually connected.
Controlling the Fence
The fence belongs to the garden base, not to the cream teapot body.
Attach the pickets after the cottage itself is secured to the mat.
Leave the entrance open in front of the two steps.
Additional gaps should remain near the spout and handle so the fence does not interfere with the silhouette.
A small difference in picket height looks natural, but keep neighboring pieces within approximately 5 mm.
Making the “Tea Time” Sign Readable
Keep the sign surface plain before embroidery.
Brown lettering gives enough contrast against cream without competing with the flower garden.
Test the hanging cord length before securing it under the spout.
The bottom of the sign should remain above the garden mat and outside the fence.
If it twists, add one small concealed tack between the cord and lower spout.
Final Shaping
Set the finished cottage on a rigid level surface.
Check the spout, handle and lid from the front.
Rotate the piece and inspect the handle arch from the side.
Lift the pink scallops, shutters and flower petals with your fingers.
Reposition the lavender stalks and straighten the fence.
Confirm that the lower body remains in full contact with the green garden mat before burying the final structural tails.
Conclusion
Build the spout and handle before committing to the façade because those two pieces determine how the cottage balances on its rounded base. Your next step is to complete the 42-stitch cream body, make the 18-stitch spout and pin the handle opposite it before sewing either permanently. Keep the flower garden dimensional but unstuffy. Share the finished crochet teapot cottage pattern project on Pinterest with the fenced garden visible, then post the door-and-window detail on Instagram using #FloralTeapotCottage. For this teapot house specifically, would you keep the dusty-pink trim or change the shutters and lid edge to lavender?









