Introduction
A pumpkin has ribs that radiate from its stem, and flattening those ribs is what makes this motif fail. This pumpkin granny square crochet pattern builds a shallow stuffed orange center, green stem and leaf, then mounts them inside a 14 cm openwork square. Use DK yarn with a 4 mm hook. The project suits intermediate crocheters and works particularly well when identical modules are needed for a blanket.
The Design: What Makes This Pumpkin Square Different
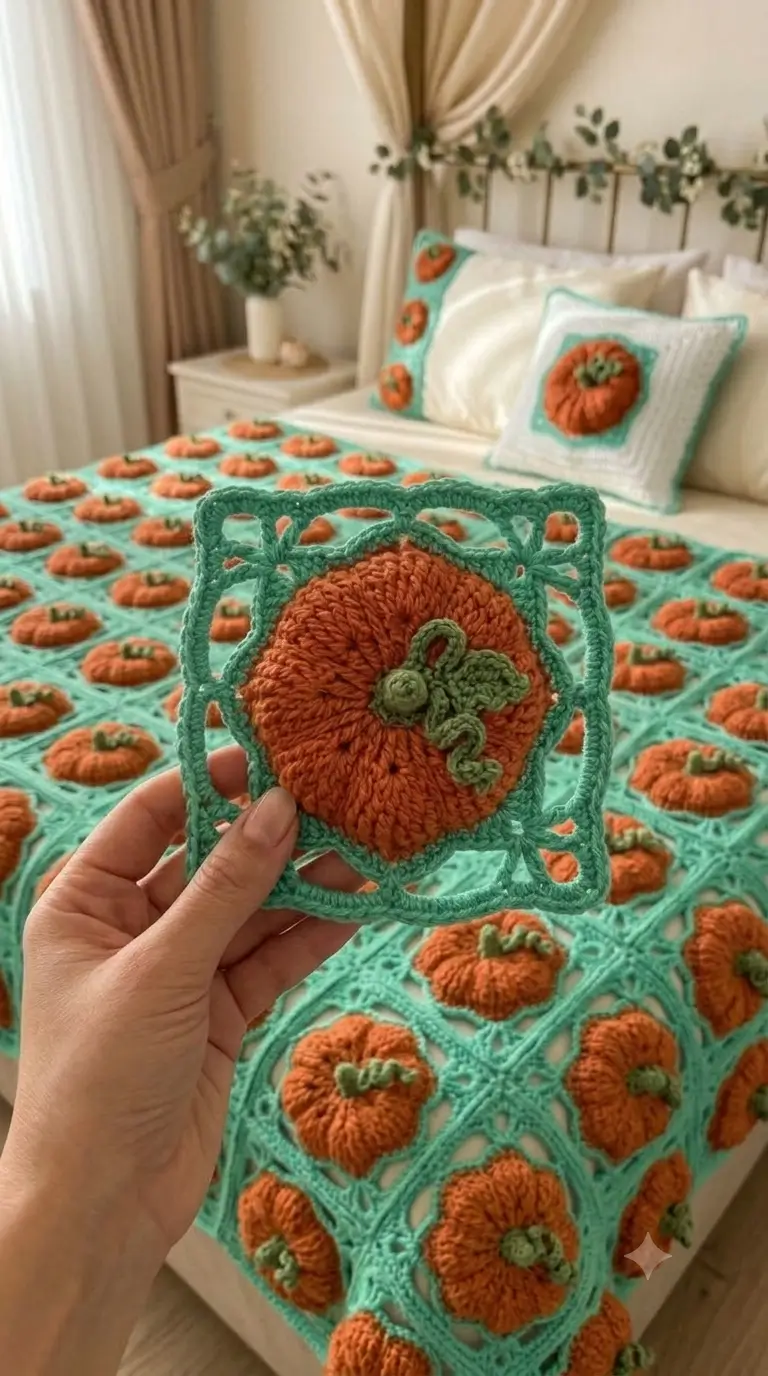
The photographed pumpkin projects above the aqua frame rather than reading as ordinary flat colorwork. That requires three structural decisions. First, the orange center is crocheted as a shallow amigurumi form and compressed after stuffing; the volume gives each rib enough fabric to curve. Second, sculpting strands run from top to bottom only after the form is closed, which divides the body into six controlled lobes. Third, the pumpkin is attached at selected points instead of being stitched flat across its entire underside.
A common failure with a raised pumpkin granny square is pulling the sculpting yarn so hard that the center cups the background. The square then twists when joined to neighboring blocks. A measured attachment method also makes this 3D pumpkin crochet square easier to reproduce across a large blanket.
Project Info at a Glance
| Skill Level | Time | Finished Size | Hook | Best For |
|---|---|---|---|---|
| Intermediate | 1½–2 hours per block | Approx. 14 cm | 4.0 mm | Blankets, cushions, bags, seasonal panels |
The 14 cm and 4 mm measurements are based on comparable published DK pumpkin granny-square patterns. Other pumpkin square designs commonly range from approximately 10 to 15 cm depending on yarn, hook size, stitch tension, and construction.
Materials and Tools
Yarn
- Burnt orange — DK — approximately 4–6 g for the raised pumpkin
- Mint/aqua — DK — approximately 8–10 g for the openwork square
- Sage green — DK — approximately 2 g for the stem, leaf, and tendril
- Matching orange yarn — approximately 1–2 m reserved for sculpting and attachment
Use a smooth DK acrylic or cotton yarn with clear stitch definition. The quantities above allow extra yarn for the dimensional pumpkin construction and finishing tails.
Tools
- 4.0 mm crochet hook
- Polyester stuffing — approximately 3–5 g
- Yarn needle
- Locking stitch marker
- Scissors
- Six removable stitch markers for rib placement
- Blocking mat and rust-resistant pins
- Tape measure
No safety eyes are required because the pumpkin motif shown in the reference design has no face.
Abbreviations
- MR — magic ring
- sc — single crochet
- inc — 2 sc in one stitch
- dec — invisible decrease over 2 stitches
- sl st — slip stitch
- ch — chain
- hdc — half double crochet
- dc — double crochet
- BLO — back loop only
- st/sts — stitch/stitches
- R — round
- Row — turned row
An invisible decrease is made through the front loops of the next two stitches, followed by one single crochet worked through both collected loops.
Pattern — Step by Step
The raised pumpkin is worked in a continuous spiral. The square frame is worked in joined rounds.
Raised Pumpkin Body — Make 1
Yarn: burnt orange. Work in a continuous spiral.
R1: 6 sc in MR. (6)
R2: inc ×6. (12)
R3: (sc, inc) ×6. (18)
R4: (2 sc, inc) ×6. (24)
R5: (3 sc, inc) ×6. (30)
R6: (4 sc, inc) ×6. (36)
R7: sc around. (36)
R8: sc around. (36)
R9: sc around. (36)
R10: sc around. (36)
R11: (4 sc, dec) ×6. (30)
R12: (3 sc, dec) ×6. (24)
R13: (2 sc, dec) ×6. (18)
Begin stuffing here. Add only enough filling to create a shallow dome approximately 3–3.5 cm thick. A spherical center will pull the finished granny square forward.
R14: (sc, dec) ×6. (12)
R15: dec ×6. (6)
Fasten off, leaving a 90 cm tail for closing and sculpting.
Pass the yarn tail through the six remaining front loops and pull the opening closed. Do not cut the yarn.
Gently flatten the pumpkin so the starting point and closing point form the vertical axis. The diameter before sculpting should measure approximately 9–10 cm.
Pumpkin Rib Sculpting
Use the long orange tail already attached to the pumpkin.
Place six removable markers evenly around the pumpkin. These mark the six sculpted divisions.
Bring the needle from the bottom center through the pumpkin to the top center. Run the yarn down the outside surface at the first marker, insert the needle at the bottom center, then bring it internally back to the top.
Pull the strand until a defined groove forms without crushing the stuffing.
Repeat the same process around all six divisions.
The pumpkin should contract to approximately 8.5–9.5 cm wide after sculpting. Stop tightening if the underside becomes strongly concave or the filling begins pushing between stitches.
Secure the yarn on the underside with two small backstitches. Leave approximately 30 cm for attaching the pumpkin to the granny square.
Stem — Make 1
Yarn: sage green.
R1: 6 sc in MR. (6)
R2: sc BLO around. (6)
R3: sc around. (6)
R4: sc around. (6)
Fasten off. Leave a 20 cm sewing tail.
Do not stuff the stem. Flatten only the lower 5 mm before sewing it into the top depression of the pumpkin.
Leaf — Make 1
Yarn: sage green.
Ch 7.
Row 1: Starting in the second ch from the hook, sl st, sc, hdc, dc, hdc, sc. (6 sts)
Continue down the opposite side of the foundation chain.
Row 2: sc, hdc, dc, hdc, sc, sl st. (6 sts)
Row 3: ch 1, sc in the next 4 edge sts toward the tip.
Row 4: sl st to the tip. Fasten off.
Leave a 20 cm sewing tail.
The finished leaf should measure approximately 3–3.5 cm.
Curled Tendril — Make 1
Yarn: sage green.
Ch 18.
Work 2 sc in the second chain from the hook and 2 sc in each remaining chain.
The increased stitch density causes the chain to curl naturally.
Fasten off with a 15 cm tail.
For a tighter spiral, rotate the finished curl twice clockwise before attaching it beside the stem.
Cheek Patches
Cheek patches are not used because no face is visible on the pumpkin motif.
Arms and Front Legs
Arms and front legs are not part of this design. The photographed motif is a dimensional botanical pumpkin rather than an animal character.
Back Legs
Back legs are not required for this pattern.
Ears or Wings
No ears or wings are present. The green leaf provides the main projecting detail above the pumpkin.
Openwork Square Center — Make 1
Yarn: mint/aqua.
The frame is intentionally open rather than densely filled. Complete the pumpkin first so the square can be checked against the actual appliqué dimensions.
R1: Make MR. Ch 3, 2 dc, ch 3; repeat (3 dc, ch 3) three more times. Join with sl st to the top of the beginning ch-3.
You should have four 3-dc groups and four corner spaces.
R2: Sl st into the first corner space. Ch 3, 2 dc, ch 3, 3 dc in the same corner. Ch 3. In each remaining corner work (3 dc, ch 3, 3 dc), ch 3. Join.
R3: Sl st to a corner. Work (3 dc, ch 3, 3 dc) in the corner. Ch 4, sc around the center of the next ch-3 side space, ch 4. Repeat around, working the doubled 3-dc group in every corner. Join.
R4: In each corner work (3 dc, ch 3, 3 dc). Across each side, ch 3, sc in the next ch-4 arch, ch 3, sc in the next arch or side anchor, ch 3 to the corner. Repeat around.
R5: Sc around the entire square, placing 3 sc in every corner ch-3 space. Work enough sc over each chain arch to keep the sides flat rather than pulled inward.
Fasten off.
Block the finished square to approximately 14 × 14 cm.
Published pumpkin granny squares commonly vary from approximately 10 to 15 cm depending on yarn weight, hook size, and construction. The 14 cm measurement provides a practical target for the hand-scale motif shown in the reference image.
Attach the Leaf
Place the pumpkin with the stem at the 12 o’clock position.
Position the leaf between approximately 12:30 and 2 o’clock. Allow the outer part of the leaf to extend over the upper-right pumpkin lobe.
Sew only along the lower half of the leaf.
Leaving the outer portion free preserves the raised appearance instead of compressing the leaf against the orange surface.
Attach the Tendril
Position the curled tendril next to the leaf and stem.
Anchor the first 10–12 mm beside the stem, then add one small tack stitch near the middle of the curl.
Do not sew every coil to the pumpkin. The tendril should retain visible dimensional movement.
Mount the Pumpkin on the Square
Measure the finished square diagonally from corner to corner and mark the exact center.
Place the pumpkin over that center point.
The orange pumpkin should occupy approximately 60–68% of the square width, leaving the aqua openwork visible around every side.
Pin the pumpkin at the 12, 3, 6, and 9 o’clock positions.
Sew the underside to the square at those four points first. Add up to four secondary attachment points between them if more stability is required.
Do not sew a tight continuous seam around the outside edge. Approximately eight relaxed anchors retain the raised pumpkin profile while distributing its weight across the frame.
Assembly
- Close the remaining six stitches of the orange pumpkin and secure the center opening.
- Sculpt six evenly spaced ribs from the top depression to the lower center.
- Sew the green stem into the top depression using four to six small stitches.
- Position the leaf to the right of the stem and attach only its lower half.
- Place the curled tendril beside the leaf and secure it at two points.
- Block the aqua granny square independently to approximately 14 × 14 cm.
- Mark the center of the square using both diagonal measurements.
- Pin the pumpkin at four compass points and compare the margins on every side.
- Attach the pumpkin with four primary and up to four secondary anchor stitches.
- Weave every yarn tail through matching-color stitches, trim, and check the finished block against a flat 14 cm template.
The completed module contains the raised pumpkin body, six sculpted ribs, green stem, leaf, curled tendril, and openwork square frame visible in the reference design.
7 Technical Tips
- Square corners lifting: Over-tight attachment stitches are the likely failure mode. If a corner rises more than 5 mm from a flat surface after mounting the pumpkin, remove the nearest attachment stitch and replace it with a looser one.
- Pumpkin turning spherical: Excess stuffing pushes the orange body too far away from the granny-square frame. Keep the finished center approximately 3–3.5 cm deep and compress it before adding the rib strands.
- Ribs cutting into the fabric: Sculpting yarn pulled too firmly creates narrow grooves instead of rounded lobes. Stop tightening when the pumpkin measures approximately 8.5–9.5 cm across.
- Round drift: Losing the beginning-of-round marker shifts increase and decrease placement away from the intended axis. Move the marker after every round and recount at every round where the total changes by 6 stitches.
- Visible decrease bumps: Standard decreases create thicker bars on the closing half of the pumpkin. Work each invisible decrease through the front loops of exactly two consecutive stitches.
- Off-center appliqué: Pinning entirely by eye can move the pumpkin several millimeters toward one corner. Cross two temporary threads diagonally through the square and keep the pumpkin center within 3 mm of their intersection.
- Loose finishing tails: Short tails can pull through the open chain spaces during handling. Weave each tail through at least 4 cm of dense matching-color stitches, reverse direction once, and then trim.
Turning the Square Into a Crochet Pumpkin Blanket
The background reference repeats the same pumpkin unit across a bed-size blanket. Repetition changes the technical priority because every finished module must share approximately the same blocked dimensions.
Make the first four squares as a calibration batch. Block all four to 14 cm and stack them. A difference of approximately 3 mm can usually be absorbed during joining, but repeated 5 mm variations become increasingly visible across several rows.
For a small throw, a 5 × 7 layout requires 35 squares and creates a motif field measuring approximately 70 × 98 cm before joining and border additions. A 6 × 8 layout requires 48 squares and begins near 84 × 112 cm before the final edging is added.
The photographed blanket keeps the same aqua color around each orange pumpkin. Using one dye lot for the background yarn helps the individual squares read as a continuous field after joining.
A crochet pumpkin blanket made with raised centers also needs different storage from a completely flat granny-square project. Avoid placing heavy objects over completed blocks before joining because long compression can reduce the definition of the sculpted pumpkin ribs.
Gauge and Yarn Substitution
Pumpkin granny-square dimensions change substantially when yarn weight or hook size changes. Current DK examples can finish around 14 cm with a 4 mm hook, while Aran and worsted constructions may use hooks around 5 mm and produce squares in the broader 11–15 cm range.
If substituting worsted yarn for DK, make one complete test square before calculating quantities for a blanket. Changing the hook alone does not guarantee that the final module will remain exactly 14 cm.
Cotton yarn creates crisp leaf edges and a firm openwork frame. Acrylic gives the stuffed pumpkin body greater flexibility and rebound. Either fiber can work, but mixing fibers within the same square can make blocking less predictable.
For the appearance shown in the reference design, smooth plied yarn works better than thick chenille. Plush yarn would hide much of the stitch definition in the leaf, curled tendril, sculpted ribs, and narrow chain spaces around the square.
Conclusion
Block one test square before committing yarn to a full blanket. The critical measurements are the 14 cm frame, an 8.5–9.5 cm sculpted pumpkin, and no more than eight relaxed attachment points beneath the raised center. Once those figures repeat reliably, batch the orange bodies, then the frames, then the botanical details instead of completing every block individually. Save this pumpkin granny square crochet pattern to Pinterest with a close view of the rib construction, and share the finished square or blanket on Instagram with #RaisedPumpkinGrannySquare. For this pumpkin, would you keep all six ribs equally deep or make the two outer lobes shallower than the center pair?









