Introduction
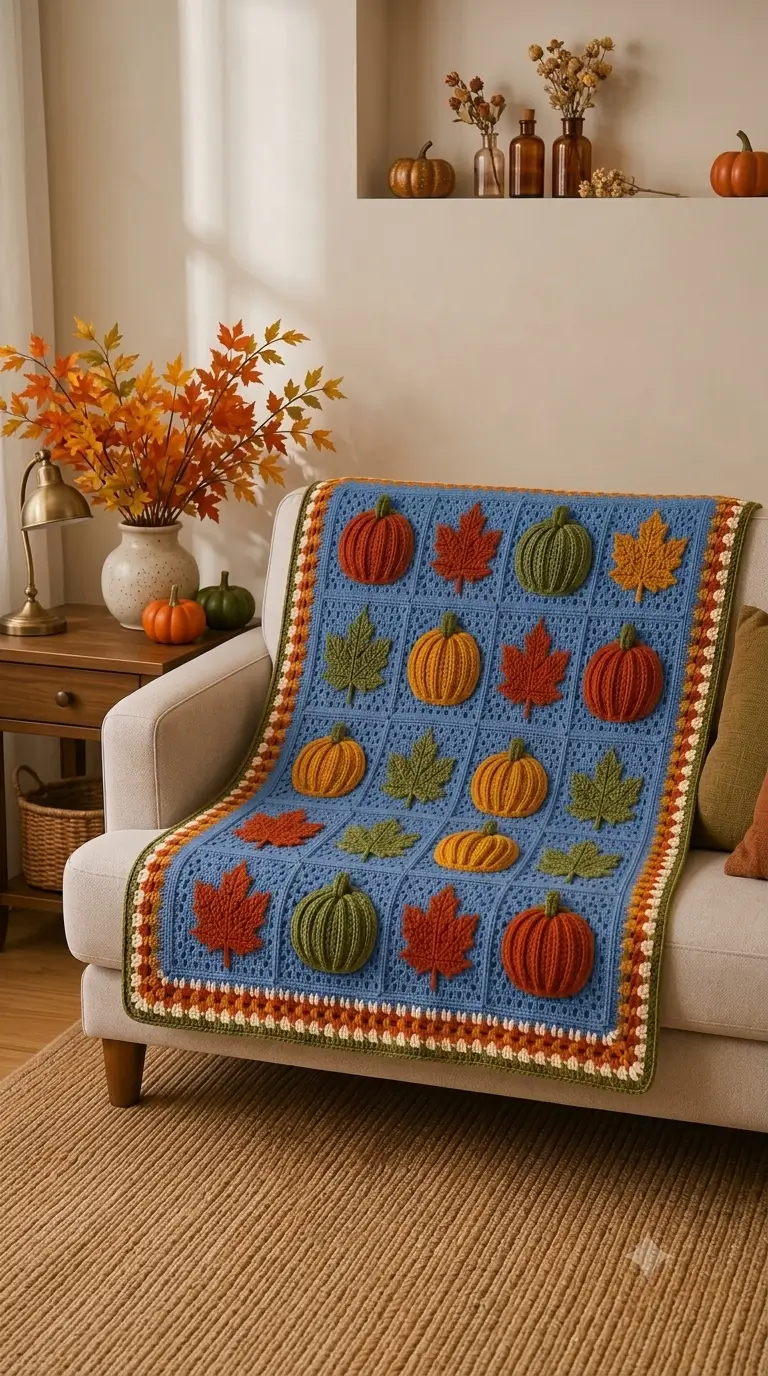
Pumpkin ribs become distorted the moment a round motif is stretched flat across a square, so their depth has to be built into the crochet itself. This fall pumpkin crochet blanket pattern combines worsted yarn, 4–5 mm hooks and twenty modular panels for a throw about 105–115 cm wide. Intermediate skills are appropriate. Separate appliqués also make individual motifs replaceable without rebuilding the blanket.
The Design: What Makes This Autumn Blanket Different
Three structural choices define this design. First, every pumpkin sits above the blue field rather than being crocheted directly into it; raised vertical ribs remain readable after the blocks are joined. Second, each crochet maple leaf appliqué stays substantially flatter than the pumpkin. That difference prevents twenty heavily textured motifs from making the throw rigid.
The blue background is the third important decision. Rust, mustard and olive contrast against blue more clearly than they would against a conventional brown autumn palette, while the cream border separates the field from stronger orange stripes.
A common mistake in a fall granny square blanket is attaching appliqués before all background panels have been blocked to the same measurement. One undersized panel may look insignificant by itself. Across four blocks, however, the error compounds and pulls the whole seam line sideways.
Project Info at a Glance
| Skill Level | Time | Finished Size | Hook | Best For |
|---|---|---|---|---|
| Intermediate | 25–35 hours | Approx. 105–115 × 130–145 cm | 5 mm field; 4–4.5 mm motifs | Sofa throw / seasonal display |
Published pumpkin references support worsted yarn with approximately 4–4.5 mm hooks, while medium/worsted yarn is commonly used for modular granny-square blankets.
Materials and Tools
Yarn
Use smooth #4 medium/worsted yarn throughout so the panels join at a consistent gauge.
- Dusty blue — worsted — approximately 850–1,000 g
- Burnt orange — worsted — approximately 120 g
- Pumpkin orange — worsted — approximately 120 g
- Mustard gold — worsted — approximately 100 g
- Olive green — worsted — approximately 120 g
- Cream — worsted — approximately 150–200 g
- Rust — worsted — approximately 75–100 g
Blanket quantities are project estimates because the precise yarn, gauge and dimensions of the photographed blanket are unknown. Individual pumpkin appliqués generally require only a small amount of yarn.
Tools
- 5.0 mm crochet hook for blue panels
- 4.0–4.5 mm crochet hook for appliqués
- Yarn needle
- Locking stitch markers
- Blocking mats and rust-resistant pins
- Scissors
- Tape measure
- Small amount of polyester stuffing, optional, for pumpkin relief
No safety eyes are used.
Abbreviations
- MR — magic ring
- sc — single crochet
- hdc — half double crochet
- dc — double crochet
- tr — treble crochet
- sl st — slip stitch
- ch — chain
- BLO — back loop only
- st/sts — stitch/stitches
- sp — space
An invisible decrease is made by picking up the front loop of each of the next two stitches before completing one sc through the collected loops.
Pattern — Step by Step
This is an original photo-based reconstruction. Work the twenty background panels first. Block them before sizing any appliqués.
Blue Openwork Square — Make 20
Yarn: dusty blue. Use a 5 mm hook.
R1: Make an MR. Ch 3, 2 dc, ch 2, then work (3 dc, ch 2) ×3 into the ring. Join with sl st.
R2: Sl st to first corner. Ch 3, 2 dc, ch 2, 3 dc in that corner. Ch 1. Work (3 dc, ch 2, 3 dc, ch 1) in each remaining corner. Join.
R3: Sl st into corner. Work (3 dc, ch 2, 3 dc) in the corner, ch 1, 3 dc in the next side space, ch 1. Repeat around.
R4: Work the same corner sequence. Place one 3-dc group in every ch-1 side space, separating groups with ch 1.
R5: Repeat R4.
R6: Repeat R4.
R7: Repeat R4.
R8: Repeat R4.
R9: Ch 1. Work 1 sc in each dc and ch-1 space around. In each corner, work (sc, ch 1, sc).
Fasten off. Block each panel to one identical measurement, approximately 25–27 cm square for the reconstructed throw.
The photographed blanket appears more solid than a traditional loose granny square. If your yarn creates oversized gaps, use a solid granny-square construction while keeping the same blocked dimensions.
Ribbed Pumpkin Appliqué — Make 9
Yarn: rotate burnt orange, pumpkin orange, mustard and olive.
This reconstruction targets pumpkins approximately 14–16 cm wide so they remain proportional to the blue panels.
Foundation: Ch 15.
Row 1: Hdc in second ch from hook and across. (14)
Row 2: Ch 1, turn. Hdc BLO across. (14)
Rows 3–22: Repeat Row 2. (14)
Do not cut a short tail. Leave approximately 60 cm.
Bring the first and final rows together. Sew them to form a short ribbed tube, then thread the tail around one opening. Pull tightly and secure.
Pass a second strand around the opposite opening. Draw it inward while pressing the tube flat into an oval. Add only a thin layer of stuffing if a more pronounced raised profile is required.
The finished pumpkin should rise roughly 10–15 mm above the blue square rather than forming a fully stuffed three-dimensional pumpkin.
Fasten securely on the back.
Pumpkin Stem — Make 9
Yarn: olive green.
R1: 6 sc in MR. (6)
R2: Sc around. (6)
R3: Sc around. (6)
R4: Sc around. (6)
Flatten the tube. Fasten off and leave a 20 cm sewing tail.
Sew the bottom 10 mm behind the top center of the pumpkin. Keep the free end slightly upright.
Maple-Style Leaf Appliqué — Make 11
Yarn: rotate rust, mustard, burnt orange and olive.
A defined maple silhouette needs multiple chain lengths and different stitch heights rather than one repeated circular round.
Leaf Center
Make an MR and work 10 sc into it. Join with sl st.
Center Lobe
Ch 11.
Beginning in second ch from hook, work:
sl st, sc, hdc, dc, tr, tr, dc, hdc, sc, sl st.
Work 3 sc into the final chain area so the tip can turn cleanly, then work back down the opposite edge in mirrored stitch heights.
Sl st to the leaf center.
Upper Side Lobe — Make 2
Ch 9.
Beginning in second ch:
sl st, sc, hdc, dc, tr, dc, hdc, sc.
Turn around the tip with 3 sc, then return along the opposite side.
Anchor to the center with sl st.
Repeat symmetrically on the opposite side.
Lower Side Lobe — Make 2
Ch 7.
Beginning in second ch:
sl st, sc, hdc, dc, hdc, sc.
Work around the tip and return along the opposite edge.
Repeat for the remaining side.
Leaf Stem
Ch 8.
Sl st into the second chain and every remaining chain back toward the leaf center.
Fasten off with a 30 cm tail.
Block the leaf to approximately 11–13 cm tall. Keep the side lobes inside the square seam allowance.
Raised Leaf Veins
Use matching or slightly darker yarn.
Start at the leaf stem and work one surface line toward the center-lobe tip. Add four shorter branches toward the side lobes.
Keep each embroidery segment around 6–9 mm long. Tight vein stitches shrink the appliqué and curl the points.
Attaching the Pumpkins
Place each blocked blue panel flat.
Center the pumpkin with equal clearance at left and right. Pin the top, bottom and widest side points.
Sew around the rear perimeter every 10–12 mm. Do not stitch through every rib because that flattens the vertical relief.
Check the reverse frequently. A tight attachment thread can cup the blue square.
Attaching the Maple Leaves
Pin the stem and central vein first.
Add one tack near the end of each major lobe, roughly 8–10 mm behind the tip. Leave the intervening edges unstitched.
This attachment method lets the pointed edges retain slight dimension while keeping the middle of each leaf stable.
Recommended 4 × 5 Layout
Arrange the twenty squares before joining.
- Row 1: orange pumpkin — rust leaf — olive pumpkin — mustard leaf
- Row 2: olive leaf — mustard pumpkin — rust leaf — orange pumpkin
- Row 3: mustard pumpkin — olive leaf — orange pumpkin — olive leaf
- Row 4: rust leaf — olive pumpkin — mustard leaf — mustard pumpkin
- Row 5: rust leaf — olive pumpkin — rust leaf — orange pumpkin
This distribution follows the alternating structure visible in the reference image without claiming an exact stitch-for-stitch reproduction.
Joining the Panels
Place four squares in each row.
Use mattress stitch for a flatter seam or a relaxed slip-stitch join through matching loops for a more visible grid. Complete all five horizontal strips before joining one strip to the next.
Measure each strip before the vertical joins. A four-square row should differ from neighboring rows by no more than about 10–15 mm before seaming.
Mark every square intersection with a locking marker. Match those points first, then sew the spaces between them.
Border
Round 1 — Blue
Join dusty blue in any corner.
Sc evenly around the blanket, placing (sc, ch 1, sc) in each corner. Do not add random stitches where panel seams meet.
Round 2 — Cream
Join cream.
Work hdc around, keeping the same stitch count except for the stated corner additions.
Round 3 — Burnt Orange
Work one round of sc.
Round 4 — Mustard and Cream Accent
Alternate short groups of mustard and cream stitches to reproduce the dotted harvest-color effect visible in the reference.
For a simpler version, work a complete cream round followed by a mustard round.
Round 5 — Rust
Work hdc around.
Round 6 — Cream
Work sc around.
Round 7 — Olive
Finish with sc in each stitch and 3 sc in each corner.
Fasten off. Weave tails into matching color sections rather than carrying dark yarn underneath the cream border.
Assembly
- Crochet all twenty blue panels and block every one to the same square measurement before making the final-size motifs.
- Complete the nine ribbed pumpkin forms and shape them to a consistent width without overfilling their centers.
- Attach an olive stem behind the upper center of every pumpkin with roughly 10 mm of the stem base hidden.
- Crochet the eleven maple-style leaves, block their five lobes and add the surface vein lines before attachment.
- Center each pumpkin on a blue block and stitch around its rear perimeter at approximately 10–12 mm intervals.
- Fix each leaf through its stem, center vein and five tip zones while leaving most of its outer perimeter free.
- Arrange the twenty decorated panels into five rows of four and photograph or label the arrangement before stacking them.
- Join each four-square horizontal strip, then connect the five strips while matching every marked intersection.
- Work the blue, cream and autumn-color border rounds without inserting extra stitches at internal seam positions.
- Block the background and border flat, reshape every pumpkin rib and leaf point, then weave remaining tails into their matching color sections.
The completed throw consists of a stable twenty-panel field with raised pumpkins, flatter maple leaves and a multicolor autumn border.
7 Technical Tips
- Square-size drift: A 5 mm difference in one blocked panel can become 20 mm across a four-square row. Measure every panel after blocking and rework any square more than 3–5 mm outside the target dimension.
- Overstuffed pumpkins: A pumpkin projecting more than about 15 mm from the blanket becomes heavy and can pull the blue panel inward. Remove filling until the appliqué compresses readily while its vertical ribs remain visible.
- Leaf-tip curling: Surface veins pulled too tightly shorten the leaf center and force the five tips upward. Keep embroidered vein segments approximately 6–9 mm long and stop tightening as soon as the yarn lies flat.
- Appliqué placement: A motif sewn less than roughly 30 mm from a panel seam can overlap visually with the neighboring block after joining. Pin the widest pumpkins first and check clearance before making permanent stitches.
- Seam puckering: Slip-stitch joins become shorter than the square edges when worked at high tension. Lay each completed strip flat after every join and reopen the seam if the row bows or shortens by more than about 10 mm.
- Border waves: Extra stitches placed automatically at every square intersection create an expanding outer edge. Add increases only at the four blanket corners unless the border round specifically requires shaping elsewhere.
- Tail failure: Short appliqué tails can work loose because raised motifs are flexed repeatedly. Leave approximately 20–30 cm for stems and leaves and weave each end in at least three changing directions through matching stitches.
Conclusion
Block one blue panel before producing the full twenty-piece batch; its finished measurement determines the scale of every pumpkin, leaf and border section that follows. Keep the pumpkins raised, attach the maple leaves mainly through their center lines and tips, and check each four-panel row before permanent joining. Those controls matter more than copying an exact color order in this fall pumpkin crochet blanket pattern. Save the finished layout to Pinterest and post the completed grid on Instagram with #FallPumpkinLeafBlanket. For your next variation, would the rust, mustard and olive motifs read more clearly against dusty blue or a muted cream background?









