Introduction
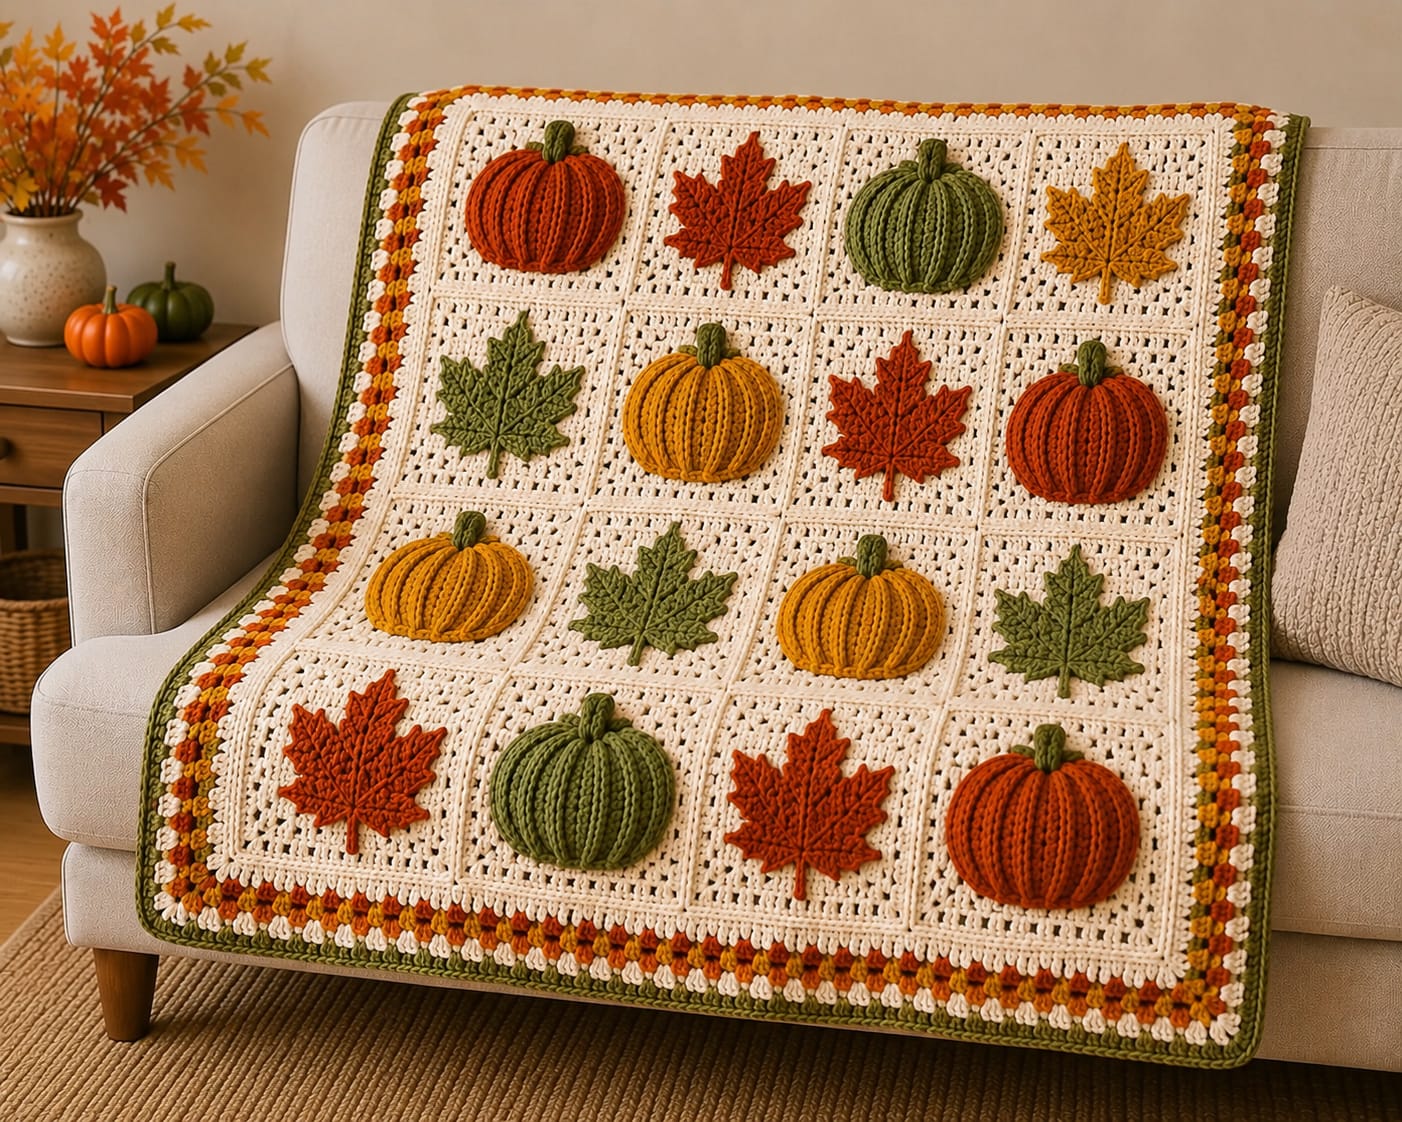
Eight pumpkins and eight maple leaves leave every square accountable for exactly half of the autumn grid. This pumpkin maple leaf granny square blanket pattern uses worsted yarn with 5 mm and 4 mm hooks to make an approximately 100–110 cm square throw. Large cream blocks, raised ribbed pumpkins and five-lobed leaves create an intermediate modular project with controlled three-dimensional texture.
The Design: What Makes This Fall Blanket Different
The blanket uses sixteen large cream blocks arranged four across and four down. Eight carry pumpkins; the other eight carry maple leaves. That exact division creates a more deliberate rhythm than a blanket built from one dominant motif with occasional accents. Pumpkin appliqués rise above the background through back-loop ribbing and minimal filling, while maple leaves remain flatter so their pointed outlines stay readable. Rust, mustard and olive appear in both motif families, connecting the entire grid without requiring every row to repeat the same color sequence. A common failure in a fall granny square blanket is sewing raised pumpkins as tightly as flat leaves. The pumpkin seam then contracts the cream block while the leaf square remains unchanged, causing neighboring blocks to finish at different dimensions.
Project Info at a Glance
| Skill Level | Time | Finished Size | Hooks | Best For |
|---|---|---|---|---|
| Intermediate | 30–40 hours | Approx. 100–110 cm square | 5.0 mm blocks / 4.0 mm appliqués | Fall sofa throws, chair blankets and seasonal displays |
Materials and Tools
Yarn
- Warm cream / ivory — worsted or Aran #4 — approximately 700–850 g — sixteen background squares, joins and border.
- Burnt orange / rust — worsted or Aran #4 — approximately 120–150 g — pumpkins, maple leaves and border.
- Mustard gold — worsted or Aran #4 — approximately 90–120 g — pumpkins, maple leaves and border.
- Moss / olive green — worsted or Aran #4 — approximately 140–180 g — pumpkins, maple leaves, stems and outer border.
Choose one yarn family for all four colors when possible. Identical stitch counts can produce different motif widths when one shade is spun noticeably thicker than another.
Tools
- 5.0 mm crochet hook for cream blocks and border
- 4.0 mm crochet hook for pumpkins, leaves and stems
- Polyester fiberfill — approximately 100–150 g
- Yarn needle
- Stitch markers
- Dressmaking pins
- Blocking mats
- Rust-resistant pins
- Scissors
- Measuring tape
Abbreviations
- MR — magic ring
- ch — chain
- sc — single crochet
- hdc — half double crochet
- dc — double crochet
- tr — treble crochet
- sl st — slip stitch
- inc — increase
- dec — decrease
- BLO — back loop only
An invisible decrease is worked through the front loops of two neighboring stitches before completing one single crochet through both loops.
Pattern — Step by Step
Make all sixteen background blocks before beginning the complete appliqué batch. The blocked square measurement controls pumpkin width, leaf scale and final blanket dimensions.
Large Cream Granny Square — Make 16
Yarn: warm cream — original reconstruction based on standard granny-square geometry.
R1: Make an MR. Ch 3, 2 dc, ch 2. Work (3 dc, ch 2) three more times into the ring. Join with sl st.
R2: Sl st to the first corner. Work (3 dc, ch 2, 3 dc) in that corner. Ch 1. Repeat in all remaining corners. Join.
R3: Work (3 dc, ch 2, 3 dc) in each corner. Place one 3-dc group in every side space with ch 1 between groups. Join.
R4: Repeat the standard granny construction, adding one 3-dc group to every new side space.
R5: Repeat R4.
R6: Repeat R4.
R7: Repeat R4.
R8: Repeat R4.
Fasten off.
Target approximately 21–23 cm before the finishing edge.
Cream Finishing Edge
Join cream yarn in any corner.
Ch 1.
Sc in each dc and one sc in every ch-1 side space.
Work (sc, ch 1, sc) in every corner.
Continue around.
Join and fasten off.
Target blocked measurement: approximately 23–25 cm.
Block the Sixteen Squares
Set one target measurement before pinning the full batch.
Use 24 cm as a practical working size.
Measure all four edges.
Check both diagonals as well.
Keep individual block dimensions within approximately 5 mm of the target.
A 7 mm difference repeated across four neighboring squares produces almost 3 cm of distortion before the border is added.
Raised Pumpkin Appliqué — Make 8
Distribute the pumpkin colors across rust, mustard and olive. The reference includes several orange pumpkins, several mustard pumpkins and two visibly green pumpkins.
Ribbed Pumpkin Panel
Yarn: chosen pumpkin color — original reconstruction using BLO half double crochet.
Foundation: ch 15.
Row 1: starting in second chain, hdc across. (14)
Row 2: ch 1, turn, hdc BLO across. (14)
Row 3: ch 1, turn, hdc BLO across. (14)
Row 4: ch 1, turn, hdc BLO across. (14)
Row 5: ch 1, turn, hdc BLO across. (14)
Row 6: ch 1, turn, hdc BLO across. (14)
Row 7: ch 1, turn, hdc BLO across. (14)
Row 8: ch 1, turn, hdc BLO across. (14)
Row 9: ch 1, turn, hdc BLO across. (14)
Row 10: ch 1, turn, hdc BLO across. (14)
Row 11: ch 1, turn, hdc BLO across. (14)
Row 12: ch 1, turn, hdc BLO across. (14)
Row 13: ch 1, turn, hdc BLO across. (14)
Row 14: ch 1, turn, hdc BLO across. (14)
Row 15: ch 1, turn, hdc BLO across. (14)
Row 16: ch 1, turn, hdc BLO across. (14)
Row 17: ch 1, turn, hdc BLO across. (14)
Row 18: ch 1, turn, hdc BLO across. (14)
Row 19: ch 1, turn, hdc BLO across. (14)
Row 20: ch 1, turn, hdc BLO across. (14)
Row 21: ch 1, turn, hdc BLO across. (14)
Row 22: ch 1, turn, hdc BLO across. (14)
Row 23: ch 1, turn, hdc BLO across. (14)
Row 24: ch 1, turn, hdc BLO across. (14)
Row 25: ch 1, turn, hdc BLO across. (14)
Row 26: ch 1, turn, hdc BLO across. (14)
Fasten off with approximately 60 cm of matching yarn.
Target panel: approximately 10–11 cm high × 28–32 cm long.
Check Pumpkin Gauge
Make one panel in each pumpkin color before completing all eight.
Place the rust, mustard and olive pieces side by side.
The long edges should remain within approximately 5–7 mm of one another.
Correct a thicker yarn by removing one or two rows rather than tightening its assembly seam.
Join the Pumpkin Tube
Bring Row 1 and Row 26 together.
Match all 14 stitch positions.
Use relaxed mattress stitch to connect the short edges.
The seam should remain at approximately the same depth as one neighboring rib.
Gather the First Pumpkin Edge
Thread matching yarn through all 26 row ends.
Pull gradually until the opening contracts to approximately 8 mm.
Cross the center once or twice.
Push the gathered point slightly inward.
Add Minimal Filling
Use only a thin ring of fiberfill around the pumpkin perimeter.
Leave the central section soft.
Target maximum appliqué depth around 12–16 mm.
That amount produces visible relief without creating a heavy ornament on the cream block.
Gather the Second Edge
Thread through the remaining row ends.
Pull to approximately an 8 mm opening.
Press both centers toward one another.
Shape the motif to approximately 14–16 cm wide and 8–9 cm high.
Secure the gathering yarn on the rear.
Refine the Pumpkin Ribs
The 26 BLO rows already form narrow channels.
If wider lobe divisions are wanted, add four shaping strands.
Work them through existing low channels.
Pull each added valley only about 3–4 mm below the neighboring raised ribs.
Balance opposite grooves rather than tightening around the pumpkin in one direction.
Green Pumpkin Stem — Make 8
Yarn: moss or olive green.
R1: 6 sc in MR (6)
R2: sc around (6)
R3: sc around (6)
R4: sc around (6)
R5: (2 sc, inc) ×2 (8)
R6: sc around (8)
Fasten off with a 20 cm sewing tail.
Do not stuff heavily.
Flatten approximately the lower 10–12 mm and sew it behind the upper pumpkin center.
Five-Lobed Maple Leaf — Make 8
Distribute the leaves among rust, mustard and olive so their colors echo the pumpkins.
Leaf Center
Yarn: chosen fall color.
Work 10 sc in MR.
Join with sl st.
Center Lobe
Ch 11.
Starting in the second chain work:
sl st, sc, hdc, dc, tr, tr, dc, hdc, sc, sl st.
Work 3 sc in the final chain.
Turn and return along the opposite side in mirrored order.
Sl st into the next center stitch.
Upper Side Lobe — Make 2
Ch 9.
Starting in second chain work:
sl st, sc, hdc, dc, tr, dc, hdc, sc.
Work 3 sc at the tip.
Return along the opposite side in mirrored order.
Sl st into the next two center stitches.
Repeat on the other side.
Lower Side Lobe — Make 2
Ch 7.
Starting in second chain work:
sl st, sc, hdc, dc, hdc, sc.
Work 3 sc in the tip chain.
Return down the opposite side in mirrored order.
Repeat for the remaining lobe.
Leaf Stem
Ch 8 from the center.
Sl st back through seven chains.
Fasten off with approximately 30 cm of yarn.
Target approximately 11–13 cm high × 10–12 cm wide.
Add Maple Leaf Veins
Thread matching or slightly darker yarn onto a needle.
Work one surface line from the stem through the center lobe.
Branch one line toward each of the four side lobes.
Keep individual stitches approximately 6–8 mm long.
Stop pulling as soon as the vein becomes visible.
Center a Pumpkin on Its Square
Place one blocked 24 cm cream square on a table.
Position the pumpkin approximately 4–5 cm from each side edge.
Keep the stem pointing toward the upper square edge.
Pin the top, bottom and widest side points.
Measure the cream clearance before sewing.
Attach the Pumpkin
Use yarn matching the pumpkin.
Sew through the rear perimeter at approximately 10–12 mm intervals.
Leave the ribbed center free.
Stop after half the circumference and lay the square flat.
If a corner rises more than approximately 5 mm, loosen the latest attachment stitches.
Center a Maple Leaf on Its Square
Place the leaf vertically with its center lobe pointing toward the upper edge.
Several leaves may be tilted approximately 5–10 degrees for variation, but the photograph uses mostly upright motifs.
Keep at least approximately 35 mm of cream visible around the widest leaf points.
Attach the Maple Leaf
Sew through the stem and central vein first.
Add one small tack near each lobe tip.
Leave most side edges unattached.
The outer points should rise approximately 4–7 mm from the cream background.
Recommended Four-by-Four Layout
The reference alternates motif type while rotating the three fall colors through the grid.
Row 1: Rust Pumpkin – Rust Leaf – Olive Pumpkin – Mustard Leaf.
Row 2: Olive Leaf – Mustard Pumpkin – Rust Leaf – Rust Pumpkin.
Row 3: Mustard Pumpkin – Olive Leaf – Mustard Pumpkin – Olive Leaf.
Row 4: Rust Leaf – Olive Pumpkin – Rust Leaf – Rust Pumpkin.
This creates exactly eight pumpkin blocks and eight maple-leaf blocks.
Check the Completed Blocks Before Joining
Lay all sixteen decorated squares in the final layout.
Measure each row without stretching.
Four-block widths should remain within approximately 10–15 mm of one another.
If a pumpkin block is narrower, inspect its appliqué seam before changing the cream block itself.
Join the Four-Square Rows
Yarn: warm cream.
Use mattress stitch for a flat grid or a relaxed slip-stitch seam for a slightly visible structure.
Join the four squares in Row 1.
Repeat for Rows 2–4.
Lay the completed horizontal strips flat.
Check that the square intersections remain aligned.
Join the Four Rows
Place Rows 1 and 2 together.
Match each vertical seam first.
Join with cream yarn.
Repeat until all four strips form one blanket.
Inspect the central four-square intersection from both directions before beginning the border.
Border Round 1 — Cream
Yarn: warm cream.
Join in any corner.
Sc evenly around the full perimeter.
Skip duplicated seam loops where necessary.
At each corner work (2 sc, ch 2, 2 sc).
Join.
Border Round 2 — Rust
Yarn: burnt orange / rust.
Sc in every stitch around.
Work (sc, ch 2, sc) in every corner.
Join and fasten off.
Border Round 3 — Mustard
Yarn: mustard gold.
Repeat sc, ch 1, skip 1 along each straight edge.
At each corner work (sc, ch 2, sc).
Join.
Border Round 4 — Cream
Join cream into any ch-1 space.
Sc in every sc and every ch-1 space.
At corners work (sc, ch 2, sc).
Join.
Border Round 5 — Olive
Yarn: moss / olive green.
Hdc evenly around.
Work (2 hdc, ch 2, 2 hdc) in each corner.
Join.
Olive Finishing Edge
Sc once around in olive.
Keep one stitch in every previous hdc.
Use (sc, ch 1, sc) at the four corners.
Fasten off.
Assembly
- Crochet sixteen eight-round cream granny squares, add the sc finishing edge and block every square to approximately 23–25 cm.
- Make eight ribbed pumpkin panels using 14 hdc across and 26 BLO rows, distributing the motifs among rust, mustard and olive.
- Seam, gather and minimally fill every pumpkin, keeping the finished appliqué approximately 14–16 cm wide and 12–16 mm deep.
- Crochet eight short green stems and attach one behind the crown of each finished pumpkin.
- Make eight five-lobed maple leaves in rust, mustard and olive, then add relaxed center and side veins.
- Sew pumpkins around their rear perimeter at approximately 10–12 mm intervals and attach leaves through their central veins and pointed tips.
- Arrange the sixteen decorated blocks in a four-by-four grid with exactly eight pumpkins and eight maple leaves.
- Join four blocks into each horizontal strip first, then connect the four strips while matching every square intersection.
- Work the cream, rust, mustard, cream and olive border sequence around the complete blanket.
- Block the finished throw from the cream grid and border, reshape every pumpkin rib and leaf point by hand and weave all tails into matching yarn.
The finished blanket should show a balanced four-by-four grid containing eight dimensional pumpkins and eight flatter maple leaves framed by cream, rust, mustard and olive edging.
7 Technical Tips
- Pumpkin square cups inward: The appliqué perimeter is tighter than the cream block. Keep sewing stitches approximately 10–12 mm apart and loosen the seam if any block corner lifts more than about 5 mm.
- Four-square rows finish different widths: Small block errors are accumulating. Keep every cream square within approximately 5 mm of the 24 cm target before attaching any motif.
- Maple leaves become narrow after veining: Surface stitches are pulling the lobes inward. Use 6–8 mm vein stitches and stop tightening before the leaf loses more than approximately 4 mm of width.
- Olive pumpkins finish larger: One yarn color has a heavier diameter or looser twist. Compare the first panel from every color and keep long measurements within approximately 5–7 mm.
- Pumpkin ribs flatten after sewing: Attachment stitches are passing through the central surface. Sew only through the rear perimeter and preserve approximately 12–16 mm of central depth.
- Leaf tips curl completely off the blanket: Too little attachment has been added near the points. Place one small tack about 8–10 mm behind each major lobe tip while keeping the side edges free.
- Border waves around square joins: Duplicated seam loops are adding perimeter stitches. Skip extra join loops and use only the stated corner increases before starting the next color round.
Why an Exact Eight-and-Eight Motif Split Works
The equal count is one of the strongest structural decisions in this pumpkin maple leaf granny square blanket pattern. Pumpkins contribute volume and rounded shapes, while maple leaves contribute sharp points and flatter surfaces.
Neither motif dominates numerically.
Because the visual weights differ, an equal count still produces variation rather than a strict checkerboard.
Color strengthens that effect. Rust, mustard and olive move through both motif types, so a green square does not automatically mean leaf and an orange square does not always mean pumpkin.
The viewer reads the grid by shape first and color second.
Why the Background Squares Are Larger Than Published Pumpkin Blocks
Published pumpkin granny squares commonly measure around 10–11 cm, but the supplied blanket clearly uses larger background blocks.
A 14–16 cm raised pumpkin needs additional cream space around its sides.
Moving to approximately 24 cm per square leaves roughly 4–5 cm of visible field around a centered pumpkin.
The same larger scale also gives the five-lobed maple leaves enough room for their points without touching the joining seams.
That negative space is particularly important around the rust motifs because darker yarn appears visually heavier than cream.
Adjusting the Blanket Size
For a smaller lap blanket, use three columns by four rows for twelve blocks.
Make six pumpkin squares and six leaf squares.
A five-by-four version requires twenty blocks and works well for a longer throw.
For a larger square blanket, use five columns by five rows and alternate the center motif according to the surrounding blocks.
Keep individual square size unchanged so the pumpkin-to-background ratio remains consistent.
Changing the Pumpkin Colors
Rust, mustard and olive match the reference closely.
Terracotta can replace rust for a softer orange.
Sage can replace olive when less contrast is preferred.
A cream pumpkin can be introduced as one accent, but its ribs will rely more heavily on shadows because the background square is also cream.
Keep all stems green if you want the different pumpkin colors to read as one repeated family.
Changing the Maple Leaf Colors
The leaves can follow the same three-color system as the pumpkins.
Rust gives the strongest contrast against cream.
Mustard produces a lighter central value.
Olive connects the motifs to the outer border and pumpkin stems.
If burgundy is added, use it sparingly because its dark value can compete with the pumpkin rib shadows.
Controlling Pumpkin Depth
A blanket appliqué does not need the stuffing density of a tabletop pumpkin.
Add fiberfill around the outer wall rather than filling the complete center.
After gathering the second end, press both centers together.
The pumpkin should remain easy to compress with two fingers.
If the motif projects more than about 16 mm from the square, remove some filling before sewing.
Lower depth reduces weight and helps the blanket fold normally.
Controlling Maple Leaf Shape
Pin each finished leaf before adding surface veins.
Compare its width after embroidery.
If the lobe tips move inward by more than a few millimeters, loosen the central vein.
During attachment, sew the stem and major central line first.
Add tip tacks only after the square is placed flat.
The final leaf should read as raised crochet without becoming a rigid patch.
Keeping the Four-by-Four Grid Straight
Join complete horizontal rows rather than adding blocks one at a time around the blanket.
Measure each four-square strip.
Then mark the three vertical intersections before connecting neighboring rows.
If one join shifts more than approximately 5 mm, reopen that short section immediately.
A multicolor border can frame a straight grid, but it cannot correct an intersection that has moved several centimeters.
Final Blocking
Pin the outer corners first.
Add pins where each internal seam meets the border.
Do not push pins through pumpkin centers or maple leaf lobes.
Allow the cream background and multicolor edging to dry flat.
Afterward, lift the ribbed pumpkin surfaces and leaf points with your fingers.
Check the blanket from several feet away so color distribution and block alignment can be judged as one complete grid.
Conclusion
Standardize the sixteen cream blocks before starting the motif batch because an exact eight-pumpkin, eight-leaf layout makes mismatched square dimensions easy to detect. Your next step is to block one 24 cm square, make one ribbed pumpkin and one maple leaf, then test both attachment methods before producing the remaining pieces. Keep the pumpkins shallow and the leaf margins partly free. Share the finished pumpkin maple leaf granny square blanket pattern project on Pinterest with the entire four-by-four grid visible, then post a motif close-up on Instagram using #PumpkinMapleGrannyBlanket. For this blanket specifically, would you keep the olive pumpkins or replace them with cream pumpkins?









