Introduction
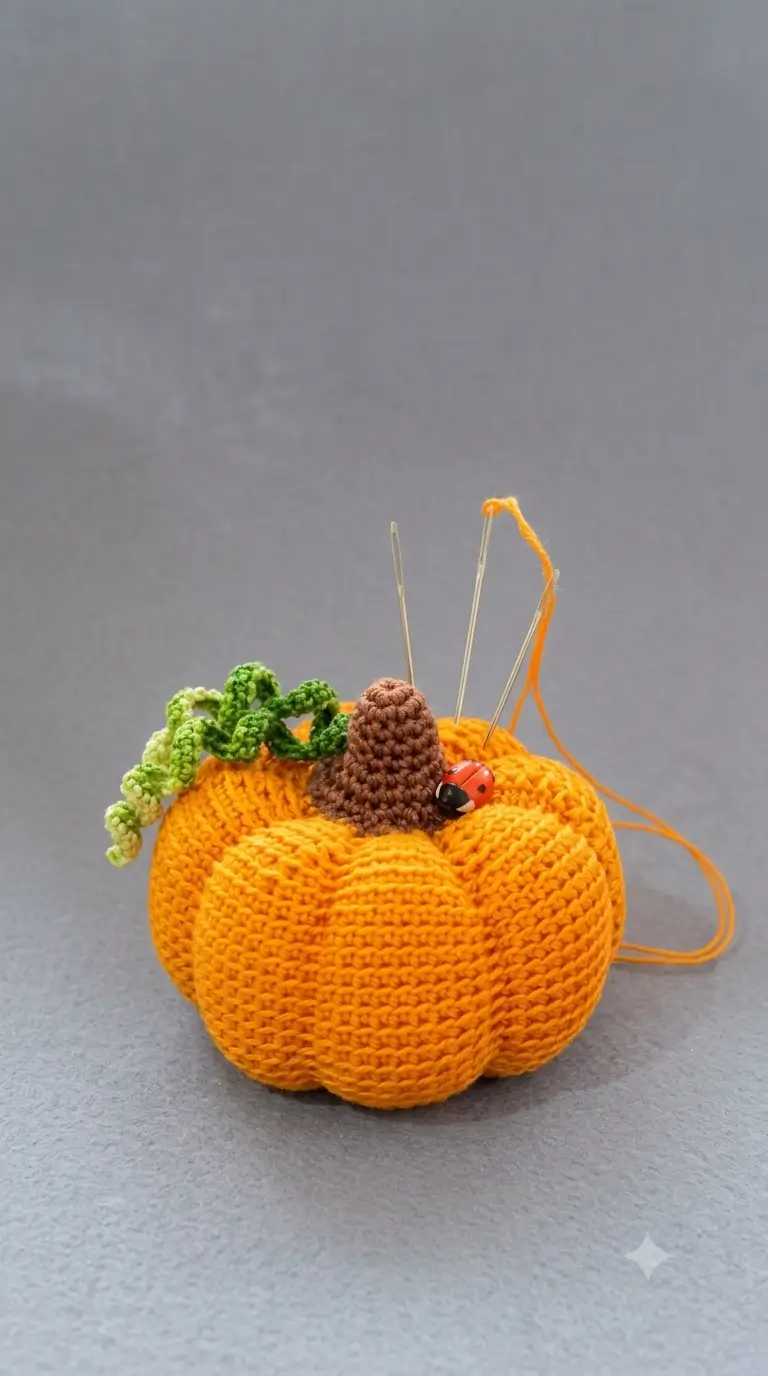
A pumpkin pincushion fails when its lobes collapse around the needle shaft instead of supporting a firm working crown. This amigurumi pumpkin pincushion crochet pattern uses light yarn, a 2.5 mm hook, dense stuffing and six sculpted ribs to produce a piece about 6–6.5 cm wide. The skill level is easy. Its compact body keeps sewing needles together without taking over the worktable.
The Design: What Makes This Pumpkin Different
Three structural decisions control this crochet pumpkin pincushion. First, the body reaches a 30-stitch plateau before decreasing, producing enough width for six visible lobes without making the crown excessively tall. Second, segmenting yarn is pulled from the bottom pole to the top after stuffing. That method creates the deep furrows seen in the reference photograph while preserving a solid central area for pins. Third, the brown stem has a widened base so it does not disappear between the lobes.
The two green spirals are worked separately in different shades. They reproduce the asymmetrical vine growth visible beside the stem and distinguish this mini pumpkin crochet pattern from a basic orange sphere.
A common mistake is under-stuffing. Once the external rib yarn is tightened, a soft shell compresses rather than holding six clean pumpkin segments.
Project Info at a Glance
| Skill Level | Time | Finished Size | Hook | Best For |
|---|---|---|---|---|
| Easy | About 1.5–2 hours | 6–6.5 cm wide | 2.5 mm | Sewing needles and pins |
Materials and Tools
Yarn
- Golden orange — #3 Light/DK — one 50 g ball; the actual project uses substantially less — YarnArt Jeans or a similar tightly twisted cotton/acrylic yarn.
- Brown — #3 Light/DK — scrap quantity for the stem.
- Dark green — #3 Light/DK — scrap quantity for the shorter tendril.
- Light green — #3 Light/DK — scrap quantity for the longer tendril.
- Orange shaping strand — approximately 100–120 cm cut from the main yarn after the body is complete.
Tools
- 2.5 mm crochet hook
- Polyester fiberfill
- Tapestry needle
- Stitch marker
- Scissors
- 6 removable pins for marking rib positions
- 10–12 mm ladybug button or charm, optional
- Strong sewing thread for attaching the ladybug
- Safety eyes: none
Abbreviations
- MR — magic ring
- sc — single crochet
- inc — 2 sc in one stitch
- dec — invisible single-crochet decrease
- sl st — slip stitch
- ch — chain
- BLO — back loop only
- st/sts — stitch/stitches
- R/Rnd — round
An invisible decrease is worked through the front loops of the next two stitches so the reduction does not create a large visible gap after stuffing.
Pattern — Step by Step
Work in a continuous spiral unless another method is stated.
Pumpkin Body — Make 1
Yarn: golden orange.
R1: 6 sc in MR (6)
R2: inc ×6 (12)
R3: (sc, inc) ×6 (18)
R4: (2 sc, inc) ×6 (24)
R5: (3 sc, inc) ×6 (30)
R6: sc around (30)
R7: sc around (30)
R8: sc around (30)
R9: sc around (30)
R10: sc around (30)
R11: sc around (30)
R12: (3 sc, dec) ×6 (24)
R13: (2 sc, dec) ×6 (18)
Stuff firmly now. Push filling toward the side walls first, then pack the centre. Keep the bottom pole flat rather than domed.
R14: (sc, dec) ×6 (12)
R15: dec ×6 (6)
Fasten off. Leave a 20 cm tail, thread it through the front loops of the remaining six stitches and close the opening.
Pumpkin Rib Sculpting — Make 6 Ribs
Yarn: matching golden orange.
Cut approximately 100–120 cm of orange yarn. Mark six equal positions around the circumference with removable pins.
Insert the tapestry needle at the bottom centre and exit through the top centre. Bring the strand over the outside surface at the first marker, return through the bottom centre, then pull until the body forms a distinct groove.
Repeat at all six marked positions. The rib thread should compress the surface without disappearing between the crochet stitches. Keep all six channels at comparable depth.
Knot discreetly at the bottom centre and bury the yarn ends inside the body.
Brown Stem — Make 1
Yarn: brown.
Leave a 20 cm starting tail.
R1: 6 sc in MR (6)
R2: sc around (6)
R3: sc around (6)
R4: sc around (6)
R5: sc around (6)
R6: inc ×6 (12)
R7: sc around (12)
Fasten off. Leave a 20 cm sewing tail.
Do not pack the stem hard. A narrow twist of fiberfill is enough to stop the upper section folding while leaving the widened base easy to sew flat.
Dark Green Corkscrew Vine — Make 1
Yarn: dark green.
Ch 24.
Starting in the second chain from the hook, work 2 sc in each ch across (46 sc).
Fasten off. Leave a 15 cm tail. The doubled stitches force the chain into a controlled corkscrew. Do not block it flat.
Light Green Corkscrew Vine — Make 1
Yarn: light green.
Ch 30.
Starting in the second chain from the hook, work 2 sc in each ch across (58 sc).
Fasten off. Leave a 15 cm tail. The extra six chains produce the longer hanging spiral visible beside the stem.
Ladybug Accent — Make 1 Optional Accessory
Material: 10–12 mm plastic or wooden ladybug button or charm.
This element is not crocheted. Position the charm beside the stem rather than in the central needle-insertion zone.
Pass strong sewing thread through the charm holes or attachment loop and through several crochet stitches below. Knot the thread securely and bury the thread ends.
Do not use a detachable hard charm on an item intended for a child.
Sewing Needles
The metal needles shown in the design are functional props, not crochet parts. Insert them only after assembly.
Keep the first test needle at least 10 mm from the stem base. This checks that the central stuffing remains penetrable and that the needle does not strike the ladybug attachment.
Assembly
- Place the closed pumpkin body on a flat surface and identify the least domed end as the base.
- Mark six equal rib positions from bottom centre to top centre before tightening any sculpting strand.
- Pull all six ribs to comparable depth, checking the silhouette after every second rib.
- Centre the brown stem where the rib lines converge at the top.
- Sew the 12-stitch stem base to the pumpkin through two complete passes around its perimeter.
- Position the dark green vine behind the left side of the stem and stitch its first 10–12 mm to the body.
- Add the light green vine beside it, allowing the final coils to hang lower than the dark vine.
- Attach the ladybug about 8–12 mm from the stem, outside the main vertical needle zone.
- Weave every yarn tail through at least 3 cm of stuffed body before trimming.
- Insert one sewing needle into the crown to test resistance, then redistribute stuffing if the shaft leans rather than standing securely.
The completed piece has one stuffed pumpkin body, six structural ribs, one stem, two curled vines and an optional ladybug accent.
7 Technical Tips
- Lost round position: Move the stitch marker into the first stitch after every completed round. A one-stitch drift repeated across several rounds shifts the decrease lines and produces a visibly twisted body.
- Soft pincushion crown: Pack the final 2 cm around the top centre more firmly than the lower sides. Under-stuffing here lets needles lean sideways and makes the rib grooves collapse during use.
- Visible decrease holes: Work every decrease through the front loops only. A conventional two-stitch decrease can expose filling once the orange surface is pulled inward by the sculpting strands.
- Eye placement: This pumpkin has no safety eyes, so no washer installation is required before closure. If a face is added, install safety-eye hardware before R14 while the opening can still be reached.
- Uneven rib spacing: Place all six markers at roughly 60-degree intervals before pulling the first sculpting strand. Freehanding one rib at a time can leave the final segment narrower than the other five.
- Stem lean: Pin the stem before sewing and keep its widened 12-stitch base completely inside the top rib junction. If part of the base crosses a groove, the stem can pull one lobe upward.
- Loose woven tails: Bury each shaping or assembly tail through at least 3 cm of dense stuffing and fabric before cutting. A short tail can migrate back through the surface when sewing needles repeatedly compress the pincushion.
Conclusion
Check the finished pumpkin against two measurements before putting it into service: roughly 6–6.5 cm across and enough stuffing density for an inserted needle to remain stable near the crown. If the ribs look shallow, tighten the sculpting strands before trimming their tails; if the body rocks, redistribute filling away from the lower centre. The next practical step is to make a second version with a different green-vine length and compare needle access around the stem. Save this amigurumi pumpkin pincushion crochet pattern to Pinterest and share the finished build on Instagram with #PumpkinPincushion. Which of the six pumpkin lobes will you leave clear as the main needle-working section?









