Introduction
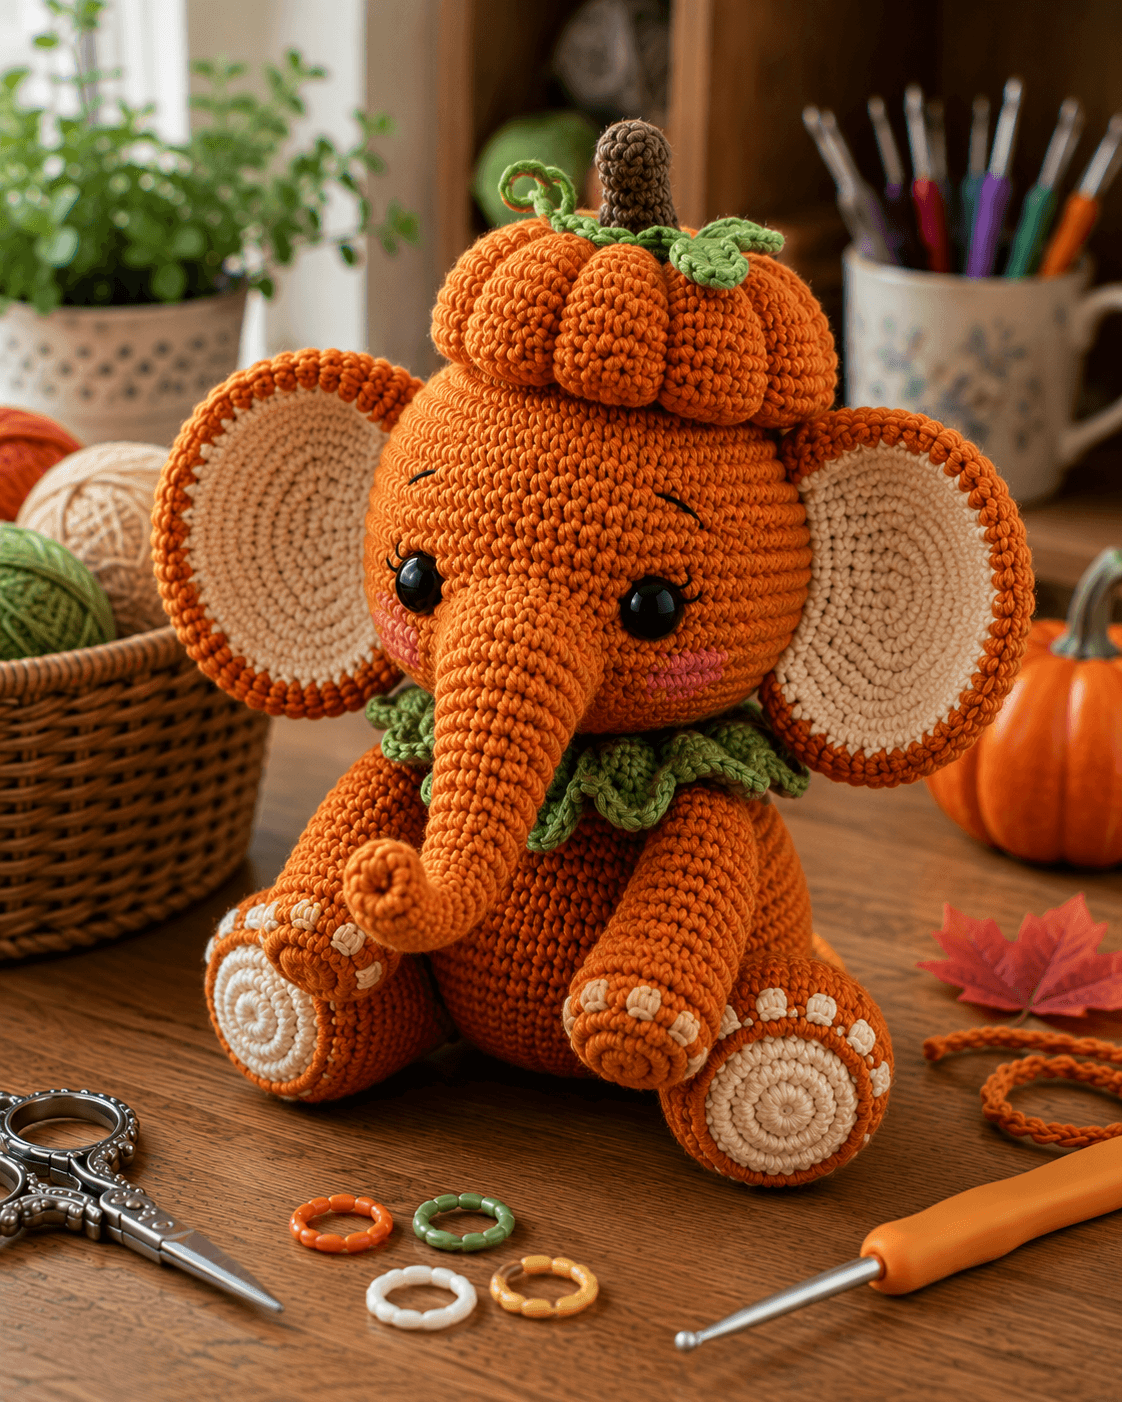
A pumpkin balanced between elephant ears this wide needs its crown compressed before either leaf is sewn in place. This pumpkin elephant amigurumi crochet pattern uses worsted yarn, a 3.5 mm hook and 15 mm eyes to make an approximately 29–33 cm sitting toy. Orange anatomy, cream ear centers, a sculpted pumpkin hat and green foliage make it an intermediate fall construction.
The Design: What Makes This Pumpkin Elephant Different
The 42-stitch head is intentionally larger than the 36-stitch torso because the forehead must carry a pumpkin crown while still supporting two broad ears and a long trunk. Cream inner-ear discs stop the orange head and orange outer ears from merging visually, while 30-stitch back legs create a stable seated base under the top-heavy character. The pumpkin is constructed separately and sculpted into six shallow lobes before attachment. That keeps its shaping strands away from the elephant head. A green leafy collar repeats the crown foliage at neck level and ties the costume together. One common error in a crochet elephant with pumpkin hat is attaching the pumpkin before the ears are pinned. A crown that appears centered on the unfinished head may sit visibly off-axis once both ears extend beyond it.
Project Info at a Glance
| Skill Level | Time | Finished Size | Hook | Best For |
|---|---|---|---|---|
| Intermediate | 12–16 hours | Approx. 29–33 cm sitting height | 3.5 mm | Fall display toys, Halloween decor and handmade gifts |
Materials and Tools
Yarn
- Pumpkin orange — worsted / medium #4 — approximately 190–220 g — head, trunk, outer ears, body, limbs and pumpkin crown.
- Warm cream — worsted / medium #4 — approximately 35–45 g — inner ears, foot pads and toe details.
- Olive green — worsted / medium #4 — approximately 35–45 g — crown leaves, vine and leafy collar.
- Medium brown — worsted / medium #4 — approximately 10–15 g — pumpkin stem.
- Dusty pink — small quantity — cheek patches.
- Black — small quantity — eyebrows and lashes.
Tools
- 3.5 mm crochet hook
- 15 mm safety eyes
- Polyester fiberfill
- Long tapestry needle
- Standard yarn needle
- Stitch markers
- Dressmaking pins
- Scissors
- Measuring tape
Embroidered eyes can replace plastic eyes when a project needs an all-yarn face or when detachable hard components are unsuitable.
Abbreviations
- MR — magic ring
- sc — single crochet
- inc — increase
- dec — decrease
- sl st — slip stitch
- ch — chain
- hdc — half double crochet
- dc — double crochet
- BLO — back loop only
An invisible decrease is worked through the front loops of the next two stitches before completing one single crochet through both loops.
Pattern — Step by Step
Work stuffed pieces in continuous spirals unless a section specifically uses rows. Move the round marker after every completed round.
Head
Yarn: pumpkin orange — original reconstruction using standard six-stitch amigurumi geometry.
R1: 6 sc in MR (6)
R2: inc ×6 (12)
R3: (sc, inc) ×6 (18)
R4: (2 sc, inc) ×6 (24)
R5: (3 sc, inc) ×6 (30)
R6: (4 sc, inc) ×6 (36)
R7: (5 sc, inc) ×6 (42)
R8: sc around (42)
R9: sc around (42)
R10: sc around (42)
R11: sc around (42)
R12: sc around (42)
R13: sc around (42)
R14: sc around (42)
R15: sc around (42)
R16: sc around (42)
R17: (5 sc, dec) ×6 (36)
R18: sc around (36)
R19: (4 sc, dec) ×6 (30)
R20: (3 sc, dec) ×6 (24)
R21: (2 sc, dec) ×6 (18)
R22: (sc, dec) ×6 (12)
R23: dec ×6 (6)
Insert the 15 mm eyes between R12 and R13, approximately 9–10 stitches apart. Pin the ears and trunk temporarily before locking the washers so the eye spacing can be judged against the completed face width.
Stuff firmly through the forehead and sides.
Fasten off and close the final six stitches.
Trunk
Yarn: pumpkin orange.
R1: 6 sc in MR (6)
R2: inc ×6 (12)
R3: sc around (12)
R4: sc around (12)
R5: sc around (12)
R6: sc around (12)
R7: sc around (12)
R8: sc around (12)
R9: sc around (12)
R10: sc around (12)
R11: (sc, inc) ×6 (18)
R12: sc around (18)
R13: sc around (18)
R14: sc around (18)
R15: sc around (18)
R16: sc around (18)
Stuff the 18-stitch base lightly. Keep the first 5–6 cm near the narrow tip much softer so it can curl upward.
Fasten off with a 45 cm sewing tail.
Shape the Curled Trunk
Thread approximately 45 cm of orange yarn onto a long needle.
Enter the underside about 2 cm from the tip.
Travel internally toward the middle of the trunk and return to the underside.
Pull until the end curves upward approximately 35–45 degrees.
Add a second shorter shaping pass only if the tip falls after the yarn is released.
Outer Ears — Make 2
Yarn: pumpkin orange.
R1: 6 sc in MR (6)
R2: inc ×6 (12)
R3: (sc, inc) ×6 (18)
R4: (2 sc, inc) ×6 (24)
R5: (3 sc, inc) ×6 (30)
R6: (4 sc, inc) ×6 (36)
Fasten off with a 45 cm sewing tail.
Target approximately 10–11 cm across.
Inner Ears — Make 2
Yarn: warm cream.
R1: 6 sc in MR (6)
R2: inc ×6 (12)
R3: (sc, inc) ×6 (18)
R4: (2 sc, inc) ×6 (24)
R5: (3 sc, inc) ×6 (30)
Fasten off with a 30 cm tail.
Center one cream disc on each orange ear.
Sew around the cream edge while leaving approximately one orange round visible.
Orange Ear Edge
Join orange yarn at the lower inner edge of each assembled ear.
Sc once around the complete outer perimeter.
Fasten off.
This extra edge gives the visible orange rim more definition.
Cheek Patches — Make 2
Yarn: dusty pink.
R1: 6 sc in MR. (6)
Sl st to the first stitch.
Fasten off with a 15 cm sewing tail.
Flatten each tiny circle before attachment.
Face Placement
Center the trunk beneath the midpoint between both eyes.
The 18-stitch base should begin several rounds below the eye line.
Place one cheek patch below and slightly outside each eye.
Embroider one short black eyebrow above each eye.
Add two small outer lash stitches if you want the expression visible in the reference.
Body
Yarn: pumpkin orange.
R1: 6 sc in MR (6)
R2: inc ×6 (12)
R3: (sc, inc) ×6 (18)
R4: (2 sc, inc) ×6 (24)
R5: (3 sc, inc) ×6 (30)
R6: (4 sc, inc) ×6 (36)
R7: sc around (36)
R8: sc around (36)
R9: sc around (36)
R10: sc around (36)
R11: sc around (36)
R12: sc around (36)
R13: sc around (36)
R14: (4 sc, dec) ×6 (30)
R15: sc around (30)
R16: (3 sc, dec) ×6 (24)
R17: sc around (24)
R18: (2 sc, dec) ×6 (18)
R19: (sc, dec) ×6 (12)
R20: dec ×6 (6)
Stuff the lower body firmly because it supports the oversized head. Leave the final 2–3 cm slightly softer for the neck seam.
Fasten off and close.
Front Legs — Make 2
Yarn: pumpkin orange.
R1: 6 sc in MR (6)
R2: inc ×6 (12)
R3: (sc, inc) ×6 (18)
R4: sc around (18)
R5: sc around (18)
R6: sc around (18)
R7: sc around (18)
R8: sc around (18)
R9: sc around (18)
R10: (sc, dec) ×6 (12)
R11: sc around (12)
R12: sc around (12)
R13: sc around (12)
Stuff the lower half firmly and the upper third lightly.
Fasten off with a 35 cm sewing tail.
Cream Front Toe Marks
Yarn: warm cream.
Use three short surface stitches across the visible front end of each arm.
Keep each mark approximately 6–8 mm long.
Do not tighten the stitches enough to flatten the paw.
Back Legs — Make 2
Yarn: pumpkin orange.
R1: 6 sc in MR (6)
R2: inc ×6 (12)
R3: (sc, inc) ×6 (18)
R4: (2 sc, inc) ×6 (24)
R5: (3 sc, inc) ×6 (30)
R6: sc around (30)
R7: sc around (30)
R8: (3 sc, dec) ×6 (24)
R9: sc around (24)
R10: (2 sc, dec) ×6 (18)
R11: sc around (18)
R12: (sc, dec) ×6 (12)
Stuff the round foot area firmly.
Leave the final round softer for sewing.
Fasten off with a 40 cm tail.
Cream Foot Pads — Make 2
Yarn: warm cream.
R1: 6 sc in MR (6)
R2: inc ×6 (12)
R3: (sc, inc) ×6 (18)
Fasten off with a 25 cm sewing tail.
Sew one flat circle to the forward-facing end of each back foot.
Rear Toe Marks
Using cream yarn, embroider three small marks above each foot pad.
Keep the marks approximately 6 mm apart.
Pumpkin Crown Accessory
The miniature pumpkin is made separately, sculpted and then attached to the head. This prevents the shaping yarn from pulling directly on the elephant’s forehead stitches.
Mini Pumpkin Body
Yarn: pumpkin orange.
R1: 6 sc in MR (6)
R2: inc ×6 (12)
R3: (sc, inc) ×6 (18)
R4: (2 sc, inc) ×6 (24)
R5: (3 sc, inc) ×6 (30)
R6: sc around (30)
R7: sc around (30)
R8: sc around (30)
R9: sc around (30)
R10: sc around (30)
R11: (3 sc, dec) ×6 (24)
R12: (2 sc, dec) ×6 (18)
R13: (sc, dec) ×6 (12)
R14: dec ×6 (6)
Stuff moderately. Keep the center softer than the outer wall so the miniature pumpkin can be compressed.
Fasten off with a long orange tail.
Sculpt Six Pumpkin Lobes
Pass the long orange tail from the crown through the bottom center and return.
Compress the mini pumpkin by approximately 10–12 mm.
Mark six positions around its circumference at roughly 60-degree intervals.
Wrap a matching orange strand from top to bottom through each marked valley.
Work opposite grooves in pairs.
Keep each channel approximately 4–6 mm below the neighboring lobe surfaces.
Brown Pumpkin Stem
Yarn: medium brown.
R1: 6 sc in MR (6)
R2: sc around (6)
R3: sc around (6)
R4: sc around (6)
R5: sc around (6)
R6: sc around (6)
R7: inc ×6 (12)
Fasten off with a 25 cm tail.
Stuff only the lower portion lightly.
Pumpkin Leaves — Make 2
Yarn: olive green.
Ch 7.
Starting in the second chain work:
sl st, sc, hdc, dc, hdc, sc.
Work 3 sc in the final chain.
Rotate and work along the opposite side:
sc, hdc, dc, hdc, sc, sl st.
Fasten off with a 15 cm tail.
Curled Pumpkin Vine
Yarn: olive green.
Ch 18.
Starting in the second chain, work 3 sc in every chain.
The added stitches force the chain into a spiral.
Fasten off with a 15 cm attachment tail.
Assemble the Pumpkin Crown
Sew the brown stem into the center of the sculpted mini pumpkin.
Place one green leaf on each side of the stem.
Attach only the lower 10–15 mm of each leaf so the pointed ends remain raised.
Sew only the first 10 mm of the vine beside the stem.
Leave the rest of the coil free.
Green Leafy Collar
The reference also uses a botanical collar between the head and body.
Collar Foundation
Yarn: olive green.
Ch 37.
Starting in the second chain, sc across. (36)
Ch 1 and turn.
Sc across again. (36)
Collar Leaves
Across the next row repeat:
sl st in next stitch, ch 5, starting in second chain work sc, hdc, dc, hdc, sl st into next foundation stitch.
Repeat until approximately 8–10 leaf points have been formed.
Fasten off with a 30 cm tail.
The completed collar should wrap around the front and sides of the neck while leaving the back less bulky.
Position the Ears
Pin both assembled ears to the sides of the head before sewing.
The upper attachment point should begin around R7–R8.
Attach approximately 35–40 percent of each ear circumference.
Leave the outer majority free.
Both cream inner discs should remain clearly visible from the front.
Position the Head on the Body
Place the stuffed body on a level surface.
Set the head above it with the trunk centered over the chest.
Pin through a neck zone approximately 4–5 cm wide.
Check the toy from the front and side.
The crown will add more top weight later, so a slightly broader neck seam is preferable to a narrow attachment point.
Attach the Back Legs
Pin one back leg to each lower side of the body.
Turn the cream foot pads toward the front.
Let both feet project approximately 3–4 cm beyond the body.
Set the elephant on a hard surface before sewing.
The body and two feet should create a stable three-point sitting base.
Attach the Leafy Collar
Wrap the green collar around the upper body immediately below the head.
Place the leaf points toward the front and sides.
Sew the plain foundation edge into the neck seam.
Leave the outer 20–25 mm of each leaf point free.
Attach the Front Legs
Pin both front legs on the chest below the collar.
Leave approximately 3–4 stitches between them.
Angle the paws slightly forward so the cream toe marks remain visible.
Sew through a broad shoulder area rather than one narrow round.
Attach the Pumpkin Crown to the Head
Pin the completed pumpkin between the ears.
Check the elephant from directly in front.
The pumpkin stem should align approximately with the center of the trunk.
Sew around the lower 40–50 percent of the mini pumpkin.
Do not sew through the sculpted upper lobes.
Keep the leaves and vine free.
Assembly
- Complete and stuff the 42-stitch orange head, then position the 15 mm eyes between R12 and R13 approximately 9–10 stitches apart.
- Attach the 18-stitch trunk beneath the eyes and use concealed underside yarn to lift its soft tip approximately 35–45 degrees.
- Sew the cream inner discs to the orange ears, add the orange edge round and attach only about 35–40 percent of each ear to the head.
- Add the two pink cheek circles, black eyebrows and optional lash stitches after the trunk and ears have established the face proportions.
- Sew the head to the 36-stitch body through a neck area about 4–5 cm wide, then fit the green leafy collar around that seam.
- Attach the 30-stitch back legs low on the torso with their cream pads pointing forward and each foot projecting approximately 3–4 cm.
- Sew the two front legs beneath the collar while keeping the cream toe markings visible from a straight-on view.
- Make and sculpt the 30-stitch miniature pumpkin into six lobes, then add its brown stem, two green leaves and curled vine.
- Center the completed pumpkin between both elephant ears and sew only the lower 40–50 percent of its circumference to the head.
- Set the finished elephant on a level surface, correct any head or leg lean and weave every remaining yarn tail through at least 4 cm of matching crochet.
The completed elephant should sit without support while the pumpkin crown remains centered above the trunk, both cream-lined ears stay visible and the green foliage projects away from the orange body.
7 Technical Tips
- Pumpkin crown tips forward: A stuffed 30-stitch accessory adds weight above the forehead. Sew its lower 40–50 percent to the head and keep the stem filling light so the top does not act as a lever.
- Ears disappear behind the pumpkin: The crown has been positioned too low or the ears are sewn too far backward. Keep the upper ear attachments around R7–R8 and leave roughly 60 percent of each disc free.
- Trunk hangs straight down: Dense filling prevents the tip from bending. Keep the narrow first 5–6 cm lightly stuffed and pull the concealed shaping yarn to approximately 35–45 degrees.
- Head leans after final assembly: A narrow neck seam cannot resist the combined ear and crown weight. Use a 4–5 cm attachment zone and add two concealed support passes across the rear neck.
- Back feet rotate sideways: The legs were sewn without testing the seated base. Pin both pads forward and leave each foot approximately 3–4 cm beyond the torso before making permanent stitches.
- Leafy collar looks like a tight ring: Sewing every green point to the body removes the layered foliage. Attach only the collar foundation and leave about 20–25 mm of every leaf point free.
- Mini pumpkin lobes become narrow wedges: The shaping strands are too tight. Keep each of the six channels around 4–6 mm deep and shape opposite grooves in pairs to distribute stuffing evenly.
Why the Head Uses a 42-Stitch Plateau
The pumpkin elephant amigurumi crochet pattern needs a broad forehead for three separate structural reasons. First, the ears are large enough to extend beyond the head on both sides. Second, the trunk needs a wide attachment base beneath the eyes. Third, the miniature pumpkin occupies the crown between those ears.
A 36-stitch head would make the same accessories look crowded.
The 42-stitch plateau adds one standard six-stitch expansion round without moving into the much larger 54- or 60-stitch head geometry found in some full-size elephant patterns.
That keeps the reconstruction suitable for a roughly 30 cm sitting toy.
Controlling the Pumpkin Crown Weight
The miniature pumpkin should not be filled like a freestanding ornament.
Place most of the stuffing around its outer wall.
Keep the center slightly compressible.
After closure, pull the top and bottom centers together before forming the six grooves.
This reduces height and spreads the lobes outward.
The finished accessory should feel firm enough to hold its shape but noticeably lighter than the elephant head.
If it feels heavy in your palm, remove some filling before attaching the stem.
Adjusting the Elephant Size
For a smaller fall elephant amigurumi, use DK yarn with a 2.75–3 mm hook and stop the head at 36 stitches. Reduce the body to a 30-stitch plateau and the pumpkin crown to 24 stitches.
For a larger version, continue the head to 48 stitches with (6 sc, inc) ×6.
Increase the body to 42 stitches with (5 sc, inc) ×6.
Scale the ears, legs and pumpkin crown only after checking the completed head diameter.
Changing the Pumpkin Color
The image uses one orange family across the elephant and crown, making the cream ears and green foliage especially important for separation.
For stronger contrast, make the elephant rust orange and the crown golden orange.
A cream elephant with an orange pumpkin produces a more conventional autumn palette.
Muted sage can replace olive in the foliage.
Keep the stem darker than both the orange and green sections so it remains readable at the center of the accessory.
Adjusting the Ears
Make the cream inner discs before attaching either ear.
If the orange outer ear curls inward, block it lightly while still flat or add one relaxed sc edge round.
If the cream center buckles, its stitch tension is looser than the orange base.
Use a slightly smaller hook for the cream discs rather than stretching the orange ears around them.
Compare both assembled ears on a table before sewing them to the head.
The diameter difference should remain below approximately 5 mm.
Finishing the Face
Evaluate the face after the trunk and ears are pinned.
Those large pieces change the apparent eye spacing much more than the cheek patches do.
Keep both 15 mm eyes level.
Place the cheek circles low enough that they do not touch the eye washers inside the head.
Curve the eyebrows gently toward the outside.
Check the trunk base from directly above; even a few millimeters of lateral offset becomes visible beneath the centered pumpkin stem.
Finishing the Pumpkin Costume
Lift the two crown leaves away from the miniature pumpkin after all sewing is complete.
Turn the spiral vine until at least one full curl can be seen from the front.
Spread the leafy collar around the shoulders so the front legs remain visible.
The costume elements should create three distinct levels: pumpkin crown above the head, cream-lined ears at face height and green collar above the torso.
That separation keeps the character readable instead of turning the accessories into one dense cluster.
Conclusion
Pin the ears before centering the crown because the pumpkin position depends on the final width of the elephant’s head. Your next step is to complete the 42-stitch head, trunk and both layered ears, then test the face alignment before making the pumpkin accessory permanent. Shape its six lobes separately and add the collar only after the head-to-body seam is stable. Share the finished pumpkin elephant amigurumi crochet pattern project on Pinterest with a straight-on view, then post a crown close-up on Instagram using #PumpkinCrownElephant. For this elephant specifically, would you keep the entire body orange or make the elephant cream and leave only the pumpkin crown orange?









