Introduction
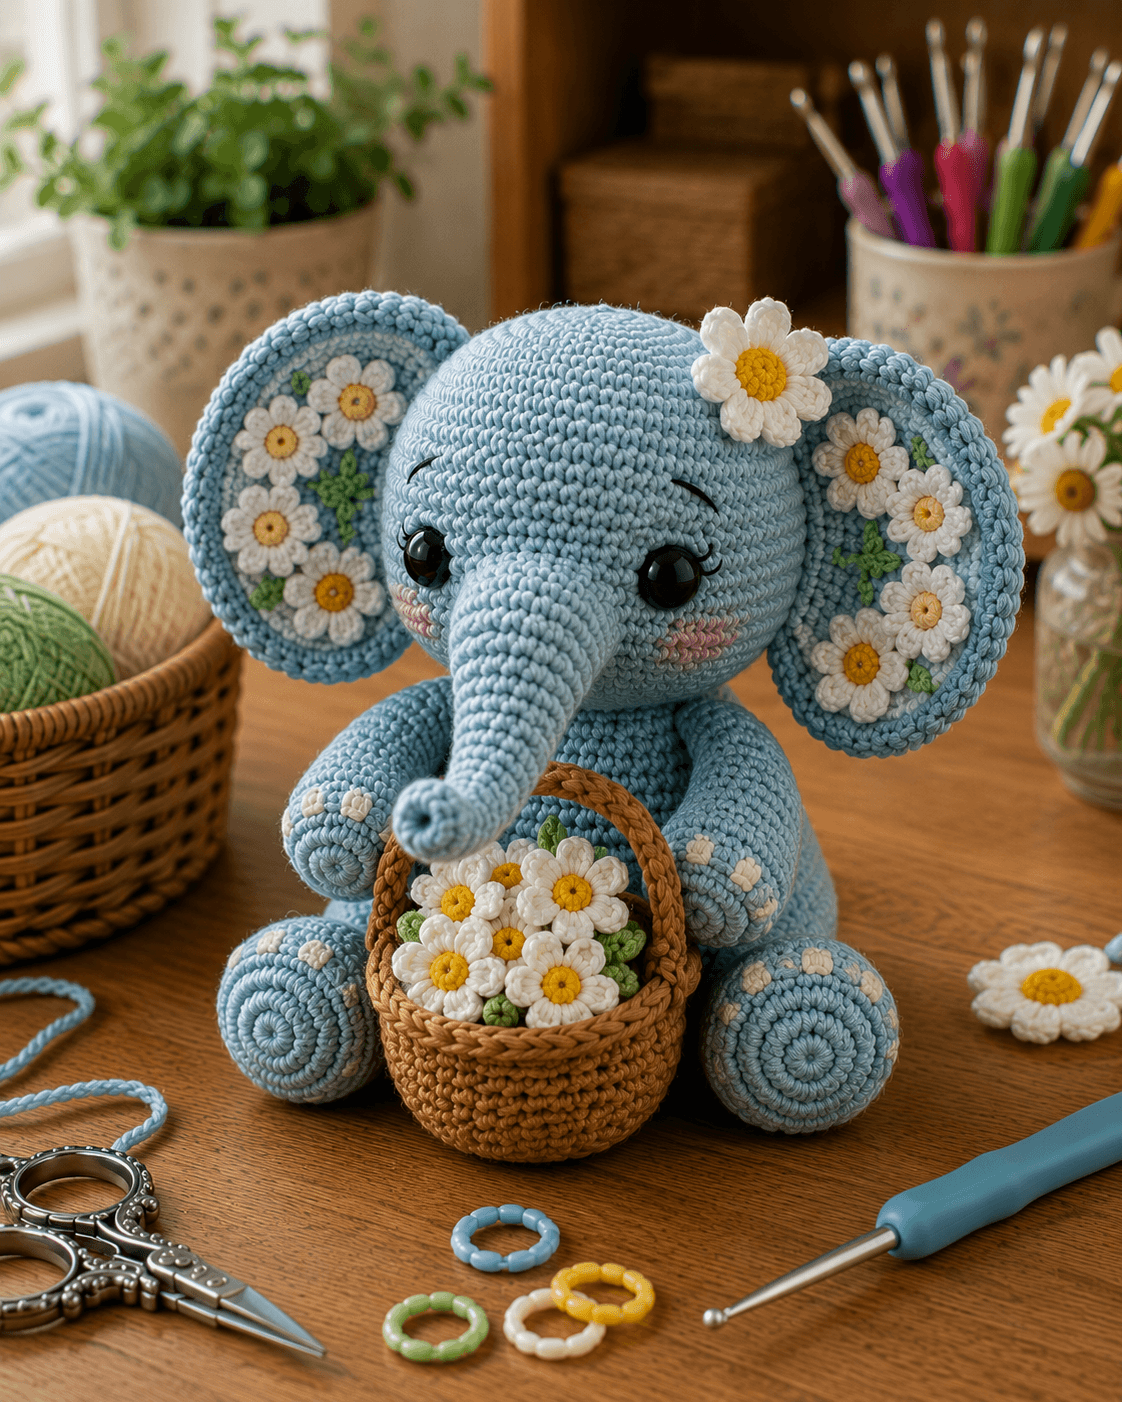
Five daisies inside one elephant ear create enough weight to make that ear rotate unless its attachment follows the full inner head curve. This floral elephant amigurumi crochet pattern uses worsted yarn, a 3.5 mm hook and 15 mm eyes to make an approximately 27–31 cm seated elephant. Floral ears, a forehead daisy and a filled crochet basket make it an intermediate-to-advanced construction.
The Design: What Makes This Floral Elephant Different
The head reaches 42 stitches so the broad ears, long trunk and layered floral details have enough visual space without crowding the eyes. Each ear uses a blue outer disc and a smaller cream-centered insert, then receives several white daisies and tiny green leaves. The decoration sits inside the ears rather than around their rims, which keeps the silhouette recognizably elephant-shaped. A separate 36-stitch body supports two large seated legs and narrower front legs, giving the figure enough stability to hold a basket against the belly. The brown basket is shallow and wide so the flowers remain visible above its rim. One common mistake in a daisy elephant amigurumi is sewing all floral appliqués firmly around every petal. That adds stiffness and can pull the ear into a cup instead of leaving it open and broad.
Project Info at a Glance
| Skill Level | Time | Finished Size | Hooks | Best For |
|---|---|---|---|---|
| Intermediate–Advanced | 15–20 hours | Approx. 27–31 cm sitting height | 3.5 mm toy / 3.0 mm flowers | Spring displays, nursery decor and handmade gifts |
Materials and Tools
Yarn
- Powder blue — worsted / medium #4 — approximately 170–200 g — head, trunk, outer ears, body and all limbs.
- Warm cream — worsted / medium #4 — approximately 35–45 g — inner ears, foot pads and toe marks.
- White — worsted or DK — approximately 30–40 g — daisies.
- Sunflower yellow — small amount, approximately 8–12 g — flower centers.
- Leaf green — approximately 20–30 g — ear foliage and basket leaves.
- Warm medium brown — approximately 40–50 g — flower basket and handle.
- Dusty pink — small amount — cheek patches.
- Black — small amount — brows and lashes.
Use a firm blue yarn that closes tightly at amigurumi gauge. The head carries substantial surface detail, and loose stitches around the ear and trunk joins become more visible once the appliqués are attached.
Tools
- 3.5 mm crochet hook
- 3.0 mm crochet hook for smaller floral details
- 15 mm safety eyes
- Polyester fiberfill
- Long tapestry needle
- Standard yarn needle
- Stitch markers
- Dressmaking pins
- Scissors
- Measuring tape
For a project where rigid plastic components are unsuitable, replace the safety eyes with securely embroidered black eyes.
Abbreviations
- MR — magic ring
- sc — single crochet
- inc — increase
- dec — decrease
- sl st — slip stitch
- ch — chain
- hdc — half double crochet
- dc — double crochet
- BLO — back loop only
An invisible decrease is worked through the front loops of two neighboring stitches before completing one single crochet through both loops.
Pattern — Step by Step
Work all stuffed components in continuous spirals unless otherwise stated. Move the stitch marker after every completed round.
Head
Yarn: powder blue — original reconstruction using standard six-stitch amigurumi geometry.
R1: 6 sc in MR (6)
R2: inc ×6 (12)
R3: (sc, inc) ×6 (18)
R4: (2 sc, inc) ×6 (24)
R5: (3 sc, inc) ×6 (30)
R6: (4 sc, inc) ×6 (36)
R7: (5 sc, inc) ×6 (42)
R8: sc around (42)
R9: sc around (42)
R10: sc around (42)
R11: sc around (42)
R12: sc around (42)
R13: sc around (42)
R14: sc around (42)
R15: sc around (42)
R16: sc around (42)
R17: (5 sc, dec) ×6 (36)
R18: sc around (36)
R19: (4 sc, dec) ×6 (30)
R20: (3 sc, dec) ×6 (24)
R21: (2 sc, dec) ×6 (18)
R22: (sc, dec) ×6 (12)
R23: dec ×6 (6)
Insert 15 mm eyes between R12 and R13, approximately 9 stitches apart. Temporarily pin the trunk and ears before locking the eye washers so the facial proportions can be checked against the full head width.
Stuff firmly through the forehead, cheeks and lower rear head.
Fasten off and close the final six stitches.
Trunk
Yarn: powder blue.
R1: 6 sc in MR (6)
R2: inc ×6 (12)
R3: sc around (12)
R4: sc around (12)
R5: sc around (12)
R6: sc around (12)
R7: sc around (12)
R8: sc around (12)
R9: sc around (12)
R10: sc around (12)
R11: sc around (12)
R12: (sc, inc) ×6 (18)
R13: sc around (18)
R14: sc around (18)
R15: sc around (18)
R16: sc around (18)
Stuff the lower 18-stitch base lightly. Keep the narrow tip and middle section softer so the trunk can curl toward the front.
Fasten off with a 45 cm sewing tail.
Shape the Trunk
Thread approximately 40 cm of blue yarn onto a long needle.
Enter the underside about 2 cm from the tip.
Travel inside the trunk toward its midpoint.
Exit on the underside and return toward the tip.
Pull until the end curves upward about 35–45 degrees.
Take one shorter shaping stitch if the curl relaxes.
Outer Ears — Make 2
Yarn: powder blue.
R1: 6 sc in MR (6)
R2: inc ×6 (12)
R3: (sc, inc) ×6 (18)
R4: (2 sc, inc) ×6 (24)
R5: (3 sc, inc) ×6 (30)
R6: (4 sc, inc) ×6 (36)
Fasten off with a 50 cm sewing tail.
Target approximately 10–11 cm across before edging.
Inner Ear Discs — Make 2
Yarn: warm cream.
R1: 6 sc in MR (6)
R2: inc ×6 (12)
R3: (sc, inc) ×6 (18)
R4: (2 sc, inc) ×6 (24)
R5: (3 sc, inc) ×6 (30)
Fasten off with a 35 cm sewing tail.
Center the cream disc on the blue ear and sew around its perimeter.
Leave approximately one full blue round visible as an outer frame.
Blue Ear Edge — Make 2
Join blue yarn at the lower inner point.
Sc evenly around the complete ear.
At the widest outer edge, add one extra sc only if the disc begins pulling into a narrow oval.
Fasten off.
Large Ear Daisy — Make 6
Yarn: yellow center and white petals, 3.0 mm hook.
Center R1: 6 sc in MR. (6)
Change to white.
For each petal, work:
ch 3, 2 dc in same stitch, ch 3, sl st in same stitch.
Repeat once in each of the six center stitches.
Fasten off with a 20 cm sewing tail.
Target approximately 3.5–4 cm across.
Small Ear Daisy — Make 4
Yarn: yellow and white.
Center: 5 sc in MR. (5)
Change to white.
In each center stitch work:
ch 2, hdc, dc, hdc, ch 2, sl st.
Repeat five times.
Fasten off.
Target approximately 2.5–3 cm across.
Ear Leaf Sprigs — Make 8
Yarn: leaf green.
Ch 5.
Starting in the second chain:
sl st, sc, hdc, sc.
Work 2 sc in the end chain.
Turn and work along the opposite side:
sc, hdc, sc, sl st.
Fasten off with a 12 cm tail.
Decorate the Ear Centers
Lay both completed ears side by side.
Arrange three larger daisies and two smaller daisies inside each cream-centered disc.
Keep at least 10–15 mm of cream visible around the floral group.
Place four green sprigs between the flowers.
Pin everything before sewing.
Sew through flower centers and only the inner 5–8 mm of selected petals.
Leave most petal edges free so the floral surface remains dimensional.
Forehead Daisy
Yarn: yellow and white.
Center R1: 6 sc in MR (6)
Center R2: inc ×6 (12)
Change to white.
Repeat five petals around the center using groups of center stitches:
ch 3, 2 dc, 2 tr, 2 dc, ch 3, sl st.
Distribute the petal bases evenly around the yellow disc.
Fasten off with a 25 cm sewing tail.
Target approximately 5–6 cm across.
Cheek Patches — Make 2
Yarn: dusty pink.
R1: 6 sc in MR. (6)
Sl st to close.
Fasten off with a 15 cm sewing tail.
Face Placement
Pin the trunk directly beneath the midpoint between the eyes.
Place the cheek circles below and slightly outside each eye.
Embroider one short black eyebrow over each eye.
Add two short lash stitches at the outer upper eye edge.
Pin the forehead daisy above one eye, slightly off-center toward the ear as in the image.
Attach through the yellow center and inner portions of the petals only.
Body
Yarn: powder blue.
R1: 6 sc in MR (6)
R2: inc ×6 (12)
R3: (sc, inc) ×6 (18)
R4: (2 sc, inc) ×6 (24)
R5: (3 sc, inc) ×6 (30)
R6: (4 sc, inc) ×6 (36)
R7: sc around (36)
R8: sc around (36)
R9: sc around (36)
R10: sc around (36)
R11: sc around (36)
R12: sc around (36)
R13: sc around (36)
R14: (4 sc, dec) ×6 (30)
R15: sc around (30)
R16: (3 sc, dec) ×6 (24)
R17: sc around (24)
R18: (2 sc, dec) ×6 (18)
R19: (sc, dec) ×6 (12)
R20: dec ×6 (6)
Stuff the lower body firmly.
Leave the upper 2–3 cm slightly softer so the head can settle into a wider neck seam.
Fasten off and close.
Front Legs — Make 2
Yarn: powder blue.
R1: 6 sc in MR (6)
R2: inc ×6 (12)
R3: (sc, inc) ×6 (18)
R4: sc around (18)
R5: sc around (18)
R6: sc around (18)
R7: sc around (18)
R8: sc around (18)
R9: sc around (18)
R10: (sc, dec) ×6 (12)
R11: sc around (12)
R12: sc around (12)
R13: sc around (12)
Stuff the lower half firmly and the upper portion lightly.
Fasten off with a 35 cm sewing tail.
Front Toe Marks
Yarn: warm cream.
Embroider three short stitches on the visible tip of each front leg.
Keep the marks approximately 6–7 mm long and 4–5 mm apart.
Back Legs — Make 2
Yarn: powder blue.
R1: 6 sc in MR (6)
R2: inc ×6 (12)
R3: (sc, inc) ×6 (18)
R4: (2 sc, inc) ×6 (24)
R5: (3 sc, inc) ×6 (30)
R6: sc around (30)
R7: sc around (30)
R8: (3 sc, dec) ×6 (24)
R9: sc around (24)
R10: (2 sc, dec) ×6 (18)
R11: sc around (18)
R12: (sc, dec) ×6 (12)
Stuff the round lower foot firmly and leave the top soft enough for sewing.
Fasten off with a 40 cm tail.
Cream Foot Pads — Make 2
Yarn: warm cream.
R1: 6 sc in MR (6)
R2: inc ×6 (12)
R3: (sc, inc) ×6 (18)
Fasten off with a 25 cm sewing tail.
Sew one disc to the forward-facing end of each back foot.
Back Toe Marks
Embroider three small cream marks immediately above each foot pad.
Keep them evenly spaced across the blue foot surface.
Brown Flower Basket
The basket should sit between the elephant’s front legs without covering the foot pads or trunk tip.
Basket Base
Yarn: warm medium brown.
R1: 6 sc in MR (6)
R2: inc ×6 (12)
R3: (sc, inc) ×6 (18)
R4: (2 sc, inc) ×6 (24)
R5: (3 sc, inc) ×6 (30)
R6: (4 sc, inc) ×6 (36)
Basket Side
R7: sc BLO around (36)
R8: sc around (36)
R9: sc around (36)
R10: sc around (36)
R11: sc around (36)
R12: sc around (36)
R13: sc around (36)
Fasten off.
Target approximately 10–12 cm across and 6–7 cm high.
Basket Rim
Join brown yarn to R13.
Work one round of reverse sc or a firm standard sc round.
Fasten off.
This extra edge gives the top enough structure to hold the flower stems.
Basket Handle
Yarn: brown.
Ch 38.
Starting in the second chain, sc across. (37)
Ch 1 and turn.
Sc across again. (37)
Fasten off with long tails at both ends.
Attach the handle to opposite basket sides around R11–R12.
Target an arch that rises approximately 9–11 cm above the rim.
Basket Daisies — Make 8
Yarn: yellow center, white petals.
Center: 6 sc in MR. (6)
Change to white.
In each center stitch work:
ch 2, hdc, dc, hdc, ch 2, sl st.
Repeat six times.
Fasten off with a 15 cm tail.
Make several slightly smaller flowers by replacing dc with hdc in the petal sequence.
Basket Leaves — Make 10
Yarn: green.
Ch 6.
Starting in second chain:
sl st, sc, hdc, dc, sc.
Work 2 sc at the tip.
Return down the opposite side:
sc, dc, hdc, sc, sl st.
Fasten off with a 15 cm tail.
Assemble the Flower Cluster
Cut several 12–15 cm lengths of green yarn.
Use them as soft stems rather than inserting wire.
Sew one green stem to the back of each flower.
Add one or two leaves near several flower bases.
Bundle the stems in groups of two or three.
Tie them together loosely with green yarn.
The cluster should remain flexible enough to fill the basket opening.
Fill the Basket
Add a small amount of fiberfill to the lower basket only if it collapses.
Place the flower stems inside.
Arrange the larger daisies toward the center and smaller ones around the outer edge.
Keep the yellow centers at several different heights.
Sew the stems to the inside of the basket rim in three or four anchor groups.
Do not sew every petal to the basket.
Attach the Ears
Pin both decorated ears to the sides of the head.
The upper attachment should begin around R7–R8.
Sew approximately 40–45 percent of each ear circumference to the head.
Because the floral appliqués add weight, use a broader attachment than you would for a plain ear.
Leave the outside half of each ear free.
Attach the Trunk
Center the 18-stitch base directly beneath the eyes.
Pin it before sewing.
Check the elephant from above to confirm that the trunk follows the vertical center of the forehead.
Sew around the complete base using small blue stitches.
Attach the Head to the Body
Place the body on a firm surface.
Set the head above it.
Use a neck attachment zone approximately 4–5 cm wide.
Pin at the front, back and both sides.
Check the head angle with both decorated ears fully spread.
Sew twice around the neck seam if necessary because the floral ears add lateral weight.
Attach the Back Legs
Pin both back legs low on the body.
Turn the cream pads toward the front.
Allow each foot to project approximately 3–4 cm beyond the torso.
Set the elephant upright before sewing.
The body and two feet should create a stable seated base.
Attach the Front Legs
Position the front legs on either side of the belly.
Leave enough space between them for the flower basket.
The inner gap should measure approximately 8–10 cm at the widest point.
Angle the paws slightly inward as if resting around the basket.
Sew through a broad shoulder zone.
Position the Basket
Place the filled basket between the front legs.
The lower edge should sit just ahead of the body rather than high on the chest.
Pass one concealed brown or blue anchoring strand through the basket back and into the elephant belly if the basket is intended to stay attached.
For a removable display accessory, leave the basket unsewn and use the front legs to hold it in place.
Assembly
- Crochet and stuff the 42-stitch blue head, then place the 15 mm eyes between R12 and R13 approximately nine stitches apart.
- Make the trunk and use concealed underside shaping to raise the soft tip approximately 35–45 degrees before sewing its 18-stitch base to the face.
- Crochet two 36-stitch blue outer ears and two 30-stitch cream inner discs, then assemble and edge both ears before adding flowers.
- Decorate each ear with three larger daisies, two smaller daisies and four green leaf sprigs, sewing mainly through centers and inner petal bases.
- Add the forehead daisy, pink cheek patches, brows and lashes only after the ears and trunk establish the final face proportions.
- Sew the 42-stitch head to the 36-stitch body through a neck area approximately 4–5 cm wide, reinforcing the rear seam if the floral ears pull sideways.
- Attach both 30-stitch back legs with cream pads facing forward, then sew the two 18-stitch front legs with an 8–10 cm basket gap between them.
- Crochet the 36-stitch brown basket, add its two-row handle and fill it with eight white daisies plus approximately ten green leaves.
- Place the basket between the front legs and either leave it removable or anchor its back to the belly with one concealed sewing strand.
- Set the elephant on a level surface, correct any ear rotation or head lean and weave every remaining tail through at least 4 cm of matching crochet.
The finished elephant should sit without support while both floral ears remain open, the trunk curves forward and the flower basket stays visible between the front legs.
7 Technical Tips
- Decorated ears rotate forward: Five flowers and several leaves add weight outside the head seam. Attach approximately 40–45 percent of each ear circumference and reinforce the upper 25 mm of the seam with a second pass.
- Flower petals flatten against the ear: Sewing the complete perimeter removes the appliqué depth. Attach through the center and only the inner 5–8 mm of selected petals, leaving most white edges free.
- Trunk falls straight down: The narrow section is overstuffed. Keep the first 5–6 cm soft and use a concealed shaping strand to lift the tip approximately 35–45 degrees.
- Head tilts after ear assembly: Lateral ear weight is overpowering the neck seam. Use a 4–5 cm neck attachment zone and reinforce the rear seam after both ears are permanently attached.
- Basket hides the front paws: Its diameter or placement is too high. Keep the basket around 10–12 cm across and set the lower edge ahead of the belly rather than against the chest.
- Daisy cluster collapses inside the basket: The stems have no internal anchor. Sew the green yarn stems into three or four groups around the inside rim while keeping the flower heads at staggered heights.
- Back legs roll outward: The seated base was not tested before sewing. Keep each cream pad facing forward, project the feet approximately 3–4 cm beyond the body and check the elephant on a hard surface before final stitches.
Why the Ears Need Separate Floral Construction
The ears are the defining feature of this floral elephant amigurumi crochet pattern. Building the daisies separately gives you control over their spacing, size and depth before any permanent ear seam is made.
The cream disc acts as a visual background.
White petals would disappear against a cream elephant body, but they remain readable when enclosed by a blue rim.
Small green sprigs also break up the repeated white circles and help the ear decoration resemble a floral arrangement rather than a row of identical buttons.
Finish both ears completely before attaching either one to the head. That makes side-to-side comparison much easier.
Balancing the Floral Ear Weight
A plain crochet ear is light enough to hang from a short seam.
This version is different.
Each ear carries several extra layers of yarn, so the attachment must spread that load over a longer curve.
Pin the ear in at least four positions before sewing.
Check the outermost edge from the front.
If one ear sits 10 mm farther forward than the other, correct the seam position rather than pulling the free edge backward with a hidden tack.
The symmetry should come from the head attachment itself.
Changing the Elephant Size
For a smaller flower elephant amigurumi, use DK yarn with a 2.75–3 mm hook and stop the head at 36 stitches.
Reduce the body to 30 stitches, ears to a 30-stitch outer disc and back legs to 24 stitches.
For a larger toy, continue the head to 48 stitches with (6 sc, inc) ×6.
Increase the body to 42 stitches using (5 sc, inc) ×6.
Scale the basket after the seated body is assembled rather than changing it from the head dimensions alone.
Changing the Flower Palette
The image uses classic white daisies with yellow centers.
That palette is effective because the blue elephant already supplies a strong body color.
For a softer spring version, alternate white, blush and pale yellow petals.
A meadow version can use lavender, cream and dusty pink flowers with several shades of green foliage.
Keep at least one repeated center color across every flower so the ear arrangements and basket still read as one coordinated floral theme.
Changing the Ear Arrangement
The floral density can be reduced without changing the ear structure.
For a simpler version, use three daisies and two leaf sprigs per ear.
For a fuller floral surface, add one smaller daisy near the upper inner rim.
Avoid covering more than about 70 percent of the cream disc.
Some open background should remain visible around the flowers or the ear becomes visually dense and loses its layered blue-and-cream construction.
Adjusting the Basket
The basket can remain removable, which makes the elephant easier to display in different seasons.
For a fixed accessory, one concealed belly stitch is usually enough when the front legs already hold the sides.
For a deeper basket, add two straight 36-stitch rounds.
For a wider arrangement, expand once more to 42 stitches using (5 sc, inc) ×6, but check that the resulting diameter still fits between the paws.
The handle should remain high enough to frame the flowers without crossing the trunk tip.
Controlling the Face Proportions
Pin the ears and trunk before deciding whether the eyes look correctly spaced.
A nine-stitch gap can appear wide on a bare head but balanced once the trunk fills the center and the ears extend outward.
Keep both eyes level.
The cheek circles should sit below the eye line rather than directly beside the pupils.
Curve the eyebrows slightly upward toward the outside.
Check the face from straight ahead before burying any black or pink yarn tails.
Flower Attachment on a Toy
Decorative appliqués need different attachment from structural limbs.
The yellow flower center can be sewn firmly because it carries the petal group.
The petals themselves should receive only limited tacking.
That keeps their rounded edges visible and reduces distortion of the ear fabric.
For the basket flowers, attach the stem group rather than sewing individual petals to neighboring flowers.
The bouquet should remain layered and slightly irregular.
Finishing the Elephant
Final wet blocking is unnecessary after stuffing.
Shape the ears by hand after their seams are reinforced.
Lift the white petals away from the cream inner discs.
Rotate the elephant on a hard surface and confirm that both back feet and the lower body share the weight.
Arrange the basket handle behind the flowers rather than across them.
Finally, position the forehead daisy so it remains visible from the front without covering the eyebrow or upper eye.
Conclusion
Finish both decorated ears before permanent head assembly because their added weight determines the final neck and face balance. Your next step is to complete the 42-stitch head, trunk and two layered ears, then pin the full floral arrangements before sewing any daisies permanently. Build the basket only after the front-leg spacing is fixed. Share the finished floral elephant amigurumi crochet pattern project on Pinterest with both ears fully visible, then post the daisy basket on Instagram using #DaisyBasketCrochetElephant. For this elephant specifically, would you keep matching daisies in both ears or make one ear daisies and the other small wildflowers?









