Introduction
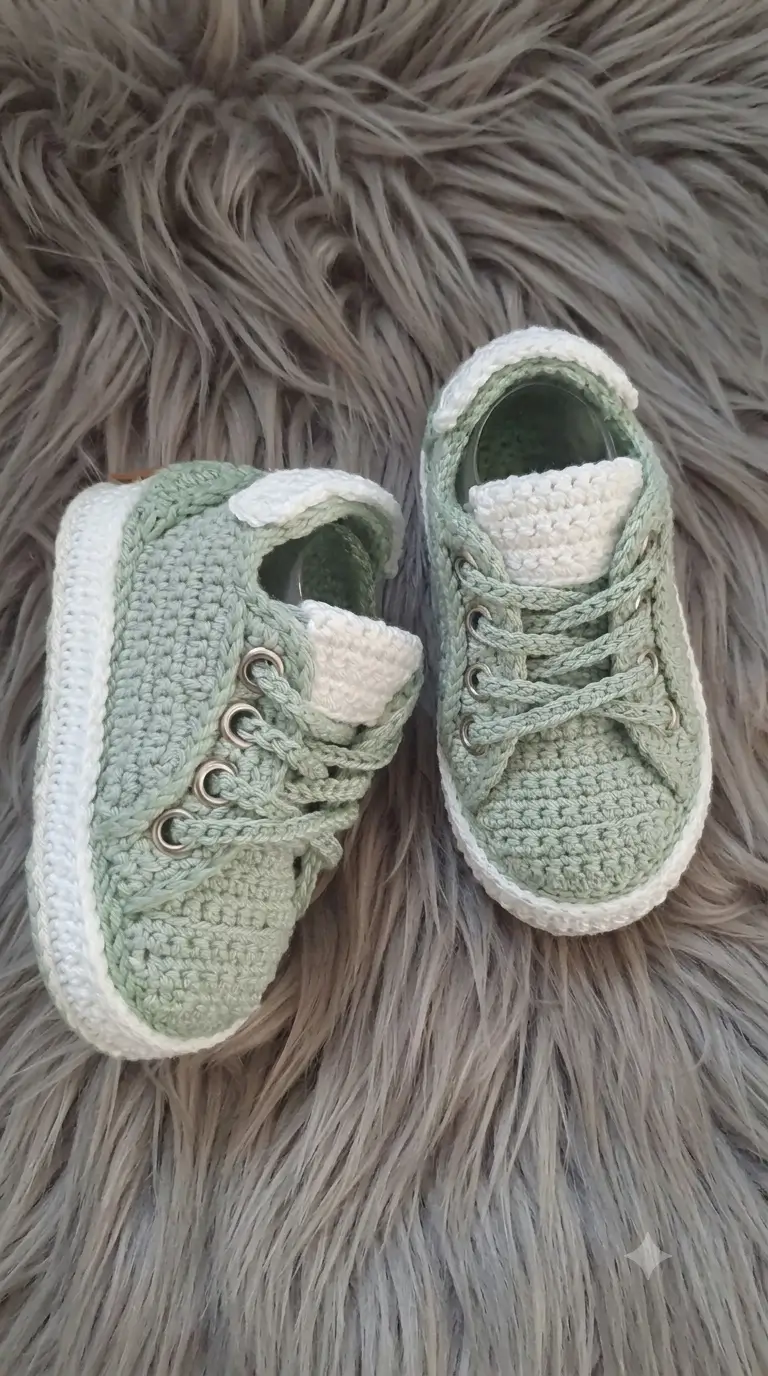
Baby sneakers fail visually when the toe box rises like a bootie instead of tapering under the laces. This crochet baby sneakers pattern recreates the mint-and-white low-top pair in the photo with cotton yarn, a 2 mm hook, and a 9 cm sole for 0–3 months. The skill level is intermediate. The construction is practical for crib shoes because the sole, upper, tongue, eyelet bands, and trim can be checked separately for symmetry.
The Design: What Makes These Mint Sneakers Different
Three structural choices control the sneaker profile. First, the sole is a shallow crochet oval rather than a circular amigurumi base; that keeps the finished length near the verified 9 cm benchmark for 0–3 months. Second, decreases are concentrated at the front of the upper, creating a low toe box rather than a rounded bootie dome. Third, the tongue and eyelet bands are worked separately so the opening remains wide enough to resemble a real lace-up shoe.
The most common error in a crochet baby booties pattern of this type is adding height uniformly around the shoe. The heel then becomes bulky and the toe points upward. A baby sneaker crochet pattern needs controlled front shaping instead. Comparable published designs also divide construction into sole, upper, tongue, heel and laces.
Project Info at a Glance
| Skill Level | Time | Finished Size | Hook | Best For |
|---|---|---|---|---|
| Intermediate | 3–5 hours per pair | Approx. 9 cm sole | 2.0 mm | Crib shoes, supervised photos, keepsake footwear |
The 9 cm measurement follows published 0–3 month sneaker sizing rather than a measurement inferred solely from the photograph.
These are soft crib shoes, not walking shoes. This category is better suited to non-walking babies, supervised photography, or keepsake use.
Materials and Tools
Yarn
- Sage green cotton — Sport/Fingering — approximately 20–30 g — use a smooth, tightly spun cotton yarn.
- Cream-white cotton — same weight — approximately 10–15 g — use the same yarn family as the green to keep the sole and upper gauge compatible.
Tools
- 2.0 mm crochet hook
- Yarn needle
- Locking stitch markers
- Small scissors
- Flexible tape measure
- Polyester stuffing: none
- Safety eyes: none
- Metal eyelets: optional, display-only
- Blocking pins: optional
For an infant-wear version, crochet eyelet spaces are preferable to detachable metal grommets. The photographed hardware can be reproduced for display or photography, but any small detachable component presents an avoidable choking risk.
Abbreviations
- ch — chain
- sc — single crochet
- hdc — half double crochet
- inc — 2 sc in the same stitch
- dec — single crochet two stitches together
- sl st — slip stitch
- BLO — back loop only
- FLO — front loop only
- st/sts — stitch/stitches
- RS — right side
- WS — wrong side
An invisible decrease is made through the front loops of the next two stitches before completing one single crochet; it reduces bulk at the shaped toe.
Pattern — Step by Step
This sneaker construction uses joined rounds for the oval sole and early upper, followed by rows for the heel opening, tongue and eyelet bands. Unlike an amigurumi sphere, the project does not begin with a six-stitch magic ring because an elongated sole requires a foundation chain.
Gauge matters more than age labeling. After Sole Round 3, measure the piece. The finished sole should be close to 9 cm once the white sidewall has been added.
Sole — Make 2
Yarn: cream-white
Ch 11.
R1: Starting in second ch from hook, sc in next 9 ch, 3 sc in last ch. Rotate the foundation chain and work into the unused loops: sc in next 8 ch, 2 sc in final ch. Join with sl st. (22)
R2: Ch 1, inc in first st, sc in next 8 sts, inc in next 3 sts, sc in next 8 sts, inc in final 2 sts. Join. (28)
R3: Ch 1, sc in first st, inc in next st, sc in next 8 sts, (sc, inc) ×3, sc in next 8 sts, (sc, inc) ×2. Join. (34)
Measure now. Work tightly enough that the sole remains flat rather than ruffled.
Do not fasten off.
White Sole Sidewall — Make 2
Yarn: cream-white
R4: Ch 1, sc BLO around. Join. (34)
R5: Ch 1, sc around. Join. (34)
Fasten off. Leave a 10 cm tail.
The BLO round produces the visible change of direction where the white sole turns upward.
Sage Upper — Make 2
Yarn: sage green
Join sage yarn at the center back.
R1: Ch 1, sc around. Join. (34)
R2: Ch 1, sc around. Join. (34)
R3: Sc in next 12 sts, dec ×5 across the center-front ten stitches, sc in next 12 sts. Join. (29)
R4: Sc in next 11 sts, dec ×4, sc in next 10 sts. Join. (25)
Place two markers around the center-front 6 stitches. These stitches form the base of the tongue. The remaining 19 stitches form the side and heel section.
Do not work across the marked six stitches in the following rows.
Row 5: Sc across the 19 heel/side stitches. Turn. (19)
Row 6: Ch 1, dec, sc 15, dec. Turn. (17)
Row 7: Ch 1, sc across. Turn. (17)
Row 8: Ch 1, dec, sc 13, dec. Turn. (15)
Fasten off. Leave a 20 cm tail for shaping the back seam if needed.
Tongue — Make 2
Yarn: cream-white
Join cream yarn to the first of the six reserved front stitches.
Row 1: Ch 1, sc across. Turn. (6)
Row 2: Ch 1, inc, sc 4, inc. Turn. (8)
Row 3: Ch 1, sc across. Turn. (8)
Row 4: Ch 1, sc across. Turn. (8)
Row 5: Ch 1, sc across. Turn. (8)
Row 6: Ch 1, sc across. Turn. (8)
Row 7: Ch 1, sc across. Turn. (8)
Row 8: Ch 1, sc, hdc, hdc 4, hdc, sc. (8)
Fasten off. Leave a 12 cm tail.
Do not stiffen the tongue. It should bend under the lace crossings rather than stand vertically.
Left Eyelet Panel — Make 2
Yarn: sage green
Ch 4.
Row 1: Sc in second ch from hook and next 2 ch. Turn. (3)
Row 2: Ch 1, sc 3. Turn. (3)
Row 3: Ch 1, sc, ch 1, skip 1, sc. Turn. (3 including ch-space)
Row 4: Ch 1, sc, sc in ch-space, sc. Turn. (3)
Row 5: Repeat Row 3.
Row 6: Repeat Row 4.
Row 7: Repeat Row 3.
Row 8: Repeat Row 4.
Fasten off. Leave a 20 cm sewing tail.
This creates three crochet eyelets. If the photographed four-eyelet appearance is required, repeat Rows 3–4 once more before fastening off.
Right Eyelet Panel — Make 2
Work identically to the left panel.
Position the panel along the opening so its bottom edge starts near the front of the sage sidewall and its upper edge stops slightly below the collar.
Crochet eyelets keep the construction soft. For a photo-prop replica with metal rings, fit the hardware only after the panel has been sewn down, and treat the result as a supervised display item.
Collar Trim — Make 2
Yarn: cream-white
Join cream yarn at one upper heel edge.
Row 1: Work evenly in sc around the open collar, across the back heel and down the opposite upper edge. Aim for 24–28 sc, adjusting only for the actual row-edge spacing.
Fasten off. Weave the tail into the inside of the shoe.
The trim should lie flat. Rippling means too many stitches were added around the row ends.
Sole Edge Trim — Make 2
Yarn: cream-white
With the sole facing outward, join yarn at the center back of the visible white sidewall.
R1: Sl st loosely into each stitch around the junction between sole and sidewall. (34)
Fasten off.
A second surface round can be added if a thicker white rubber-sole effect is wanted, but it should not extend below the base.
Faux Laces — 8 Short Straps per Pair
Yarn: sage green
For the safer crib-shoe interpretation, make four short lace straps per shoe rather than one long loose cord.
For each strap:
Ch 11. Starting in second ch from hook, sl st across 10 chains. Fasten off with a 5 cm tail at each end.
Thread or position one strap through a matching pair of eyelets, then stitch both ends permanently to the inside of the panels. Repeat for all lace levels.
The photographed criss-cross can be reproduced by offsetting alternate straps slightly. Permanent ends remove dangling lace tails.
For a supervised photography prop only, a traditional chain lace can be made approximately 35–40 cm long and threaded through the eyelets before tying.
Assembly
- Check the two soles first. Lay them together and compare length, width and curve before attaching more components.
- Shape each upper over its sole. Finger-block the toe decreases so the front slopes toward the tongue rather than forming a vertical wall.
- Set the tongues centrally. The six-stitch tongue base must align with the center line of each toe.
- Sew the eyelet panels beside each tongue. Pin both panels first and check that the lowest eyelet begins at the same height on the left and right shoe.
- Add the cream collar trim. Keep the stitch spacing even around the heel curve and both front edges.
- Work the outsole surface trim. Maintain relaxed slip stitches so the sole does not cup.
- Attach the faux laces. Cross them symmetrically and secure every end inside the shoe.
- Check heel height. Both heels should measure within about 2 mm of one another when standing on a flat surface.
- Weave all yarn tails through at least 3 cm of dense crochet. Reverse direction once before trimming the end.
- Measure the finished sole. The target for this version is approximately 9 cm; record the actual measurement before labeling the pair by age.
The completed pair consists of two matching soft crochet crib sneakers with fixed lace detailing.
7 Technical Tips
- Stitch-marker drift: A round marker that moves one stitch forward on every round shifts the toe shaping away from the center line. Mark both the first stitch and the two center-front points before starting the decrease rounds.
- Overstuffing failure: These shoes require zero stuffing. Filling the toe or heel changes the foot opening and converts the low sneaker shape into a rigid rounded bootie.
- Bulky decrease ridges: Standard decreases can leave a raised seam across the toe. Use invisible decreases through the front loops during Rounds 3 and 4 of the sage upper.
- Eyelet placement error: Sewing the eyelet bands after the laces are threaded often produces unequal panel spacing. Pin both bands with the lowest holes at the same height before attaching either one permanently.
- Tension mismatch: A 2 mm hook with smooth Sport or Fingering cotton should produce a dense fabric. If the 34-stitch sole is already longer than about 9 cm before the sidewall is added, move down a hook size or recheck gauge.
- Panel distortion during pinning: The tongue should stay on the longitudinal center line of the sole. Measure from each tongue edge to the corresponding heel-side seam; a difference greater than roughly 3 mm is visible once the laces are installed.
- Tail migration: A short yarn end can work back through dense cotton after handling. Weave each structural tail for at least 3 cm, reverse direction once, then trim without cutting flush against the fabric.
Conclusion
Measure the first finished sole before beginning the second shoe; that single checkpoint prevents most pair-to-pair sizing errors. The sage upper should remain low across the toe, while the cream tongue sits visibly behind the fixed lace crossings. For an infant-wear pair, choose crocheted eyelets and permanently anchored faux laces instead of detachable metal hardware. Save the finished crochet baby sneakers pattern to Pinterest with a close view of the toe shaping, then share the completed pair on Instagram using #MintBabySneakers. For the next version, record your actual sole length and hook size. Would you keep the sage laces from the photograph, or switch them to cream to match the tongue and sole?









