Introduction
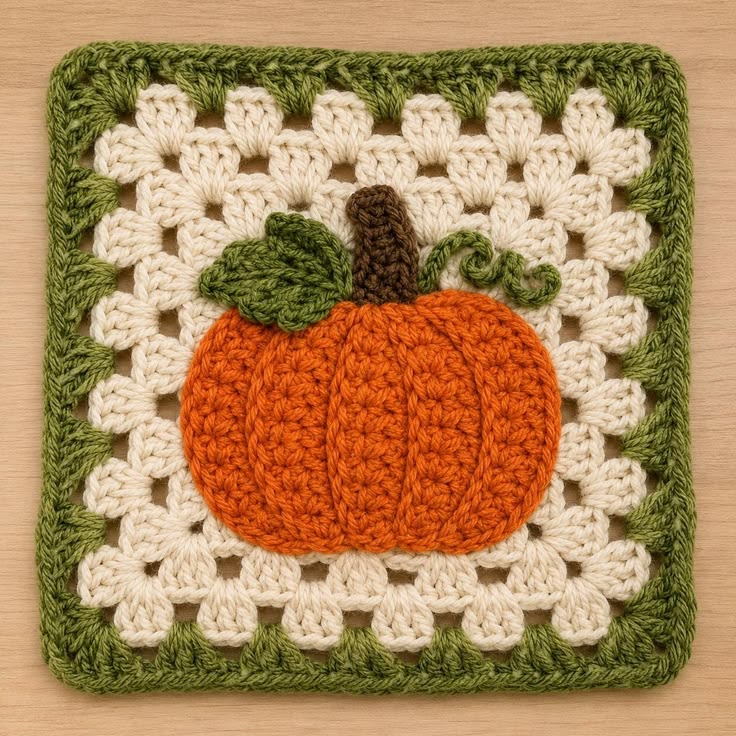
A five-panel pumpkin needs enough clearance from the green frame or its outer ribs disappear into the border. This pumpkin granny square crochet pattern uses worsted yarn with 5 mm and 4 mm hooks to make an approximately 18–20 cm block. A raised orange pumpkin, brown stem, pointed green leaf and curled vine sit on an open cream granny background for an intermediate fall project.
The Design: What Makes This Pumpkin Square Different
The pumpkin is not built as one flat orange disc. Five narrow ribbed sections overlap slightly, creating strong vertical divisions without relying only on embroidered lines. That construction gives the center more depth than a conventional flat pumpkin applique crochet square. The cream background remains open and comparatively light, so the dense orange motif reads clearly against it. An olive border frames the block and repeats the same green used in the leaf and curled vine. The stem sits behind the pumpkin crown rather than directly on top of the orange surface, which keeps the upper profile cleaner. One common mistake in a raised pumpkin granny square is sewing every pumpkin panel flat across its full width. The ribs then lose their separation and the center becomes one solid oval instead of five distinct sections.
Project Info at a Glance
| Skill Level | Time | Finished Size | Hooks | Best For |
|---|---|---|---|---|
| Intermediate | 3–4 hours | Approx. 18–20 cm square | 5.0 mm / 4.0 mm | Blankets, pillows, bags and fall wall decor |
Materials and Tools
Yarn
- Warm cream — worsted / Aran #4 — approximately 25–30 g — open granny background.
- Pumpkin orange — worsted / Aran #4 — approximately 15–20 g — five raised pumpkin sections.
- Olive green — worsted / Aran #4 — approximately 8–10 g — outer border, leaf and spiral vine.
- Medium brown — worsted / Aran #4 — approximately 3–5 g — stem.
Use yarns with similar thickness so the border does not overpower the cream center. The orange yarn can be slightly firmer because each pumpkin section needs enough structure to keep a rounded vertical profile.
Tools
- 5.0 mm crochet hook for the square
- 4.0 mm crochet hook for the pumpkin, leaf, stem and vine
- Yarn needle
- Stitch markers
- Dressmaking pins
- Scissors
- Blocking mats
- Measuring tape
Abbreviations
- MR — magic ring
- ch — chain
- sc — single crochet
- hdc — half double crochet
- dc — double crochet
- tr — treble crochet
- sl st — slip stitch
- inc — increase
- dec — decrease
- BLO — back loop only
An invisible decrease is worked through the front loops of two neighboring stitches before completing one single crochet through both loops.
Pattern — Step by Step
Make and block the cream background before attaching the pumpkin. The final square measurement controls how wide the center motif can be without crowding the green frame.
Cream Granny Square — Round 1
Yarn: warm cream — original reconstruction based on standard granny-square geometry.
Make an MR.
Ch 3, 2 dc, ch 2.
Work (3 dc, ch 2) three more times into the ring.
Join with sl st to the top of the beginning chain.
You now have four 3-dc groups and four corner spaces.
Cream Granny Square — Round 2
Sl st to the next corner space.
Work (3 dc, ch 2, 3 dc) in the corner.
Ch 1.
Repeat the same corner group in the remaining three corners with ch 1 between each corner.
Join.
Cream Granny Square — Round 3
Sl st to the corner.
Work (3 dc, ch 2, 3 dc) in the corner.
Ch 1, 3 dc in the next side space, ch 1.
Repeat around, placing one cluster in each side space and a doubled cluster in every corner.
Join.
Cream Granny Square — Round 4
Work (3 dc, ch 2, 3 dc) in every corner.
Place one 3-dc cluster in each side space with ch 1 between clusters.
Join.
Cream Granny Square — Round 5
Repeat the same granny construction around.
Fasten off.
Target approximately 16–18 cm before the green finishing border.
Green Outer Border
Yarn: olive green.
Join yarn in any corner space.
Ch 1.
Sc in every dc and ch-1 space across the first side.
In each corner work (sc, ch 1, sc).
Continue around all four sides.
Join and fasten off.
Target blocked square: approximately 18–20 cm.
Block the Background Square
Pin the four corners first.
Measure horizontally and vertically.
The two measurements should differ by no more than approximately 5 mm.
Check both diagonals as well.
If one side is shorter, adjust it before the square dries rather than trying to compensate during pumpkin placement.
Raised Pumpkin Construction
The pumpkin is made from five narrow oval sections. The center section is largest, the two sections beside it are slightly smaller, and the two outer panels are narrower again.
Center Pumpkin Panel — Make 1
Yarn: pumpkin orange.
Ch 12.
Row 1: Starting in second chain, sc across. (11)
Row 2: ch 1, turn, inc, 9 sc, inc. (13)
Row 3: ch 1, turn, inc, 11 sc, inc. (15)
Rows 4–7: ch 1, turn, sc across. (15)
Row 8: ch 1, turn, dec, 11 sc, dec. (13)
Row 9: ch 1, turn, dec, 9 sc, dec. (11)
Fasten off with a 30 cm sewing tail.
Target approximately 4–4.5 cm wide × 8–9 cm high.
Inner Pumpkin Panels — Make 2
Yarn: pumpkin orange.
Ch 11.
Row 1: Starting in second chain, sc across. (10)
Row 2: ch 1, turn, inc, 8 sc, inc. (12)
Row 3: ch 1, turn, inc, 10 sc, inc. (14)
Rows 4–6: ch 1, turn, sc across. (14)
Row 7: ch 1, turn, dec, 10 sc, dec. (12)
Row 8: ch 1, turn, dec, 8 sc, dec. (10)
Fasten off with a 30 cm tail.
Outer Pumpkin Panels — Make 2
Yarn: pumpkin orange.
Ch 9.
Row 1: Starting in second chain, sc across. (8)
Row 2: ch 1, turn, inc, 6 sc, inc. (10)
Row 3: ch 1, turn, inc, 8 sc, inc. (12)
Rows 4–5: ch 1, turn, sc across. (12)
Row 6: ch 1, turn, dec, 8 sc, dec. (10)
Row 7: ch 1, turn, dec, 6 sc, dec. (8)
Fasten off.
Edge the Pumpkin Panels
Join orange yarn to each panel in turn.
Sc evenly around the complete outside edge.
Place 2 sc around the widest curves where needed.
Keep the edging relaxed.
A tight edging contracts the oval and reduces the layered pumpkin width.
Join the Five Pumpkin Sections
Lay the center panel on a flat surface.
Overlap one inner panel behind its left edge by approximately 8–10 mm.
Repeat on the right.
Place each outer panel behind the corresponding inner panel with a similar overlap.
The finished pumpkin should measure approximately 10–12 cm across.
Sew only through the overlapping inner edges.
Leave the broad front surfaces free so the five vertical sections remain visibly raised.
Shape the Pumpkin Crown
Pinch the upper edges of all five panels slightly toward one another.
Take two or three hidden orange stitches through the top center.
Pull until the crown narrows by approximately 10–15 mm.
Do not gather the lower edge as tightly.
The bottom should remain broader and more rounded.
Brown Stem
Yarn: medium brown.
Ch 5.
Row 1: Starting in second chain, sc across. (4)
Rows 2–7: ch 1, turn, sc across. (4)
Fasten off with a 20 cm sewing tail.
Fold the narrow rectangle lengthwise and sew the long edges together.
Target approximately 3–3.5 cm of visible stem height.
Attach the Stem to the Pumpkin
Insert the lower 8–10 mm of the stem behind the center pumpkin section.
Sew through the stem base and the top edges of the center three orange panels.
Keep the stem vertical or allow a slight lean of approximately 5 degrees.
Green Leaf
Yarn: olive green.
Ch 10.
Starting in the second chain, work:
sl st, sc, hdc, dc, tr, dc, hdc, sc, sl st.
Work 3 sc in the final chain.
Rotate and work back along the opposite side:
sl st, sc, hdc, dc, tr, dc, hdc, sc, sl st.
Fasten off with a 20 cm sewing tail.
Target approximately 5–6 cm long.
Shape the Leaf
Pinch the base slightly.
Run one green surface stitch from base to tip to suggest a center vein.
Keep the outer edge loose.
The leaf should remain broad enough to overlap the upper-left pumpkin panel without covering the complete crown.
Curly Green Vine
Yarn: olive green.
Ch 20.
Starting in the second chain, work 3 sc in every chain.
The extra stitches force the strand into a spiral.
Fasten off with a 20 cm sewing tail.
Target approximately 6–8 cm of relaxed curled length.
Attach the Leaf and Vine
Place the leaf behind the left side of the brown stem.
Sew only the lower 15–20 mm of the leaf.
Leave the outer half free so it sits above the pumpkin surface.
Attach the vine beside the right side of the stem.
Tack only the first 10–15 mm of the spiral.
Leave the remaining curls unattached.
Center the Pumpkin on the Granny Square
Place the blocked square on a flat table.
Set the pumpkin in the center.
Leave approximately 30–40 mm of cream background between the widest orange panels and the green border.
Measure from the pumpkin midpoint to both vertical square edges.
The difference should remain below approximately 5 mm.
Pin the pumpkin at the center top, center bottom and both widest side points.
Sew the Pumpkin to the Square
Use orange yarn.
Sew the two outer pumpkin panels to the cream background first.
Work attachment stitches approximately 8–10 mm apart.
Next, add several hidden stitches through the lower edge of the inner panels.
Leave most of the center panel free.
This maintains the raised five-section effect.
Lay the square flat after every few stitches.
Stop and loosen the seam if any corner lifts more than about 5 mm.
Refine the Pumpkin Rib Definition
The overlaps between the five panels act as natural rib channels.
If a boundary looks too flat, add one short orange backstitch along the overlap.
Do not sew the entire division line to the cream square.
Keeping the inner edges partly free lets light create visible shadows between the sections.
Assembly
- Crochet the five-round cream granny square, add the green single-crochet border and block the finished background to approximately 18–20 cm.
- Make one 15-stitch center pumpkin panel, two 14-stitch inner panels and two 12-stitch outer panels.
- Edge all five orange sections and overlap them by approximately 8–10 mm to form a 10–12 cm pumpkin.
- Pinch and stitch the upper orange edges slightly inward to create a narrower crown without contracting the rounded base.
- Crochet the brown stem and sew its lower 8–10 mm behind the three center pumpkin sections.
- Make the olive leaf, add a center vein and attach only the lower 15–20 mm beside the stem.
- Crochet the spiral vine with 3 sc in every foundation chain and tack only its first 10–15 mm beside the stem.
- Center the completed pumpkin on the blocked cream square with approximately 30–40 mm of visible background beside it.
- Sew the pumpkin using relaxed stitches approximately 8–10 mm apart while leaving most of the center surface raised.
- Lay the completed square flat, correct any lifted corner or twisted vine and weave all remaining yarn tails into matching stitches on the reverse.
The completed block should show one raised five-section orange pumpkin centered on an airy cream granny square with a green frame, brown stem, pointed leaf and free curling tendril.
7 Technical Tips
- Square corners lift after appliqué attachment: Sewing tension is contracting the cream background. Keep attachment stitches approximately 8–10 mm apart and loosen them if a corner rises more than about 5 mm.
- Pumpkin reads as one flat oval: The five panels have been sewn across their entire width. Join only along the 8–10 mm overlaps and leave the broad front surfaces unsupported.
- Center pumpkin section disappears: Inner panels overlap it too far. Keep approximately 25–30 mm of the center section visible at its widest point.
- Leaf covers the crown: The base is attached too far across the pumpkin. Sew only the lower 15–20 mm and leave roughly half the leaf free above the orange surface.
- Vine becomes a loose wave instead of a spiral: Too few stitches were worked into each chain. Use 3 sc in every foundation chain and do not stretch the 6–8 cm curl during attachment.
- Green border flares: Too many single crochets have been placed into the open granny spaces. Use one sc per dc and one per ch-1 space, then check each side on a flat surface before fastening off.
- Pumpkin sits off-center: Visual alignment becomes unreliable against an open granny grid. Measure from the pumpkin midpoint to both square edges and keep the difference below approximately 5 mm.
Why the Pumpkin Uses Separate Panels
The five-panel method creates stronger relief than a flat orange circle with embroidered ribs. Each section has its own curved edge, so the overlaps cast narrow shadows and make the pumpkin look deeper without stuffing.
The center panel remains the widest.
Two intermediate sections build the shoulders of the pumpkin, while the narrow outer pieces round the sides.
This approach also makes size correction easier. If the finished pumpkin is too wide, increase the overlap slightly. If it is too narrow, reduce each overlap by a few millimeters before sewing.
Adjusting the Square Size
This pumpkin granny square crochet pattern can be enlarged by continuing standard granny rounds before adding the green border.
For a 22–24 cm block, add one or two cream granny rounds.
Keep the pumpkin at the original 10–12 cm width if you want more negative space.
For a larger center motif, increase every pumpkin panel by two foundation chains and add one plateau row before decreasing.
Measure the blocked square first. The pumpkin should generally occupy about 55–65 percent of the usable width inside the green frame.
Changing the Color Palette
Orange, cream and olive match the reference closely.
Rust can replace bright orange for a darker autumn palette.
Oatmeal or beige can replace cream if less contrast is preferred.
The green frame can shift toward sage, moss or forest green.
Keep the stem visibly darker than both the pumpkin and leaf.
A stem too close to the green value can disappear between the foliage details at the crown.
Using the Square in a Blanket
Block every finished square to the same dimension before joining.
For a small throw, arrange 24 blocks in four columns by six rows.
A larger blanket can use 30 squares in five columns by six rows.
Alternate the pumpkin orientation slightly if desired, but keep all stems generally upright.
Use a cream or green mattress seam so the joining yarn blends with the square rather than cutting through the pumpkin motif visually.
Finishing the Square
Perform the final shaping on a flat surface.
Lift the center pumpkin panel slightly with your fingertips.
Spread the leaf so its tip remains visible beyond the orange crown.
Turn the spiral vine so at least two complete curls can be seen from the front.
Check all four green corners for equal width.
If one side is shorter, reshape the square with light blocking rather than pulling on the pumpkin appliqué.
Conclusion
Block the cream background before assembling the pumpkin because the five orange sections need a fixed center and predictable side margins. Your next step is to complete one 18–20 cm square, make all five pumpkin panels and pin the entire motif before sewing any overlap permanently. Keep the center raised and leave the leaf and vine partly free. Share the finished pumpkin granny square crochet pattern project on Pinterest with the full green frame visible, then post a close view of the layered ribs on Instagram using #RaisedPumpkinGrannySquare. For this square specifically, would you keep the olive border or switch it to burnt orange?









