Introduction
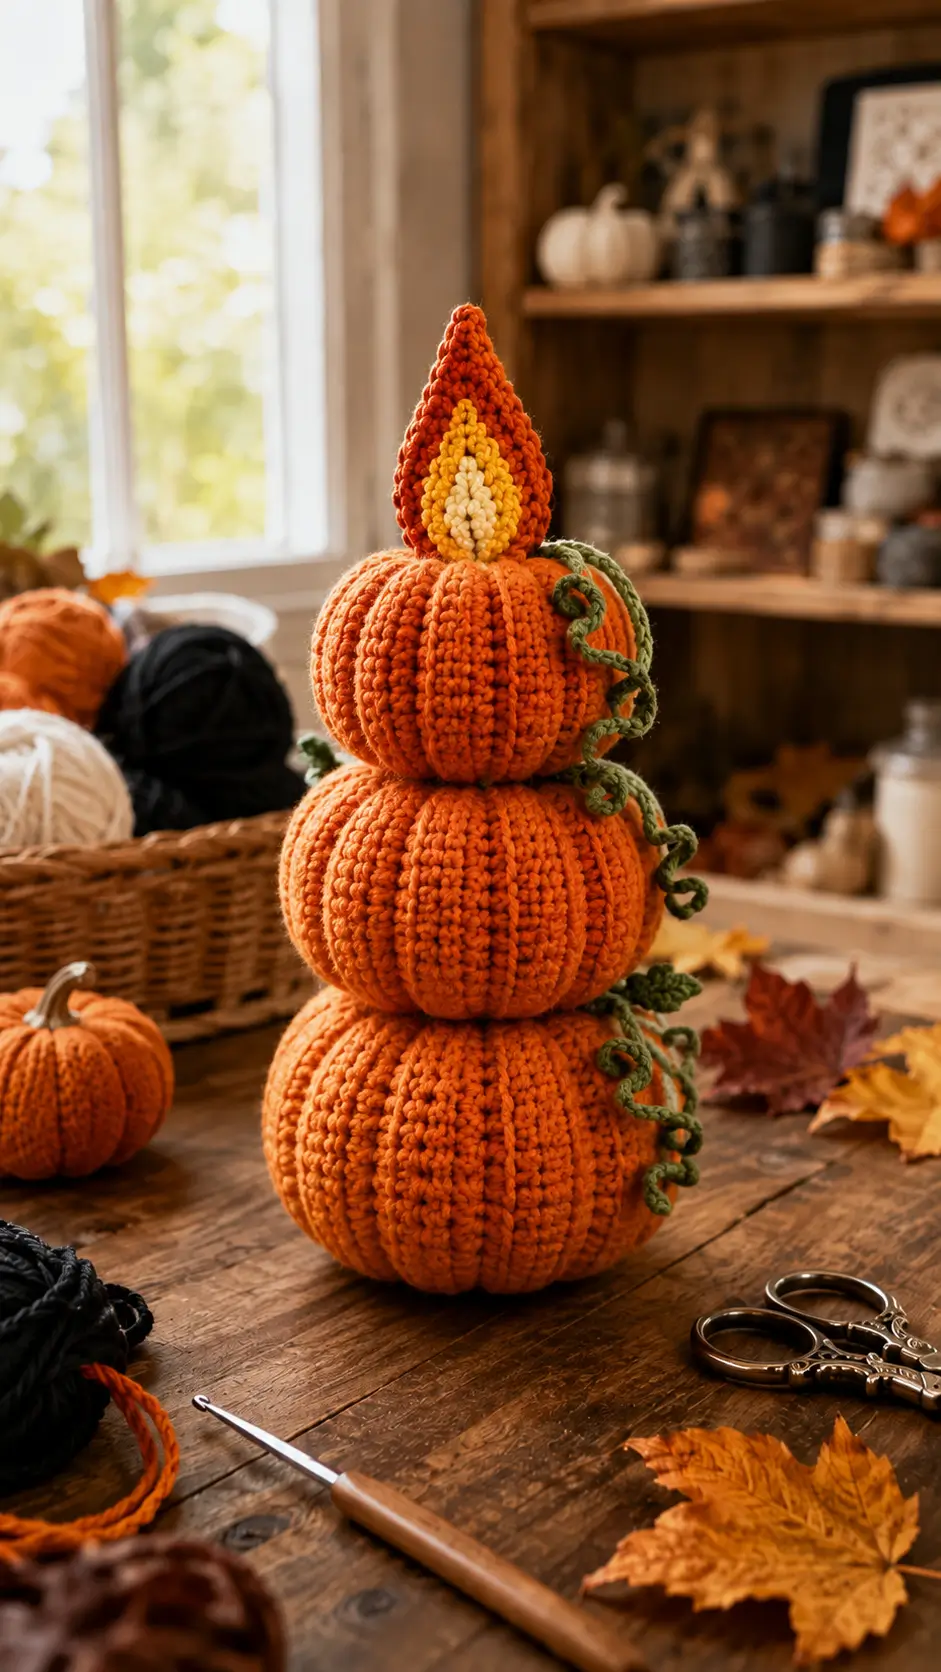
A pumpkin tower topped by crocheted fire has two silhouettes to solve: compressed squash ribs below and a narrow flame point above. This stacked pumpkin crochet pattern uses worsted yarn, a 5 mm hook and three stuffed spiral-work pumpkins to target a display near 50 cm tall. The skill level is intermediate because the rib sculpting and stacked alignment require controlled finishing. Its narrow footprint suits table or mantel displays.
The Design: What Makes the Pumpkin Flame Stack Different
Three structural choices separate this design from a normal crochet pumpkin stack. First, the pumpkins use different stitch plateaus—42, 36 and 30 stitches—so each tier reduces visibly instead of forming three equal balls. Second, long sculpting strands travel from top to bottom after stuffing. Those strands create the deep channels needed for a recognizable ribbed crochet pumpkin rather than relying on a spherical shell alone.
Third, the flame stays narrow and lightly stuffed; too much filling would produce a cone rather than the flattened fire shape shown in the photograph. The vine is deliberately asymmetric. A centered vine would compete with the vertical stack, while one offset line breaks the symmetry without affecting balance. A common mistake in a crochet pumpkin topiary is packing the pumpkin centers too firmly. Dense filling resists compression and leaves the finished tiers round.
Project Info at a Glance
| Skill Level | Time | Finished Size | Hook | Best For |
|---|---|---|---|---|
| Intermediate | Not specified | About 50.8 cm tall | 5.0 mm | Tall tabletop and mantel décor |
Published comparison dimensions and hook data are based on a comparable stacked pumpkin centerpiece from Winding Road Crochet.
Materials and Tools
Yarn
- Burnt orange — worsted/Aran #4 — approximately 193–220 g
- Olive green — worsted/Aran #4 — approximately 14–28 g
- Golden yellow — worsted/Aran #4 — approximately 8–12 g
- Cream — worsted/Aran #4 — approximately 3–5 g
- Orange sculpting yarn — reserve approximately 8–10 m from the main yarn for the rib channels
Tools
- 5.0 mm crochet hook
- Polyester fiberfill
- Long tapestry needle — preferably 10–15 cm
- Standard yarn needle
- Locking stitch marker
- 8 removable markers
- Scissors
- Measuring tape
- Optional weighted pellets enclosed inside a fabric pouch for the lowest pumpkin
A 5 mm hook with Aran or worsted yarn is documented for a comparable stacked centerpiece.
Abbreviations
- MR — magic ring
- sc — single crochet
- inc — 2 sc in one stitch
- dec — invisible decrease
- sl st — slip stitch
- ch — chain
- BLO — back loop only
- st / sts — stitch / stitches
- R — round
For an invisible decrease, insert the hook through the front loops of the next two stitches, yarn over and draw through both front loops, then complete one single crochet.
Pattern — Step by Step
Work in a continuous spiral unless a section states otherwise. Place the marker in the first stitch of every round.
The three pumpkin shells use a 42-stitch large plateau, 36-stitch medium plateau and 30-stitch small plateau. Every full increase round adds six stitches; every full decrease round removes six.
Bottom Pumpkin — Large (Make 1)
Yarn: burnt orange.
R1: 6 sc in MR (6)
R2: inc ×6 (12)
R3: (1 sc, inc) ×6 (18)
R4: (2 sc, inc) ×6 (24)
R5: (3 sc, inc) ×6 (30)
R6: (4 sc, inc) ×6 (36)
R7: (5 sc, inc) ×6 (42)
R8: sc around (42)
R9: sc around (42)
R10: sc around (42)
R11: sc around (42)
R12: sc around (42)
R13: sc around (42)
R14: sc around (42)
R15: sc around (42)
R16: sc around (42)
R17: sc around (42)
R18: sc around (42)
R19: (5 sc, dec) ×6 (36)
R20: (4 sc, dec) ×6 (30)
R21: (3 sc, dec) ×6 (24)
Insert filling in small pieces. Keep the center compressible rather than rigid. Add an enclosed weight pouch now if the finished display needs extra base stability.
R22: (2 sc, dec) ×6 (18)
R23: (1 sc, dec) ×6 (12)
R24: dec ×6 (6)
Fasten off. Leave a 100 cm tail for sculpting and closure.
Thread the tail onto the long needle. Pass from the top center through the bottom center, carry the yarn up the outside and return through both centers. Repeat at eight evenly spaced positions around the pumpkin. Pull only until each channel is visible; excessive pressure reduces the diameter.
Middle Pumpkin — Medium (Make 1)
Yarn: burnt orange.
R1: 6 sc in MR (6)
R2: inc ×6 (12)
R3: (1 sc, inc) ×6 (18)
R4: (2 sc, inc) ×6 (24)
R5: (3 sc, inc) ×6 (30)
R6: (4 sc, inc) ×6 (36)
R7: sc around (36)
R8: sc around (36)
R9: sc around (36)
R10: sc around (36)
R11: sc around (36)
R12: sc around (36)
R13: sc around (36)
R14: sc around (36)
R15: sc around (36)
R16: sc around (36)
R17: sc around (36)
R18: sc around (36)
R19: (4 sc, dec) ×6 (30)
R20: (3 sc, dec) ×6 (24)
Stuff to the same firmness as the base. Matching firmness matters more than matching filling weight because the tiers must compress at comparable rates.
R21: (2 sc, dec) ×6 (18)
R22: (1 sc, dec) ×6 (12)
R23: dec ×6 (6)
Fasten off. Leave a 90 cm tail.
Form eight vertical ribs using the same top-to-bottom sculpting method. Stop pulling when the channels match the depth of the lower pumpkin.
Top Pumpkin — Small (Make 1)
Yarn: burnt orange.
R1: 6 sc in MR (6)
R2: inc ×6 (12)
R3: (1 sc, inc) ×6 (18)
R4: (2 sc, inc) ×6 (24)
R5: (3 sc, inc) ×6 (30)
R6: sc around (30)
R7: sc around (30)
R8: sc around (30)
R9: sc around (30)
R10: sc around (30)
R11: sc around (30)
R12: sc around (30)
R13: sc around (30)
R14: sc around (30)
R15: sc around (30)
R16: sc around (30)
R17: (3 sc, dec) ×6 (24)
Stuff lightly around the top center because the flame base will be stitched through this area.
R18: (2 sc, dec) ×6 (18)
R19: (1 sc, dec) ×6 (12)
R20: dec ×6 (6)
Fasten off. Leave an 80 cm tail.
Add eight sculpted channels. Check the pumpkin from above before tying the final knot. The top center must remain close to level so the flame does not lean.
Outer Flame (Make 1)
Yarn: burnt orange.
Work from the point downward.
R1: 6 sc in MR (6)
R2: sc around (6)
R3: sc around (6)
R4: inc ×6 (12)
R5: sc around (12)
R6: sc around (12)
R7: (1 sc, inc) ×6 (18)
R8: sc around (18)
R9: sc around (18)
R10: (2 sc, inc) ×6 (24)
R11: sc around (24)
R12: sc around (24)
R13: sc around (24)
Add a thin layer of filling. Keep the flame approximately half as deep as it is wide.
Fasten off. Leave a 40 cm sewing tail.
Flatten the lower third gently. Bend the first four rounds a few millimeters off the center line to avoid a rigid cone profile.
Golden Flame Patch (Make 1)
Yarn: golden yellow.
R1: 6 sc in MR (6)
R2: inc ×6 (12)
R3: (1 sc, inc) ×6 (18)
R4: sc around (18)
R5: sc around (18)
Fasten off. Leave a 30 cm tail.
Flatten into an oval. Pin it vertically to the lower front of the outer flame and pinch its top into a slight point while sewing. The patch should occupy roughly two-thirds of the outer flame height.
Cream Flame Center (Make 1)
Yarn: cream.
R1: 6 sc in MR (6)
R2: inc ×6 (12)
R3: sc around (12)
Fasten off. Leave a 25 cm tail.
Flatten the piece and stitch it to the lower center of the yellow patch. Compress the top edge into a narrow point during attachment.
Curling Vine — Long (Make 1)
Yarn: olive green.
Ch 55.
Starting in the second ch from the hook, work 3 sc into each ch across.
The dense increase causes the strip to coil automatically. Fasten off and leave a 30 cm tail.
Do not pull the coil straight before attachment. Allow several loops to hang free between pumpkin tiers.
Curling Vine — Short (Make 2)
Yarn: olive green.
Ch 30.
Starting in the second ch from the hook, work 3 sc into each ch across.
Fasten off. Leave a 25 cm tail on each vine.
Place one curl beside the top pumpkin and one at the junction of the middle and bottom tiers.
Assembly
- Place the large pumpkin on a flat surface and press its top center down approximately 1–1.5 cm to create a shallow seat for the next tier.
- Center the medium pumpkin over the large one. Pin it at four quarter points before sewing; a 5 mm sideways shift becomes obvious once the third tier is added.
- Stitch the medium tier to the large pumpkin through approximately 10–12 stitches around the hidden contact circle. Avoid sewing through the outer rib peaks.
- Center and pin the small pumpkin on the medium tier. View the stack from two perpendicular directions before fixing the first stitch.
- Sew the small pumpkin down around a compact contact circle, keeping its eight sculpted ribs aligned roughly between the ribs below rather than forcing all channels into vertical columns.
- Sew the golden patch to the outer flame, then attach the cream center. Keep both inserts on the same front-facing plane.
- Pin the flame to the small pumpkin. Its base should sit inside the shallow top depression, with the point vertically above the stack’s center of gravity.
- Stitch the flame down twice around its base: one pass close to the edge and a second pass approximately 5 mm inward.
- Anchor the long vine near the flame base, guide it down the right side of the stack and add small attachment stitches at each pumpkin junction. Sew the two shorter curls into open spaces.
- Bury every structural tail through at least 4 cm of stuffed fabric before trimming. Place the completed stack on a level surface and correct any visible rotational lean before the final tails are cut.
The finished object consists of three structurally joined pumpkins, one layered flame and three curling vine sections.
7 Technical Tips
- Marker drift: A misplaced round marker can shift decrease points by one stitch and twist the pumpkin’s shaping line. Count the final six stitches before moving the marker at every increase or decrease round.
- Stuffing firmness: Packing the center hard enough that a thumb cannot compress it by about 1 cm will prevent deep pumpkin ribs. Keep most filling toward the outer wall and leave the central axis slightly softer.
- Invisible-decrease gaps: Catching both loops during a decrease can expose a larger opening when the pumpkin is compressed. Work each decrease through the front loops only and inspect it before continuing.
- Flame alignment: Sewing the topper only after the tower is permanently assembled gives a reliable vertical reference. A flame base shifted more than about 5 mm from center can make the complete piece appear tilted.
- Tension variation: Switching to a very soft velvet yarn with the same 5 mm hook can change the diameter and reduce rib definition. If the fabric spreads between stitches, test a hook 0.5–1 mm smaller before making all three tiers.
- Pinning error: Attaching the middle pumpkin from one viewing angle can conceal a sideways offset. Use four pins and inspect the stack after rotating it 90 degrees before sewing.
- Tail weaving: A structural tail buried for only one or two stitches can work back out when the tiers are handled. Pass assembly tails through at least 4 cm of dense stuffed fabric and change direction once before trimming.
Conclusion
Measure the completed bottom tier before committing to the rest of the stack; that diameter is the fastest check on whether your yarn and tension are producing the scale you want. Next, mark eight rib positions and sculpt the large pumpkin before crocheting the smaller tiers, since its channel depth sets the visual standard for the complete project. Save this stacked pumpkin crochet pattern to Pinterest, then share the finished tower on Instagram with #FlamePumpkinStack. Photograph it from the front and side so tier alignment is visible. For the next version, would you keep the flame centered above the pumpkin ribs, or rotate it between two rib channels?









