Introduction
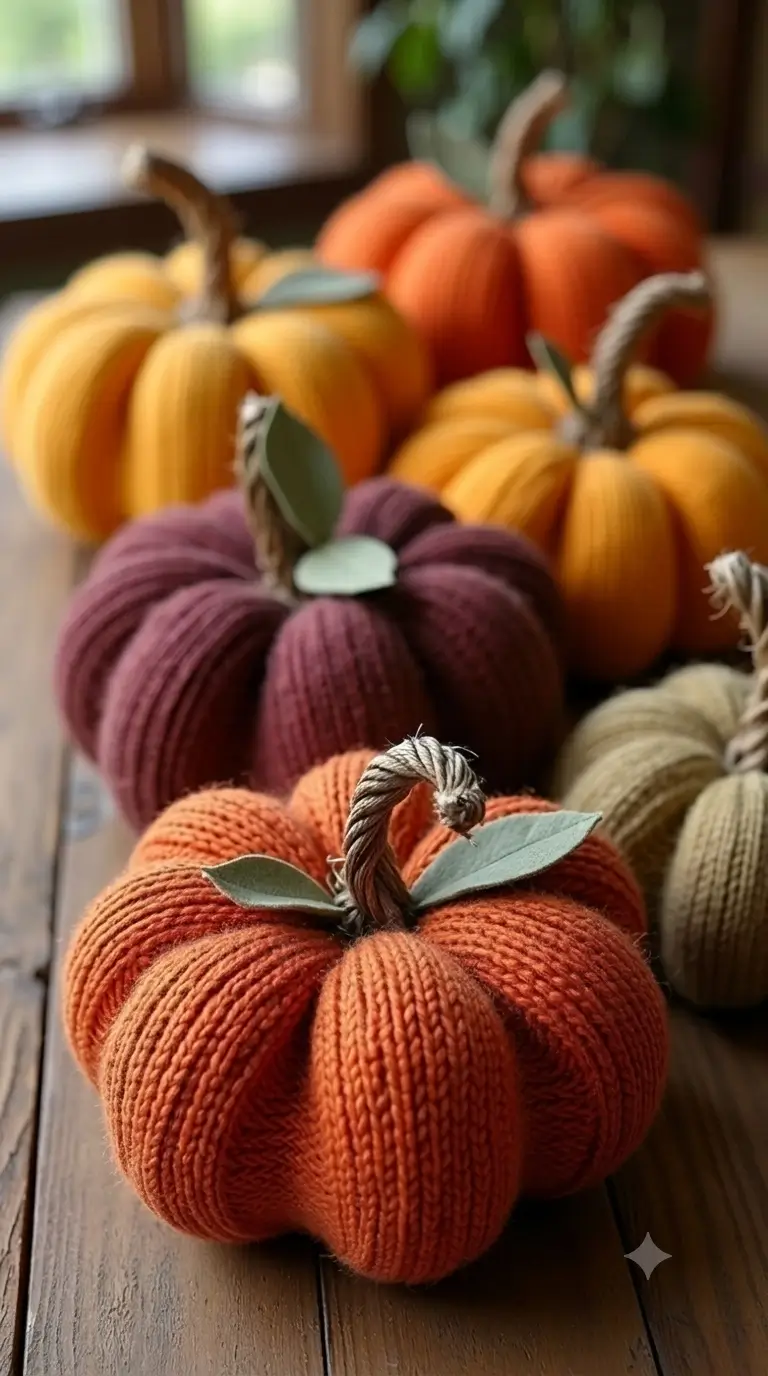
A pumpkin stops reading as a pumpkin when its ribs are too shallow. This pumpkin amigurumi crochet pattern converts the photographed knitted form into a 42-stitch crochet body with deep external shaping, a curved brown stem, and two sage leaves. Use medium yarn with a 3.75–4 mm hook; published comparable pumpkins fall within roughly 9–15 cm. The construction suits a confident beginner and works well for repeatable tabletop fall décor.
The Design: What Makes This Pumpkin Different
Three structural decisions control the silhouette. First, the body reaches a 42-stitch plateau, giving the piece enough circumference for broad lobes rather than a narrow ball. Second, eight external shaping passes compress the stuffed shell after closure; that produces deeper channels closer to the photograph than relying on stitch texture alone. Third, a long six-stitch stem is sewn with a deliberate bend instead of standing vertically.
The two-leaf crown also matters. A typical crochet pumpkin pattern may add one leaf or a coiled vine, while this version uses paired broad leaves to echo the reference image. One common error in an amigurumi pumpkin tutorial is overstuffing before cinching. The maker then has to pull excessive tension through dense fiberfill, which can distort the top and bottom centers.
Project Info at a Glance
| Skill Level | Time | Finished Size | Hook | Best For |
|---|---|---|---|---|
| Confident beginner | One-evening project class | Approximately 9–15 cm depending on yarn and gauge | 3.75–4 mm | Table, shelf, mantel and fall display |
Materials and Tools
Yarn
- Burnt orange — medium/worsted #4 or comparable medium chenille — have approximately 50 g available — matte acrylic, wool blend, or low-sheen chenille.
- Natural brown — medium/worsted #4 — small scrap quantity — firm acrylic or cotton blend for the stem.
- Muted sage green — medium/worsted #4 — small scrap quantity — smooth cotton or acrylic for the leaves.
Tools
- 3.75 mm crochet hook for medium chenille or 4 mm hook for standard worsted yarn
- Polyester fiberfill
- Long tapestry or doll needle for shaping the ribs
- Standard yarn needle
- Locking stitch marker
- Straight pins
- Scissors
No safety eyes are required because the photographed pumpkin has no face.
Abbreviations
- MR — magic ring
- sc — single crochet
- inc — 2 sc in the same stitch
- dec — invisible decrease across the next 2 stitches
- sl st — slip stitch
- ch — chain
- hdc — half double crochet
- dc — double crochet
- BLO — back loop only
- st / sts — stitch / stitches
For an invisible decrease, insert the hook under the front loops of the next two stitches, yarn over, pull through both front loops, then finish the single crochet.
Pattern — Step by Step
Work the main body in a continuous spiral. Place a marker in the first stitch and move it after every round.
The reference image contains no head, arms, legs, ears, wings, cheeks, snout, or safety-eye face, so those components are intentionally omitted.
Pumpkin Body — Make 1
Yarn: burnt orange. This body uses standard six-stitch amigurumi sphere math with a 42-stitch maximum.
R1: 6 sc in MR (6)
R2: inc ×6 (12)
R3: (1 sc, inc) ×6 (18)
R4: (2 sc, inc) ×6 (24)
R5: (3 sc, inc) ×6 (30)
R6: (4 sc, inc) ×6 (36)
R7: (5 sc, inc) ×6 (42)
R8: sc around (42)
R9: sc around (42)
R10: sc around (42)
R11: sc around (42)
R12: sc around (42)
R13: sc around (42)
R14: sc around (42)
R15: (5 sc, dec) ×6 (36)
R16: (4 sc, dec) ×6 (30)
R17: (3 sc, dec) ×6 (24)
Begin stuffing at R17. Fill the outer wall first, then add smaller pieces toward the center so the pumpkin remains symmetrical.
R18: (2 sc, dec) ×6 (18)
R19: (1 sc, dec) ×6 (12)
Add the final stuffing now. The shell should resist light thumb pressure while the stitch openings remain closed.
R20: dec ×6 (6)
Fasten off. Leave a 25 cm tail, pass it through the front loops of the remaining six stitches, pull the opening closed, and bury the tail.
The 42-stitch maximum creates the broad body needed for deep pumpkin lobes.
Deep Rib Shaping — 8 Segments
Yarn: matching burnt orange.
Cut approximately 180 cm of orange yarn and thread the long needle.
- Enter through the bottom center and exit through the top center.
- Carry the strand down the outside of the pumpkin.
- Re-enter at the bottom center and exit at the top again.
- Pull until the first channel becomes visibly recessed.
- Repeat at evenly spaced positions until eight lobes have formed.
Do not pull the first strand to maximum depth immediately. Establish all eight divisions, compare their spacing, then tighten each section in sequence.
Fasten the sculpting yarn at the bottom center and bury both ends inside the body.
Curved Stem — Make 1
Yarn: natural brown.
R1: 6 sc in MR (6)
R2: sc around (6)
R3: sc around (6)
R4: sc around (6)
R5: sc around (6)
R6: sc around (6)
R7: sc around (6)
R8: inc ×6 (12)
Place only a thin amount of stuffing in R5–R8. Leave the upper section mostly empty so it can bend.
Fasten off and leave a 30 cm sewing tail.
To create the curved profile without wire, bend the tube approximately 30–40 degrees near R4. Add two hidden tack stitches between the inner sides of R3 and R5. This gives the stem a crooked outline while keeping the component soft.
Broad Leaf — Make 2
Yarn: muted sage green.
Ch 9.
Row 1: Beginning in the second ch from hook, sl st, sc, hdc, dc, dc, hdc, sc, 3 sc in final ch. Rotate and work down the unused side of the foundation chain: sc, hdc, dc, dc, hdc, sc, sl st (17).
Fasten off. Leave a 20 cm tail on each leaf.
For a more pointed outline, pin each leaf flat and extend the tip approximately 1 cm beyond its relaxed position while dry blocking.
Optional Leaf Vein
Yarn: matching sage or one shade darker.
Cut approximately 20 cm of yarn. Bring the needle from the underside at the leaf base, make one long running stitch toward the tip, and return through the same path with short anchoring stitches.
Fasten the ends on the underside. Keep the embroidery flat so the leaves do not curl upward.
Assembly
- Place the closed pumpkin body on a flat surface and check that the top and bottom openings sit on the same vertical axis.
- Divide the circumference visually into eight sections before tightening the sculpting strands to their final depth.
- Pull each rib only until the orange fabric recesses. Stop if stitches begin separating around the top center.
- Leave the front lobe free of eyes, embroidery, or cheek pieces because the photographed design has no face.
- Pin the 12-stitch base of the brown stem directly over the top closure, with its bend leaning slightly toward one side.
- Sew around the full stem base instead of attaching it with only two or three stitches.
- Position the first sage leaf against the stem base at roughly the 4 o’clock direction when viewed from above.
- Place the second leaf on the opposite side at roughly 9 o’clock, overlapping the stem base without covering the first leaf tip.
- Sew each leaf along only its lower third so the outer sections remain flat and separate.
- Bury every remaining tail through at least 3 cm of stuffed body, trim it after tensioning, and reshape the surface with your fingers.
The finished object is a face-free, deeply segmented crochet pumpkin with one curved stem and two broad leaves.
7 Technical Tips
- Stitch marker: A drifting first stitch creates a diagonal decrease line. Move the marker immediately after completing the first stitch of every round.
- Stuffing: Overpacked fiberfill makes the eight ribs difficult to recess. Stop adding filling when firm thumb pressure compresses the body by roughly 5–8 mm without opening the stitches.
- Invisible decreases: Working through all four loops leaves raised bars on R15–R20. Pick up only the front loops of the next two stitches before completing each decrease.
- Eye placement: The reference pumpkin has no face. If you change the design and add safety eyes, install them before R17 because the opening becomes increasingly difficult to reach afterward.
- Velvet tension: Loose chenille stitches can expose stuffing. If gaps exceed roughly 2 mm at rest, move from a 4 mm hook to a 3.75 mm or 3.5 mm hook.
- Leaf pinning: Leaves placed without measuring can cluster on one side of the stem. Set the two attachment points approximately 140–170 degrees apart when viewed from above before sewing.
- Tail weaving: Short sculpting ends can pull back through the center after repeated handling. Bury each structural tail through at least 3 cm of dense stuffing before trimming.
Conclusion
Check the eight ribs first, then compare the stem angle and leaf spacing against the reference photograph before trimming any structural tails. A second pumpkin can be scaled through yarn weight while keeping the same round logic, making it practical to build a mixed-size display without changing the core shaping method. Save the finished pumpkin amigurumi crochet pattern project to Pinterest and post the completed version on Instagram with #DeepRibPumpkin so the lobe spacing and color choices remain easy to compare. For the next version, record yarn weight, hook size, and finished diameter beside the photo. Would you keep the eight-lobe look, or compress the body into six wider pumpkin segments?









