Introduction
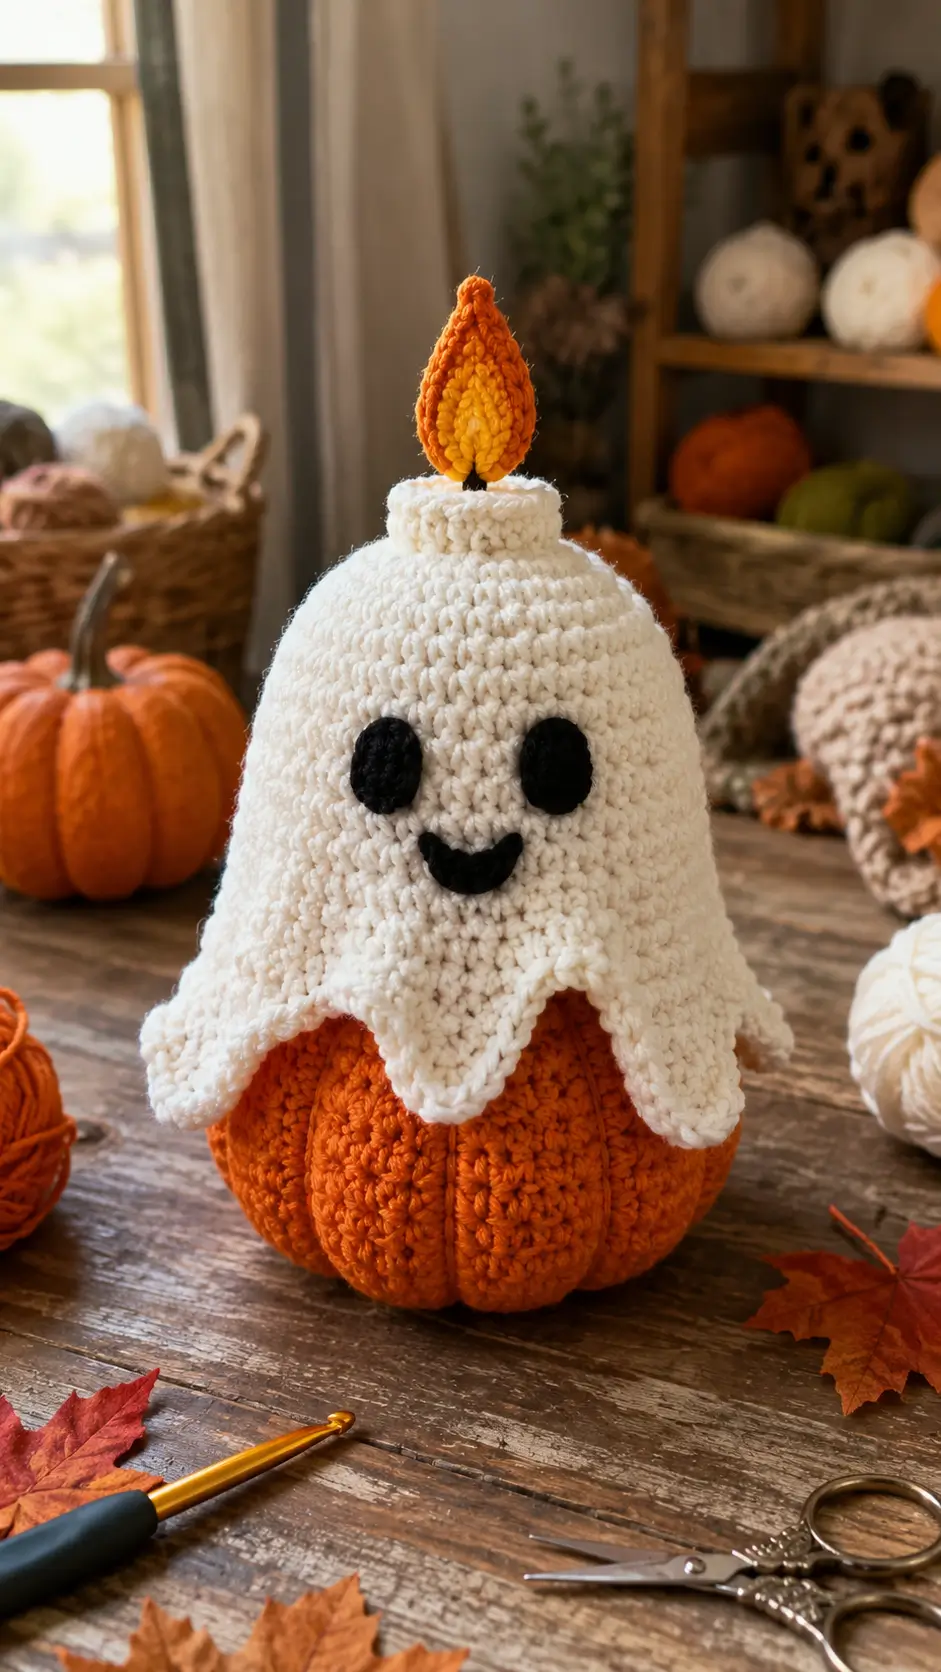
A sheet ghost that sprouts a candle flame from its head and sits on a ribbed pumpkin has three silhouettes to balance before a single face stitch is added. This ghost amigurumi crochet pattern uses worsted-weight yarn, a 4 mm hook, and a medium 36-stitch plateau to target a tabletop figure near 20 cm. The skill level is intermediate. Make it when you need one compact Halloween centerpiece instead of separate ghost, pumpkin, and candle pieces.
The Design: What Makes the Pumpkin Candle Ghost Different
Three structural decisions control this ghost amigurumi crochet pattern. First, the pumpkin is a closed stuffed sphere with six external sculpting passes, because surface ribbing reads more clearly than relying on color alone. Second, a compact stuffed head core sits above that base and supports an unstuffed ghost sheet; this keeps the white fabric from collapsing against the pumpkin while allowing the hem to hang freely. Third, the candle collar and flame are centered on the head axis so the narrow top does not pull the figure sideways. The most common error in a ghost pumpkin crochet pattern is making the white drape as wide and firm as the pumpkin. That produces a cylinder rather than a sheet silhouette. Here, the candle ghost crochet pattern uses a 36-stitch medium plateau but leaves the outer drape unstuffed.
Project Info at a Glance
| Skill Level | Time | Finished Size | Hook | Best For |
|---|---|---|---|---|
| Intermediate | 5–7 hours plus assembly | About 20–21 cm including flame | 4.0 mm | Tabletop Halloween décor |
The 20.5 cm size reference, 4 mm hook, worsted yarn, and 70 g white-yarn benchmark come from a published worsted ghost pattern. Source: Storyland Amis. A comparable 20 cm ribbed pumpkin project places the crochet work in the 5–7 hour range. Source: Krochify.
Materials and Tools
Yarn
- Warm white — worsted / Aran #4 — 70 g — a smooth acrylic yarn works well for the ghost body.
- Burnt orange — worsted / Aran #4 — 50 g — use a firm yarn that holds the pumpkin ribbing clearly.
- Golden yellow — worsted / Aran #4 — 5 g — used for the center of the flame.
- Black — worsted / Aran #4 — 5 g — used for the eyes, mouth, and wick.
The 70 g white-yarn quantity is based on a published full-size ghost reference from Storyland Amis. A 50 g orange ball is consistent with published pumpkin material allowances from Cuddly Stitches Craft.
Tools
- 4.0 mm crochet hook
- Polyester toy stuffing
- Yarn needle
- Long tapestry or doll needle for pumpkin ribbing
- Locking stitch marker
- Straight pins
- Scissors
- 12 mm safety eyes, optional — the photographed version uses crocheted black eye patches instead.
Abbreviations
- MR = magic ring
- sc = single crochet
- inc = 2 sc in the same stitch
- dec = single-crochet decrease
- sl st = slip stitch
- ch = chain
- hdc = half double crochet
- dc = double crochet
- tr = treble crochet
- BLO = back loop only
- FLO = front loop only
- st/sts = stitch/stitches
An invisible decrease works through the front loops of the next two stitches and keeps the reduction less visible on stuffed fabric.
Pattern — Step by Step
Work in continuous spirals unless a section states otherwise. The head and pumpkin use a 36-stitch plateau, which matches the medium-size construction used for this design.
Ghost Head Core
Yarn: warm white — Standard amigurumi math; photo-based original construction.
R1: 6 sc in MR (6)
R2: inc ×6 (12)
R3: (sc, inc) ×6 (18)
R4: (2 sc, inc) ×6 (24)
R5: (3 sc, inc) ×6 (30)
R6: (4 sc, inc) ×6 (36)
R7: sc around (36)
R8: sc around (36)
R9: sc around (36)
R10: sc around (36)
R11: (4 sc, dec) ×6 (30)
R12: (3 sc, dec) ×6 (24)
R13: (2 sc, dec) ×6 (18)
Stuff firmly enough that the top stays rounded but not hard.
R14: (sc, dec) ×6 (12)
R15: dec ×6 (6)
Fasten off. Leave a 25 cm tail, thread it through the final six front loops, and close.
Pumpkin Body / Base
Yarn: burnt orange — Standard amigurumi math and photo-based construction.
R1: 6 sc in MR (6)
R2: inc ×6 (12)
R3: (sc, inc) ×6 (18)
R4: (2 sc, inc) ×6 (24)
R5: (3 sc, inc) ×6 (30)
R6: (4 sc, inc) ×6 (36)
R7: sc around (36)
R8: sc around (36)
R9: sc around (36)
R10: sc around (36)
R11: sc around (36)
R12: (4 sc, dec) ×6 (30)
R13: (3 sc, dec) ×6 (24)
Stuff in small pieces. Keep the center dense enough to accept six sculpting passes.
R14: (2 sc, dec) ×6 (18)
R15: (sc, dec) ×6 (12)
R16: dec ×6 (6)
Fasten off. Leave approximately 120 cm of orange yarn for the pumpkin ribbing.
Pumpkin Ribbing
Yarn: burnt orange — photo structure and standard external pumpkin sculpting.
Thread the long orange tail through a long tapestry needle. Pass the needle from the bottom center through the stuffed pumpkin and bring it out through the top center.
Carry the yarn down the outside of the pumpkin and insert the needle through the bottom center again. Bring it back through the top center.
Repeat this process until the pumpkin has six evenly spaced ribs. At the 36-stitch widest section, each lobe corresponds to roughly six stitches of circumference.
Pull each strand only until a visible groove forms. Excessive tension can flatten the pumpkin or distort the base. Knot the yarn securely underneath and bury the remaining tail.
Ghost Sheet / Drape
Yarn: warm white — Standard amigurumi math with a photo-matched pointed lower edge.
R1: 6 sc in MR (6)
R2: inc ×6 (12)
R3: (sc, inc) ×6 (18)
R4: (2 sc, inc) ×6 (24)
R5: (3 sc, inc) ×6 (30)
R6: (4 sc, inc) ×6 (36)
R7: sc around (36)
R8: sc around (36)
R9: sc around (36)
R10: sc around (36)
R11: sc around (36)
R12: sc around (36)
R13: sc around (36)
R14: sc around (36)
R15: (sl st, sc, hdc, tr, hdc, sc) ×6 (36)
Do not stuff the ghost sheet. The six treble-stitch peaks form the elongated lower points visible over the pumpkin.
Fasten off. Leave a 30 cm tail for attaching the drape to the head core.
Arms / Side Drape Points — Make 2
Yarn: warm white.
R1: 6 sc in MR (6)
R2: inc ×6 (12)
R3: sc around (12)
R4: sc around (12)
R5: sc around (12)
R6: sc around (12)
R7: sc around (12)
R8: dec ×6 (6)
Do not stuff. Flatten each piece slightly so the closed end points downward.
Fasten off and leave a 25 cm sewing tail on each piece.
Back Legs
No back legs appear in the reference design. The ghost is built as a sheet-shaped upper body mounted directly above the pumpkin, so separate back legs are not required.
Ears or Wings
No ears or wings appear in the reference image. The visible projections on both sides belong to the ghost sheet and arm structure.
Crocheted Eye Patches — Make 2
Yarn: black — photo-matched facial construction.
R1: 6 sc in MR (6)
R2: inc ×6 (12)
Slip stitch into the next stitch and fasten off with a 25 cm sewing tail.
Stretch each circle vertically while sewing so the finished patch becomes an oval approximately 16–18 mm high and 11–13 mm wide. The photographed character uses elongated crocheted eyes rather than round plastic safety eyes.
Mouth
Yarn: black — photo-matched construction.
Row 1: ch 8. Starting in the second chain from the hook, sl st across 7 chains (7).
Fasten off with a 25 cm tail. Pin the strip into a shallow U shape before sewing. The finished mouth should span approximately five visible single-crochet stitches.
Cheek Patches — Make 2, Optional
Yarn: muted orange or pink.
R1: 6 sc in MR (6)
R2: inc ×6 (12)
Fasten off with a 20 cm tail.
For a photo-matched version, omit the cheek patches. No colored cheeks are visible in the reference image.
Candle Collar
Yarn: warm white — photo-based original construction.
R1: 6 sc in MR (6)
R2: inc ×6 (12)
R3: (sc, inc) ×6 (18)
R4: BLO sc around (18)
R5: sc around (18)
R6: sc around (18)
Add only a thin layer of stuffing so the candle collar keeps its cylindrical shape without becoming bulky.
Fasten off and leave a 30 cm sewing tail.
Wick
Yarn: black.
Row 1: ch 5. Starting in the second chain from the hook, sl st across 4 chains (4).
Fasten off with tails at both ends. Position the wick so approximately 8–10 mm remains visible between the candle collar and flame.
Outer Candle Flame
Yarn: burnt orange — photo-based original construction.
R1: 6 sc in MR (6)
R2: inc ×6 (12)
R3: (sc, inc) ×6 (18)
R4: sc around (18)
R5: sc around (18)
Add only a small amount of stuffing. Excess stuffing will turn the flame into a round ball instead of a narrow teardrop.
R6: (sc, dec) ×6 (12)
R7: dec ×6 (6)
R8: sc around (6)
Fasten off and leave a 20 cm tail. Close the remaining six stitches. Pinch the R8 section while securing the yarn through the top to create the pointed flame shape.
Inner Yellow Flame Patch
Yarn: golden yellow.
R1: 6 sc in MR (6)
R2: inc ×6 (12)
Fasten off with a 20 cm tail.
Stretch the circle vertically into a narrow teardrop while sewing it to the front of the orange flame. Keep an orange border of approximately 3–4 mm visible around the yellow center.
Assembly
- Place the ghost head core on the top center of the closed pumpkin and sew a 25–30 mm circle of contact stitches between the two pieces.
- Set the pumpkin body on a flat surface and check that all six ribbing channels divide the circumference evenly. Correct loose sculpting strands before the upper section is covered.
- Pull the ghost drape over the head core. Center one long lower point at the front and tack the top of the sheet to the core with four small stitches around R2–R3.
- Pin the eye patches around R9–R10 of the drape. Leave approximately six visible stitches between them, then position the mouth one or two rounds lower.
- Attach the two arms or side drape points at approximately the 3 o’clock and 9 o’clock positions. Leave most of each piece visible beneath the outer sheet.
- Check the pumpkin rib alignment from the front. Position the ghost face above a pumpkin lobe rather than directly over a deep sculpted groove.
- Sew the candle collar over the exact top center of the drape. Catch both the ghost sheet and the stuffed head core underneath.
- Insert the black wick through the center of the candle collar. Stitch its lower end into the head core, then attach the orange flame over the upper end.
- Add the optional cheek patches only when making the alternate version. Leave them off to match the reference photo.
- Bury every remaining yarn tail inside a stuffed component. Set the finished figure on a flat surface and redistribute the pumpkin stuffing if one lobe lifts away from the table.
The completed figure has a six-lobed pumpkin base, supported ghost sheet, crocheted face, centered candle collar, black wick, and two-color flame.
7 Technical Tips
- Control stitch-marker drift. Move the marker after the first stitch of every round instead of waiting until the round is complete. A one-stitch shift repeated across multiple rounds can rotate the face or pumpkin decreases away from the intended center.
- Avoid overfirm stuffing. Stop adding fiberfill when the pumpkin rebounds after a light thumb press but still compresses by approximately 8–10 mm. A rigid pumpkin makes the external sculpting strands less effective.
- Prevent visible decrease gaps. Work through the two front loops when making invisible decreases on the head and pumpkin. Standard decreases can create larger openings where the stuffing presses against the fabric.
- Position the eyes before fixing the drape. Pin both crocheted eyes before permanently sewing the ghost sheet to the head core. Moving an eye by only two stitches after attachment can rotate the visible front of the ghost.
- Adjust tension when using velvet yarn. If substituting chenille or velvet, select a hook size that leaves no visible stuffing gaps in a 10-stitch test section. Mark both the first stitch and midpoint of a 36-stitch round because plush yarn can hide stitch boundaries.
- Pin the candle before sewing. Use at least four pins around the candle collar and three around each eye patch. A collar shifted by approximately 5 mm can make the entire flame appear tilted.
- Leave long sewing tails. Keep at least 20–25 cm for facial pieces and other sewn components. Pass each tail through the stuffed core twice before trimming so repositioning the drape does not pull the yarn end free.
Conclusion
Finish the pumpkin ribbing before making permanent face stitches because the sculpting passes determine the final front axis of the figure. Photograph the completed piece at eye level so the orange pumpkin base, white ghost points, black face, and two-color candle flame remain visually separate. Your next step is to prepare approximately 70 g of white yarn and one 50 g orange ball before marking R1. Save this ghost amigurumi crochet pattern to Pinterest and share the finished version on Instagram with #GhostPumpkinCandle. Which detail would you change on this character first: the number of pumpkin ribs, the length of the ghost hem, or the shape of the candle flame?









