Introduction
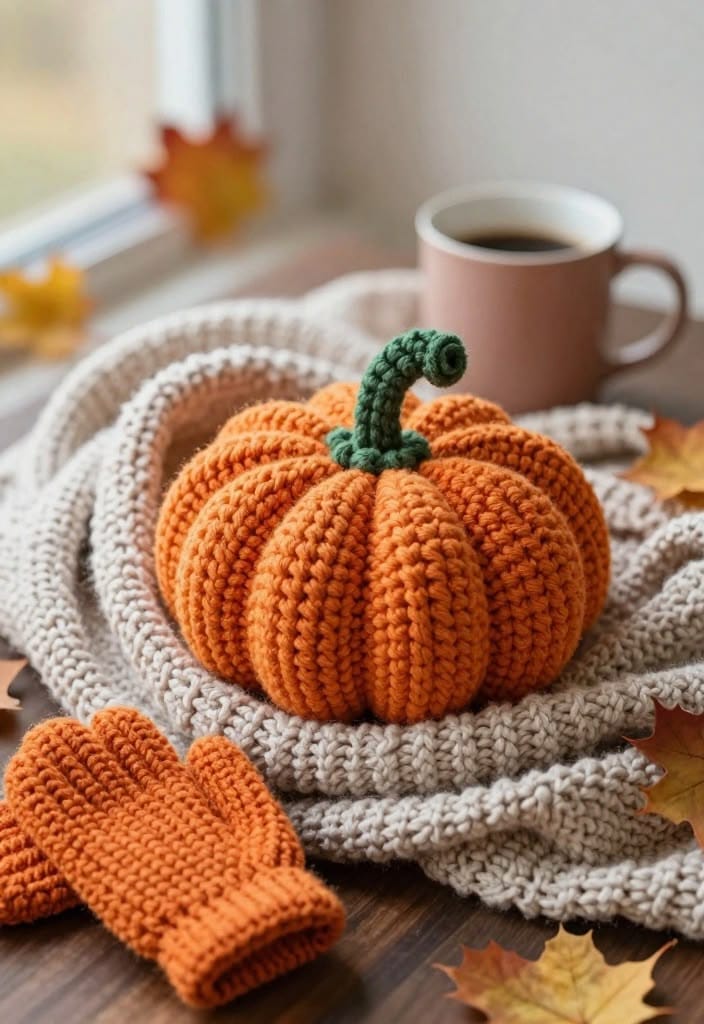
A pumpkin with dozens of fine vertical ribs still needs eight deeper channels or the body reads as a round cushion instead of a segmented fruit. This ribbed crochet pumpkin pattern uses worsted or Aran yarn and a 5 mm hook to make an approximately 20–22 cm pumpkin. Back-loop rows form the dense texture, while stuffing, gathering and exterior sculpting create the broad lobes and curved green stem.
The Design: What Makes This Ribbed Pumpkin Different
The pumpkin begins as one rectangular piece because the photographed surface contains uninterrupted vertical ribbing from the upper crown to the lower center. Back-loop half double crochet produces those narrow raised lines without requiring post stitches or complex cables. After the short edges are joined, the resulting tube is gathered and stuffed into a broad oval. Eight separate shaping strands then create deeper channels across the fine ribbing. That second layer of structure is what distinguishes this orange crochet pumpkin from a basic ribbed cylinder. The stem remains intentionally narrow and relatively tall, then curves forward near its tip so it does not add unnecessary bulk to the crown. One common construction mistake is making the starting rectangle too tall. A tall rectangle produces an upright pumpkin even after cinching; keep the body height near 16–18 cm before assembly.
Project Info at a Glance
| Skill Level | Time | Finished Size | Hook | Best For |
|---|---|---|---|---|
| Confident beginner / intermediate finishing | 5–7 hours | Approx. 20–22 cm wide × 18–21 cm high including stem | 5.0 mm | Fall tables, shelves, Thanksgiving displays and farmhouse decor |
Materials and Tools
Yarn
- Burnt pumpkin orange — worsted / Aran #4 — approximately 150–180 g — used for the ribbed body and sculpting strands.
- Forest or moss green — matching worsted yarn — approximately 15–20 g — used for the stem and stem base.
A smooth, tightly plied yarn gives clearer rib definition than a brushed or fuzzy fiber. Keep the orange and green yarns within the same general weight category so the stem does not look disproportionately heavy.
Tools
- 5.0 mm crochet hook
- Polyester stuffing, approximately 170–210 g
- Long tapestry or doll needle, preferably 12–15 cm
- Standard yarn needle
- Eight locking stitch markers or pins
- Scissors
- Measuring tape
Abbreviations
- MR — magic ring
- ch — chain
- sc — single crochet
- hdc — half double crochet
- inc — two stitches in one stitch
- sl st — slip stitch
- BLO — back loop only
- RS — right side
- WS — wrong side
Working half double crochet through the back loop leaves the unused front loop on the surface, forming the narrow raised line that creates the knit-look pumpkin texture.
Pattern — Step by Step
The body is worked flat in rows rather than in continuous rounds. Measure the rectangle while it is relaxed on a table; stretching the ribbing during measurement will produce an undersized finished pumpkin.
Pumpkin Body Rectangle
Yarn: burnt pumpkin orange — Source: rectangle-based ribbed pumpkin construction supported by current published patterns.
Ch 23.
Row 1: Hdc in second ch from hook and in every ch across. Turn. (22)
Row 2: Ch 1, hdc BLO in each stitch across. Turn. (22)
Row 3: Ch 1, hdc BLO across. Turn. (22)
Repeat Row 3 until the rectangle measures approximately 46–50 cm along the row-end edge.
Depending on gauge, this will usually require approximately 46–54 rows.
The stitch count remains 22 on every row. The row count controls circumference; the 22-stitch width controls pumpkin height.
Do not fasten off until you have checked the dimensions.
Check the Rectangle Proportions
Place the rectangle flat with the rib lines vertical.
The foundation-to-working-edge measurement should be approximately 16–18 cm. The row-end measurement should fall near 46–50 cm.
Bring the two short edges together temporarily.
The resulting tube should look wider around than it is tall. If the height and diameter appear nearly equal, add rows rather than changing the 22-stitch width.
Join the Short Edges
Fold the rectangle so the foundation edge meets the final row.
Keep the right side of the ribbing facing inward.
Using the working yarn, slip stitch the two short edges together through corresponding loops.
Turn the tube right side out.
Place the seam inside one rib valley. A seam sitting on top of a raised ridge remains visible after stuffing.
Fasten off, leaving approximately 80 cm of yarn.
Gather the Bottom
Thread the long orange tail through a tapestry needle.
Run the needle in and out through the row ends around one complete opening.
Catch approximately one point every 8–10 mm rather than entering every tiny loop.
Pull gradually until the opening reduces to roughly 1–2 cm.
Pass the needle across the opening three or four times and pull firmly.
Do not create a hard knot of fabric at the center. The gathered base should remain shallow enough for the finished pumpkin to sit flat.
Knot securely and bury the short tail temporarily inside the tube.
Initial Stuffing
Add small pieces of polyester filling around the inside wall first.
Push stuffing outward behind the ribbed fabric rather than packing the center immediately.
Rotate the tube as you work.
The ribbing should expand without becoming stretched flat. Stop and redistribute filling if the raised BLO lines begin disappearing.
Build the Broad Pumpkin Shape
Continue stuffing until the lower two-thirds of the body are full.
Press the base against a hard surface and move filling outward toward the circumference.
Keep the central vertical axis slightly softer.
The body should resist normal handling but still compress about 10–15 mm under firm thumb pressure.
A completely rigid pumpkin cannot be sculpted into deep lobes without excessive strain on the yarn.
Gather the Crown
Cut approximately 100 cm of orange yarn and thread the long needle.
Run the strand evenly around the open upper edge.
Pull until the opening reduces to approximately 4 cm.
Add the remaining stuffing through the gap, focusing on the outer circumference beneath the crown.
Pull again until the opening measures approximately 1–1.5 cm.
Secure the gathering strand but leave a long tail for the next step.
Vertical Compression
Pass the gathering yarn through the exact center of the pumpkin from crown to base.
Exit through the lower gathered point.
Return through the center and pull gradually.
Compress the body by approximately 1–1.5 cm in height.
The circumference should become slightly wider as the upper and lower centers draw inward.
Secure temporarily. Do not bury the strand until the eight shaping channels are complete.
Mark Eight Lobe Positions
Place the pumpkin upright and view it from directly above.
Divide the circumference into eight approximately equal sections.
Place removable markers at each future groove.
Align one groove with the body seam so the seam becomes part of the sculpted structure.
Measure visually from both the crown and widest circumference. A groove that starts correctly at the top can still drift sideways near the base.
First Sculpted Groove
Yarn: matching orange.
Cut approximately 130 cm of yarn.
Anchor it securely at the bottom center.
Carry the yarn over the outside of the pumpkin along the first marked valley.
Enter through the crown center, pass through the complete body and exit at the lower center.
Pull until the channel sits approximately 10–12 mm below the fullest neighboring rib surfaces.
Do not cinch until the yarn disappears into the pumpkin. The photographed lobes are deep but rounded.
Second Groove
Work the position directly opposite Groove 1.
Pull to approximately the same depth.
Set the pumpkin on a flat surface and compare both sides.
If one section is noticeably flatter, loosen the nearest strand and move stuffing into that lobe.
Grooves 3 and 4
Work the next pair at approximately 90 degrees to the first two.
Alternate from one side to the opposite side.
After four channels, the pumpkin should appear divided into four broad quarters from above.
Do not work all grooves clockwise because the filling will migrate toward the unfinished side.
Grooves 5 and 6
Add one groove halfway between two existing channels.
Rotate the pumpkin 180 degrees and form its opposite partner.
Compare the width of all six visible lobes before continuing.
Grooves 7 and 8
Complete the final opposite pair in the two remaining wide spaces.
Rotate the pumpkin slowly while checking every lobe.
Adjust individual strand tension until no section projects more than approximately 10 mm farther than the others.
Secure all sculpting yarn at the lower center and weave the ends deeply through the stuffed body.
Refine the Flat Base
Place the pumpkin on a hard table.
If it rocks, push the lower gathering point upward by approximately 5–8 mm.
Redistribute stuffing outward into the lowest lobe sections.
A stable base should come from filling distribution and shallow compression, not from flattening several ribs.
Green Stem
Yarn: moss / forest green — original curved tubular stem reconstruction.
R1: 6 sc in MR (6)
R2–R6: sc around (6)
R7: (2 sc, inc) ×2 (8)
R8–R10: sc around (8)
R11: (3 sc, inc) ×2 (10)
R12: sc around (10)
R13: (4 sc, inc) ×2 (12)
R14: sc around (12)
Stuff R9–R14 lightly. Leave the narrow upper half nearly empty so it can curl forward without creating a rigid bend.
Fasten off. Leave a 35 cm sewing tail.
Stem Base Disc
Yarn: moss green.
R1: 6 sc in MR (6)
R2: inc ×6 (12)
R3: (sc, inc) ×6 (18)
Do not stuff.
Fasten off. Leave a 30 cm sewing tail.
Stem Crown Points
Join green yarn to the edge of the 18-stitch disc.
Repeat three times:
Sl st in next stitch,
ch 4,
sl st in second ch from hook,
sc in next ch,
hdc in final ch,
sl st into next disc stitch.
The short points spread the stem base over the pumpkin crown without adding a separate leaf that is not visible in the reference.
Fasten off.
Shape the Stem Curl
Hold the stem at its wider lower third.
Bend the upper narrow tube gradually forward over approximately 4–5 cm.
Turn the last 1–2 cm slightly inward to create the hook-like tip.
If the stem springs back, make two concealed green stitches along the inside of the curve.
Avoid folding one round sharply; the photographed stem follows a continuous arc.
Assembly
- Complete the full ribbed rectangle and verify the 22-stitch width before joining its short edges into a tube.
- Gather the bottom opening, distribute stuffing around the outer wall and keep the central axis somewhat softer.
- Gather the crown and compress the body vertically by approximately 1–1.5 cm to produce the broad pumpkin profile.
- Mark eight equal sculpting positions, placing one directly over the rectangle seam.
- Form all eight grooves in four opposite pairs, redistributing filling whenever one lobe becomes flatter than its neighbors.
- Set the pumpkin on a hard surface and correct any rocking before permanently burying the shaping yarn.
- Sew the 18-stitch green stem base disc over the crown gathering point, covering the ends of the eight sculpting channels.
- Attach the stem through its 12-stitch lower edge and add extra hidden stitches through the disc if the stem leans at the base.
- Curve the upper stem gradually forward and secure the inside of the bend with one or two matching stitches only when needed.
- Weave every structural yarn tail through at least 4–5 cm of dense crochet, reverse direction once and trim after the end retracts beneath the stitches.
The completed pumpkin should sit on a broad eight-lobed base with dense fine ribbing running vertically through every section and a centered green stem curving forward above the crown.
7 Technical Tips
- Rectangle too tall: A body section taller than approximately 18 cm produces an upright pumpkin that remains narrow after cinching. Keep the 22-stitch strip near 16–18 cm high before assembly.
- Ribbing flattening: Excess stuffing stretches the BLO ridges until the surface resembles ordinary crochet. Stop filling when firm thumb pressure still creates approximately 10–15 mm of temporary indentation.
- Visible body seam: A seam sewn across the top of a raised rib remains obvious after stuffing. Match the two short edges inside a natural valley and place the first deep sculpting strand directly over that seam.
- Unequal lobes: Working all eight shaping channels clockwise pushes filling into the final sections. Form one groove and then its exact opposite before adding the next pair.
- Grooves too shallow: Fine BLO ribs alone do not create the deep segmentation seen in the photograph. Pull each external shaping line approximately 10–12 mm below the fullest point of the neighboring lobes.
- Stem kinking: Filling all 14 stem rounds firmly creates one hard fold. Leave roughly the upper eight rounds nearly empty and distribute the bend across 4–5 cm of the tube.
- Stem wobble: Sewing a 12-stitch stem directly over the gathered pumpkin opening concentrates its weight on a small point. Add the 18-stitch base disc first so the attachment spans approximately 3–4 cm of the crown.
Conclusion
Check the rib direction and all eight sculpted channels before attaching the stem because the green base will cover the crown where those lines meet. Next, rotate the pumpkin on a level table and compare lobe width, groove depth and base contact from every side. Correct any section that projects noticeably farther than its opposite before burying the shaping tails. Share the finished ribbed crochet pumpkin pattern project on Pinterest with a vertical fall photograph, then post a close view of the fine BLO texture and curved stem on Instagram using #ClassicRibbedCrochetPumpkin. For this pumpkin specifically, would you keep the forest-green curled stem or make the stem dark brown for a more natural contrast?









