Introduction
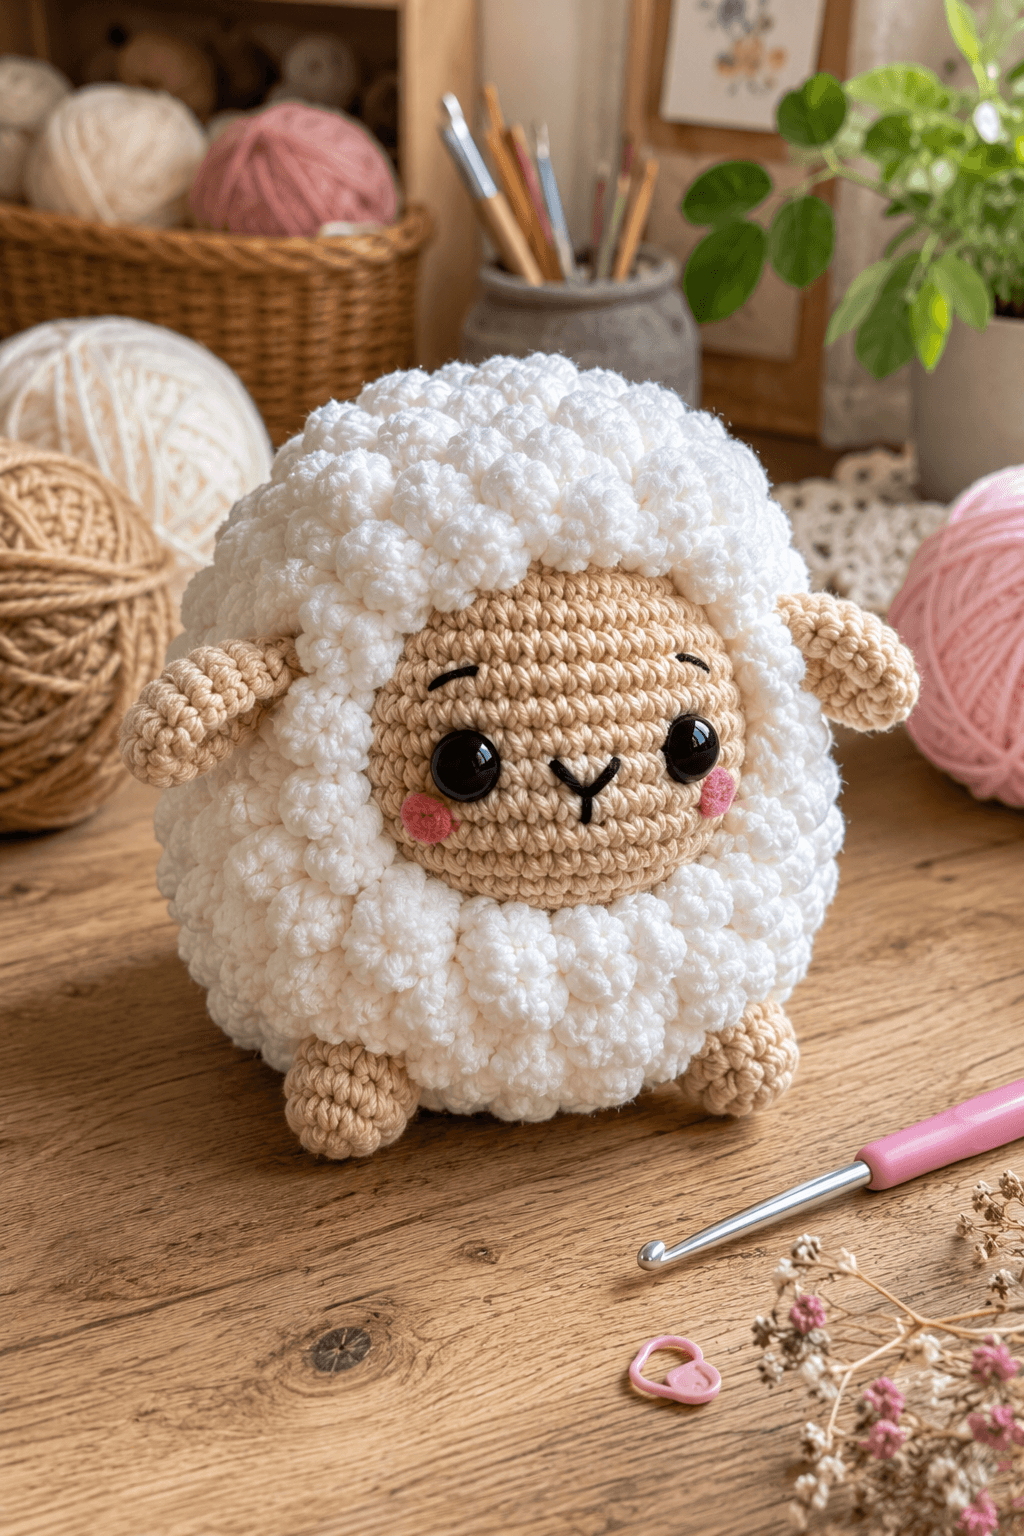
A sheep with this much white fleece needs a face opening wide enough that the bobbles never crowd the eyes. This fluffy sheep amigurumi crochet pattern uses worsted yarn, a 4 mm hook and 12–14 mm safety eyes to make a lamb approximately 21–23 cm tall. A smooth beige head and body carry a separate surface fleece layer, while compact ears, legs and embroidered features remain exposed.
The Design: What Makes This Fluffy Sheep Different
The head reaches a 36-stitch plateau because the photographed face is broad and almost circular rather than long and narrow. White fleece begins outside that beige face window and continues over the crown, sides and rear of the head. The body also reaches 36 stitches, producing the compact ball shape required beneath the dense bobble coat. Small beige limbs stay deliberately understated; the fleece remains the dominant mass. Instead of relying on one fuzzy novelty yarn, this bobble sheep crochet pattern builds visible individual curls over a smooth structural base. That choice makes fleece placement controllable around the eyes and ears. A frequent maker error is filling every available stitch with a large bobble. Crowding causes the coat to push forward over the cheeks, so leave approximately one background stitch between selected clusters near the facial boundary.
Project Info at a Glance
| Skill Level | Time | Finished Size | Hook | Best For |
|---|---|---|---|---|
| Intermediate | 9–12 hours | Approx. 21–23 cm seated | 4.0 mm | Farm-animal collections, nursery decor and spring displays |
Materials and Tools
Yarn
- Warm beige / oatmeal — worsted / Aran #4 — approximately 60–75 g — used for the head, body base, ears and legs.
- Soft white — worsted / Aran #4 — approximately 110–140 g — used for the dimensional fleece coat.
- Blush pink — scrap yarn — used for two cheek patches.
- Black embroidery yarn — small amount — used for eyebrows, nose and mouth.
A smooth white yarn produces the distinct rounded clusters visible in the reference. Very fluffy novelty yarn hides the bobble structure and changes the finished outline.
Tools
- 4.0 mm crochet hook
- 12–14 mm safety eyes
- Polyester stuffing, approximately 130–160 g
- Long yarn needle
- Embroidery needle
- Locking stitch markers
- Dressmaking pins
- Scissors
Use securely embroidered eyes rather than plastic safety-eye fittings when the finished lamb is intended for a child under three.
Abbreviations
- MR — magic ring
- sc — single crochet
- inc — two single crochet stitches in one stitch
- dec — invisible single crochet decrease
- sl st — slip stitch
- ch — chain
- hdc — half double crochet
- dc — double crochet
- BO — bobble stitch
- BLO — back loop only
- FLO — front loop only
An invisible decrease is worked through the front loops of the next two stitches before completing one single crochet through both loops.
Bobble Stitch
For one BO, yarn over and insert the hook into the indicated stitch, yarn over and pull up a loop, yarn over and pull through two loops. Repeat that partial double crochet four more times in the same stitch. Yarn over and pull through all six loops on the hook, then ch 1 to close the cluster.
The bobble naturally projects away from the wrong side of the working row. Push each cluster toward the outside as soon as it is completed.
Pattern — Step by Step
Work the stuffed beige pieces in continuous spirals unless noted. Mark the first stitch of every round and count before moving the marker.
Head
Yarn: warm beige — Source: standard six-stitch amigurumi math.
R1: 6 sc in MR (6)
R2: inc ×6 (12)
R3: (sc, inc) ×6 (18)
R4: (2 sc, inc) ×6 (24)
R5: (3 sc, inc) ×6 (30)
R6: (4 sc, inc) ×6 (36)
R7–R12: sc around (36)
R13: (4 sc, dec) ×6 (30)
R14: (3 sc, dec) ×6 (24)
R15: (2 sc, dec) ×6 (18)
R16: sc around (18)
R17: (sc, dec) ×6 (12)
R18: dec ×6 (6)
Insert the safety eyes between R9 and R10 with approximately eight visible stitches between the posts. Begin stuffing after R13 and shape the face into a broad sphere rather than an oval.
Fasten off. Leave a 35 cm sewing tail and close the final six front loops.
Body Base
Yarn: warm beige or white — Source: standard six-stitch amigurumi math.
R1: 6 sc in MR (6)
R2: inc ×6 (12)
R3: (sc, inc) ×6 (18)
R4: (2 sc, inc) ×6 (24)
R5: (3 sc, inc) ×6 (30)
R6: (4 sc, inc) ×6 (36)
R7–R13: sc around (36)
R14: (4 sc, dec) ×6 (30)
R15: sc around (30)
R16: (3 sc, dec) ×6 (24)
R17: (2 sc, dec) ×6 (18)
R18: sc around (18)
R19: (sc, dec) ×6 (12)
R20: dec ×6 (6)
Stuff firmly through R15, then use smaller portions near the top. The base should remain round enough to support fleece on every side.
Fasten off. Leave a 35 cm sewing tail and close.
Ears (Make 2)
Yarn: warm beige.
R1: 6 sc in MR (6)
R2: inc ×6 (12)
R3: (sc, inc) ×6 (18)
R4–R6: sc around (18)
R7: (sc, dec) ×6 (12)
R8: sc around (12)
R9: dec ×6 (6)
Do not stuff. Flatten each ear and press the center slightly so the outer end remains rounded.
Fasten off. Leave a 25 cm sewing tail.
Front Legs (Make 2)
Yarn: warm beige.
R1: 6 sc in MR (6)
R2: inc ×6 (12)
R3: (sc, inc) ×6 (18)
R4–R5: sc around (18)
R6: (sc, dec) ×6 (12)
R7–R8: sc around (12)
R9: dec ×6 (6)
Stuff the rounded end lightly. The upper section should stay soft so most of each front leg can disappear beneath the fleece.
Fasten off. Leave a 25 cm sewing tail.
Back Legs / Feet (Make 2)
Yarn: warm beige.
R1: 6 sc in MR (6)
R2: inc ×6 (12)
R3: (sc, inc) ×6 (18)
R4–R6: sc around (18)
R7: (sc, dec) ×6 (12)
R8–R9: sc around (12)
R10: dec ×6 (6)
Stuff through R7. Keep the attachment end flexible so each foot can point slightly outward beneath the fleece body.
Fasten off. Leave a 30 cm sewing tail.
Cheek Patches (Make 2)
Yarn: blush pink — Source: standard flat-circle math.
R1: 6 sc in MR (6)
R2: inc ×6 (12)
Do not stuff. Flatten both circles.
Fasten off. Leave a 12 cm sewing tail.
Head Fleece Foundation
Yarn: white.
The face must remain uncovered. Mark a circular face window that begins approximately one round above the eyes, passes about 1–2 stitches outside each eye and finishes approximately two rounds below the cheeks.
Join white yarn at the upper edge of that boundary.
Work surface slip stitches around the marked face outline, then continue adding horizontal and vertical surface lines across the crown and rear head at intervals of approximately two background stitches.
These surface lines create anchor points for the bobbles without covering the smooth beige face.
Fasten off and bury the tail.
Head Fleece Bobbles
Yarn: white.
Join at the crown.
Work one BO into the first available surface anchor.
Sl st into the next anchor.
Continue alternating BO and sl st across each foundation line.
On the side rows nearest the face, skip one anchor whenever two neighboring bobbles push toward the eyes.
The photographed fleece forms overlapping rounded clusters. Allow adjacent bobbles to touch, but do not compress them into one solid ridge.
Fasten off when the crown, rear head and side fleece are covered.
Body Fleece Foundation
Yarn: white.
Attach white yarn near the lower rear body.
Work a continuous surface spiral around the body, placing the line approximately two rounds apart as it climbs toward the neck.
Stop the spiral approximately one background round from each leg attachment point.
The uncovered gaps give the beige limbs room to emerge from the coat.
Fasten off.
Body Fleece Bobbles
Yarn: white.
Join at the lower rear fleece foundation.
Work one BO at approximately every second anchor point.
Sl st to the next foundation point, then repeat.
On the lower front, leave a narrow clear area approximately 2 cm wide between the two feet.
Continue upward until the entire body is covered.
Add extra bobbles into visible gaps only after the first full coat has been completed.
Fasten off and weave in the end.
Extra Fleece Clusters
If isolated beige base stitches remain visible, make individual surface bobbles.
Insert the hook beneath one exposed background stitch, join white yarn and work one BO.
Secure the cluster through the neighboring stitch with sl st.
Limit correction bobbles around the face and limb openings. Excess clusters in those zones can conceal structural details.
Eyebrows
Yarn: black embroidery yarn.
Place each eyebrow approximately one crochet round above the corresponding eye.
Work one slightly curved stitch measuring approximately 12–15 mm.
Angle the outer end upward by a few millimeters.
Secure both ends inside the head.
Nose and Mouth
Yarn: black embroidery yarn.
Center the nose approximately one round below the midpoint between the eyes.
Work a small inverted triangular or shallow V-shaped nose approximately 10–12 mm wide.
Bring one vertical stitch downward approximately 8–10 mm.
From its lower end, add one short curved mouth line to each side.
The complete mouth should remain narrower than the distance between the inner edges of the eyes.
Secure the embroidery ends inside the head.
Assembly
- Sew the head to the upper front of the body before adding the fleece, keeping the eye line level and the face centered over the body.
- Attach both ears high on the sides of the head, with their flattened tips projecting horizontally beyond the future fleece edge.
- Sew the two front legs high on the body sides and angle them slightly forward so only their rounded beige ends remain visible after the fleece is added.
- Attach both back feet at the lower front of the body, place the sheep on a level surface and correct the angle until both feet touch evenly.
- Sew the two pink cheek patches below and slightly outside the eyes, then embroider the eyebrows, nose and split mouth.
- Mark the face boundary and work the white head-fleece foundation over the crown, sides and rear without crossing the marked beige window.
- Add the head bobbles first, checking every few rows that the eyes remain completely unobstructed.
- Build the body fleece from the lower rear upward, leaving clear gaps around all four limb attachment points.
- Add isolated correction bobbles only where the beige base remains visible, then trim or reposition any cluster that pushes across an eye, ear or foot.
- Weave every structural tail through at least 4 cm of dense fabric, reverse direction once and trim only after the end retracts beneath the stitches.
The completed lamb should stand or sit on its two visible feet with a round white fleece silhouette, both ears exposed and a wide beige face remaining clear of the surrounding bobbles.
7 Technical Tips
- Face disappearing into fleece: Bobbles closer than approximately 8–10 mm to the safety-eye rims make the face look crowded. Mark the face boundary before the first cluster and leave at least one clear beige stitch outside each eye.
- Uneven bobble size: Changing the number of partial double crochets produces visibly different fleece curls. Use five partial double crochets in every BO and close each cluster with the same ch-1 tension.
- Visible decrease holes: Loose decreases expose stuffing through the beige face. Work every decrease through the two front loops and keep the completed stitch the same height as its neighboring single crochet stitches.
- Late eye installation: Fitting 12–14 mm eye washers after the head decreases below 24 stitches leaves limited access. Install both eyes after R12 and verify the eight-stitch spacing before stuffing heavily.
- Ears buried by wool: Fleece extending over more than roughly 10 mm of the ear base can make the ears appear undersized. Pin the ears first and stop the nearest bobble row just behind their attachment seam.
- Body turning lopsided: Adding extra bobbles repeatedly to one visible side increases fleece thickness there. Rotate the sheep after each complete foundation line and add correction clusters in opposite areas rather than one section at a time.
- Feet floating above the table: Dense lower fleece can extend farther than the beige feet. Keep the lowest bobble row at least 10–15 mm above the foot base and test the sheep on a hard surface before adding extra lower clusters.
Conclusion
Check the beige face opening before adding the final fleece because the eye clearance is harder to correct once neighboring bobbles interlock. Next, place the sheep at eye level and compare the exposed ear length, cheek spacing and both foot positions from the front. Remove or relocate any white cluster that interrupts those landmarks. Share the finished fluffy sheep amigurumi crochet pattern project on Pinterest with a vertical photograph, then post a close view of the bobble fleece and embroidered face on Instagram using #FluffyBobbleSheepAmigurumi. For this sheep specifically, would you keep the fleece pure white or work a second version in warm cream?









