Introduction
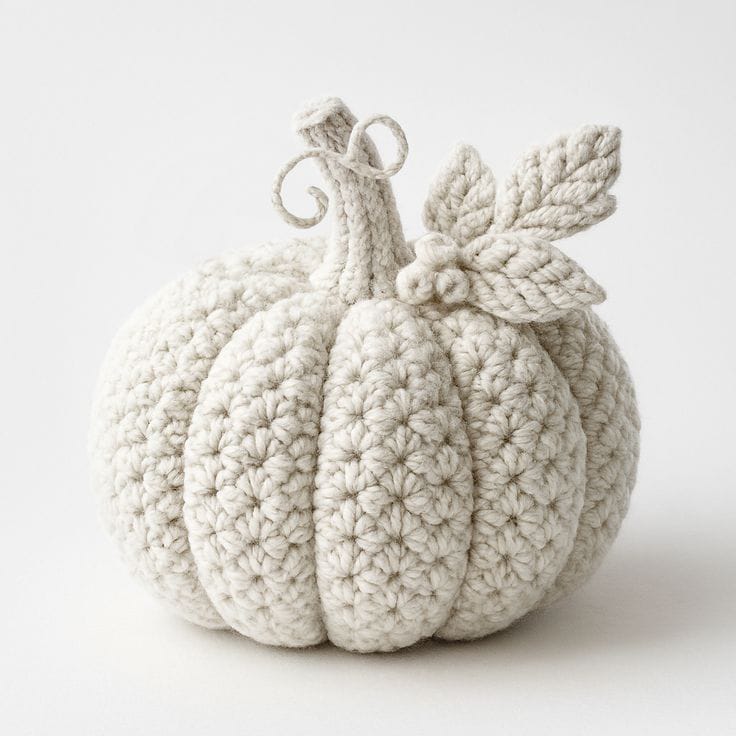
A white pumpkin loses its botanical structure quickly when the stem, leaf veins and eight rib channels are all the same color. This white crochet pumpkin pattern uses bulky yarn, a 5.5 mm hook and post-stuffing sculpting to make an approximately 20 cm pumpkin. A tapered stem, three raised-vein leaves and two curled vines provide enough shadow and relief to separate every ivory component.
The Design: What Makes This White Pumpkin Different
The pumpkin body reaches a 42-stitch plateau because the reference has a broad, nearly spherical core before sculpting. Eight exterior shaping passes then compress that core into deep lobes while preserving rounded surfaces between the grooves. Monochrome color makes the relief more important than it would be on a multicolor pumpkin. The stem therefore stays long and narrow, the leaves use a raised center vein, and the tendrils coil away from the crown rather than lying flat against it. This ribbed crochet pumpkin also uses three different leaf positions to break the symmetry around the stem. One common maker mistake is underfilling the center before sculpting. Loose stuffing collapses beneath eight tightening strands and creates flat panels. Pack the middle firmly, then leave only the two center poles slightly softer.
Project Info at a Glance
| Skill Level | Time | Finished Size | Hook | Best For |
|---|---|---|---|---|
| Intermediate | 6–8 hours | Approx. 20 cm wide × 21–23 cm high including stem | 5.5 mm | Fall tables, farmhouse displays and neutral seasonal decor |
Materials and Tools
Yarn
- Natural white / ivory — bulky #5 yarn — approximately 150–180 g — used for the pumpkin body.
- Natural white / ivory — same yarn — approximately 35–45 g additional — used for the stem, leaves, tendrils and sculpting.
Two strands of smooth worsted yarn held together can replace bulky yarn when you want the tighter stitch texture visible in the photograph. Make one 12-stitch test circle first because doubled worsted can produce a different diameter from a standard bulky yarn.
Tools
- 5.5 mm crochet hook for the body
- 4.5–5.0 mm crochet hook optional for firmer leaves and tendrils
- Polyester stuffing, approximately 160–200 g
- Long tapestry or doll needle, preferably 12–15 cm
- Standard yarn needle
- Eight locking stitch markers or pins
- Scissors
- Measuring tape
Abbreviations
- MR — magic ring
- sc — single crochet
- inc — two single crochet stitches in one stitch
- dec — invisible single crochet decrease
- sl st — slip stitch
- ch — chain
- hdc — half double crochet
- dc — double crochet
- tr — treble crochet
- BLO — back loop only
- FLO — front loop only
An invisible decrease is worked through the front loops of the next two stitches before completing one single crochet through both loops.
Pattern — Step by Step
Work the stuffed pumpkin and stem in continuous spirals unless a row is specified. Mark the first stitch of every round and verify the final count before moving the marker.
Pumpkin Body
Yarn: natural white — Source: standard six-stitch amigurumi math.
R1: 6 sc in MR (6)
R2: inc ×6 (12)
R3: (sc, inc) ×6 (18)
R4: (2 sc, inc) ×6 (24)
R5: (3 sc, inc) ×6 (30)
R6: (4 sc, inc) ×6 (36)
R7: (5 sc, inc) ×6 (42)
R8–R15: sc around (42)
R16: (5 sc, dec) ×6 (36)
R17: (4 sc, dec) ×6 (30)
R18: (3 sc, dec) ×6 (24)
R19: (2 sc, dec) ×6 (18)
R20: (sc, dec) ×6 (12)
R21: dec ×6 (6)
Begin stuffing after R16. Pack the middle firmly enough that the body resists thumb pressure, then use smaller portions around the decreasing rounds. Keep the final 2 cm at the top and bottom slightly softer.
Fasten off. Leave a 40 cm tail and close the six remaining front loops.
Initial Pumpkin Compression
Yarn: matching ivory.
Cut approximately 110 cm of yarn and thread the long needle. Enter at the exact bottom center, pass through the full stuffed body and exit through the top center.
Return through the same central channel and pull gradually until the pumpkin becomes approximately 1–1.5 cm shorter.
The circumference should spread outward slightly. Stop before either center forms a sharp crater.
Tie securely at the bottom but leave the yarn tail accessible until the ribs have been checked.
Mark Eight Rib Positions
View the pumpkin directly from above. Divide the widest circumference into eight visually equal sections and mark each future groove with a removable stitch marker.
Trace each position mentally from the top center down to the bottom center.
Correct uneven spacing before adding shaping yarn. Eight grooves make even small spacing errors visible.
Ribs 1 and 2
Yarn: matching ivory.
Cut approximately 130 cm of yarn. Anchor the strand at the lower center, carry it over the exterior along the first marked line and enter the top center.
Pass the needle through the complete pumpkin and exit at the bottom. Pull until the groove sits approximately 10–12 mm below the fullest point of the neighboring lobes.
Repeat on the position directly opposite Rib 1.
Leave both strands adjustable until the opposite pair has been compared from the side.
Ribs 3 and 4
Work the next pair at approximately 90 degrees to the first two grooves.
Carry each strand from bottom center to top center over the surface, then pass through the body and tighten gradually.
The pumpkin should now display four broad quarters from above.
Ribs 5 and 6
Place these shaping passes halfway between the first four grooves.
Tighten one side, rotate the pumpkin 180 degrees and shape the opposite side before making any permanent knot.
Alternating opposite grooves keeps the stuffing centered.
Ribs 7 and 8
Work the final pair through the remaining wide spaces.
Set the pumpkin on a level table and compare all eight lobes from the front, side and top.
Move stuffing beneath a flat lobe before tightening its neighboring strands. Extra tension alone cannot correct poorly distributed filling.
Knot all shaping strands securely at the lower center and bury the tails through the stuffed body.
Tall Tapered Stem
Yarn: natural white — original tapered stem construction.
R1: 6 sc in MR (6)
R2–R6: sc around (6)
R7: (2 sc, inc) ×2 (8)
R8–R10: sc around (8)
R11: (3 sc, inc) ×2 (10)
R12–R13: sc around (10)
R14: (4 sc, inc) ×2 (12)
R15–R16: sc around (12)
Stuff R9–R16 lightly. Leave the top eight rounds nearly empty so the stem can lean without developing one hard fold.
Fasten off. Leave a 40 cm sewing tail.
Stem Base Disc
Yarn: natural white.
R1: 6 sc in MR (6)
R2: inc ×6 (12)
R3: (sc, inc) ×6 (18)
Do not stuff. Keep the 18-stitch disc flat.
Fasten off. Leave a 30 cm sewing tail.
Large Leaf
Yarn: natural white — pointed two-sided leaf construction.
Row 1: ch 14
Row 2: starting in second ch from hook: sl st, sc, hdc, dc, dc, 2 tr, dc, dc, hdc, sc, sl st; work 3 sc in final chain.
Continue down the opposite side of the foundation chain:
sl st, sc, hdc, dc, dc, 2 tr, dc, dc, hdc, sc, sl st.
Pull the foundation chain into a shallow ridge to define the central vein.
Fasten off. Leave a 25 cm sewing tail.
Medium Leaves (Make 2)
Yarn: natural white.
Row 1: ch 11
Row 2: starting in second ch from hook: sl st, sc, hdc, dc, 2 dc, hdc, sc, sl st; work 3 sc in final chain.
Continue along the opposite side:
sl st, sc, hdc, 2 dc, dc, hdc, sc, sl st.
Keep both medium leaves slightly narrower than the large leaf.
Fasten off. Leave a 20 cm sewing tail.
Raised Leaf Veins
Yarn: matching ivory.
Thread a yarn needle and make one long surface stitch from the base of each leaf toward its point.
Add two short diagonal stitches on either side of the main vein.
Pull only until the surface line becomes visible. Heavy tension will cup the leaf.
Bury the ends on the back.
Long Curled Tendril
Yarn: natural white.
Ch 30.
Starting in the second chain from the hook, work 2 sc into each chain across.
The extra stitches force the cord to coil. Leave the spiral in its natural direction instead of rewinding it tightly.
Fasten off. Leave a 20 cm attachment tail.
Short Curled Tendril
Yarn: natural white.
Ch 20.
Starting in the second chain from the hook, work 2 sc into every chain across.
Fasten off. Leave an 18 cm sewing tail.
Optional Small Crown Bud
Yarn: natural white.
R1: 6 sc in MR (6)
R2: sc around (6)
R3: dec ×3 (3)
Do not stuff. This tiny tapered piece can fill an open space between the leaf bases if the crown looks sparse.
Fasten off. Leave a 12 cm sewing tail.
Assembly
- Complete and firmly stuff the pumpkin body before adding exterior shaping, leaving only the upper and lower center zones slightly softer.
- Compress the body vertically by approximately 1–1.5 cm so the finished silhouette becomes broader than the unshaped sphere.
- Mark eight equal rib positions around the widest circumference and inspect the spacing from directly above.
- Create the eight grooves in four opposite pairs, redistributing stuffing after every pair rather than tightening all eight consecutively.
- Place the finished pumpkin on a hard surface and correct any lobe that rises more than approximately 8 mm above its neighbors before burying the shaping tails.
- Sew the 18-stitch stem base disc over the top indentation, covering the meeting points of all eight sculpting strands.
- Attach the 12-stitch lower stem edge to the center of the disc and bend the lightly filled upper section into a gradual natural curve.
- Pin the large leaf beside the stem, place the two smaller leaves behind and beside it, then add one concealed fixing stitch approximately 10 mm along each center vein.
- Attach the long and short curled tendrils between the leaf bases and stem, fixing only the first 10–15 mm so the remaining coils stay free.
- Weave every structural tail through at least 4–5 cm of dense crochet, reverse direction once and trim after the yarn retracts beneath the stitches.
The completed pumpkin should rest on a broad eight-lobed base with the stem centered over the crown, three leaves visible from the front and both tendrils projecting freely around the stem.
7 Technical Tips
- White lobes disappearing: Monochrome yarn removes the color contrast that normally defines the sections. Pull each shaping groove to approximately 10–12 mm below the fullest adjacent surface so the ribs remain readable in ordinary light.
- Collapsed pumpkin center: An underfilled 42-stitch body compresses too far when eight strands are added. Before sculpting, thumb pressure at the widest point should create no more than approximately 10–15 mm of temporary indentation.
- Visible decrease gaps: Pale stuffing is especially obvious through ivory yarn. Work each decrease through the two front loops and keep its tension equal to the surrounding single crochet stitches.
- Unequal rib spacing: Working grooves by eye from only the front can create one narrow rear lobe. Mark all eight positions around the circumference and inspect the pumpkin from above before threading the first strand.
- Stem wobble: Sewing the 12-stitch stem directly to the six-stitch body closure concentrates its weight on too little fabric. Fit the 18-stitch base disc first so the attachment spreads across approximately 3–4 cm.
- Flat leaves: A monochrome leaf without a visible center line blends into the pumpkin surface. Add one raised central vein and keep at least half of each leaf unsupported so its edge casts a separate shadow.
- Straight tendrils: One single crochet per chain creates a cord rather than a spiral. Work two single crochets into every foundation chain and attach only the first 10–15 mm of each finished curl.
Conclusion
Inspect the eight ribs from above before attaching the foliage because the leaves will hide several upper groove endpoints. The next practical step is to compare opposite lobe widths and correct any section that differs noticeably before fixing the stem base. After the geometry is stable, add the leaves and curls without flattening them against the body. Share the finished white crochet pumpkin pattern project on Pinterest with a vertical fall photograph, then post a close view of the stem, raised leaf veins and sculpted ribs on Instagram using #WhiteRibbedCrochetPumpkin. For this pumpkin specifically, would you keep every botanical detail ivory or make only the leaves muted sage green?









