Introduction
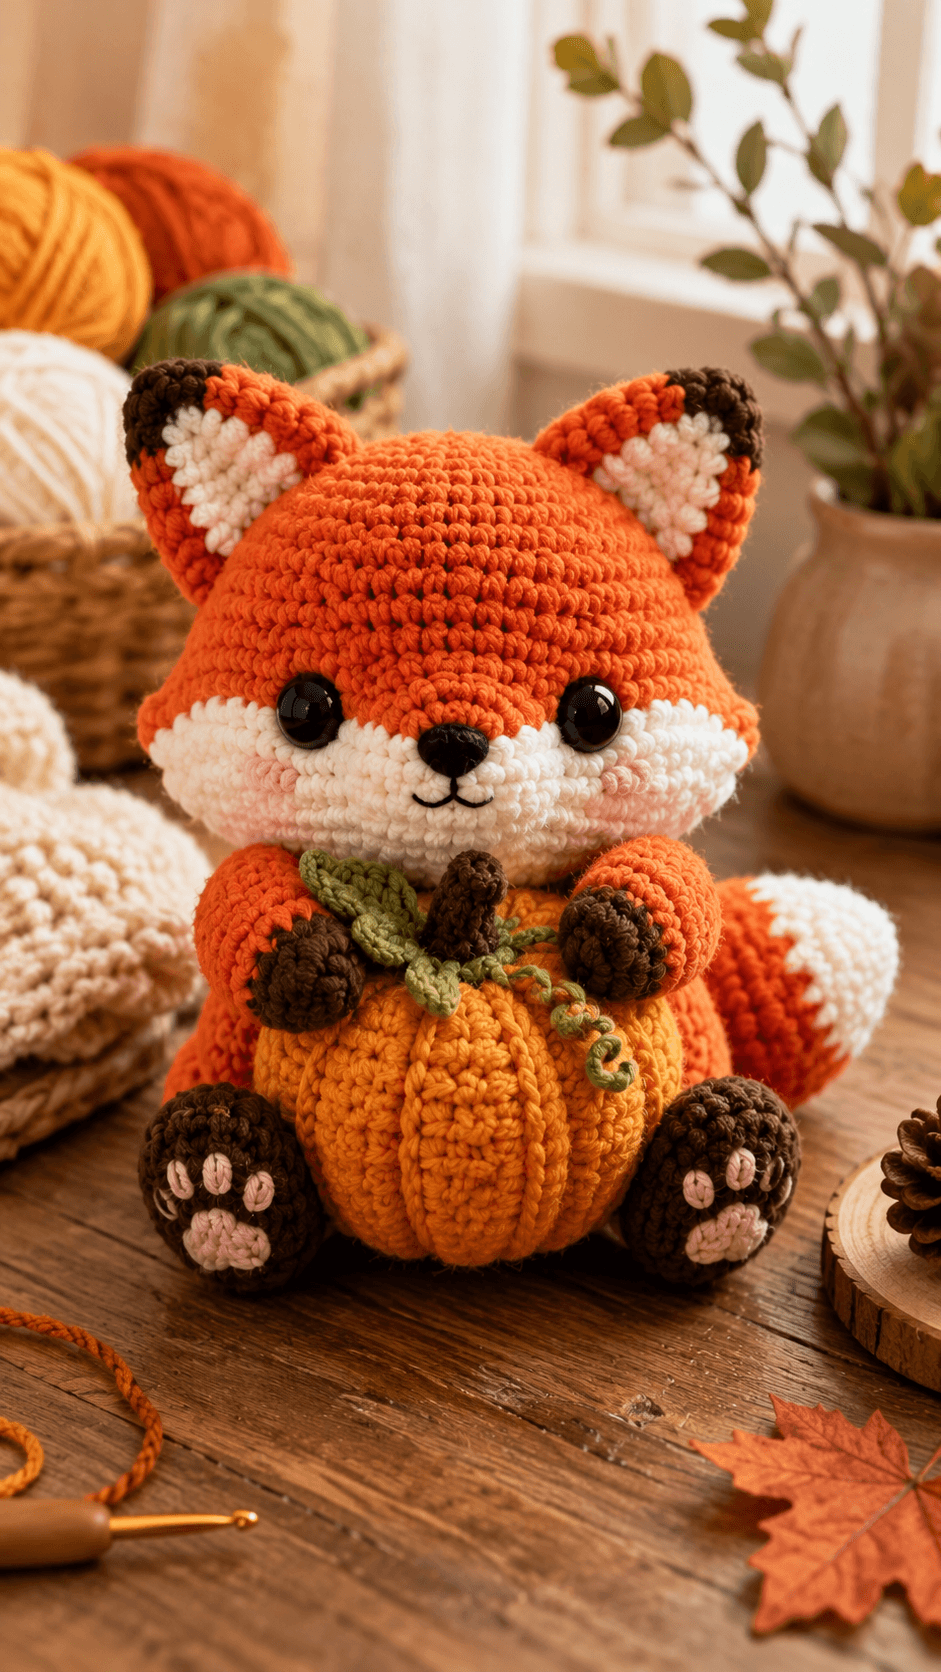
A fox cannot hold a pumpkin against its belly unless the front paws clear the pumpkin’s widest ridge without hiding the white facial mask above it. This fox amigurumi crochet pattern uses worsted yarn, a 3.5 mm hook, 15–16 mm eyes, a 42-stitch head, oversized seated feet, and a sculpted pumpkin. The finished fox measures approximately 29–33 cm sitting and requires intermediate shaping and assembly.
The Design: What Makes This Fox Different
The head carries most of the fox anatomy. Large triangular ears establish the pointed silhouette, while a wide cream lower-face section separates the orange forehead from the dark nose. The body stays relatively compact because the pumpkin occupies the front-center space. Long arms angle inward and finish with dark brown paws positioned against the pumpkin’s upper corners. A broad sitting fox crochet pattern also needs substantial rear feet, so these expand to 24 stitches before tapering toward the body. The final major structure is the tail: orange at the base, cream at the tip, thick enough to remain visible beside the seated figure. One common mistake is mounting the pumpkin before pinning both arms. If the accessory sits too high, the paws cover the muzzle; too low, and the fox appears to be resting behind rather than holding it.
Project Info at a Glance
| Skill Level | Time | Finished Size | Hook | Best For |
|---|---|---|---|---|
| Intermediate | 14–18 hours | Approx. 29–33 cm sitting | 3.5 mm | Autumn décor, woodland amigurumi, seasonal display |
Materials and Tools
Yarn
- Fox orange — worsted / Aran #4 — approximately 190–230 g — head, body, limbs, ears, and tail
- Warm cream — matching worsted yarn — approximately 55–70 g — muzzle, inner ears, tail tip, and facial markings
- Dark chocolate brown — matching worsted yarn — approximately 45–55 g — ear tips, paws, foot soles, nose, and pumpkin stem
- Pumpkin orange — matching worsted yarn — approximately 45–60 g — pumpkin accessory
- Blush pink — matching yarn — approximately 8–12 g — cheeks and paw-pad details
- Olive green — matching yarn — approximately 10–15 g — pumpkin leaf and curly tendril
- Black embroidery yarn — small amount — mouth and eyebrow details
Tools
- 3.5 mm crochet hook
- 15–16 mm safety eyes ×2
- Polyester fiberfill
- Large-eye yarn needle
- Long doll needle for pumpkin sculpting
- Locking stitch marker
- Straight pins
- Sharp scissors
Replace plastic safety eyes with securely embroidered eyes when the finished fox is intended for a child under three.
Abbreviations
MR — magic ring
sc — single crochet
inc — increase, 2 sc in one stitch
dec — invisible decrease
sl st — slip stitch
ch — chain
hdc — half double crochet
dc — double crochet
tr — treble crochet
BLO — back loop only
For an invisible decrease, insert the hook through the front loops of the next two stitches, draw up one loop, then finish both stitches together as one single crochet.
Pattern — Step by Step
Work stuffed components in continuous spirals unless a section states otherwise. The pattern below is an original photo-matched construction based on standard six-stitch amigurumi shaping.
Head
Yarn: fox orange.
R1: 6 sc in MR (6)
R2: inc ×6 (12)
R3: (sc, inc) ×6 (18)
R4: (2 sc, inc) ×6 (24)
R5: (3 sc, inc) ×6 (30)
R6: (4 sc, inc) ×6 (36)
R7: (5 sc, inc) ×6 (42)
R8: sc around (42)
R9: sc around (42)
R10: sc around (42)
R11: sc around (42)
R12: sc around (42)
R13: sc around (42)
R14: sc around (42)
Insert the safety eyes between R10 and R11, approximately 9 visible stitches apart. Do not lock the washers until the muzzle position has been tested.
R15: (5 sc, dec) ×6 (36)
R16: (4 sc, dec) ×6 (30)
R17: (3 sc, dec) ×6 (24)
Stuff firmly around the crown and eye area.
R18: (2 sc, dec) ×6 (18)
R19: (sc, dec) ×6 (12)
R20: dec ×6 (6)
Fasten off and close.
Cream Muzzle / Lower Face
Yarn: cream. Make one wide oval.
Ch 9.
R1: starting in second ch from hook, 7 sc, 3 sc in final ch, continue on opposite side with 6 sc, inc in final ch (18)
R2: inc, 6 sc, inc ×3, 6 sc, inc ×2 (24)
R3: (sc, inc), 6 sc, (sc, inc) ×3, 6 sc, (sc, inc) ×2 (30)
Fasten off with a 35 cm sewing tail.
Do not stuff.
Dark Brown Nose
Yarn: dark brown.
R1: 6 sc in MR (6)
R2: inc ×6 (12)
R3: sc around (12)
Stuff very lightly.
Fasten off with a sewing tail.
Ears — Make 2
Begin with dark brown and change to orange.
R1: 6 sc in MR (6)
R2: sc around (6)
R3: (sc, inc) ×3 (9)
Change to orange.
R4: (2 sc, inc) ×3 (12)
R5: (3 sc, inc) ×3 (15)
R6: (4 sc, inc) ×3 (18)
R7: sc around (18)
Flatten.
Fasten off with a 30 cm sewing tail.
Cream Inner Ears — Make 2
Yarn: cream. Work flat.
Ch 7.
R1: starting in second ch, sc, hdc, dc, dc, hdc, 3 sc in final ch.
Continue on the opposite side: hdc, dc, dc, hdc, sc.
Fasten off with a 20 cm tail.
Body
Yarn: fox orange.
R1: 6 sc in MR (6)
R2: inc ×6 (12)
R3: (sc, inc) ×6 (18)
R4: (2 sc, inc) ×6 (24)
R5: (3 sc, inc) ×6 (30)
R6: (4 sc, inc) ×6 (36)
R7: (5 sc, inc) ×6 (42)
R8: sc around (42)
R9: sc around (42)
R10: sc around (42)
R11: sc around (42)
R12: sc around (42)
R13: sc around (42)
Begin stuffing the lower body.
R14: (5 sc, dec) ×6 (36)
R15: sc around (36)
R16: (4 sc, dec) ×6 (30)
R17: sc around (30)
R18: (3 sc, dec) ×6 (24)
R19: sc around (24)
R20: (2 sc, dec) ×6 (18)
Stuff firmly through the neck.
Fasten off with a 45 cm sewing tail.
Front Arms — Make 2
Begin with dark brown for the paw.
R1: 6 sc in MR (6)
R2: inc ×6 (12)
R3: (sc, inc) ×6 (18)
R4: sc around (18)
Change to fox orange.
R5: sc around (18)
R6: sc around (18)
R7: sc around (18)
R8: sc around (18)
R9: (sc, dec) ×6 (12)
R10: sc around (12)
R11: sc around (12)
R12: sc around (12)
Stuff the paw firmly and the upper arm lightly.
Flatten the final opening.
Fasten off with a 30 cm sewing tail.
Back Legs — Make 2
Begin with dark brown.
R1: 6 sc in MR (6)
R2: inc ×6 (12)
R3: (sc, inc) ×6 (18)
R4: (2 sc, inc) ×6 (24)
R5: sc around (24)
R6: sc around (24)
Change to orange.
R7: sc around (24)
R8: sc around (24)
R9: (2 sc, dec) ×6 (18)
R10: sc around (18)
R11: sc around (18)
R12: (sc, dec) ×6 (12)
Stuff firmly through R9 and lightly near the final edge.
Fasten off with a 35 cm sewing tail.
Pink Rear Paw Pads — Make 2
Yarn: blush pink.
R1: 6 sc in MR (6)
R2: inc ×6 (12)
Join and fasten off with a long sewing tail.
Pink Toe Pads — Make 6
Yarn: blush pink.
R1: 6 sc in MR (6)
Pull the center closed.
Fasten off with a sewing tail.
Cheek Patches — Make 2
Yarn: blush pink.
R1: 6 sc in MR (6)
R2: inc ×6 (12)
Join.
Fasten off with a 20 cm sewing tail.
Bushy Tail
Begin with cream for the tip.
R1: 6 sc in MR (6)
R2: inc ×6 (12)
R3: (sc, inc) ×6 (18)
R4: (2 sc, inc) ×6 (24)
R5: sc around (24)
Change to fox orange.
R6: (3 sc, inc) ×6 (30)
R7: sc around (30)
R8: sc around (30)
R9: sc around (30)
R10: sc around (30)
R11: (3 sc, dec) ×6 (24)
R12: sc around (24)
R13: (2 sc, dec) ×6 (18)
R14: sc around (18)
R15: (sc, dec) ×6 (12)
R16: sc around (12)
Stuff the cream tip and thick middle moderately. Leave the final 3 cm lightly filled so the tail can lie beside the body.
Fasten off with a 40 cm sewing tail.
Pumpkin Body
Yarn: pumpkin orange.
R1: 6 sc in MR (6)
R2: inc ×6 (12)
R3: (sc, inc) ×6 (18)
R4: (2 sc, inc) ×6 (24)
R5: (3 sc, inc) ×6 (30)
R6: (4 sc, inc) ×6 (36)
R7: sc around (36)
R8: sc around (36)
R9: sc around (36)
R10: sc around (36)
R11: sc around (36)
R12: sc around (36)
R13: (4 sc, dec) ×6 (30)
R14: (3 sc, dec) ×6 (24)
R15: (2 sc, dec) ×6 (18)
Stuff firmly and keep the form slightly wider than tall.
R16: (sc, dec) ×6 (12)
R17: dec ×6 (6)
Fasten off and close.
Pumpkin Sculpting
Cut approximately 120 cm of strong pumpkin-orange yarn.
Pass the needle through the top and bottom centers.
Wrap the yarn around the outside and pull until one shallow groove forms.
Repeat to create six equal pumpkin sections.
Adjust all six channels before knotting the strand at the underside.
Pumpkin Stem
Yarn: dark brown.
R1: 6 sc in MR (6)
R2: sc around (6)
R3: sc around (6)
R4: sc around (6)
R5: sc around (6)
R6: sc around (6)
Fasten off with a sewing tail.
Pumpkin Leaf
Yarn: olive green.
Ch 8.
Starting in second ch from hook:
sl st, sc, hdc, dc, dc, hdc, 3 sc in final ch.
Continue along the opposite side:
hdc, dc, dc, hdc, sc, sl st.
Fasten off with a 20 cm sewing tail.
Curly Pumpkin Tendril
Yarn: olive green.
Ch 18.
Work 2 sc in the second chain from the hook and 2 sc in every remaining chain.
The chain should curl automatically.
Fasten off with a sewing tail.
Assembly
- Sew the head to the 18-stitch body opening, adding firm stuffing through the neck during the final section of the seam.
- Pin the cream muzzle across the lower face, attach the dark brown nose at its center, then embroider the small curved mouth beneath the nose.
- Sew the cream inserts onto the ears, attach both ears high on the head, and keep the dark brown tips pointing slightly outward.
- Attach the pink cheeks below and outside the eyes, then add short black eyebrow or eyelash stitches if matching the photographed expression.
- Pin the two back legs low on the body, test the seated balance, then attach each pink central paw pad and three smaller pink toe pads.
- Attach the bushy tail to one rear side of the body, positioning the cream tip outward so it remains visible from the front three-quarter view.
- Finish the sculpted pumpkin, sew on its brown stem, then attach the olive leaf and curled tendril around the stem base.
- Place the pumpkin against the fox’s lower belly and secure it with several hidden stitches through the back of the pumpkin into the body.
- Pin both arms so the dark brown paws rest against the pumpkin’s upper left and right edges, then sew the upper arms to the body and tack each paw lightly to the pumpkin.
- Weave all remaining tails through matching-color stitches, straighten both ears, reshape the tail and pumpkin ridges, and confirm the fox remains seated without using the pumpkin for balance.
The completed fox should sit independently, with the pumpkin centered below the white muzzle, both dark paws touching the pumpkin, and the white tail tip remaining visible beside the body.
7 Technical Tips
- Muzzle distortion: A cream oval sewn under excessive tension pulls the 42-stitch head into a flat front. Pin the complete 30-stitch muzzle first and keep the sewing thread loose enough that the orange head remains rounded.
- Ear rotation: Triangular ears attached more than approximately 15 mm behind the eye line disappear from the frontal silhouette. Pin their lower front corners approximately level with the outer eye edges before sewing.
- Head tipping: The large head and forward pumpkin create front-loaded weight. Pack the upper 4–5 cm of the body firmly so finger pressure compresses the neck area by less than about 1 cm.
- Pumpkin collapse: Sculpting a loosely filled 36-stitch pumpkin produces narrow dents and a hollow center. Fill the accessory firmly before pulling the six ridge strands.
- Paw misalignment: Sewing one arm before positioning the pumpkin can leave the second paw several centimeters higher. Pin the pumpkin and both arms simultaneously before making any permanent arm seam.
- Tail droop: Filling all 16 tail rounds firmly creates too much weight at the attachment point. Keep the final 3 cm lightly stuffed and stitch the 12-stitch base through at least two body rounds.
- Visible color-step: Abrupt brown-to-orange or cream-to-orange changes can create a jog in spiral crochet. Make the final stitch before each color change with the new color and position the transition on the least-visible rear side.
Building the Fox Face
The white lower face is broader than a conventional small muzzle. That distinction matters because fox markings extend laterally across the cheeks rather than forming one narrow snout.
The 30-stitch cream oval should sit under both eyes and behind the dark brown nose. Pin the center first, then the left and right ends. From the front, equal amounts of white should remain visible on either side of the nose.
Attach the nose after the cream piece is positioned. A dark center approximately 12 stitches around provides enough contrast without covering the surrounding white.
The two pink cheek circles belong near the outer edge of the white face, not directly beside the nose.
Shaping the Pointed Ears
Fox ears need a narrower tip than rounded cat ears.
Starting with six stitches and increasing in groups of three creates a tapered cone. The first three rounds remain dark brown, creating the visible ear-tip marking.
Do not stuff the ears.
Flatten each finished cone and sew the cream inner-ear piece to the front before attaching it to the head.
Angle the upper tips slightly away from one another. Two perfectly vertical ears make the head appear narrower than the reference.
Constructing the Seated Paws
The rear feet reach a 24-stitch maximum because they provide the primary support base.
The dark brown lower rounds remain visible from the front, producing a strong contrast against the orange body. Pink central and toe pads are attached over that dark surface.
Pin both legs before sewing.
The feet should sit outside the pumpkin rather than directly behind it. Leave enough space between them for the accessory to occupy the center without forcing either leg sideways.
The upper leg seam can remain partly hidden by the pumpkin once assembly is complete.
Making the Bushy White-Tipped Tail
A fox is still recognizable without a pumpkin, but not without its tail.
The tail begins at the cream tip, expands rapidly to 30 stitches, then narrows toward a 12-stitch attachment edge. The broad middle should be visibly thicker than either the front arms or rear legs.
Place the color change from cream to orange around the fifth round. That keeps the white tip substantial rather than producing a narrow white cap.
During assembly, position the tail to one side with part of the cream tip visible. Hiding the entire tail behind the torso removes one of the strongest fox-specific features from the front view.
Building the Pumpkin Accessory
The pumpkin starts as a 36-stitch stuffed sphere and receives its characteristic shape after closing.
Six exterior strands compress the surface into equal sections.
Form opposite ridges first: top-to-bottom, then rotate the pumpkin 180 degrees for the second channel. Divide the remaining halves afterward.
Do not tighten the first strand to its final depth immediately. Form all six ridges, compare the lobes, then increase tension gradually.
The finished pumpkin should remain slightly wider than tall so it fits naturally between the fox’s feet and paws.
Positioning the Pumpkin
The accessory belongs against the lower belly, not on the floor in front of the fox.
Its top should reach approximately to the lower ends of the front paws. The stem can rise between the hands without crossing the muzzle.
Secure the pumpkin to the body before fixing the arms permanently.
Use three or four concealed stitches through the back of the pumpkin. The accessory should not wobble when one paw is moved during assembly.
Once the pumpkin is stable, angle the arms inward and tack only the brown paw ends to the pumpkin.
Adding the Leaf and Curly Vine
The olive details break up the orange-on-orange transition between the fox and pumpkin.
Place the leaf beside the brown stem with the pointed end angled horizontally.
The spiral vine begins as an ordinary chain. Working two single crochets into every chain forces the strip to coil naturally.
Keep the tendril short enough that it remains on the pumpkin rather than hanging below the paws.
If 18 chains produce too long a curl in the selected yarn, reduce the foundation to 14–16 chains.
Choosing Yarn and Hook Size
Published fox amigurumi covers a wide range of gauges. DK patterns use hooks around 2.5–3 mm, while plush and medium-yarn designs often use 4 mm.
The supplied fox shows defined individual stitches without the fuzzy surface of chenille. Worsted or Aran yarn with a 3.5 mm hook gives a dense fabric while producing the larger photo-matched scale.
Work the head through R7 before continuing.
Stretch the 42-stitch section lightly over two fingers. If openings larger than approximately 2 mm appear, change to a 3.25 mm hook.
Estimating Yarn Quantity
A verified small sport-weight fox uses approximately 30 g orange, 14 g white, and 2 g black. This project is substantially larger and adds a large tail, dark paws, pumpkin, leaf, and vine.
For a more accurate personal estimate, weigh the finished head before making the body.
Then weigh one arm, one back leg, and the tail. Double paired components and add at least 10% to the main orange quantity for assembly and tension variation.
The pumpkin should be calculated separately because its orange shade is visually distinct from the fox body in the reference.
Competition Gap
Current fox patterns commonly use orange and white fur markings, pointed ears, black or brown noses, and contrasting tails. Other designs focus on keychains, miniature foxes, realistic animals, scarves, or generic woodland plushies.
The supplied reference combines those established fox features with a more specific autumn composition: a large seated figure, dark paw ends, pink foot pads, oversized white-tipped tail, and a complete sculpted pumpkin with leaf and curled vine.
That makes crochet fox holding pumpkin and autumn fox crochet pattern more useful secondary phrases than treating the project as another generic fox plush.
Finishing Checks
Set the fox on a hard table before hiding the final sewing tails.
Both rear feet and the lower body should support the figure independently.
View the head directly from the front. The ear tips should rise to similar heights, the nose should sit on the facial centerline, and the white mask should extend evenly to both sides.
Check the pumpkin next. Six visible lobes should remain distinct, and the stem should sit between the paws rather than lean across one arm.
Finally, inspect the tail. At least part of the cream tip should remain visible beside the seated fox.
Conclusion
Complete and pin the fox, pumpkin, and both front arms before sewing those three components together, because their spacing controls the final composition of this fox amigurumi crochet pattern. Build the 42-stitch head first, fit the cream facial mask, establish a stable seated base, and leave the arm seams until the pumpkin is fixed against the belly. Record the finished pumpkin diameter and tail length before making a second fox. Share a pumpkin close-up on Pinterest and the completed autumn display on Instagram with #PumpkinFoxAmigurumi. Would you keep the pumpkin bright orange or switch it to cream for stronger contrast against the fox?









