Introduction
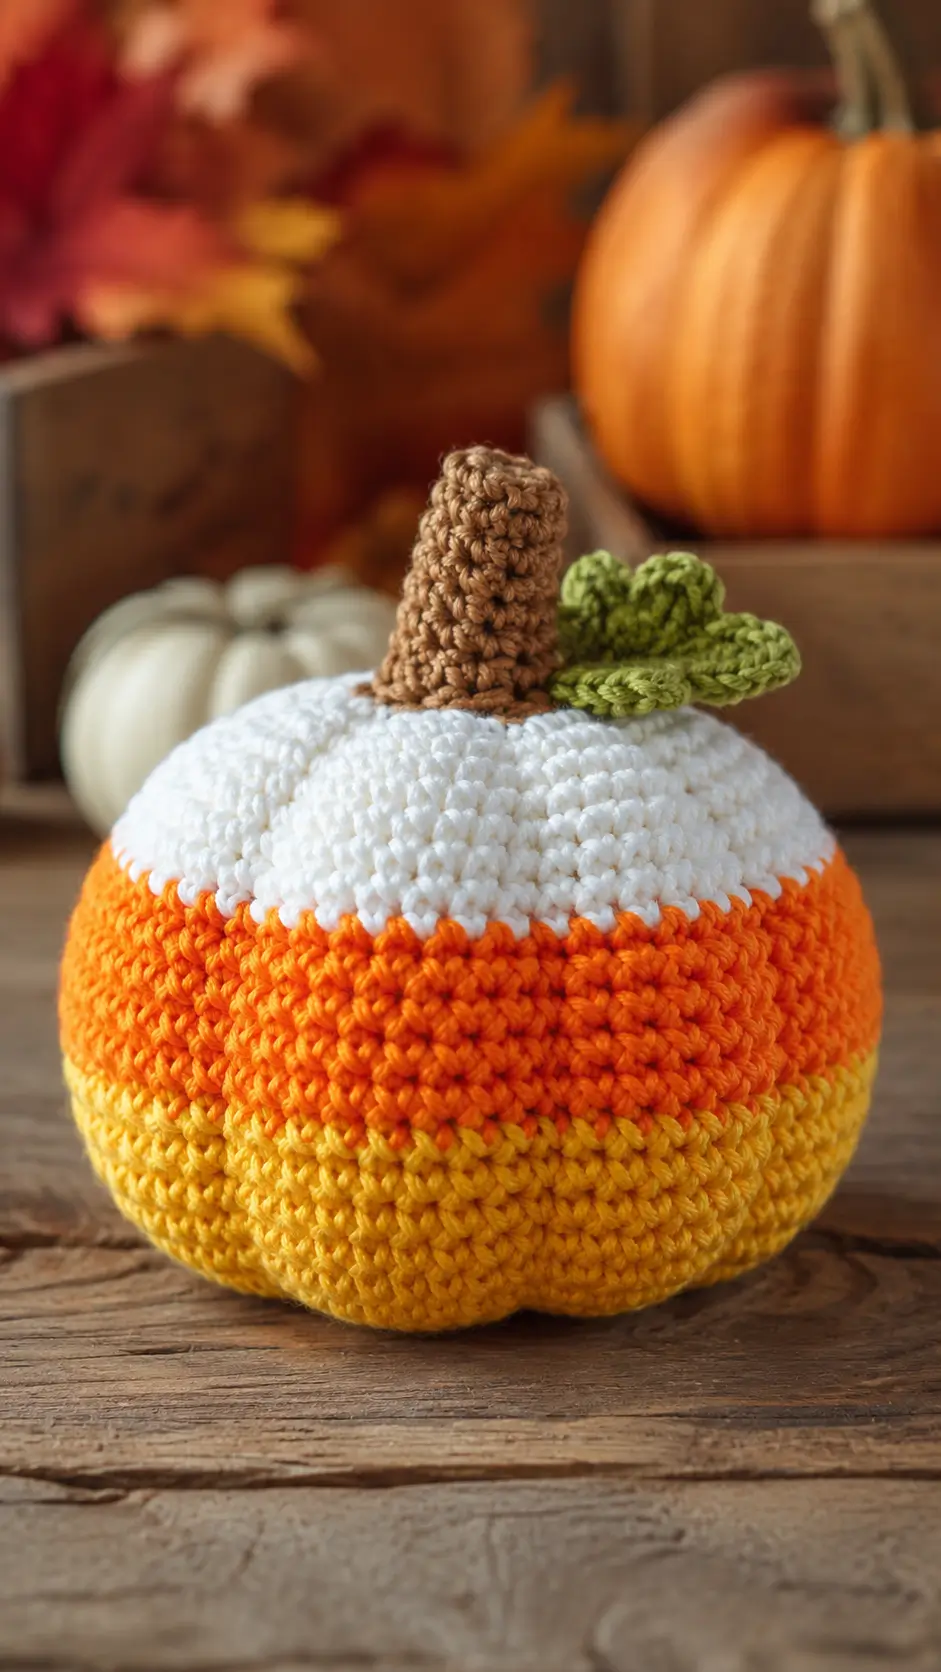
A candy corn pumpkin only works if the yellow base, orange middle, and white crown stay readable after six deep ribs compress the fabric. This candy corn crochet pumpkin pattern uses worsted or Aran yarn, a 4–4.5 mm hook, a 42-stitch body, brown stem, and olive leaf. The finished piece measures about 22–25 cm wide and works as structured Halloween or autumn tabletop décor.
The Design: What Makes This Candy Corn Pumpkin Different
The three colors follow the candy-corn sequence from bottom to top, but the body remains shaped like a broad pumpkin rather than a cone. Yellow occupies the rounded lower section, orange crosses the widest middle, and white closes over the crown. Six sculpting channels run continuously through all three bands, which keeps the stripes intact while producing a clear pumpkin silhouette. The brown cylindrical stem and olive leaf move the design away from graphic candy décor and toward a more natural striped crochet pumpkin. Another structural decision is the use of compact single crochet instead of tall stitches; this creates the dense surface visible in the reference. A common mistake is tightening the sculpting yarn before all six channels are positioned. One over-tightened first groove pulls the color bands diagonally and makes the remaining sections visibly unequal.
Project Info at a Glance
| Skill Level | Time | Finished Size | Hook | Best For |
|---|---|---|---|---|
| Intermediate | 5–7 hours | Approx. 22–25 cm wide | 4.0–4.5 mm | Halloween tables, shelves, fall displays |
Materials and Tools
Yarn
- Golden yellow — worsted / Aran #4 — approximately 55–70 g — lower pumpkin section
- Bright pumpkin orange — worsted / Aran #4 — approximately 50–65 g — center band
- White / soft ivory — worsted / Aran #4 — approximately 55–70 g — upper section
- Medium brown — worsted / Aran #4 — approximately 12–18 g — stem
- Olive green — worsted / Aran #4 — approximately 10–15 g — leaf
- Strong matching yellow, orange, or neutral yarn — approximately 5–6 m — pumpkin sculpting
Tools
- 4.0–4.5 mm crochet hook
- Polyester fiberfill
- Long upholstery or doll needle
- Large-eye yarn needle
- Locking stitch marker
- Six removable markers for ridge placement
- Sharp scissors
- Measuring tape
Abbreviations
MR — magic ring
sc — single crochet
inc — increase, 2 sc in one stitch
dec — invisible decrease
sl st — slip stitch
ch — chain
hdc — half double crochet
dc — double crochet
tr — treble crochet
BLO — back loop only
For an invisible decrease, insert the hook through the front loops of the next two stitches, draw up one loop, then complete the two stitches together as one single crochet.
Pattern — Step by Step
Work the pumpkin body in a continuous spiral. Move the stitch marker after every round. Make each color change on the final yarn-over of the last stitch before the new color begins.
Pumpkin Body
Begin with golden yellow.
R1: 6 sc in MR (6)
R2: inc ×6 (12)
R3: (sc, inc) ×6 (18)
R4: (2 sc, inc) ×6 (24)
R5: (3 sc, inc) ×6 (30)
R6: (4 sc, inc) ×6 (36)
R7: (5 sc, inc) ×6 (42)
R8: sc around (42)
R9: sc around (42)
Change to orange on the final yarn-over of R9.
R10: sc around (42)
R11: sc around (42)
R12: sc around (42)
R13: sc around (42)
R14: sc around (42)
R15: sc around (42)
Change to white on the final yarn-over of R15.
R16: sc around (42)
R17: sc around (42)
R18: sc around (42)
R19: sc around (42)
Begin stuffing. Place filling into the lower yellow edge first, then work upward around the orange band. Keep the body broad and slightly flattened rather than spherical.
R20: (5 sc, dec) ×6 (36)
R21: (4 sc, dec) ×6 (30)
R22: (3 sc, dec) ×6 (24)
Add more stuffing. The widest orange band should resist a light finger press by approximately 1 cm.
R23: (2 sc, dec) ×6 (18)
R24: (sc, dec) ×6 (12)
Finish stuffing firmly before the opening becomes smaller.
R25: dec ×6 (6)
Fasten off with a 25 cm tail.
Thread through the six remaining front loops and pull the opening closed.
Sculpting the Six Pumpkin Sections
Use a strong strand that disappears visually against the pumpkin.
Cut approximately 140–160 cm.
Thread the long needle and pass it from the bottom center through the stuffed body to the top center.
Bring the strand down the outside of the pumpkin.
Return through the bottom center and exit through the same top-center area.
Pull only until a shallow groove forms.
Make the second groove directly opposite the first.
Divide the remaining circumference into four equal sections.
Form grooves three and four opposite one another.
Add the final two channels.
Once all six positions are established, tighten them gradually in the same sequence.
The completed pumpkin should have six rounded lobes with the yellow, orange, and white lines remaining nearly horizontal.
Knot securely at the bottom center and bury the ends inside the stuffing.
Brown Stem
Yarn: medium brown.
R1: 6 sc in MR (6)
R2: inc ×6 (12)
R3: BLO sc around (12)
R4: sc around (12)
R5: sc around (12)
R6: sc around (12)
R7: sc around (12)
R8: sc around (12)
Stuff lightly. Keep the stem firm enough to stand but flexible at its open sewing edge.
Fasten off with a 30 cm tail.
Three-Lobed Pumpkin Leaf
Yarn: olive green.
R1: 10 sc in MR (10)
Do not turn.
First lobe: sl st in next st, ch 2, 2 hdc in same st, (dc, tr, ch 2, sl st) in next st.
Move across the center with sl st in the next 2 sts.
Middle lobe: ch 2, dc and 2 tr in same st, ch 1, 2 tr and dc in next st, ch 2, sl st in same st.
Sl st in the next 2 sts.
Third lobe: ch 2, (tr, dc) in same st, 2 hdc in next st, ch 1, sl st in same st.
Pull the MR closed.
Fasten off with a 25 cm sewing tail.
Leaf Stem Extension
With olive green, ch 5 from the lower edge of the leaf.
Sl st back through the next 4 chains.
Fasten off.
This short extension can disappear beneath the brown stem during assembly.
Color Placement
The lower yellow section covers the increase rounds and the first two maximum-width rounds. That causes yellow to curve beneath the pumpkin instead of appearing as a narrow straight stripe.
Orange occupies six complete 42-stitch rounds through the widest part of the body. This is the most stable position for a strong center band because no shaping interrupts the color.
White begins while the body is still at maximum circumference and continues through every decrease. As a result, the upper white section wraps over the shoulder and closes at the stem.
That distribution matches the visual balance of a candy corn even though the finished object is round rather than triangular.
Making Clean Color Changes
Do not complete the final stitch of a color with the old yarn.
Insert the hook into the final stitch, yarn over with the current color, and draw up a loop. Complete the final yarn-over with the new color.
Continue immediately into the next round.
Keep both tails on the inside of the pumpkin.
A visible staircase can still develop because the body is worked in a continuous spiral. Position that jog at the rear before sculpting so the most regular section faces forward.
When placing the six ridge markers, avoid putting the central front groove directly through the color-change jog.
Stuffing the Body
This Halloween crochet pumpkin needs firm filling because the external sculpting strands compress the body after closure.
Add small pieces of fiberfill rather than one dense ball.
Push filling into the yellow lower perimeter first.
Continue around the orange middle, then fill the white shoulder.
Keep the bottom center slightly flatter than the sides so the finished pumpkin sits without rocking.
Before R25, place the body on a table. It should already sit upright before the sculpting channels are added.
Getting Six Equal Ridges
Six channels divide the circumference into sections of roughly 60 degrees.
Place six removable stitch markers around the widest orange round before threading the sculpting yarn.
View the pumpkin from above.
The gaps between markers should appear similar.
Create the first and second grooves opposite each other rather than working clockwise around the body. Follow with the third and fourth as another opposite pair, then finish with five and six.
This sequence balances pressure through the stuffed center.
Tighten all six only after each strand sits in its correct channel.
Keeping the Color Bands Level During Sculpting
Watch the line where yellow meets orange while tightening the grooves.
If that line rises sharply on one side of a channel, the sculpting strand is entering the top or bottom center off-axis.
Release some tension and reposition the needle closer to the true center.
The orange-to-white line should behave the same way.
Minor movement is normal because the fabric is being compressed, but the bands should still read as three horizontal zones from the front.
Building the Stem
The photograph uses a brown crochet stem rather than black yarn, cinnamon stick, or a natural twig.
A 12-stitch circumference produces enough thickness for a 22–25 cm pumpkin while leaving room beside it for the green leaf.
The BLO round creates a small lower lip at the stem base.
Do not pack the last round firmly. A soft sewing edge conforms more closely to the curved white crown and reduces visible gaps.
Pin the stem at the exact top center after sculpting, not before it.
Making the Lobed Leaf
The crown leaf in the image is shorter and broader than a pointed botanical leaf.
Three lobes create that compact shape.
Work the leaf from a ten-stitch magic ring, allowing each lobe to grow from the same small central base.
The middle lobe should project slightly farther than the two side lobes.
After fastening off, flatten the leaf with the fingers and bend the center slightly upward.
Only the base needs to be sewn to the pumpkin. Leaving the lobe tips free preserves the raised shape.
Assembly
- Complete the yellow, orange, and white body, stuff it firmly, and close the six-stitch top opening before adding any external details.
- Mark six equal positions around the widest orange round and check the spacing from directly above.
- Sculpt the first two pumpkin grooves opposite one another, then add the second opposing pair and finally the last two channels.
- Tighten all six grooves gradually until each indentation measures approximately 1–1.5 cm deep without distorting the horizontal color bands.
- Set the pumpkin on a level table and adjust the stuffing by hand until the yellow base sits flat.
- Center the brown stem over the white top closure and pin it at four points before sewing.
- Sew through all 12 stem-base stitches, making a second pass through any section that lifts away from the pumpkin.
- Place the olive leaf beside the stem with its middle lobe pointing outward and its short stem hidden beneath the brown base.
- Sew only the lower 2–3 cm of the leaf to the white crown, leaving the three lobe tips free.
- Weave all remaining tails into the matching color sections, rotate the pumpkin so the cleanest color transitions face forward, and reshape the six lobes by hand.
The finished piece should show three distinct horizontal candy-corn bands, six rounded pumpkin sections, one upright brown stem, and one raised olive leaf.
7 Technical Tips
- Diagonal color bands: A ridge strand that misses the true center can pull yellow or orange upward on one side. Keep every needle entry within approximately 5 mm of the same top and bottom center points.
- Weak pumpkin grooves: A lightly stuffed center absorbs the sculpting tension instead of forming rounded lobes. Pack the body until a finger press compresses the widest section by no more than about 1 cm.
- Unequal sections: Six grooves positioned by eye can create one oversized lobe. Mark approximately 60-degree intervals around the orange band before inserting the long needle.
- Color-change stair step: Continuous spirals leave a small jog at R10 and R16. Rotate both transitions toward the rear and keep them away from the most visible front lobe.
- Stem wobble: A 12-stitch stem sewn through only one pass can lean after handling. Work a second anchoring pass through four evenly spaced stem-base points.
- Leaf flattening: Sewing the full three-lobed leaf to the crown removes its raised profile. Attach only the lower 2–3 cm and leave every tip unsupported.
- Visible stuffing: If gaps between single crochets exceed approximately 2–3 mm when the fabric is stretched, reduce the hook from 4.5 mm to 4.0 mm before continuing the body.
Choosing the Yarn
A smooth worsted or Aran yarn makes the color divisions sharper than fuzzy chenille.
The direct published candy-corn pumpkin benchmark uses Aran yarn and a 5 mm hook, producing a 23.5 cm-wide pumpkin. For the denser single-crochet fabric in this version, a 4–4.5 mm hook gives a closer stitch appearance.
Choose yellow and orange with similar saturation.
A muted mustard paired with fluorescent orange produces an uneven palette. Golden yellow and pumpkin orange create a more controlled transition into the white crown.
Use brown and olive as secondary colors only.
Estimating Yarn Use
The three body colors do not consume identical quantities even when their visible bands look similar.
Yellow includes all expansion rounds, orange occupies the uninterrupted maximum circumference, and white includes the decrease section.
Start with approximately 70 g each of yellow and white and at least 65 g orange for a 22–25 cm project.
Weigh the first finished pumpkin before making multiples.
If the finished yellow section uses 58 g, record that number rather than assuming the other two colors require the same amount.
Keep at least 10 g of the body colors in reserve for gauge differences and repairs.
Competition Gap
A strong current free competitor already uses the same yellow-orange-white candy-corn concept and measures 23.5 cm wide. That published version uses double crochet, a 60-stitch body, a black stem, and curly black vines.
The supplied image takes a different visual direction. Compact single crochet creates a denser textile surface. A medium-brown stem replaces black, and an olive three-lobed leaf provides the only green accent. The six sculpted channels also remain highly visible across all three color zones.
That distinction gives this candy corn pumpkin decor a more natural autumn profile while keeping the candy-corn color sequence immediately recognizable.
Scaling the Pattern
For a smaller pumpkin, stop the increase sequence at 36 stitches.
Work fewer maximum-width rounds while retaining the same yellow-orange-white order.
For a larger version, continue after R7:
R8: (6 sc, inc) ×6 (48)
Then shift the remaining round numbers forward and reverse the increase sequence with matching six-stitch decrease rounds.
Keep six sculpted sections for the photo-matched appearance.
Using eight channels changes the silhouette considerably and narrows every lobe.
Finishing Checks
Place the pumpkin on a hard surface and view it straight on.
The yellow, orange, and white sections should each remain distinct.
Rotate the body through a complete turn. All six lobes should have comparable width and no groove should cut diagonally across a color boundary.
Check the brown stem from the side. It should remain upright with its base sitting flush against the white crown.
Inspect the leaf last. At least two of its three lobes should remain clearly visible from the front, and the leaf should not conceal the complete stem base.
Conclusion
Finish the three-color body before adding any crown details because the sculpted ribs determine the final width and color alignment of this candy corn crochet pumpkin pattern. Mark six equal divisions, tighten the grooves in opposing pairs, then attach the brown stem and three-lobed olive leaf. Record the finished width, body height, and yarn consumption before making a matching set in other sizes. Share the three-band side view on Pinterest and the finished fall display on Instagram with #CandyCornCrochetPumpkin. Would you keep the leaf olive green, or switch it to a darker forest green?









