Introduction
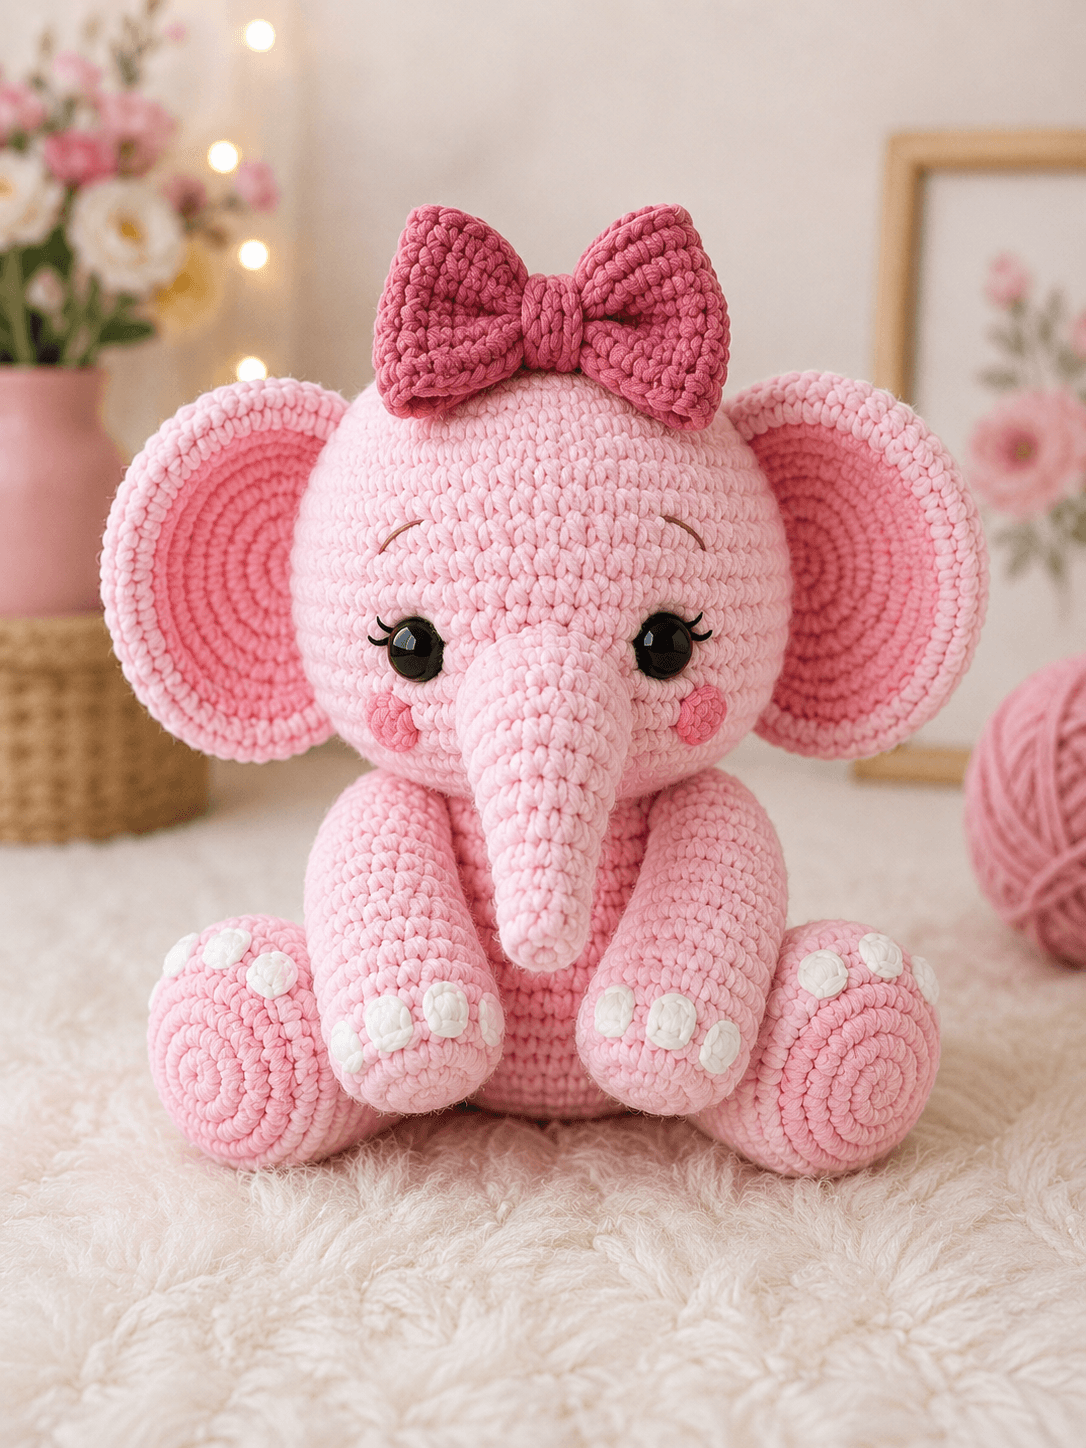
An elephant bow this large changes the balance of the whole head, so the ears and crown need enough width to support it without making the face look narrow. This pink elephant amigurumi crochet pattern uses DK yarn, a 3.5 mm hook, approximately 14 mm eyes, oversized ears, twelve white toenails, and a structured raspberry bow. The finished seated elephant measures approximately 27–31 cm high.
The Design: What Makes This Pink Elephant Different
The head expands to 42 stitches, while the body stops at 36, producing the oversized baby-elephant proportion visible in the reference. Both ears also reach a 42-stitch diameter, so they frame the face rather than disappearing behind it. The long trunk is tapered in stages from 18 to six stitches and is left lightly filled near the tip, allowing it to hang vertically between the front legs. This baby elephant amigurumi also uses separate raised toenails instead of embroidered claws. The raspberry bow creates a second focal point above the eyes and must remain lighter than the stuffed head. One common mistake with a crochet elephant with big ears is sewing the ears too far toward the back. That placement reduces their visible diameter and makes the head appear disproportionately narrow.
Project Info at a Glance
| Skill Level | Time | Finished Size | Hook | Best For |
|---|---|---|---|---|
| Intermediate | 11–15 hours | Approx. 27–31 cm seated | 3.5 mm | Nursery display, large handmade toy, elephant collection |
Materials and Tools
Yarn
- Baby pink — DK / light worsted — approximately 220–260 g — head, trunk, ears, body, legs, and tail
- Raspberry / dusty rose — DK / light worsted — approximately 30–40 g — large bow
- White — DK / light worsted — approximately 20–25 g — twelve toenails
- Medium pink — DK — approximately 5–8 g — cheeks
- Black embroidery floss — small amount — eyelashes
- Muted brown embroidery floss — small amount — eyebrows
Tools
- 3.5 mm crochet hook
- Approximately 14 mm safety eyes ×2
- Polyester stuffing
- Large-eye yarn needle
- Embroidery needle
- Locking stitch markers
- Straight pins
- Sharp scissors
Replace plastic eyes with embroidered eyes when the finished elephant is intended for a child under three.
Abbreviations
MR — magic ring
sc — single crochet
inc — increase, 2 sc in one stitch
dec — invisible decrease
sl st — slip stitch
ch — chain
hdc — half double crochet
dc — double crochet
tr — treble crochet
BLO — back loop only
For an invisible decrease, insert the hook through the front loops of the following two stitches, draw up one loop, then complete one single crochet.
Pattern — Step by Step
Work the stuffed pieces in continuous spirals unless another method is stated. Move the stitch marker after every round. This construction is photo-matched to the supplied elephant and uses standard amigurumi shaping rather than reproducing a searched commercial design.
Head
Yarn: baby pink — Source: Standard amigurumi math.
R1: 6 sc in MR (6)
R2: inc ×6 (12)
R3: (sc, inc) ×6 (18)
R4: (2 sc, inc) ×6 (24)
R5: (3 sc, inc) ×6 (30)
R6: (4 sc, inc) ×6 (36)
R7: (5 sc, inc) ×6 (42)
R8: sc around (42)
R9: sc around (42)
R10: sc around (42)
R11: sc around (42)
R12: sc around (42)
R13: sc around (42)
R14: sc around (42)
Insert the safety eyes between R10 and R11, approximately 8 visible stitches apart. Check the spacing from the front before installing the washers.
R15: sc around (42)
R16: (5 sc, dec) ×6 (36)
R17: (4 sc, dec) ×6 (30)
R18: (3 sc, dec) ×6 (24)
Stuff firmly around the eye posts and crown. Keep the lower-front section slightly softer where the trunk will attach.
R19: (2 sc, dec) ×6 (18)
R20: (sc, dec) ×6 (12)
R21: dec ×6 (6)
Fasten off and close.
Trunk
Yarn: baby pink — Source: Standard amigurumi math.
R1: 6 sc in MR (6)
R2: inc ×6 (12)
R3: (sc, inc) ×6 (18)
R4: sc around (18)
R5: sc around (18)
R6: (sc, dec) ×6 (12)
R7: sc around (12)
R8: sc around (12)
R9: sc around (12)
R10: sc around (12)
R11: (sc, dec) ×4 (8)
R12: sc around (8)
R13: sc around (8)
R14: sc around (8)
R15: sc around (8)
R16: (2 sc, dec) ×2 (6)
R17: sc around (6)
R18: sc around (6)
R19: sc around (6)
Stuff R1–R9 firmly, R10–R14 lightly, and leave R15–R19 almost empty. The lower trunk should hang rather than project forward.
Fasten off with a 40 cm sewing tail.
Body
Yarn: baby pink — Source: Standard amigurumi math.
R1: 6 sc in MR (6)
R2: inc ×6 (12)
R3: (sc, inc) ×6 (18)
R4: (2 sc, inc) ×6 (24)
R5: (3 sc, inc) ×6 (30)
R6: (4 sc, inc) ×6 (36)
R7: sc around (36)
R8: sc around (36)
R9: sc around (36)
R10: sc around (36)
R11: sc around (36)
R12: sc around (36)
R13: sc around (36)
R14: sc around (36)
R15: (4 sc, dec) ×6 (30)
R16: (3 sc, dec) ×6 (24)
Begin stuffing. Concentrate the filling in the lower belly so the seated elephant has a firm center.
R17: (2 sc, dec) ×6 (18)
R18: (sc, dec) ×6 (12)
R19: dec ×6 (6)
Finish stuffing firmly.
Fasten off and close.
Front Legs — Make 2
Yarn: baby pink — Source: Standard amigurumi math.
R1: 6 sc in MR (6)
R2: inc ×6 (12)
R3: (sc, inc) ×6 (18)
R4: sc around (18)
R5: sc around (18)
R6: sc around (18)
R7: sc around (18)
R8: (sc, dec) ×6 (12)
R9: sc around (12)
R10: sc around (12)
R11: sc around (12)
R12: sc around (12)
R13: sc around (12)
R14: sc around (12)
Fill the paw firmly and reduce stuffing through the upper four rounds so each arm can angle inward.
Fasten off with a 35 cm sewing tail.
Back Legs — Make 2
Yarn: baby pink — Source: Standard amigurumi math.
R1: 6 sc in MR (6)
R2: inc ×6 (12)
R3: (sc, inc) ×6 (18)
R4: (2 sc, inc) ×6 (24)
R5: sc around (24)
R6: sc around (24)
R7: sc around (24)
R8: sc around (24)
R9: (2 sc, dec) ×6 (18)
R10: sc around (18)
R11: sc around (18)
R12: (sc, dec) ×6 (12)
R13: sc around (12)
Pack the first eight rounds firmly. Keep R11–R13 softer so the large feet can angle outward when attached.
Fasten off with a 40 cm sewing tail.
Large Ears — Make 2
Yarn: baby pink — Source: Standard flat-circle amigurumi math.
R1: 6 sc in MR (6)
R2: inc ×6 (12)
R3: (sc, inc) ×6 (18)
R4: (2 sc, inc) ×6 (24)
R5: (3 sc, inc) ×6 (30)
R6: (4 sc, inc) ×6 (36)
R7: (5 sc, inc) ×6 (42)
R8: sc around (42)
Join with sl st.
Do not stuff.
Fasten off with a 45 cm sewing tail.
Gently flatten each ear. The finished diameter should be approximately 12–14 cm before attachment.
Cheek Patches — Make 2
Yarn: medium pink — Source: Standard amigurumi math.
R1: 6 sc in MR (6)
R2: inc ×6 (12)
Join with sl st.
Fasten off with a 20 cm tail.
Toenails — Make 12
Yarn: white — Source: Standard amigurumi math.
R1: 6 sc in MR (6)
R2: sc around (6)
Do not stuff.
Fasten off with a 12 cm sewing tail.
Make three nails for each front paw and three for each rear foot.
Tail
Yarn: baby pink — Source: Standard amigurumi math.
R1: 6 sc in MR (6)
R2: sc around (6)
R3: sc around (6)
R4: sc around (6)
R5: sc around (6)
R6: sc around (6)
R7: sc around (6)
R8: sc around (6)
R9: sc around (6)
R10: sc around (6)
Do not stuff.
Fasten off with a 25 cm sewing tail.
Tail Tuft
Yarn: baby pink.
R1: 6 sc in MR (6)
R2: inc ×6 (12)
R3: sc around (12)
R4: dec ×6 (6)
Add a small amount of stuffing.
Fasten off and sew to the tail tip.
Bow Loops — Make 2
Yarn: raspberry / dusty rose.
Ch 13.
Row 1: starting in second ch from hook, 12 sc (12)
Row 2: ch 1, turn, inc, 10 sc, inc (14)
Row 3: ch 1, turn, 14 sc (14)
Row 4: ch 1, turn, inc, 12 sc, inc (16)
Row 5: ch 1, turn, 16 sc (16)
Row 6: ch 1, turn, 16 sc (16)
Row 7: ch 1, turn, dec, 12 sc, dec (14)
Row 8: ch 1, turn, 14 sc (14)
Row 9: ch 1, turn, dec, 10 sc, dec (12)
Fasten off.
Work one round of sc evenly around the complete loop panel, placing 2 sc at each outer corner.
Fasten off with a 30 cm tail.
Bow Center Band
Yarn: raspberry / dusty rose.
Ch 6.
Row 1: starting in second ch, 5 sc (5)
Rows 2–10: ch 1, turn, 5 sc (5)
Fasten off with a 25 cm tail.
Assembling the Bow
Pinch one short edge of the first bow loop into three small folds.
Repeat with the second loop.
Place the folded edges together.
Wrap the center band tightly around both pinched sections.
Overlap the band ends at the back and stitch them securely.
The completed bow should measure approximately 14–16 cm across.
Eyelashes and Eyebrows
Yarn: black for lashes; muted brown for eyebrows.
Embroider three short black lashes at the outer edge of each safety eye.
Keep each lash approximately 5–7 mm long.
Add one shallow brown eyebrow approximately 1.5–2 cm above each eye.
Angle both eyebrow ends slightly downward toward the outside of the head.
Assembly
- Pin the long trunk to the center-front of the head between and below the eyes, then sew completely around the 18-stitch base while keeping the lower section vertical.
- Pin both large ears behind the sides of the head with their upper edges approximately level with the upper third of the crown; sew only the inner attachment section so the outer edges remain free.
- Attach the two medium-pink cheek patches below and slightly outside the eyes, then embroider the black lashes and brown eyebrows using the same measurements on both sides.
- Sew the head centrally to the upper body and check that the trunk falls toward the center line rather than resting against either front arm.
- Attach both back legs low and wide on the body, angling the large feet outward until the elephant sits without rolling backward.
- Sew three white toenails across the front of each rear foot, placing the center nail first and matching the spacing on the second leg.
- Attach both front legs high on the torso and angle them slightly inward, then sew three white toenails across the rounded end of each paw.
- Sew the narrow tail to the rear body and attach the stuffed tuft to its free end, keeping the tail low enough that it does not interfere with the seated base.
- Center the raspberry bow above the forehead between the upper ear edges and sew through the back of the bow band into at least three head rows for support.
- Weave every remaining tail into matching-color stitches, place the elephant on a hard surface, and compare ear height, foot angle, eye details, trunk alignment, and bow symmetry from the front.
The finished elephant should sit on two broad rear feet with the front paws directed inward, the trunk centered vertically, and the oversized bow positioned directly above the forehead.
7 Technical Tips
- Ear rotation: A 42-stitch flat ear sewn only at one point can twist backward. Attach approximately 4–5 cm of the inner edge to the head while leaving the lower and outer perimeter free.
- Trunk stiffness: Dense stuffing in the final six-stitch rounds makes the trunk project outward. Leave at least the final four rounds almost empty so gravity can keep the tip vertical.
- Eye-spacing error: Eyes more than about nine visible stitches apart make the trunk look unusually narrow. Test both eye positions with temporary markers before installing the washers.
- Foot rocking: One rear foot angled 10 mm farther forward than the other can destabilize the seated body. Pin both legs simultaneously and test the elephant on a hard table before sewing.
- Toenail crowding: Three six-stitch pieces sewn too closely overlap and produce one white band. Leave approximately 5–7 mm between neighboring nail centers where the paw width permits.
- Bow collapse: A heavily stuffed or loosely folded center makes the two loops sag. Keep the bow unstuffed and compress each inner edge into three folds before wrapping the five-stitch center band.
- Head tipping: A large head attached above the body’s center can pull the elephant forward. Seat the rear feet first and tilt the head no more than approximately 5–10 degrees before closing the neck seam.
Shaping the Large Head
The head is the largest single focal piece in this pink crochet elephant toy. Its 42-stitch plateau gives enough width for the large eyes, trunk base, cheeks, eyebrows, ears, and bow without forcing those features together.
Stuffing placement matters. Pack the rear and upper head firmly because the bow and ears add weight at the crown. Keep the lower-front portion slightly more flexible so the trunk attachment can settle into the face.
After closing the head, roll it between both hands rather than squeezing it from front to back. The goal is a broad sphere with a slightly fuller forehead.
Getting the Trunk Length Right
The trunk in the reference reaches well below the mouth area and finishes near the level of the front paws.
Nineteen rounds give enough length to reproduce that proportion in DK yarn. If your row gauge is taller than expected, stop after R18. A very tight crocheter may need one extra six-stitch round.
Measure before attaching.
The trunk should extend approximately 9–11 cm from the face once sewn. Avoid adding a wire because the reference uses a soft downward shape rather than a tightly curled trunk.
Positioning the Oversized Ears
The ears are almost the same visual height as the head itself.
Place them too far back and much of the circular shape disappears. Move them too far forward and they begin to overlap the cheeks.
Pin the inside edge approximately one-quarter of the head diameter behind the eye line.
The top of each ear should sit below the outer bow loops, while the lower edge should extend to approximately cheek height.
Check from directly in front before sewing. Similar visible ear area on both sides is more important than matching an exact stitch number on the head.
Making the White Toenails
The photo uses dimensional white pieces rather than simple embroidered lines.
Twelve separate six-stitch cylinders create the raised effect: three per limb.
Do not stuff them.
Flatten each tiny piece between the fingers before sewing. Attach the center nail first, followed by the two outer nails.
For the rear feet, place the nails across the upper-front curve rather than on the bottom surface. The front paws can carry them slightly closer to the end because those limbs face forward.
Constructing the Bow
The bow is oversized on purpose.
Each loop widens from twelve to sixteen stitches across its flat rows, then narrows again. This creates a convex outer edge rather than a plain rectangular ribbon.
Adding one sc border gives both loops enough stability to hold their shape.
Do not stuff the bow.
The center depends on compression: fold each inner edge, place the folded sections together, then wrap the narrow band around them. Once attached to the elephant, the top edges of the two loops should sit slightly above the crown.
Creating the Face
The safety eyes supply most of the dark contrast, so the embroidered details should remain narrow.
Place the three lashes on the outer side of each eye only. A fourth lash can work, but heavy embroidery changes the scale of the eyes and competes with the bow.
The eyebrows use a softer brown rather than black. Keep them approximately 1.5–2 cm above the eyes.
Both cheek circles sit below the eye centers. Their color is deeper than the main pink but substantially lighter than the bow.
Constructing a Stable Seated Base
The two rear feet create the tripod-like base with the lower body.
Attach them low enough that the belly nearly touches the surface. The reference does not show long standing legs beneath the torso.
Both feet angle outward, increasing the total width of the seated elephant.
Pin the legs before adding the arms. If the body rolls backward, move each rear foot 5–10 mm farther forward. When the torso falls forward, shift them slightly toward the back.
Positioning the Front Legs
The front limbs are longer and narrower than the back feet.
Their upper sections sit high on the torso, while the paws extend toward the viewer.
Keep the last four rounds lightly stuffed. This allows the upper arm to flatten against the body and gives the paw a natural downward angle.
Attach both arms at matching heights before adding their toenails.
A narrow central gap should remain between the paws so the trunk is still visible.
Choosing Yarn and Hook Size
A current pink-elephant pattern from Keep Calm and Crochet On uses DK/light-worsted acrylic with a 3.5 mm hook, which closely matches the visible stitch scale in this reference image.
Work the first seven head rounds as a fabric test.
The 42-stitch circle should remain flexible but dense enough that stuffing cannot be seen under normal tension.
Move to 3.25 mm if gaps open significantly. A 3.75 mm hook may work for a very tight crocheter, although it will increase the final dimensions.
Estimating Yarn Quantity
Published elephant patterns vary widely because some finish near 10 cm while larger seated designs reach about 23 cm. Yarn weight also ranges from fine cotton through DK and Aran.
For the photo-matched size, record the weight of the finished head and trunk before starting the body.
If those pieces consume approximately 80 g, reserve at least twice that amount for the torso, large ears, four limbs, and tail.
The main-color estimate of 220–260 g includes a practical allowance for gauge variation and sewing.
Buy the pink yarn from one dye lot because the head, ears, and limbs touch directly and make shade differences easy to see.
Competition Gap
Current elephant crochet patterns include standing animals, seated elephants, miniature pink elephants, diaper-wearing characters, party-hat designs, loveys, and bow-wearing baby-shower sets.
The supplied design combines those familiar elephant elements in a more specific proportion system. Both ears are extremely wide, the trunk is long and completely downward-facing, all four feet carry raised white toenails, the cheeks are separate circles, and the crown carries a bow almost half the width of the head.
That gives the project a clearer visual position for searches around an elephant with bow crochet pattern rather than another generic elephant amigurumi.
Scaling the Pattern
The easiest way to make a smaller elephant is to change yarn and hook rather than alter every stitch count.
Fingering yarn with an appropriately smaller hook produces a miniature version while retaining the same proportions. Aran yarn increases the dimensions substantially.
If modifying the stitch counts directly, preserve the relationship between the 42-stitch head and 36-stitch body. Reducing both by six gives a 36-stitch head and 30-stitch body.
The ears should be reduced in the same proportion. Otherwise the character changes from an oversized-ear baby elephant into a more conventional elephant silhouette.
Finishing Checks
Place the completed elephant on a hard level surface.
Both rear feet should contact the table evenly and the belly should sit between them without tilting.
View the head from directly in front. Equal amounts of each ear should remain visible, the trunk should bisect the face, and both cheek circles should sit at comparable heights.
Check the bow from above. Its center band needs to align with the trunk rather than with either eye.
Finally, compare the twelve toenails. Each set of three should form a similar arc across its paw or foot.
Conclusion
Finish the head, trunk, and oversized ears before fixing the legs because those pieces establish the scale and balance of this pink elephant amigurumi crochet pattern. Pin the broad rear feet on a hard surface, add the narrower front legs, then position the unstuffed raspberry bow only after the head is permanently attached. Record the finished ear diameter and trunk length before making another color version so the proportions can be reproduced. Share a face close-up on Pinterest and the complete seated elephant on Instagram with #PinkBowElephant. Would you keep the raspberry bow, or match it to the white toenails for a cream accent version?









