Introduction
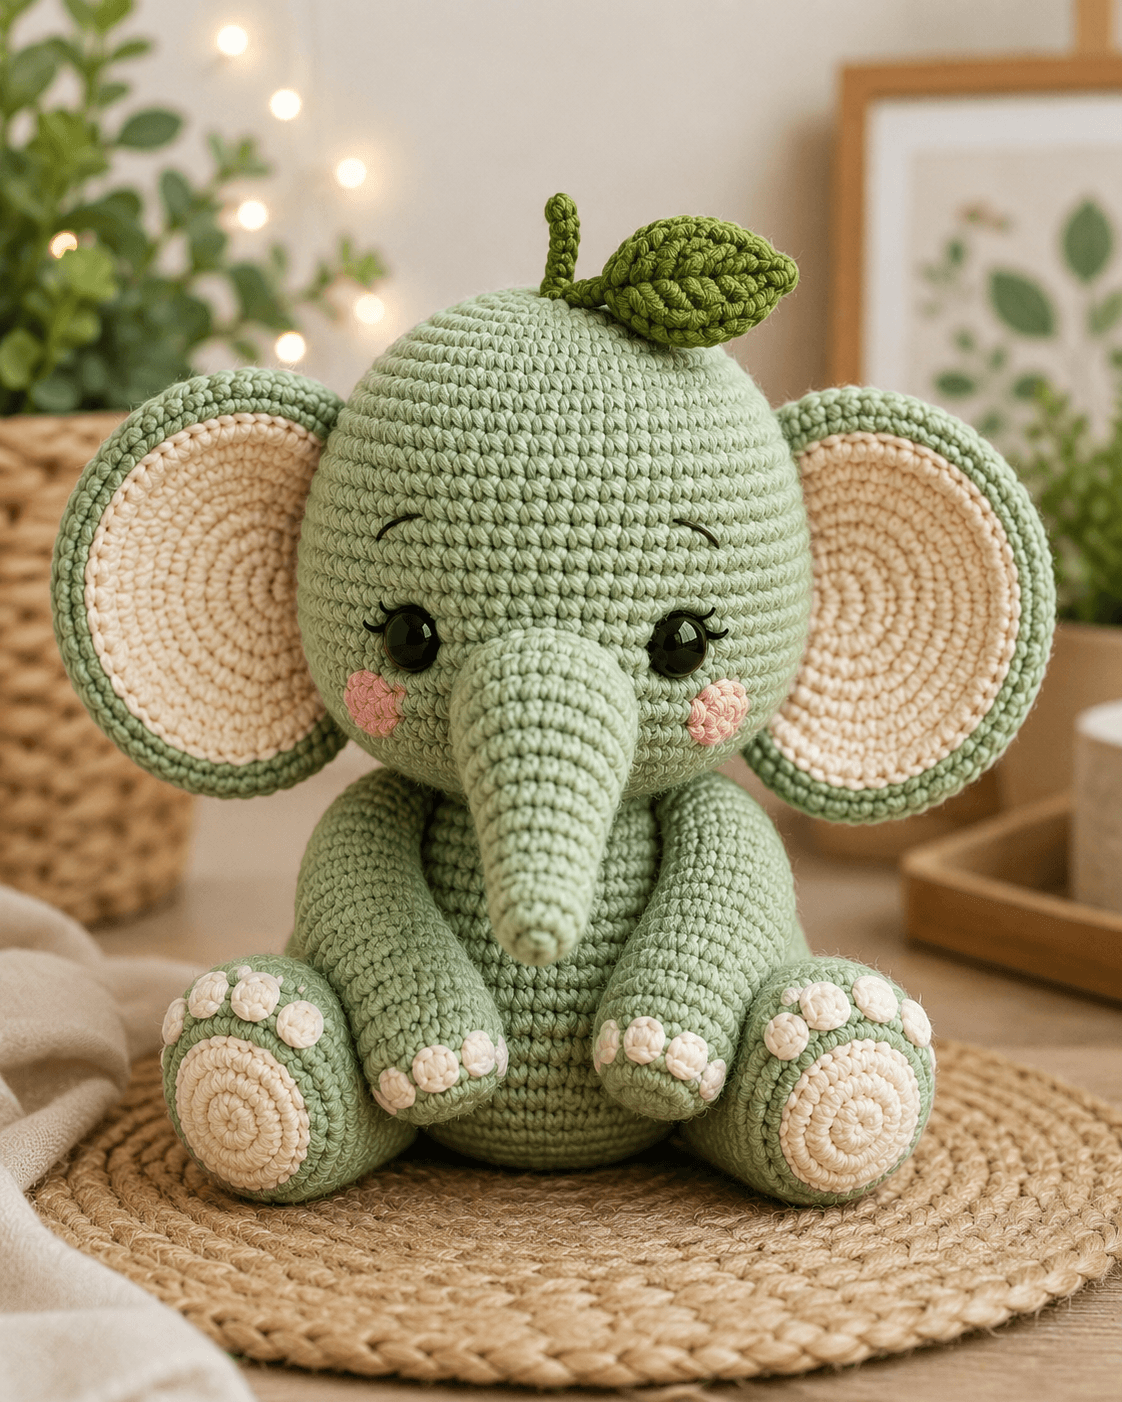
An elephant ear this wide can pull a round crochet head sideways unless its sewing edge is kept light and flat. This elephant amigurumi crochet pattern uses worsted yarn, a 3.5 mm hook, 14–16 mm eyes, oversized layered ears, a long trunk, large paw pads, and one dark-green leaf. The finished elephant sits approximately 29–32 cm high and uses intermediate amigurumi shaping and assembly.
The Design: What Makes This Elephant Different
The ears establish the scale before any other detail. Each outer sage circle reaches 36 stitches, while a slightly smaller cream insert leaves a visible green rim around the edge. The trunk stays narrow at the tip and broadens to 18 stitches where it meets the face, preventing a heavy cylindrical shape. Large rear feet create the seated base, and long front arms angle inward toward the belly. This sage green elephant crochet pattern also replaces the usual bow, flower crown, or tusks with one dark olive leaf and short stem. The third structural decision is the paw treatment: flat cream pads sit inside the back feet, while small raised cream bumps form the toes. A common elephant-making error is attaching both ears too far behind the eye line. That placement reduces their apparent diameter and makes the head look narrow from the front.
Project Info at a Glance
| Skill Level | Time | Finished Size | Hook | Best For |
|---|---|---|---|---|
| Intermediate | 12–16 hours | Approx. 29–32 cm sitting | 3.5 mm | Large amigurumi, nursery display, animal collection |
Materials and Tools
Yarn
- Soft sage green — worsted / Aran #4 — approximately 190–230 g — head, body, trunk, limbs, and outer ears
- Warm cream — matching worsted yarn — approximately 55–70 g — inner ears, sole pads, and toe bumps
- Blush pink — matching worsted yarn — approximately 10–15 g — cheek patches
- Dark olive green — matching worsted yarn — approximately 15–20 g — leaf and crown stem
- Black embroidery yarn — small amount — eyebrows and eyelashes
Tools
- 3.5 mm crochet hook
- 14–16 mm safety eyes ×2
- Polyester fiberfill
- Large-eye yarn needle
- Locking stitch marker
- Straight pins
- Scissors
For a toy intended for a child under three, replace plastic eyes with securely embroidered facial features.
Abbreviations
MR — magic ring
sc — single crochet
inc — increase, 2 sc in one stitch
dec — invisible decrease
sl st — slip stitch
ch — chain
hdc — half double crochet
dc — double crochet
tr — treble crochet
BLO — back loop only
For an invisible decrease, insert through the front loops of the next two stitches, draw up a loop, then finish one single crochet through both stitches.
Pattern — Step by Step
Work stuffed pieces in continuous spirals unless another method is stated. The construction below is an original photo-matched pattern using standard six-stitch amigurumi shaping rather than a reproduction of any searched pattern.
Head
Yarn: sage green — standard amigurumi math.
R1: 6 sc in MR (6)
R2: inc ×6 (12)
R3: (sc, inc) ×6 (18)
R4: (2 sc, inc) ×6 (24)
R5: (3 sc, inc) ×6 (30)
R6: (4 sc, inc) ×6 (36)
R7: (5 sc, inc) ×6 (42)
R8: sc around (42)
R9: sc around (42)
R10: sc around (42)
R11: sc around (42)
R12: sc around (42)
R13: sc around (42)
R14: sc around (42)
Insert 14–16 mm safety eyes between R10 and R11, approximately 9 visible stitches apart. Check the trunk location before locking the washers.
R15: (5 sc, dec) ×6 (36)
R16: (4 sc, dec) ×6 (30)
R17: (3 sc, dec) ×6 (24)
Stuff firmly around the eyes and crown.
R18: (2 sc, dec) ×6 (18)
R19: (sc, dec) ×6 (12)
R20: dec ×6 (6)
Fasten off and close.
Body
Yarn: sage green — standard amigurumi math.
R1: 6 sc in MR (6)
R2: inc ×6 (12)
R3: (sc, inc) ×6 (18)
R4: (2 sc, inc) ×6 (24)
R5: (3 sc, inc) ×6 (30)
R6: (4 sc, inc) ×6 (36)
R7: (5 sc, inc) ×6 (42)
R8: sc around (42)
R9: sc around (42)
R10: sc around (42)
R11: sc around (42)
R12: sc around (42)
R13: sc around (42)
R14: sc around (42)
R15: sc around (42)
Begin stuffing through the lower belly.
R16: (5 sc, dec) ×6 (36)
R17: sc around (36)
R18: sc around (36)
R19: (4 sc, dec) ×6 (30)
R20: sc around (30)
R21: (3 sc, dec) ×6 (24)
R22: sc around (24)
R23: (2 sc, dec) ×6 (18)
Finish stuffing firmly, concentrating support through the neck area.
Fasten off with a 40 cm sewing tail.
Trunk
Yarn: sage green — standard amigurumi math.
R1: 6 sc in MR (6)
R2: sc around (6)
R3: sc around (6)
R4: inc ×6 (12)
R5: sc around (12)
R6: sc around (12)
R7: sc around (12)
R8: sc around (12)
R9: sc around (12)
R10: sc around (12)
R11: sc around (12)
R12: (sc, inc) ×6 (18)
R13: sc around (18)
R14: sc around (18)
Stuff the upper half lightly. Leave the lowest tip almost unstuffed so it remains narrow.
Fasten off with a 35 cm sewing tail.
Outer Ears — Make 2
Yarn: sage green. Work flat in joined rounds.
R1: 6 sc in MR (6)
R2: inc ×6 (12)
R3: (sc, inc) ×6 (18)
R4: (2 sc, inc) ×6 (24)
R5: (3 sc, inc) ×6 (30)
R6: (4 sc, inc) ×6 (36)
Join with sl st.
Do not stuff.
Fasten off with a 40 cm sewing tail.
Cream Inner Ears — Make 2
Yarn: cream. Work flat in joined rounds.
R1: 6 sc in MR (6)
R2: inc ×6 (12)
R3: (sc, inc) ×6 (18)
R4: (2 sc, inc) ×6 (24)
R5: (3 sc, inc) ×6 (30)
Join with sl st.
Fasten off with a 30 cm tail.
Center one cream circle over each sage ear, leaving approximately one outer sage round visible.
Front Arms — Make 2
Yarn: sage green.
R1: 6 sc in MR (6)
R2: inc ×6 (12)
R3: (sc, inc) ×6 (18)
R4: sc around (18)
R5: sc around (18)
R6: sc around (18)
R7: sc around (18)
R8: sc around (18)
R9: (sc, dec) ×6 (12)
R10: sc around (12)
R11: sc around (12)
R12: sc around (12)
R13: sc around (12)
Stuff the hand firmly and the upper arm lightly.
Flatten the opening.
Fasten off with a 30 cm sewing tail.
Back Legs — Make 2
Yarn: sage green.
R1: 6 sc in MR (6)
R2: inc ×6 (12)
R3: (sc, inc) ×6 (18)
R4: (2 sc, inc) ×6 (24)
R5: sc around (24)
R6: sc around (24)
R7: sc around (24)
R8: sc around (24)
R9: sc around (24)
R10: (2 sc, dec) ×6 (18)
R11: sc around (18)
R12: sc around (18)
R13: (sc, dec) ×6 (12)
Stuff firmly through R10, then reduce the stuffing near the sewing edge.
Fasten off with a 35 cm tail.
Cream Foot Pads — Make 2
Yarn: cream.
R1: 6 sc in MR (6)
R2: inc ×6 (12)
R3: (sc, inc) ×6 (18)
Join with sl st.
Fasten off with a long sewing tail.
Do not stuff.
Cream Back-Foot Toe Bumps — Make 6
Yarn: cream.
R1: 6 sc in MR (6)
Join with sl st and pull the center closed.
Fasten off with a sewing tail.
Cream Hand Toe Bumps — Make 6
Yarn: cream.
R1: 6 sc in MR (6)
Join with sl st.
Fasten off.
Pink Cheek Patches — Make 2
Yarn: blush pink.
R1: 6 sc in MR (6)
R2: inc ×6 (12)
Join with sl st.
Fasten off with a 20 cm sewing tail.
Dark Green Crown Stem
Yarn: dark olive green.
R1: 6 sc in MR (6)
R2: sc around (6)
R3: sc around (6)
R4: sc around (6)
R5: sc around (6)
R6: sc around (6)
Fasten off with a 20 cm sewing tail.
Do not stuff.
Dark Green Leaf
Yarn: dark olive green. Work around both sides of the foundation chain.
Ch 10.
Starting in second ch from hook:
sl st in next ch,
sc in next ch,
hdc in next 2 ch,
dc in next 3 ch,
hdc in next ch,
3 sc in final ch.
Continue along the opposite side:
hdc in next ch,
dc in next 3 ch,
hdc in next 2 ch,
sc in next ch,
sl st in final ch.
Fasten off with a 25 cm tail.
For the raised center vein, surface-sl-stitch from the base toward the point or embroider one firm line along the foundation chain.
Eyebrows and Eyelashes
Yarn: black embroidery yarn.
Work one shallow eyebrow approximately 2–2.5 cm above each eye.
Add two short eyelash stitches at each outer eye corner.
Keep each eyelash approximately 4–6 mm long.
Assembly
- Pin the head to the 18-stitch upper body opening and sew around the complete neck seam, keeping the head centered over the belly.
- Center the trunk between the eyes with its 18-stitch edge beginning just below the eye line, then sew the upper edge firmly to the face.
- Sew each cream inner-ear circle to an outer sage ear, leaving one visible sage round around the cream insert.
- Attach both completed ears to the sides of the head with their upper edges near the crown and their front edges approximately level with the eyes.
- Sew the pink cheek circles below and slightly outside the eyes, then add the two eyebrows and short outer eyelashes.
- Attach the front arms high on the body and angle the hands slightly inward; add three cream toe bumps across each hand.
- Pin both back legs low on the body, checking the seated balance before completing their seams, then sew one cream foot pad to each sole.
- Attach three cream toe bumps above each rear foot pad, spacing them evenly across the upper edge of the foot.
- Sew the dark-green stem to the crown, position the leaf beside it at a slight angle, and secure only the leaf base so the pointed end remains raised.
- Weave every remaining tail through matching-color stitches, check the ear symmetry, straighten the trunk, and set the elephant on a hard surface to confirm a stable seated position.
The completed elephant should sit without rear support, with both large ears visible from the front, the trunk centered between the eyes, and the dark-green leaf angled across the crown.
7 Technical Tips
- Ear droop: A heavily sewn 36-stitch ear can pull the head sideways. Attach only the inner 5–6 cm of each ear edge and leave the outer circumference unsupported.
- Trunk rotation: Sewing one side completely before the other can twist the trunk away from the facial center. Pin its 18-stitch base at the top, bottom, left, and right before working the final seam.
- Head tipping: A loosely packed neck allows the oversized head to fall forward. Add firm stuffing through the body’s upper 4–5 cm before closing the neck seam.
- Uneven eyes: A difference of one crochet round changes the expression dramatically on a large face. Insert both safety-eye posts through the same head round and keep approximately nine visible stitches between them.
- Foot-pad cupping: Tight sewing around the 18-stitch cream circle pulls the rear foot inward. Stitch through only the outer loops and keep the pad flat against the sole.
- Toe crowding: Three six-stitch bumps placed edge-to-edge form one cream band rather than separate toes. Leave approximately one sage stitch visible between neighboring toe bases.
- Leaf collapse: Sewing the complete leaf surface to the crown removes the raised botanical shape. Fix only the lower 2–3 cm and leave the pointed half free.
Building the Oversized Elephant Ears
The ears carry more visual area than any component except the head itself. That makes their diameter and placement critical.
A 36-stitch outer circle gives enough width to extend beyond the side of a 42-stitch head. The cream insert stops at 30 stitches, producing one full sage ring around the lighter center.
Assemble each ear before attaching it to the elephant.
Place the cream piece centrally and pin it at four quarter points. Sew around the insert without pulling the yarn tight. Once the two-layer ear lies flat, fold the inner attachment edge very slightly before pinning it to the head.
That small fold lets the outer edge project forward instead of hanging directly sideways.
Shaping the Long Trunk
The trunk is the most character-specific element of this elephant plush crochet pattern.
Its six-stitch tip is intentionally narrow. The circumference increases first to 12 stitches and later to 18 at the facial end.
Do not fill the entire tube to the same density.
The upper third needs enough stuffing to support the attachment seam. The middle requires only light filling, and the lowest few rounds can remain almost empty.
This distribution allows the trunk to hang naturally while preserving a rounded base.
Before sewing, place a vertical marker through the exact center of the face. The trunk should cover that line.
Getting the Seated Proportions Right
The back legs create the base rather than serving as standing limbs.
Their 24-stitch maximum makes the feet much larger than the 18-stitch hands. That size difference is visible in the reference and prevents the elephant from becoming top-heavy.
Pin both legs before sewing either one completely.
Set the elephant on a flat table and move the legs until the body sits between them without rolling backward.
The inner edges of the feet can point slightly upward and inward. Their outer sides should still contact the surface.
Once the position holds, sew several anchoring stitches into each leg before completing the full seams.
Positioning the Cream Paw Pads
The foot pads sit on the forward-facing portion of each rear foot rather than directly underneath.
That placement keeps the cream circles visible when the elephant is sitting.
Center each 18-stitch pad on the rounded foot and leave a consistent green margin around the edge.
Attach the three toe bumps after the pad is secure.
The toe line should follow the upper curve of the pad rather than form a straight horizontal row.
Repeat the same cream bumps on the hands, but omit the large circular hand pad because the photograph shows only individual light-colored toes there.
Placing the Eyes and Cheeks
The large ears frame the face, so the eyes should remain relatively close to the trunk.
For a 42-stitch head, approximately nine visible stitches between 14–16 mm eye posts produces a similar proportion to the reference.
Install the eyes before the final head decreases.
The pink cheeks belong below the eye centers and slightly farther outward. Positioning them directly beneath the trunk makes the facial details look crowded.
Add embroidery only after the cheeks are attached. The eyebrows should follow the curve of the head rather than forming horizontal bars.
Making the Botanical Crown Detail
The single leaf is a useful distinction from flower-crown elephant patterns.
Its color should be noticeably darker than the sage body. Olive, moss, or fern green creates enough separation without introducing a bright new color.
The stem remains narrow at six stitches for its complete length.
The leaf is worked around both sides of one foundation chain, creating a pointed oval with no seam through the outer edge.
Position the stem close to the top center, then angle the leaf slightly toward one ear.
Do not center the leaf vertically. The asymmetry is part of the photographed design.
Choosing Yarn and Hook Size
Published elephant patterns cover several yarn scales. A Ravelry design approximately 12 inches tall uses Aran yarn with a 4 mm hook and 12 mm eyes, while a Ribblr worsted elephant uses a 3.25 mm hook and 8 mm eyes. :contentReference[oaicite:17]{index=17}
The supplied elephant has compact, highly visible stitches with little space between them. A 3.5 mm hook offers a useful middle point for worsted yarn.
Test the head through R7.
Gently stretch the 42-stitch fabric over two fingers. If the stuffing would show through, reduce to 3.25 mm. If the hook is difficult to insert into every stitch, move to 4 mm.
Estimating Yarn Quantity
A verified 12-inch elephant pattern uses approximately 182 m of main-color worsted yarn plus 18 m of accent yarn. :contentReference[oaicite:18]{index=18}
The supplied design adds unusually large two-layer ears, oversized rear feet, separate paw pads, toe bumps, and a botanical crown piece. That additional surface area increases the accent requirement.
For the most accurate personal calculation, weigh the finished head, body, and one ear.
Then weigh one arm and one leg and double those figures.
Reserve additional sage yarn for the trunk and sewing tails.
If the selected yarn supplies only 100 m per 100 g rather than 180–200 m, the gram requirement will increase substantially even though the crochet dimensions remain similar.
Keeping the Head Round
Forty-two stitches form the widest head section.
Stuffing should be added in small pieces rather than one large bundle. Place fiberfill first behind the eyes, then into the crown and side walls.
Do not overpack the area directly behind the ear seams. A rigid side wall makes it difficult for the large ears to sit close against the head.
Before closing R20, rotate the head in both hands and check the profile.
The front should remain full enough to support the trunk, but the back of the skull should not become pointed.
Competition Gap
Current elephant amigurumi patterns cover many familiar variations: gray safari animals, pink nursery elephants, dressed characters, tiny keychains, realistic tuskers, chenille plushies, and loveys. Established designs commonly use contrast inner ears and separate trunks. :contentReference[oaicite:19]{index=19}
The supplied reference combines those basic elephant structures with a less common visual system. Sage replaces conventional gray. Cream appears in the oversized ears and feet rather than in clothing. Pink is limited to two small cheek circles. One dark-green leaf acts as the only head accessory.
The resulting search gap is strongest around a crochet elephant with big ears or botanical sage elephant rather than another standard gray safari toy.
Finishing Checks
Set the elephant on a level table before trimming any final tails.
Both back legs should support the body without the belly tipping backward.
View the head from directly in front. The outer edges of the ears should extend to similar widths, and the cream inner circles should appear centered.
Check the trunk next. Its upper seam should fall on the vertical centerline between the eyes.
Look at the hands and feet. Each group of three cream toe bumps should remain visibly separate.
Finally, inspect the leaf from above. Its pointed end should project away from the crown rather than lying flat against the head.
Conclusion
Complete the 42-stitch head and both layered ears before fixing the limbs, because those pieces establish the visual scale of this elephant amigurumi crochet pattern. Add the trunk on the facial centerline, build a stable seated base with the oversized rear feet, and place the cream pads and toe bumps only after the leg position is fixed. Record the finished ear diameter and sitting height before making a second color version. Share the ear-and-leaf detail on Pinterest and the completed elephant on Instagram with #SageLeafElephant. Would you keep the single olive leaf, or add a second smaller leaf behind it?









