Introduction
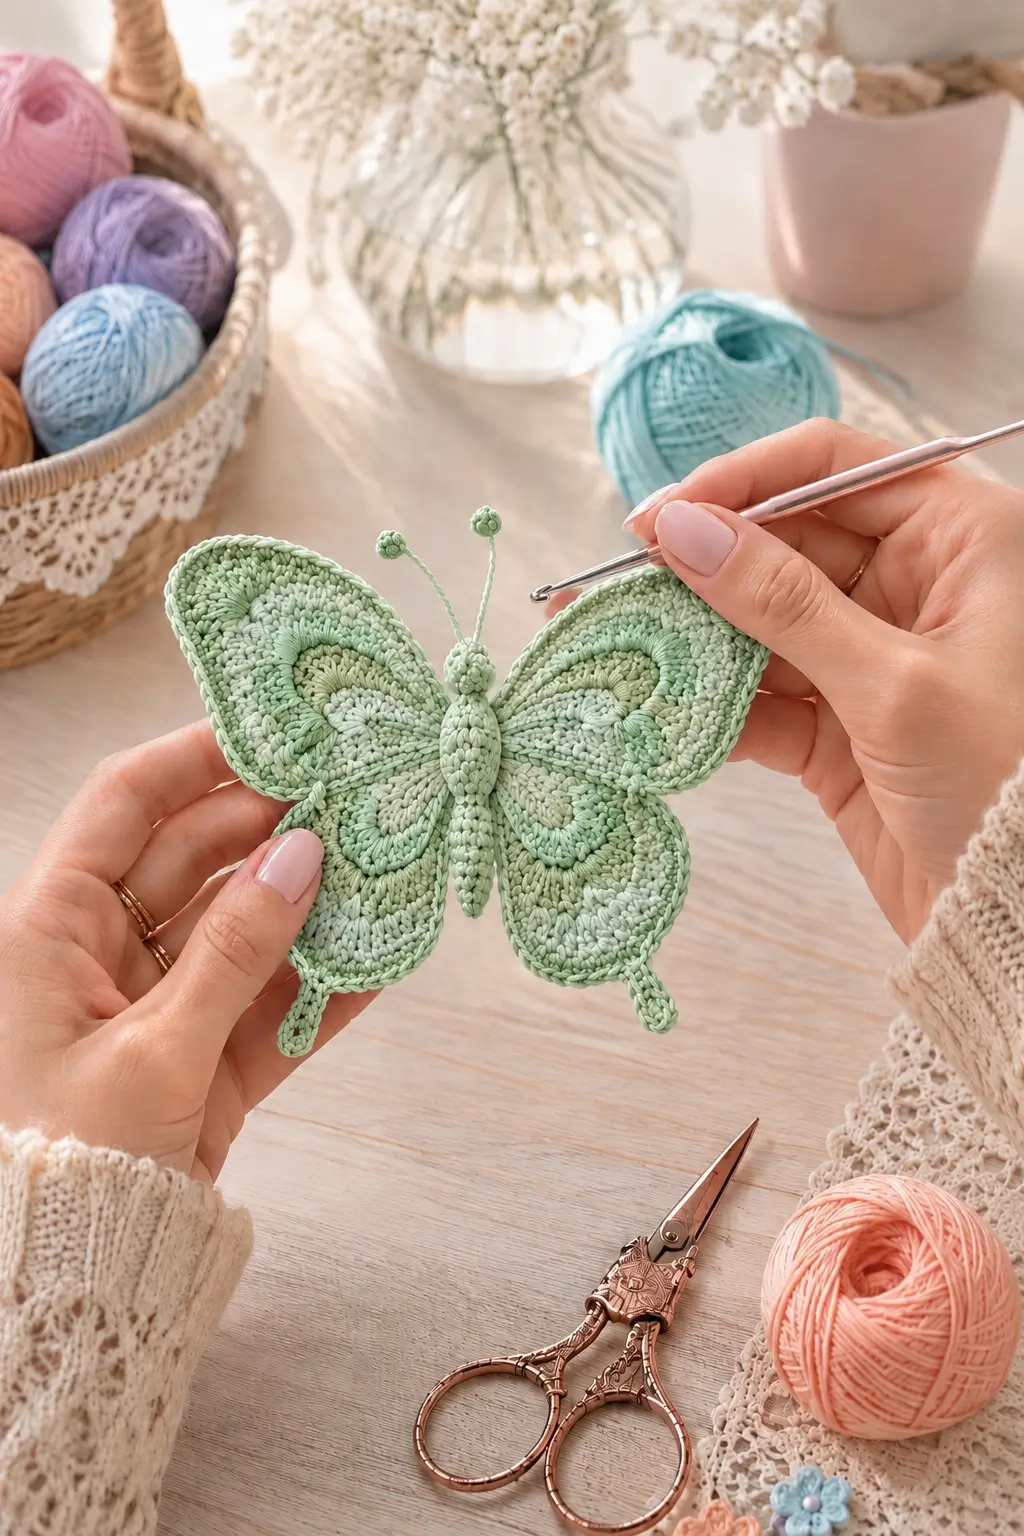
A butterfly loses its silhouette quickly when the lower wings become as long as the upper pair. This crochet butterfly applique pattern separates all four wings so each section can be shaped independently. Fine cotton, a 2.5 mm hook and three green shades produce a finished motif approximately 14–16 cm wide, with an elongated body, curved wing markings and two narrow antennae.
The Design: What Makes This Butterfly Different
The upper wings are elongated teardrops with their widest section above the body midpoint, while the lower pair remain shorter and rounder. That difference controls the butterfly outline before any decorative stitching is added. Each wing is crocheted as a separate flat panel, then bordered in darker mint to sharpen the edge. Pale sage and olive surface stitches create curved internal markings without forcing multiple color changes through the structural rows. The realistic crochet butterfly also uses a narrow padded body rather than wrapping yarn around the center of folded wings. Two chain antennae extend from a small thorax, and rounded terminal buds reproduce the prominent tips visible in the reference. A frequent construction error is joining the upper wings too low on the abdomen. Their narrow bases should meet beside the thorax, not beside the lower abdomen.
Project Information at a Glance
| Skill Level | Time | Finished Size | Hook | Best For |
|---|---|---|---|---|
| Intermediate | 3–5 hours | Approx. 14–16 cm wide | 2.5 mm | Wall art, bags, cushions, mobiles and textile embellishment |
Published cotton butterfly appliqués demonstrate how strongly hook and yarn choice affect scale. GoldenLucyCrafts lists a 7.5 cm motif made with mercerized cotton and a 2.75 mm hook, while a Scheepjes Catona butterfly tutorial uses a 2.5 mm hook. The larger dimensions here come from lengthening and independently shaping all four wings rather than simply enlarging a compact folded motif. :contentReference[oaicite:16]{index=16}
Materials and Tools
Yarn
- Soft mint — sport-weight mercerized cotton — approximately 20–25 g — wings and body
- Pale sage — matching cotton — approximately 8–12 g — inner wing markings
- Muted olive green — approximately 3–5 g — secondary wing markings and antenna tips
Tools
- 2.5 mm crochet hook
- Fine tapestry needle
- Sharp embroidery scissors
- Blocking mat
- Rust-resistant pins
- Optional fabric stiffener for hanging ornaments
Cotton is useful for this construction because the wing edges need to retain defined curves after blocking. Current butterfly patterns use everything from fine embroidery cotton to worsted yarn, so yarn thickness can be changed when a different finished scale is required. :contentReference[oaicite:17]{index=17}
Abbreviations
- MR — magic ring
- ch — chain
- sl st — slip stitch
- sc — single crochet
- hdc — half double crochet
- dc — double crochet
- tr — treble crochet
- inc — two stitches in one stitch
- dec — work two stitches together
- RS — right side
- WS — wrong side
An invisible decrease can be worked through the front loops of the following two stitches when shaping the body, reducing bulk along the narrow abdomen.
Pattern — Step by Step
Work the wing panels in turned rows. The body and antenna tips are worked in continuous rounds. Make the two wings of each pair from the same hook and yarn before blocking so their gauge remains consistent.
Upper Left Wing
Yarn: soft mint.
Ch 15.
Row 1: starting in second ch from hook, sc, 2 hdc, 7 dc, 3 hdc, sc (14)
Row 2: ch 1, turn, inc, 2 hdc, 8 dc, 2 hdc, inc (16)
Row 3: ch 2, turn, hdc, inc, 3 dc, 6 tr, 3 dc, inc, hdc (18)
Row 4: ch 2, turn, hdc, inc, 4 dc, 6 tr, 4 dc, inc, hdc (20)
Row 5: ch 2, turn, 2 hdc, 5 dc, 6 tr, 5 dc, 2 hdc (20)
Row 6: ch 1, turn, dec, 3 hdc, 10 dc, 3 hdc, dec (18)
Row 7: ch 1, turn, dec, 3 hdc, 8 dc, 3 hdc, dec (16)
Row 8: ch 1, turn, dec, 3 hdc, 6 dc, 3 hdc, dec (14)
Do not fasten off.
Upper Wing Edging
Work sc evenly down the side edge.
Place 3 sc around the upper rounded tip.
Continue sc along the opposite edge and finish with sl st at the wing base.
Fasten off with a 30 cm sewing tail.
Block the tip slightly upward and outward. The lower edge should retain a shallow inward curve beside the body.
Upper Right Wing
Repeat the upper-left wing.
During blocking, reverse the shaping so the two pieces form mirror images.
Lower Left Wing
Yarn: soft mint.
Ch 11.
Row 1: starting in second ch, sc, 2 hdc, 4 dc, 2 hdc, sc (10)
Row 2: ch 1, turn, inc, 2 hdc, 6 dc, 2 hdc, inc (12)
Row 3: ch 2, turn, hdc, inc, 3 dc, 4 tr, 3 dc, inc, hdc (14)
Row 4: ch 2, turn, 2 hdc, 4 dc, 4 tr, 4 dc, 2 hdc (16)
Row 5: ch 1, turn, dec, 3 hdc, 6 dc, 3 hdc, dec (14)
Row 6: ch 1, turn, dec, 2 hdc, 6 dc, 2 hdc, dec (12)
Row 7: ch 1, turn, dec, 2 hdc, 4 dc, 2 hdc, dec (10)
Do not fasten off.
Lower Wing Tail
At the outer lower corner:
ch 8,
sl st in second ch from hook,
sc in next 2 ch,
hdc in next 2 ch,
sc in next ch,
sl st into wing edge.
Sc around the remaining wing perimeter.
Work 3 sc at the broadest lower curve and sl st at the wing base.
Fasten off with a 30 cm sewing tail.
Lower Right Wing
Repeat the lower-left wing and reverse its blocked orientation.
Upper Wing Inner Marking — Make Two
Yarn: pale sage.
Ch 22 loosely.
Starting in second ch, sl st across.
Fasten off with two 15 cm tails.
Curve the strip into an elongated open loop following the upper-wing perimeter. Sew it approximately 8–10 mm inside the outer edge.
Upper Wing Center Curl — Make Two
Yarn: muted olive.
Ch 12.
Work 2 sc in each chain from second ch to end.
The strip will curl naturally.
Fasten off.
Arrange the curl in the inner lower area of each upper wing and stitch it flat at several points.
Lower Wing Inner Marking — Make Two
Yarn: pale sage.
Ch 15.
Sl st back across.
Arrange the chain as a curved teardrop inside each lower wing.
Sew in place without pulling the wing fabric inward.
Lower Wing Small Curl — Make Two
Yarn: muted olive.
Ch 8.
Work 2 sc in each chain from second ch.
Fasten off and sew the resulting curl toward the inside edge of each lower wing.
Butterfly Thorax
Yarn: soft mint. Work in continuous rounds.
R1: 6 sc in MR (6)
R2: inc ×6 (12)
R3–R4: sc around (12)
R5: dec ×6 (6)
R6–R7: sc around (6)
Stuff with a very small amount of cotton fiber if a raised center is wanted.
Fasten off with a 30 cm tail.
Abdomen
Yarn: soft mint.
R1: 6 sc in MR (6)
R2: sc around (6)
R3: (sc, inc) ×3 (9)
R4–R8: sc around (9)
R9: (sc, dec) ×3 (6)
R10–R12: sc around (6)
Add only a narrow amount of stuffing.
Fasten off with a 30 cm tail.
The abdomen should remain longer than it is wide and taper toward the lower tip.
Antenna Stem — Make Two
Yarn: soft mint.
Ch 22–25.
Sl st back across the chain.
Fasten off with a 12 cm tail.
Current butterfly patterns also commonly form antennae from chains or tied yarn strands, making a flexible crocheted stem appropriate for a flat appliqué. :contentReference[oaicite:18]{index=18}
Antenna Tip — Make Two
Yarn: muted olive or mint.
R1: 6 sc in MR (6)
R2: sc around (6)
Fasten off.
Pull the opening closed around one end of an antenna stem.
The finished terminal bud should measure approximately 6–8 mm.
Blocking the Four Wings
Wet-block all four wing panels before assembly.
Pin the two upper wings to identical length and width measurements.
Repeat with the lower pair.
The upper-wing tips should angle approximately 30–40 degrees above the horizontal center line.
Position the lower wings approximately 20–30 degrees below horizontal.
Allow every panel to dry fully before removing the pins.
Assembly
- Block the two upper wings as mirror images and compare their widest points before beginning any surface decoration.
- Block the two lower wings separately, keeping their outer tails approximately the same length and angle.
- Sew the pale-sage perimeter markings and olive curls onto all four wings without pulling the panels out of their blocked dimensions.
- Place the upper wing bases beside the thorax and overlap their inner edges by no more than approximately 5 mm.
- Position the lower wings directly below the upper pair, keeping their rounded upper corners partly behind the upper-wing bases.
- Sew the abdomen vertically over the four wing bases so the joins disappear beneath the center body.
- Attach the thorax above the abdomen, covering the upper ends of the wing seams.
- Sew one antenna behind each side of the thorax and angle the stems outward before curving them inward near their tips.
- Attach or tighten the rounded antenna buds, then compare both antenna lengths from directly above.
- Steam or lightly re-block the completed motif without flattening the raised thorax, abdomen or surface-crochet markings.
The finished butterfly should lie mostly flat while the body and decorative wing lines remain slightly raised above the four blocked wing panels.
7 Technical Tips
- Upper-wing mismatch: A difference greater than about 5 mm is immediately visible across the butterfly center. Block both upper wings against the same paper or foam template before assembly.
- Lower-wing oversizing: Lower wings that approach the length of the upper pair create a moth-like outline. Keep each lower wing approximately 70–75 percent of the corresponding upper-wing length.
- Surface-line puckering: Tight appliqué stitches shorten the wing beneath them. Leave approximately 1 mm of movement in each securing stitch so the panel remains flat.
- Body rotation: Sewing the abdomen through only the wing bases allows it to twist. Catch the upper and lower wing layers on both sides at intervals of approximately 1 cm.
- Antenna asymmetry: A difference of more than 1 cm becomes obvious above the narrow head. Count the same 22–25 chains for both stems before adding the end buds.
- Tail curling: Lower-wing tails can curl after blocking because they contain fewer stitches than the main panel. Pin each tail straight until completely dry.
- Loose outer edge: Too many edging stitches produce ripples around the wing. If the border begins to wave, skip one edge insertion approximately every 2–3 cm rather than continuing at the same density.
Shaping the Upper Butterfly Wings
The upper pair determine most of the finished silhouette. Their narrow bases sit beside the thorax, then widen through the central rows before tapering again toward rounded upper tips.
Tall treble stitches belong around the broad center. Half double crochet and single crochet at the edges reduce height gradually and prevent a rectangular wing.
Do not judge the final shape while the cotton is still unblocked. Mercerized cotton responds strongly to wet blocking, and a slightly uneven raw panel can become a controlled teardrop once pinned.
Building the Smaller Lower Wings
Lower wings need less height and less overall area. Their rounded lower sections balance the long upper panels without competing with them.
The narrow tails are added after the main panel so their placement can be controlled independently. In the reference, those tails extend below the main lower-wing curves but remain considerably narrower than the wing itself.
If the motif will be sewn onto a garment, the tails may be shortened to reduce snagging.
Creating the Layered Wing Markings
The supplied butterfly has more internal detail than a typical single-round appliqué. Curved lines repeat the outer wing shape, producing visual depth without requiring the entire panel to be worked in complicated colorwork.
Use surface chains or separately crocheted narrow strips. Both methods let you reposition the line before sewing it permanently.
Keep at least 6–10 mm between the outer edging and first inner marking. Crowding those lines makes the wing look smaller after assembly.
Constructing the Narrow Butterfly Body
The body has two visual sections: a compact thorax where all four wings meet and a longer tapered abdomen below it.
A separate abdomen hides the wing seams more effectively than wrapping a chain around the entire butterfly. It also reproduces the elongated central form visible in the photograph.
Use minimal stuffing. The finished motif should remain suitable for appliqué work rather than becoming a half-stuffed toy.
Making the Antennae
Butterfly appliqué patterns commonly use chains or tied yarn to create antennae. :contentReference[oaicite:19]{index=19} This project extends that approach by adding small crocheted buds to both tips.
Attach the stems behind the thorax so the connection is hidden. Curve them while blocking rather than adding wire.
For children’s clothing or baby items, the yarn-only construction also avoids a rigid internal support.
Choosing Cotton and Hook Size
A published Scheepjes Catona butterfly tutorial uses a 2.5 mm hook, while GoldenLucyCrafts pairs mercerized cotton with a 2.75 mm hook for a 7.5 cm motif. :contentReference[oaicite:20]{index=20} Those references make the 2.5 mm specification suitable for the fine stitch definition seen here.
For a smaller motif, use finer thread and a smaller hook. Crochet 365 Knit Too notes that its butterfly can be reduced substantially by switching from worsted yarn to embroidery cotton and a 2 mm hook. :contentReference[oaicite:21]{index=21}
For a larger wall decoration, keep the stitch instructions and move to DK cotton with approximately a 3.5–4 mm hook.
Planning Yarn Quantity
Most current butterfly appliqués are designed as scrap-yarn projects rather than full-skein makes. Crochet 365 Knit Too explicitly specifies worsted scraps, and Ravelry’s Miak Design butterfly accepts any yarn. :contentReference[oaicite:22]{index=22}
The four large wings in this version use more material than a compact folded butterfly, but the total remains low. Approximately 20–25 g of mint and under 20 g combined for the two accent shades gives practical working allowances.
Make both upper wings first. They consume the largest share of the main color.
Adjusting the Finished Size
Published butterfly motifs demonstrate a wide range of finished dimensions. Current examples include approximately 5 cm, 7.5 cm and 8.25 cm motifs, while larger thread-based decorative butterflies can extend much farther. :contentReference[oaicite:23]{index=23}
Changing yarn and hook is the simplest resizing method because the four-wing proportions can remain unchanged.
If width must change without altering yarn, add or remove one row near the widest section of each wing. Make the same modification on both sides.
Using the Butterfly as an Appliqué
Ravelry butterfly patterns specifically position the motif as an embellishment for bags, hats, shirts and blankets. :contentReference[oaicite:24]{index=24}
For permanent attachment, sew around the body first. Then add small stitches at the upper and lower wing tips while leaving the central wing areas free.
That limited attachment keeps some dimension between the butterfly and its background fabric. For a completely flat patch, stitch around the entire outer edge instead.
Finishing Checks
Lay the butterfly on a white surface and inspect the overall outline before weaving in the final tails. Both upper wings should reach comparable heights, and both lower-wing tails should extend below their rounded panels.
Check the body next. The abdomen needs to stay on the vertical center line while the thorax covers all four wing joins.
Compare the antennae last. Their stems should curve symmetrically without touching the upper wings, and both terminal buds should sit at approximately the same height.
Conclusion
Measure the finished butterfly across the widest upper-wing points and record the body length before storing the pattern notes. Those measurements make another crochet butterfly applique pattern easier to reproduce when changing cotton brands. Re-block the four wing tips after final assembly, then photograph the motif against a plain background so the pale-sage markings remain visible. Save the finished butterfly to Pinterest and share it on Instagram with #MintBotanicalButterfly. One final check should compare the two lower-wing tails before all sewing ends are hidden. Would you keep this monochromatic mint palette or work the next butterfly with lavender upper wings and blue lower wings?
Sources
- Crochet 365 Knit Too — free butterfly pattern updated June 2024, using worsted scraps with size changes possible through different yarn and hook combinations. :contentReference[oaicite:25]{index=25}
- GoldenLucyCrafts — cotton Butterfly Applique, approximately 7.5 cm long with a 2.75 mm hook. :contentReference[oaicite:26]{index=26}
- Crochet to Z / Scheepjes Catona tutorial — small cotton butterfly worked with a 2.5 mm hook. :contentReference[oaicite:27]{index=27}
- Lion Brand — cotton butterfly decoration approximately 3 inches / 7.5 cm. :contentReference[oaicite:28]{index=28}
- B.Hooked Crochet — butterfly approximately 3.25 inches wide, with resizing possible through yarn and hook changes. :contentReference[oaicite:29]{index=29}
- Ravelry — Miak Design free Butterfly, categorized as an appliqué/embellishment and suitable for any yarn. :contentReference[oaicite:30]{index=30}
- Ravelry — Elaine D’Angels Butterfly, an intermediate flat appliqué intended for bags, hats, shirts and blankets. :contentReference[oaicite:31]{index=31}
- Etsy and Pinterest — current butterfly appliqué, 3D butterfly and realistic lace-butterfly competition references. :contentReference[oaicite:32]{index=32}









